


Chapter 6:
Disk Image Backup and Recovery
Tool
Introduction
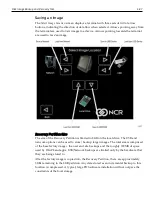
This chapter discusses procedures on how to backup or recover the POS image. The
terminal has a recovery tool that performs a complete backup of the whole HDD/SSD.
This includes the operating system, all files, data and the database itself if it is installed
on the HDD/SSD, making an exact duplicate of everything contained on the terminal.
The
Recovery Tool
uses the Windows Image (.WIM) file format to store the OS image.
This is a file-based format for use with the ImageX and DISM tools that Microsoft
created for use with Windows Vista and later OS versions. The format can also be used
to capture and restore XP-based OS images. More information on the ImageX tool and
.WIM format can be found at:
http://technet.microsoft.com/en-us/library/cc722145(WS.10).aspx
The
Recovery Tool
is designed to create a complete backup of, or restore, a previously
saved image to the terminal.
The Recovery Tool offers the following functions and features:
•
Multi-language support for the following languages: EN; DE; FR; IT; ES.
•
Check and Repair Disk
•
Backup the System
•
Restore the System to a previous state
•
Password Protection
•
Network support
You can save and restore your backup from different locations:
•
Network
•
USB Drive
•
Hard Drive/Solid State Device (if present on the terminal)
Summary of Contents for POS XR8
Page 1: ...User Guide NCR POS XR8 XR8c 7607 B005 0000 2436 Issue C ...
Page 9: ...vii Touch Screen Cleaning Procedures 141 ...
Page 27: ...Chapter 2 External Connectors Motherboard Release 1 x Release 2 x Display Port Connections ...
Page 28: ...2 18 External Connectors Release 3 x XR8c ...
Page 42: ...2 32 ...
Page 59: ...Hardware Installation 3 49 24V Powered USB and RS232 Cables ...
Page 61: ...Hardware Installation 3 51 24V Powered USB and RS232 Cables ...
Page 70: ...3 60 Hardware Installation NCR 5932 5715 Big Ticket USB Keyboard ...
Page 72: ...3 62 Hardware Installation NCR 5932 6674 POS Compact Alphanumeric USB Keyboard ...
Page 77: ...Hardware Installation 3 67 3 Disconnect the SATA Power connector from the Drive ...
Page 78: ...3 68 Hardware Installation 4 Unscrew the Drive from the Hard Drive chassis Retain the screws ...
Page 79: ...Hardware Installation 3 69 5 Slide the drive out of the chassis bracket ...
Page 80: ...3 70 Hardware Installation 6 Slide in the new drive and secure with the retained screws ...
Page 81: ...Hardware Installation 3 71 7 Connect the SATA Power connector to the Drive ...
Page 82: ...3 72 Hardware Installation 8 Replace the Sled Cover and reconnect power to the terminal ...
Page 92: ...5 82 ...
Page 130: ...7 120 ...
Page 147: ...Configuring a Second HDD for RAID 10 137 7 Select Next ...
Page 152: ...11 142 ...


