background image

521-OM0108.88

Copyright 

 

2009 Nalco Company

6-13

Technical Help

(630) 305-CHEM

3D TRASAR

5500 - Installation & Operation Manual

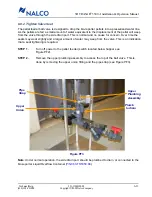
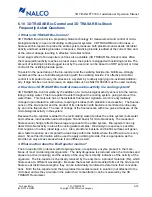
Pipe
Strap

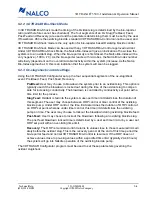
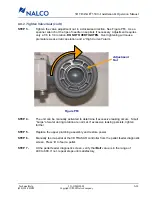
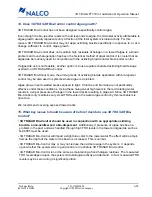
Figure PF3

Upper
Union

Upper
Plumbing
Assembly

6.9.2   Tighten Valve Seat

The pellet feeder ball valve is designed to drop the bio-reporter pellets into a pressurized water line.

As the pellets are fed a small amount of water equivalent to the displacement of the pellet will weep

from the valve through the side drain port. This is normal and no cause for concern. Over time the

seats may wear slightly and a larger amount of water may weep from the valve. This is an indication

that a seat tightening is required.

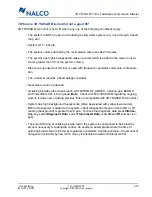
STEP 1

-

Turn off power to the pellet feeder (switch located below hopper see

Figure PF2).

STEP 2

-

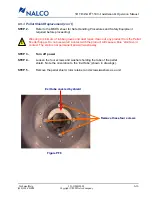
Remove the upper plumbing assembly to access the top of the ball valve. This is

done by removing the upper union fitting and the pipe strap (see Figure PF3).

Note

: Under normal operation, the side drain port should be plumbed to drain, or connected to the

bio-reporter Liquid Overflow Container (

P/N 060-TR5350.88

).

Plumb

to drain

Summary of Contents for 3D TRASAR Series

Page 1: ...TRASAR 5500 Series 3D TRASAR 3500 Series 3D TRASAR Technology for Closed Loop Applications 3D TRASAR Technology for High Fouling Applications 3D TRASAR Models for the Pacific 3D TRASAR Technology Ins...

Page 2: ...now how which pertain to either TRASAR or 3D TRASAR method of use or practice of technology Tracer Technology Buyer s purchase of equipment software and chemicals from Nalco conveys to Buyer a non ass...

Page 3: ...tems Requiring Assembly 3D TRASAR 5500 models only 2 4 2 1 4 Pellet Feeder Assembly Optional 2 5 2 1 5 Items Shipped Separately 2 5 2 1 5a 3D TRASAR Starter Upgrades 2 5 2 1 5b 3D TRASAR Start up and...

Page 4: ...be Connections 2 43 2 7 13 Analog I O Connections 2 45 2 7 14 Factory Wired Digital Inputs 2 46 2 7 15 User Wired Digital Inputs 2 46 2 7 16 Alarm Output Connections 2 47 2 7 17 Phone Line Connections...

Page 5: ...y 4 11 4 9 1 System Performance Screens 4 11 4 9 2 Operating Data Screens 4 12 4 9 3 Product Usage Screens 4 12 4 9 4 Water and Energy Screens 4 13 4 9 5 Plot Data Screens 4 13 4 9 6 Control Methods S...

Page 6: ...down Control 5 6 5 3 3D TRASAR Scale Tagged Polymer Control 5 9 5 3 1 3D TRASAR Scale Tagged Polymer Control 2 Drum Program Overview 5 9 5 3 2 Start up Procedure for 2 Drum 3D TRASAR Scale Tagged Poly...

Page 7: ...3D TRASAR Web Alarms 7 8 7 6 Vantage V100 7 9 7 6 1 Import 3D TRASAR Data into Vantage V100 7 9 7 6 2 Vantage V100 3D TRASAR EZ Reports 7 11 7 6 3 Vantage V100 3D TRASAR Specification Limits 7 13 7 7...

Page 8: ...x C Replacement Parts Accessories Appendix D Air Purging System Appendix E SCADA and LAN Appendix F 3D TRASAR Starter Upgrade Procedures Appendix G 3D TRASAR Technology for Closed Loop Applications Ap...

Page 9: ...oversight and testing The end result is a better safer more reliable system that runs more efficiently 1 2 About this Manual This manual is a simple step by step description of what you need to do to...

Page 10: ...osed Frame Mount w J Box and pre installed Nalco Global Gateway 060 TR3530 88 060 TR5530 88 Air Purged Wall Mount w Juncti on Box 060 TR3532 88 060 TR5532 88 Air Purged Wall Mount w J Box and pre inst...

Page 11: ...or and control chemical feed Features of the 3D TRASAR 5500 are available as upgrades to the 3D TRASAR Starter 3500 Scale Fouling Corrosion Microbio Biocides Inhibitor I Inhibitor II Acid Pump Blowdow...

Page 12: ...ri ate frequencies to reliably and repeatably measure the chemical properties of the flowing water As a solid state device the fluorometer offers trouble free long life 1 5 2 3D TRASAR Scale Control 3...

Page 13: ...D TRASAR Bio Control is the only bio control system available that adjusts system operation in response to changes in bio activity This unique Nalco innovation delivers comprehensive continuous contro...

Page 14: ...water pressure to the 3D TRASAR skid and pellet feeder should never exceed 90 psi Maximum water temperature should not exceed 120 deg F Always wear the appropriate Personal Protective Equipment PPE wh...

Page 15: ...back to recirculating system downstream from supply in basin where possible Calibration checkout Calibrate probes following instruction on screen Wiring Connect cable between controller box and pellet...

Page 16: ...entify all parts Unpack and identify 3D TRASAR Starter Model 3D TRASAR Model Description 060 TR3500 88 060 TR5500 88 Wall Mount Small Backboard 060 TR3501 88 060 TR5501 88 Frame Mount Small Backboard...

Page 17: ...wall mount Air Purged Part 060 TR3530 88 060 TR3532 88 060 TR5530 88 060 TR5532 88 wall mount Unpack and identify all parts Unpack and identify Drawings shown with all probes assembled pH ORP and Cor...

Page 18: ...er Cable 6 ft orange Qty 1 Part 991 05047661 88 Additional Items Replacement Fuses 4 Part 991 50473718 88 Installation and User Manual Part 521 OM0108 88 Fluorometer Qty 1 Part 060 TR5220 88 3D or 060...

Page 19: ...00 88 Fluorometer Patented 3D TRASAR technology upgrade procedure 3D TRASAR Fluorometer rebate return instructions and upgrade confirmation sticker 060 TR3205 88 NCM Patented NCM technology upgrade pr...

Page 20: ...controller from direct sunlight and driving rain 4 In cold weather climates provisions must be made to prevent piping from freezing 5 The mounting location should be accessible to sample water 5 gpm m...

Page 21: ...l 521 OM0108 88 Copyright 2009 Nalco Company 2 7 Technical Help 630 305 CHEM 2 2 2 3D TRASAR Controller Dimensions Wall Mount Small Backboard 060 TR3500 88 060 TR5500 88 Mount controller Frame Mount S...

Page 22: ...n Operation Manual 521 OM0108 88 Copyright 2009 Nalco Company 2 8 Technical Help 630 305 CHEM Mount controller Wall Mount with Junction Box 060 TR3510 88 060 TR5510 88 Frame Mount with Junction Box 06...

Page 23: ...right 2009 Nalco Company 2 9 Technical Help 630 305 CHEM Mount controller Enclosed Wall Mount with Junction Box 060 TR3520 88 060 TR3522 88 060 TR5520 88 060 TR5522 88 Enclosed Frame Mount with Juncti...

Page 24: ...ght 2009 Nalco Company 2 10 Technical Help 630 305 CHEM Mount controller Air Purged Wall Mount with Junction Box 060 TR3530 88 060 TR3532 88 060 TR5530 88 060 TR5532 88 Air Purged Frame Mount with Jun...

Page 25: ...ed on a flat wall so that the controller display is at eye level Use the template below to locate and drill mounting holes for Model s 060 TR3500 88 and 060 TR5500 88 approximate weight 75 lbs Mount c...

Page 26: ...OM0108 88 Copyright 2009 Nalco Company 2 12 Technical Help 630 305 CHEM Use the template below to locate and drill mounting holes for Model s 060 TR3510 88 and 060 TR5510 88 approximate weight 90 lbs...

Page 27: ...rmine the space require ment for Model s 060 TR3520 88 060 TR3522 88 060 TR3530 88 060 TR3532 88 060 TR5520 88 060 TR5522 88 060 TR5530 88 060 TR5532 88 approximate weight 200 lbs Mount controller Dim...

Page 28: ...2 14 Technical Help 630 305 CHEM 2 2 4 Frame Mount Template For models 060 TR3501 88 060 TR5501 88 060 TR3511 88 060 TR5511 88 060 TR3521 88 060 TR5521 88 060 TR3523 88 060 TR5523 88 060 TR3531 88 06...

Page 29: ...pellet feeder lid and placing your hands inside the hopper NEVER insert your fingers in the pellet drop holes at the bottom of the hopper 1 Attach the pellet hopper and plumbing assembly to the stand...

Page 30: ...3D TRASAR 5500 Installation Operation Manual 521 OM0108 88 Copyright 2009 Nalco Company 2 16 Technical Help 630 305 CHEM...

Page 31: ...o the bio reporter tank and the 3D TRASAR controller Install bio reporter feeder Install Bio Reporter Feeder in well lit dry location convenient to points of use IMPORTANT Ensure that the suction side...

Page 32: ...flow requirement of the 3D TRASAR system and the Pellet Feeder 2 Return Header to Cooling Tower Sample points from the return header give the best representation of corrosion rate measurements due to...

Page 33: ...inlet water pressure should not exceed 90 psig Inlet water temperature should be between 40 and 120 deg F Note If the required 5 gpm flow cannot be achieved through normal system operating pressures...

Page 34: ...n 0 5 GPM Plumb controller There are two outlet connections on the 3D TRASAR system a The top fluorometer outlet must have a minimum flow rate of 0 5 gpm b The bottom sensor outlet must have a minimum...

Page 35: ...or longer than a user specified time Do not inject chemicals immediately upstream of the 3D TRASAR sampling point Chemical injection points should allow for good mixing prior to reaching the sampling...

Page 36: ...3D TRASAR 5500 Installation Operation Manual 521 OM0108 88 Copyright 2009 Nalco Company 2 22 Technical Help 630 305 CHEM 2 4 5 Typical Installation Drawing...

Page 37: ...for maximum and even distribution Avoid close proximity to any biocide injection points 4 Connect pellet feeder overflow to tubing and route to drain or attach theBio reporter Liquid Overflow Containe...
Page 38: ...he hopper when the cover is opened for refilling and maintenance When the Pellet Feeder is not in use especially when temperatures are near freezing it is strongly recommended to drain the plumbing ma...

Page 39: ...Install probes Install probes and attach connectors Corrosion Probe 1 Corrosion Probe 2 pH Probe ORP Probe Fluorometer Conductivity Probe WARNING Always turn off power before making any electrical con...

Page 40: ...unt the fluorometer and outlet assembly to the back panel with the screws provided DO NOT FORCE Install probes Install probes and attach connectors as shown Tighten swage fitting fully ORP Probe Insta...

Page 41: ...Carefully unpack the pH probe STEP 2 Apply 5 revolutions of T eflon tape to the pH probe threads STEP 3 Hand tighten the probe in the threaded tee location indicated in Section 2 6 STEP 4 Connect pH p...

Page 42: ...efully unpack the ORP probe STEP 2 Apply 5 revolutions of T eflon tape to the ORP probe threads STEP 3 Hand tighten the probe in the threaded tee location indicated in Section 2 6 STEP 4 Connect the O...

Page 43: ...Conductivity Probe Installation The Conductivity probe is shipped installed Verify probe is hand tight in the tee and the cable is firmly connected to the controller and probe Install probes Install p...

Page 44: ...ered separately Refer to theAppendix for part numbers Install the corrosion probes as follows STEP 1 Carefully unpack both corrosion probes and locate the two probe restraints Install probes Install p...

Page 45: ...nnectors as shown Tighten swage fitting fully ORP Probe Install probes Install probes and attach connectors STEP 4 Insert the copper probe in location 2 as indicated in Section 2 6 Probe tips must be...

Page 46: ...termination has been provided A proper plug for 20 amp service must be provided or the unit may be hard wired using 12AWG wire Failure to provide 20 amp service could result in intermittent operations...

Page 47: ...SAR 5500 Installation Operation Manual 521 OM0108 88 Copyright 2009 Nalco Company 2 33 Technical Help 630 305 CHEM 2 7 2 Controller Box Layout pH and ORP cables are not pre wired on 3D TRASAR Starter...

Page 48: ...R 5500 Installation Operation Manual 521 OM0108 88 Copyright 2009 Nalco Company 2 34 Technical Help 630 305 CHEM 2 7 3 Controller Wiring Details pH and ORP cables are not pre wired on 3D TRASAR Starte...

Page 49: ...r Wiring Details con t Notes 1 Relay voltage jumpers terminals 4 5 Remove for non powered output Refer 2 7 8 and 2 7 9 for control relay details 2 Control relays fused at 2 5 amps 3 Alarm relay fused...

Page 50: ...3D TRASAR 5500 Installation Operation Manual 521 OM0108 88 Copyright 2009 Nalco Company 2 36 Technical Help 630 305 CHEM 2 7 4 Junction Box Layout...

Page 51: ......

Page 52: ...in the junction box for all other models Connection Description Controller Box Board Reference Controller Box Terminal Junction Box Terminal Wire Color Ground TB9 4 Gnd Not used Not used Ground TB9 3...

Page 53: ...owered control relay outputs 120 V AC fused 2 5 amps Typical Powered Relay from Controller Box Typical Powered Relay from Junction Box Wiring NO N L COM 1 2 3 4 5 Fuse BLK WHT GRN Controller Box Typic...

Page 54: ...lay from Controller Box NO N L COM 1 2 3 4 5 Fuse Controller Box Contact NO N L COM 1 2 3 4 5 Fuse Controller Box Contact External Motor Starter Power Motor Starter External Motor Starter Neutral 2 5...

Page 55: ...x Terminal TRASAR Feed Relay 1 TB1 1 NO1 TRASAR NO1 TB1 2 N TRASAR N TB1 3 Gnd Ground Bar TB1 4 L TRASAR L TB1 5 COM1 TRASAR COM1 Tag Polymer Feed Relay 2 TB2 1 NO2 TAG POLYMER NO2 TB2 2 N TAG POLYMER...

Page 56: ...1 NO5 NONOX BIOCIDE NO5 TB5 2 N NONOX BIOCIDE N TB5 3 Gnd Ground Bar TB5 4 L NONOX BIOCIDE L TB5 5 COM5 NONOX BIOCIDE COM5 Blowdown Valve Relay 6 TB6 1 NO6 BLOWDOWN NO6 TB6 2 N BLOWDOWN N TB6 3 Gnd Gr...

Page 57: ...Removable Connector Junction Box Terminal Wire Color Pellet Feeder TB11 ISO Gnd Gnd Blue with White stripe TB11 B B Orange with White stripe TB11 A A White with Orange stripe TB11 ISO Gnd Gnd Black TB...

Page 58: ...rminals as they look very similar and will display a reading even if connected improperly Probe Description Controller Box Board Reference Controller Box Terminal Removable Connector Wire Color pH J4...

Page 59: ...outputs can be used to transmit any of the following variables TRASAR product dosage Tag Polymer product dosage Cell Fouling Nalco Scale Index Nalco Bio Index Conductivity pH ORP Corrosion 1 Corrosio...

Page 60: ...that can be used to log and or alarm the state of an unpowered contact or totalize the counts from a low frequency pulse water meter Note Please call 630 305 CHEM for wiring assistance with hall effec...

Page 61: ...nal General System Alarm TB8 1 COM ALARM COM TB8 2 NO ALARM NO TB8 3 NC ALARM NC Float Switch Alarm Terminations made at float switch N A N A 2 7 17 Phone Line Connections A phone line can be connecte...

Page 62: ...nnections The 3D TRASAR controller can be connected to a LAN system however it is required that a Router P N 060 TR5270 88 be used to isolate the controller from the rest of the LAN system Processing...

Page 63: ...Check for leaks and tighten where necessary 5 Verify that a minimum of 5 gpm is flowing through the unit as indicated by the rotometer 6 Verify that the circuit breaker in the appropriate electrical s...

Page 64: ...r and follow directions on screen 5 Refer to Section 4 10 3 for details pH Calibration 1 Press Actions key on control panel 2 Select Clean Calibrate 3 Enter PASSWORD 12345 if requested 4 Select pH 5 S...

Page 65: ...arrow keys to toggle toMan On 8 Press Accept 9 Verify pump or valve has been activated NOTE when testing Pellet Feeder make sure feeder is switched ON before verifying the feed of a pellet 10 Use arro...

Page 66: ...e created your system configuration prior to installation STEP 2 Verify control settings setpoints and alarms Through the controller keypad verify that all of the new settings from the Configurator ha...

Page 67: ...ng the most recent data for use in the configurator The configurator also has the capability of generating email messages with the user s consent which are sent via the user s Notes mailbox at the nex...

Page 68: ...Installation Operation Manual 3 3 Configurator Support Important configurator information can be located in the help screen by pressing the F1 function key A keyword search can also be performed to l...

Page 69: ...ms and pumps 4 1 2 The Keys The function of the 20 keyson the control panel s key pad are summarized to the right Pressing any of these keys will change the information shown on the display and let yo...

Page 70: ...te a particular function Refer to the symbols below for more details Relay is ON inAuto mode no icon indicatesAuto OFF Move to next previous screen use arrow keys Relay is OFF in Manual mode Relay is...

Page 71: ...iocide Plot Data System Startup Timer Status External Inputs Product Factors Diagnostic Data Control Methods Test Email Information Actions Alarms Information Actions Alarms System Performance Clean a...

Page 72: ...ces Set time date password SCADAand display options Network Network settings System Info System volume make up conductivity and delta t 4 3 1 Password Screen A password must be entered to access all s...

Page 73: ...rection TAG Method Toggles between Fixed offset correction and Online background correction for tagged polymer control Note The preferred Online TAG Method can only be used if TAG Ratio is between 1 4...

Page 74: ...applicable Control range is not displayed if 3D Scale Index schemes are used In these cases the ranges are determined by the control algorithm 4 4 3 Tagged Polymer Relay 2 Product Screen Displays the...

Page 75: ...ay is activated 4 5 1 System Alarms Screen High and low alarm thresholds for temperature and cell fouling To change these set points press Edit arrow down to the setting to change type inthe new value...

Page 76: ...nute period that the relay is activated For example if the failsafe duty is set at 20 the relay will be activated for 3 minutes and deactivated for 12 minutes This pattern repeats as long as the alarm...

Page 77: ...d Contrast SCADA Address SCADA Mode SCADA Baud Displays the clock setting in hours and minutes 24 hour format Shows the date setting in the format configured through the PC Selects the date format M D...

Page 78: ...P Addr Subnet Gateway Enables disables the assignment of the controller IP address for use on a network In most cases this should be disabled Displays the current controller IP address Indicates the c...

Page 79: ...his is a unit less measure of the scaling tendencies of the system water It is used for trending and is not to be viewed as a direct indication of scaling as each system will trend uniquely Nalco Bio...

Page 80: ...e measurement of inert TRASAR level in one drum programs Real time measurement of active Tagged Polymer level in one drum programs Real time measurement from system conductivity probe Real time measur...

Page 81: ...ctions Menu Alarms Blowdown Calculated blowdown rate in gallons per day based on mass balance equations Makeup Calculated make up rate to the system based on mass balance equations Heat Rejection Calc...

Page 82: ...key labeled Y Zoom For Example In the 30 day view the graph spans 1 week time periods The average value for the week is dis played next to the y axis Likewise in the 7 day view the graph spans 1 day...

Page 83: ...ns Menu Alarms 4 9 8 External Inputs Screens Displays the values for the external inputs Only items that have been configured will appear 4 20 mA inputs shows scaled values Digital Input 1 shows the S...

Page 84: ...630 305 CHEM 3D TRASAR 5500 Installation Operation Manual 4 9 10 Diagnostic Data Screens The Diagnostic screens are used primarily by Nalco Service T echnicians to ascertain the status of raw signals...

Page 85: ...s Clean and Calibrate Accesses the calibration for the fluorometer pH conductivity and ORP Manual Relay Control Selects control relay mode Manual Off Auto Pumping Rates Enter pump feed rates based on...

Page 86: ...Alarms A password must be entered to access allActions submenus The password has to be re entered after 10 minutes of inactivity 4 10 2 Clean and Calibrate Screen To calibrate or clean the sensor pro...

Page 87: ...s Rinse well with water Using the flow cell brush P N 500 P2817 88 gently push the brush down through the opening and scrub the full length of the flowswitch and fluorometer tube IMPORTANT If using 1...

Page 88: ...be in tee with water flowing Select1 point calibration STEP 2 Using a handheld instrument of known accuracy and calibration sample the process water and determine the pH value STEP 3 Enter this value...

Page 89: ...STEP 1 Leave probe in tee with water flowing Select1 point calibration STEP 2 Using a handheld instrument of known accuracy and calibration sample the process water and determine the ORP value STEP 3...

Page 90: ...other cali brations pH ORP etc A calibrated conductivity meter with correct temperature coefficient for the process water is required Measure the water sample and obtain an accurate conductivity value...

Page 91: ...P 2 Using a handheld instrument of known accuracy locally sample the process water and determine the conductivity value STEP 3 Enter this value 4 10 6 Conductivity Calibration Screens con t Control Se...

Page 92: ...do not consistently correlate with tempera ture changes may indicate other issues such as probe malfunction loose wire connections etc Call the Nalco Help Desk for assistance Adjust the TempCoEff valu...

Page 93: ...5 2 2 0 8 8 C e ll fo uling a la rm C a lib ra tio n S o lu tio n 4 6 0 S 0 9 4 0 7 5 C le a n a nd c a lib ra te m o nthly Ind e finite p H 0 6 0 T R 5 4 11 8 8 p H d rift p H 7 0 B uffe r 4 6 0 S 0...

Page 94: ...se screens STEP 1 After selecting desired relay highlight Current Mode and press Edit STEP 2 Use arrow keys to select desired mode Manual Off Manual On Auto and press Accept STEP 3 After selecting des...

Page 95: ...ing rates are used to monitor and report on chemical usage and several calcu lations of water and energy use The inert TRASAR product pumping rate is used to determine system volume The accuracy of th...

Page 96: ...re are three options for slug feeding biocides Each choice will follow the pre bleed and lockout conditions setup in the configuration 1 Use Hand Feed Nonox to physically add a non oxidizer by an oper...

Page 97: ...a data email to the indicated respective addresses Control Settings Alarm Settings Preferences System Info Network Information Manual Relay Actions Menu Alarms 4 10 13 Service Email Screens Sends an e...

Page 98: ...4 11 2 System Alarms System Alarmsare related to cooling system parameters that are not controlled by the 3D TRASAR system Interlock and No Flow alarms supercede all other alarms such that the other...

Page 99: ...alarms are activated and the relay must be reset at the controller display by clearing the popup window The bio reporter isnever fed in failsafe mode System Stress High Corrosion 1 High Corrosion 2 H...

Page 100: ...relays will operate in Failsafe Mode In Failsafe Mode the relay is operated in a cycle of on time and off time as determined by the failsafe duty For each relay the user can select Fixed Failsafe and...

Page 101: ...Index NSI Measurement The Nalco Scale Index NSI is a calculated variable that compares the current rate of polymer consumption against the learned average rate of polymer consumption The NSI number h...

Page 102: ...ontrolled based on conductivity during this period It will take approximately 5 HTI s to complete Step 1 Step 2 3D TRASAR Scale Blowdown Monitoring Mode In this step the 3D TRASAR controller learns th...

Page 103: ...roller The Configurator program should request an automatic REBOOT of the controller If not reboot manually either by using the power switch or through the Configurator go to Con troller Tools Reboot...

Page 104: ...Blowdown valve remains connected to BLOWDOWN control Relay 6 In the Configurator Control Settings window 1 Click the Blowdown pH tab leave the Blowdown Control Method in 3D Scale Control 2 Under 3D TR...

Page 105: ...de The purpose of this step is to gradually replace any old UNTAGGED polymer product with the new TAGGED polymer product The TRASAR Product is controlled based on TRASAR while the T agged Polymer Prod...

Page 106: ...ctivity Setpoint enter the desired Blowdown Set Point and accept the default control range 3 Click the Inhibitor tab set the Number of Inhibitor Products to 2 or more choose the Product Names set the...

Page 107: ...hange box By checking this box no blowdown setpoint adjustments will be made 3 Click the Inhibitor tab change the Tagged Polymer Product Control Method to Tagged Polymer Control enter the Tagged Polym...

Page 108: ...set point will now be decreased by as much as 30 in response to high system stressAND will be allowed to go above the user entered set point by as much as 10 in response to low system stress IMPORTANT...

Page 109: ...trolled based on conductivity during this period Step 2 3D TRASAR Scale Tagged Polymer Monitoring Mode In this step the 3D TRASAR control ler learns the typical rate of polymer consumption needed to c...

Page 110: ...nductivity Setpoint enter the desired Blowdown Set Point and accept the default control range 3 Click the Inhibitor tab set the Number of Inhibitor Products to 2 or more choose the Product Names set t...

Page 111: ...oes not change box By checking this box no blowdown setpoint adjustments will be made 3 Change the Tagged Polymer Product Control Method to Scale Index Control enter the Tagged Polymer Set Point as re...

Page 112: ...set point will now be increased by as much as 30 in response to high system stressAND will be allowed to go below the user entered set point by as much as 10 in response to low system stress STEP 4 A...

Page 113: ...Inert TRASAR Tagged Polymer TRASAR or Tagged Polymer Level ppm After the product s is are fed to the system and the pump s is are turned off the concentrations of inert TRASAR also known as PTSA and t...

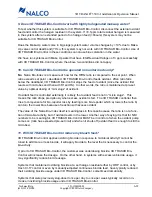
Page 114: ...feed more scale inhibitor when needed to minimize and or prevent scaling of critical heat exchanger surfaces 4 What differences will I see when I run 3D TRASAR Scale Control compared to what I do now...

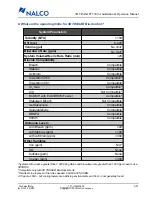
Page 115: ...sponds to a 10 loss of fluorescence when exposed to halogen for 24 hrs System Parameters Turbidity NTU 150 Background Fluorescence Correction1 Fixed offset 30 Online real time 30 HTI hrs Minimum of 14...

Page 116: ...polymer either Nalco s tagged PRISM polymer or tagged High Stress Polymer HSP The 3D TRASAR 5500 controller measures the fluorescent intensity of the tag to determine the concentration of residual di...

Page 117: ...bility Index RSI and the Pukorius Practical Scale Index PSI as practical predictors of calcium carbonate forma tion The scaling stress or the Relative Rate of Polymer Consumption K can also be compare...

Page 118: ...Data File Column under NSI Cycle Download 3D Scale Data File through the configurator If numerical values other than 999 appear in the NSI log the learning period has completed If 999 appears the syst...

Page 119: ...centration of the active polymer as ppm of product 21 For one drum programs why does the a reading not vary with polymer consumption during tagged polymer control The TRASAR concentration will vary wi...

Page 120: ...e To avoid creating bubbles which affect the accuracy of fluorescence readings SLOWLY draw S0940 standard into the syringe andSLOWLY inject S0940 standard into the cell 4 Go to the controller keypad a...

Page 121: ...product or Product Factor TRASAR or T agged Polymer This also needs a product transition period 24 My conductivity is over the upper deadband Why is there no blowdown After the product pump off event...

Page 122: ...gy can be operated in two modes 3D TRASAR Bio Control mode the bio reporter ratio determines when and what amount of biocide is to be added into the system to continuously control the microbiological...

Page 123: ...l applies the necessary biocide to maintain microbiological control In some systems additional dosing of biocide may be desired for a variety of reasons including 1 System has recirculation problems w...

Page 124: ...g biocide is applied based on timer control or system ORP measurement A functional ORP probe is required to resume bio reporter feed with both timer and ORP based slugs For timer based slugs the oxida...

Page 125: ...eed Recovery PreBleed User may choose to blowdown the system prior to an oxidant slug This option is typically used if the blowdown is locked out during the time of the oxidant slug to compen sate for...

Page 126: ...d into a dead leg or a potential dead leg e g Makeup water tank The oxidizing biocide pump rate is set too high or too low The system does not recirculate properly Oxidant feed issues should be resolv...

Page 127: ...one pellet into the system to verify operation At controller keypad press Information Diagnostic Data Pellet Feeder Data Press the number 0 to feed one pellet Bio reporter Liquid Feed Pump use 3DTBR0...

Page 128: ...d leg or intermittent e g make up water header portion of system Manually operate pump from the keypad to verify operation see Section 4 10 8 for manual relay control For standard 3D TRASAR Bio Contro...

Page 129: ...rm Settings window select the appropriateAlarm Pump Duty for the oxidizing biocide see Section 4 5 4 Upload the modified configuration to the controller Check to make sure the Configurator program ask...

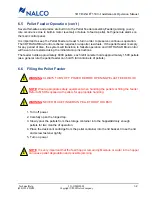
Page 130: ...structions The feeder holds approximately 8000 pellets each refill canister holds approximately 1 500 pellets as a general rule the pellet feeder can hold 5 full containers of pellets 6 6 Filling the...

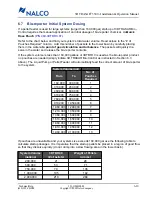
Page 131: ...ed as the bio reporter product no pouches are needed simply initiate 3D TRASAR Bio Control as instructed in Section 6 3 above The Liquid Pump or Pellet Feeder will automatically feed the correct amoun...

Page 132: ...rrect operation Refer to the bio reporter MSDS sheet for safe handling procedures and required safety gear Contact with any moisture will cause the pellets to impart an intense blue coloring This is w...

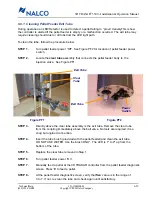
Page 133: ...2 Locate the clear tube assembly that connects the pellet feeder body to the injection valve See Figure PF1 STEP 3 Directly above the clear tube assembly is the exit tube Remove the clear tube from th...

Page 134: ...rough the side drain port This is normal and no cause for concern Over time the seats may wear slightly and a larger amount of water may weep from the valve This is an indication that a seat tightenin...

Page 135: ...TEN Over tightening will cause premature wear erratic operation and a High Current alarm STEP 4 The unit can be manually activated to determine if excessive leaking occurs Small burps of water during...

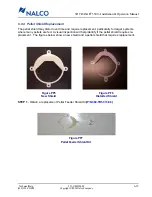
Page 136: ...ield Kit 6 9 3 Pellet Shield Replacement The pellet shield may distort over time and require replacement particularly for larger systems where many pellets are fed A visual inspection will help identi...

Page 137: ...uipment required before proceeding Wearing a minimum of rubber gloves and dust mask clean out any product from the Pellet Feeder hopper Do not use water Contact with the product will cause a blue stai...

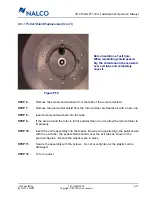
Page 138: ...Remove the used pellet shield from the rotor retainer and replace it with a new one STEP 8 Insert screws and washers into the tabs STEP 9 If the area around the rotor is full of powder clean it out t...

Page 139: ...nature which is enzymatically changed upon interaction with active respiring microbes both planktonic and sessile The fluores cence of the bio reporter and the product of its interaction with bacteria...

Page 140: ...eat exchange surfaces and respond with oxidizing biocide before it inoculates the system 3D TRASAR Bio Control will detect situations where the oxidizing biocide tank is empty the pump is air locked o...

Page 141: ...ired Oxidizing biocides other than bleach ACTI BROM ST AB REX Chlorine gas BCDMH and TowerBrom 991 is being used Note Check with 630 305 CHEM regarding ongoing work to include new oxidizing biocides t...

Page 142: ...mpatible3 Stabilized Bleach Not Compatible Isothiazolinone Compatible Glutaraldehyde Compatible DBNPA Compatible 90005 Compatible Ammonia Levels with Bleach ppm 20 with Stabrex ppm 100 with Actibrom p...

Page 143: ...rolled externally it is likely that oxidant feed is not in micro slugs This means the ratio drops precipitously when excess oxidant is fed The 3D TRASAR controller then tries to compensate for bio rep...

Page 144: ...ulation problems routine tower cleaning and disinfection proper oxidizing biocide selection routine application of an appropriate non oxidizing biocide at proper dosage and coordinated with detergent...

Page 145: ...e grows in semi wetted areas exposed to light Chlorine and bromine are not particularly effective under these conditions Using these halogens at high levels in the recirculating water results in a vap...

Page 146: ...fective microbial control it is important to vary the stresses in a system by routinely applying non oxidizers Additionally if algae has been a known issue an algaecide such as N 90005 must be used ro...

Page 147: ...ol These slugs may be scheduled or be manually triggered from the controller During the Ox slug bio reporter feed is suspended The duration of the slug feed is set by the user During the Ox slug the o...

Page 148: ...nnot be adjusted 3D TRASAR Bio Shock Mode requires a functional ORP probe to be in place and recalibrated The ORP probe is used to control the oxidant slug and monitor the system in the recovery perio...

Page 149: ...0 This is often seen within 48 hours of startup If persistent with no other alarms call 630 305 CHEM 20 10 Good control 10 30 System is working against an influx 30 80 System is straining 80 Alarm con...

Page 150: ...ile microbes attached to surfaces The sessile population consti tutes 98 of the total microbial population and cause the problems associated with microbial proliferation under deposit corrosion impeda...

Page 151: ...icrobial demand and therefore biocide usage is efficient Since oxidizing biocide is dosed based on demand corrosion is often reduced significantly under Bio Control Therefore is typically a reduction...

Page 152: ...ional conditions such as an air locked oxidizing biocide pump or empty oxidizing biocide porta feeds occur Thus issues can be dealt with in a more timely manner and the system does not develop severe...

Page 153: ...ing which no STA BR EX is fed into the tower Compare this to normal operation period 08 20 04 08 22 04 The consecutive application of two non oxidizers led to low microbiological activity and conseque...

Page 154: ...should be distant from the intake for the fluorom eter and the feed point of the oxidizing biocide It should be in a well mixed region of the cooling system If a pellet feeder is being used flow thro...

Page 155: ...ide relay has been feeding biocide by checking the Calcs portion of the General Data log in column Z Ox Bio Relay Duty Y ou will see a number per centage listed if the ox_biocide relay has come on in...

Page 156: ...slug is triggered By setting the duration and ORP level of the slug the user can modify the amount of biocide entering the system 36 Can you make 3D TRASAR Bio Control feed less oxidant into the syst...

Page 157: ...served is 0 0 below detection limit of Hach DPD test During periods of moderate demand total halogen residuals in a cooling tower can be expected to be 0 1 0 4 ppm TRH ORP levels at which control is m...

Page 158: ...Planktonic counts measured by dip slides or DMAshould be between 103 105 cfu ml Swabs of coupons in systems with 3D TRASAR Bio Control give population counts of 10 7 cfu sq cm or less Excursions outsi...

Page 159: ...ant feed and is for display purposes only NBI represents the average value of the Rf Rz Ratio with respect to the control band over the past 6 hours Because it is an averaged value the response time o...

Page 160: ...oduct Is the tower water recirculating properly Is there adequate flow through the pellet feeder Is the output from the pellet feeder being dis charged into the system not to drain and not to a dead l...

Page 161: ...register a no flow alarm and pellets will stop being fed However if the feeder is plumbed to a separate line that becomes plugged or if the flow is throttled to less than 5 gpm but greater than 0 5 g...

Page 162: ...in the 3D TRASAR Optimizer can be transferred to the 3D TRASAR Configurator to avoid duplicate data entry Contact your Nalco representative for questions about the 3D TRASAR Optimizer 7 2 3D TRASAR Co...

Page 163: ...ontrollers View alarm detail and enable alarms to be sent via e mail Generate customized reports Download data to PC Downloaded data is compatible with V antage V100 Data is sent to the 3D TRASAR Web...

Page 164: ...y 7 3 Technical Help 630 305 CHEM 3D TRASAR 5500 Installation Operation Manual 7 5 1a Create Edit Users Create and edit user profiles in the personal information page Select which e mail addresses are...

Page 165: ...OM0108 88 Copyright 2009 Nalco Company 7 4 Technical Help 630 305 CHEM 3D TRASAR 5500 Installation Operation Manual 7 5 1b Assign Controllers Data Sources Assign users access to view data on the webs...

Page 166: ...0 305 CHEM 3D TRASAR 5500 Installation Operation Manual 7 5 1c Manage Controller Data Source Setup Information The data source management screen provides a view of important controller information suc...

Page 167: ...2 3D TRASAR Web Data Use the 3D TRASAR Web to review multiple systems performance or view specific operating parameters for one controller The Performance Summary page provides a high level view of t...

Page 168: ...asic Report and Advanced Report pages allow users to preview graphs and download data Historical data is captured at 15 minute intervals 7 5 3 3D TRASAR Web Reports Reports can be emailed to the custo...

Page 169: ...RASAR Web Alarms Alarm information generated by the 3D TRASAR controller will be sent in an email to the 3D TRASAR web site where it will be forwarded to the specified user s email address Details on...

Page 170: ...ical Process Control graphs and report corrective actions 3D TRASAR files can be downloaded into V antage V100 by either the 3D TRASAR Configurator or the 3D TRASAR Web using the V antage V100 Downloa...

Page 171: ...Data File STEP 4 Follow the directions below to transfer data Select File to Load click Browse to enter the directory location and name of the 3D TRASAR Data file toimport V100 Target Database click B...

Page 172: ...ts can be generated from V antage V100 by using the 3D TRASAR EZ Report STEP 1 On the Reports form choose the 3D TRASAR EZ Report then select the parameters and the date with optional statistics range...

Page 173: ...30 305 CHEM 3D TRASAR 5500 Installation Operation Manual 7 6 2 Vantage V100 3D TRASAR EZ Reports con t STEP 3 Click on Make to create the report in Excel Save report template in V antage V100 by click...

Page 174: ...luded in the data download files you will need to manually enter the specification limits into V antage V100 in order for them to show up in graphs and have certain statistical values calculated T o d...

Page 175: ...hnical Help 630 305 CHEM 3D TRASAR 5500 Installation Operation Manual 7 6 3 Vantage V100 3D TRASAR Spec Limits con t STEP 3 Type in the Specification Limits into the appropriate fields in theEdit Meas...

Page 176: ...cell phone call Even the best cell phone on the market is of little use without an adequate interference free stable signal Use the guidelines below to determine signal availability in your area If yo...

Page 177: ...X X X X X X X X X X X X Corrosion probes check X X X X Conductivity probe clean calibrate X X Strainers check clean X X X X X X X X X X X X Pellet feeder check refill Perform weekly Pellet feeder cle...

Page 178: ...RASAR fluorometer If the indicator is blue desiccant does not need to be replaced If the indicator is pink unscrew the desiccant cover from fluorometer Replace both the indicator P N 060 TR5223 88 and...

Page 179: ...aning this strainer mesh Close the inlet and outlet valves and unscrew the plug at the end of the wye Remove the mesh and rinse with clean water 8 7 Pellet Feeder Maintenance For trouble free operatio...

Page 180: ...control method Select 3D Scale Control as the blowdown control method 3D TRASAR Starter 3500 system requires fluorometer upgrade to measure Nalco Scale Index Purchase 3D TRASAR fluorometer upgrade P...

Page 181: ...or state Check the active alarms and resolve the alarm condition s as needed The first 3D Bio Control decision interval has not yet been reached On power up the first pellet feed happens at the end of...

Page 182: ...ess 169 254 1 2 Subnet 255 255 0 0 and Gateway 169 254 14 Your PC Ethernet adapter should be configured with the values IP Address 169 254 1 Subnet 255 255 0 0 and Gateway 169 254 14 where any number...

Page 183: ...Configurator is incorrect The default IP address for the gateway connection is 192 168 1 2 In the Configurator s Connection Window click on Advanced and make sure this is the IP address being used in...

Page 184: ...vided by your Nalco Rep username password access phone number Controller data cannot be viewed at 3D TRASAR Web Analog phone line is not connected Check all connections and replace the phone line if d...

Page 185: ...ll connections are seated tightly and the error persists after power off on Value of 999 is logged in datalog The measurement is invalid A sensor error or some other conditi on is present which is cau...

Page 186: ...eck calibration and recalibrate if needed 2 Readjust alarm threshold 3 Reduce chemical feed rate 4 Eliminate condition causing siphoning 5 Confirm with other data and eliminate source Conductivity Hig...

Page 187: ...jumper is not in place 3 Interlock wiring is loose or not making good connection 1 Check This may be expected operation 2 Replace jumper refer to wiring diagram for location and directions 3 Check an...

Page 188: ...tant Bio IndexHigh Alarms may occur Biocide Pump Rate Low Biocide feed rate is too low to control microbio activity effectively 1 Biocide pump stroke are set too low or pump is too small for system 1...

Page 189: ...did not increase the minimum value during a slug 1 The Oxidant pump is airlocked or failed to apply the biocide 2 The recirculation time in the tower is long and the applied Biocide is not seen by the...

Page 190: ...f based on flat surface double junction 2 wire pH probe input range 0 14 pH ORP Oxidizing biocide feed based on flat surface double junction ORP probe input range 1000 to 1000 mv Blowdown On off based...

Page 191: ...low input contact closure 1 Interlock input contact closure 2 Spare digital inputs contact closure used to log input states or low frequency water meter counts Modbus RS 232 or RS 485 choose one RTU S...

Page 192: ...unt with Junction Box 90 160 33 x 6 1 4 x 57 060 TR3511 88 060 TR5511 88 Frame Mount with Junction Box 155 225 33 x 28 x 66 060 TR3520 88 060 TR5520 88 Enclosed Wall Mount with Junction Box 195 270 36...

Page 193: ...TR5500 88 Wall Mount Small Backboard B 2 060 TR3501 88 060 TR5501 88 Frame Mount Small Backboard B 3 060 TR3510 88 060 TR5510 88 Wall Mount with Junction Box B 4 060 TR3511 88 060 TR5511 88 Frame Mou...

Page 194: ...PROPIETARY AND CONFIDENTIAL MENU 1 2 3 0 HELP 7 8 9 4 5 6 Actions Alarms Information Back Model s 060 TR3500 88 060 TR5500 88 Wall Mount Small Backboard B 2...

Page 195: ...PROPIETARY AND CONFIDENTIAL Back Information Alarms Actions 6 5 4 9 8 7 HELP 0 3 2 1 MENU Model s 060 TR3501 88 060 TR5501 88 Frame Mount Small Backboard B 3...

Page 196: ...PROPIETARY AND CONFIDENTIAL MENU 1 2 3 0 HELP 7 8 9 4 5 6 Actions Alarms Information Back Model s 060 TR3510 88 060 TR5510 88 Wall Mount with Junction Box B 4...

Page 197: ...PROPIETARY AND CONFIDENTIAL MENU 4 1 6 HELP 3 5 0 2 Alarms 7 Information Actions 9 8 Back Model s 060 TR3511 88 060 TR5511 88 Frame Mount with Junction Box B 5...

Page 198: ...D CONFIDENTIAL MENU 4 1 6 HELP 3 5 0 2 Alarms 7 Information Actions 9 8 Back Model s 060 TR3520 88 060 TR5520 88 Enclosed Wall Mount with Junction Box 060 TR3522 88 060 TR5522 88 Enclosed Wall Mount w...

Page 199: ...CONFIDENTIAL MENU 4 1 6 HELP 3 5 0 2 Alarms 7 Information Actions 9 8 Back Model s 060 TR3521 88 060 TR5521 88 Enclosed Frame Mount with Junction Box 060 TR3523 88 060 TR5523 88 Enclosed Frame Mount...

Page 200: ...MENU 4 1 6 HELP 3 5 0 2 Alarms 7 Information Actions 9 8 Back INSTRUMENT AIR MiniPurge Model s 060 TR3530 88 060 TR5530 88 Air Purged Wall Mount with Junction Box 060 TR3532 88 060 TR5532 88 Air Purge...

Page 201: ...ENU 4 1 6 HELP 3 5 0 2 Alarms 7 Information Actions 9 8 Back INSTRUMENT AIR MiniPurge Model s 060 TR3531 88 060 TR5531 88 Air Purged Frame Mount with Junction Box 060 TR3533 88 060 TR5533 88 Air Purge...

Page 202: ...Model 060 TR5120 88 Pellet Feeder Plumbing Assembly B 10...

Page 203: ...Model 060 TR5540 88 High Pressure Water Reinjection System B 11...

Page 204: ...5523 88 Enclosed Frame Mount with Junction Box and Pre Installed Wireless Gateway 060 TR3530 88 060 TR5530 88 Air Purged Wall Mount with Junction Box 060 TR3532 88 060 TR5532 88 Air Purged Wall Mount...

Page 205: ...ASAR Fluorometer rebate return instructions upgrade confirmation sticker 060 TR3205 88 NCM upgrade includes Patented NCM technology upgrade procedure 2 probe restraints 2 Swagelock fittings and upgrad...

Page 206: ...stic with 1 year contract 060 NGG200 88 Nalco Global Gateway International with 1 year contract 060 TR5280R 88 US Wireless Gateway Renewal 1 year contract for Cingular service Includes SIM P art Numbe...

Page 207: ...TR5222 88 Desiccant C anister Fluorometer 060 TR5223 88 Desiccant Indicator Fluorometer 500 P2818 88 Pellet Feeder Cleaning Brush 060 TR5313 88 Pellet Feeder Shield Kit Dam Repair Kit 060 TR5350 88 Pe...

Page 208: ...ges 3 060 TRMNKIT 88 3D TRASAR 5000 Series Maintenance Value Package Maintenance Value Package includes 3D TRASAR Calibration Solution 1L 2 pH 7 0 and 10 0 Calibration Solutions 1L 1 of each ORP 200 m...

Page 209: ...3D TRASAR 5500 Installation Operation Manual 521 OM0108 88 Copyright 2009 Nalco Company Technical Help 630 305 CHEM C 6 Hardware Piping Layout...

Page 210: ...lation Operation Manual 521 OM0108 88 Copyright 2009 Nalco Company Technical Help 630 305 CHEM C 7 Pellet Feeder Piping Layout Lower Assembly P N 060 TR5334 88 Pellet Feeder Piping Layout Upper Assemb...

Page 211: ...3D TRASAR 5500 Installation Operation Manual 521 OM0108 88 Copyright 2009 Nalco Company Technical Help 630 305 CHEM C 8 High Pressure Water Reinjection System P N 060 TR5540 88...

Page 212: ...305 CHEM D 1 Appendix D Air Purging System A copy of the manual shown below is included with models 060 TR3530 88 060 TR3531 88 060 TR3532 88 060 TR3533 88 060 TR5530 88 060 TR5531 88 060 TR5532 88 a...

Page 213: ...option 3 Enter password from the Password Screen 12345 is the default 4 From the Preferences screen arrow down to the 2 nd screen 5 SCADAAddr 0 99 is currently supported 10 is the default Make selecti...

Page 214: ...oller Input Float Registers Address Min Max Units Notes Product 1 Dosage TRASAR 300040 0 0 300 0 ppm Product 2 Dosage TAG Polymer 300042 0 0 300 0 ppm Rz 300044 0 0 300 0 ppb Rs 300046 0 0 300 0 ppb T...

Page 215: ...Integer Registers Address Min Max Units Notes Product 1 Dosage TRASAR 300150 0 300 ppm Divide value by 10 Product 2 Dosage TAG Polymer 300151 0 300 ppm Divide value by 10 Rz 300152 0 300 ppb Divide va...

Page 216: ...to be scaled by their unique documented scaling factor Note 6 If the controller is configured to display SI units the corresponding engineering units will appear on the screen and be translated to it...

Page 217: ...DI1 State Digital In 2 Interlock Information External Inputs DI2 State DigitalIn 3 Spare Information External Inputs DI3 State DigitalIn 4 Spare Information External Inputs DI4 State Product 1 Dosage...

Page 218: ...osion1 Right Side of Controller Information SystemPerformance Corrosion Metallurgy OR Information Diagnostic Data Sensor Data C1 Corrosion 2 Left side of Controller Information SystemPerformance Corro...

Page 219: ...ler provides the following Ethernet email settings The factory defaults can be modified as needed on site Power must be cycled before any changes take effect in the Controller Settings accessed from t...

Page 220: ...oller to connect to their network This diagram shows the recommended network configuration Note that the use of a router P N 060 TR5270 88 is required on LAN s with more than 25 computers on the same...

Page 221: ...Starter Upgrade Procedures There are four different upgrades available for the 3D TRASAR Starter system 3D TRASAR Fluorometer upgrade P N 060 TR3200 88 Nalco NCM Corrosion Measurement upgrade P N 060...

Page 222: ...e Order Wizard 2 Unpack and Identify Components The 3D TRASAR Starter Fluorometer upgrade includes the following 3D TRASAR Fluorometer Patented 3D TRASAR technology upgrade procedure Upgrade confirmat...

Page 223: ...ter fluorometer with new 3D TRASAR Fluorometer For details on how to install the Fluorometer please see section 2 6 1 Place upgrade confirmation sticker on visible portion of back panel 7 Configure Fe...

Page 224: ...mer service or through the Order Wizard 2 Unpack and Identify Components The 3D TRASAR NCM technology upgrade includes the following Patented NCM technology upgrade procedure 2 NCM probe restraints 2...

Page 225: ...matically receive the upgrade 5 Configure New Hardware Connect computer to controller and the upgrade will appear in theManage Controller button on the Configurator home page Click Manage Controller t...

Page 226: ...rough Nalco customer service or through the Order W izard 2 Install New Hardware Install the pH probe as follows STEP 1 Carefully unpack the pH probe STEP 2 Apply 5 revolutions of T eflon tape to the...

Page 227: ...the ORP probe threads STEP 3 Hand tighten the probe in the threaded tee location indicated in drawing at right STEP 4 Connect ORP probe to ORP cable cable is labeled ORP STEP 5 With power off wire ORP...

Page 228: ...quired for closed loop applications and must be ordered separately 1 Corrosion Coupon Rack Select a Corrosion Coupon rack P N001 H10506 88 to monitor trends of corrosion rate over time P N 001 H10506...

Page 229: ...ystem requires a minimum flowrate of 8gpm 3 High Pressure Water Reinjection System High Pressure W ater Reinjection System shown with 3D TRASAR system High Pressure Water Reinjection System Specificat...

Page 230: ...TR5526 88 include the following enhancements not found on the standard 3D TRASAR models Automated fluorometer cleaning system delivers cleaning solution to the 3D TRASAR fluorometer Modified basket s...

Page 231: ...meter is shipped unattached to prevent damage Follow installation instructions from sec tion 2 6 1 in the manual with the following exception a t fitting is installed on the outlet side of the Fluorom...

Page 232: ...r cell fouling Select task button from 3D TRASAR Configurator main window then follow list of steps 4 1 Select External Inputs For 4 20 mA input 1 1 AI 1 Name enter Cell Fouling 2 4 mA Value enter 0 3...

Page 233: ...orometer close ball valve beneath fluorometer and set relay 5 to manual off through keypad press Actions Manual Relay Control Relay 5 S0340 Current State Edit Manual Off Accept Press AutoAfter then Ed...

Page 234: ...r and duration Set cleaning duration to 10 minutes 4 Click Add 5 Monitor cell fouling adjust cleaning schedule as required 6 3 Select Alarm Settings For system alarms 1 No Flow Relay Action select For...

Page 235: ...991 05058141 88 Magnetic Disc for basket strainer 991 50537710 88 Basket Strainer with 80 mesh filter 991 28737119 88 Solenoid Valve 1 4 Stainless Steel with PTFE seals NO 991 05058102 88 Rotameter 0...

Page 236: ...nclosed large backpanel Pacific 240 60 220 50 To meet local voltage requirements 3D TRASAR models for High FoulingApplications Pacific utilize a different pump and solenoid valve Specifications are sh...

Page 237: ...r can be used to control the oxidant feed pump in place of ORP control oxidant feed This is accomplished auto matically through the Configurator Analog Input Selection Screen Wire the analog output of...

Page 238: ...ut from the halogen analyzer is 0 ppm at 4mA and 5 ppm at 20mA If this is suitable for the application enter these values into the corresponding fields in configurator If you alter the output settings...

Page 239: ...r damage caused by misuse neglect accident including a force majeure event improper installation or improper maintenance or repair Nalco s liability under this warranty is limited to repair or replace...

Page 240: ...kes corrective action through blowdown or chemical inhibitor feed adjustments 3D TRASAR System The Nalco 3D TRASAR system is the most advanced water treatment control system on the market today It rep...

Page 241: ...Corrosion is measured in units of mils per year mpy Failsafe duty fixed In the event of alarm conditions the relay is activated for a period of time equal to a percentage of a 15 minute period Failsaf...

Page 242: ...nd the failsafe duty mode begins user set Tagged Polymer A new component of TRASAR cooling water programs ie Nalco s Prism polymer or High Stress Polymer HSP The concentration of the tag equals the co...

Page 243: ...232 BV Oegstgeest The Netherlands Asia Pacific 2 International Business Park 02 20 The Strategy Tower 2 Singapore 609930 Latin America Av das Na es Unidas 17 891 6 Andar 04795 100 S o Paulo SP Brazil...

Reviews: