EN - 1
EN - 2
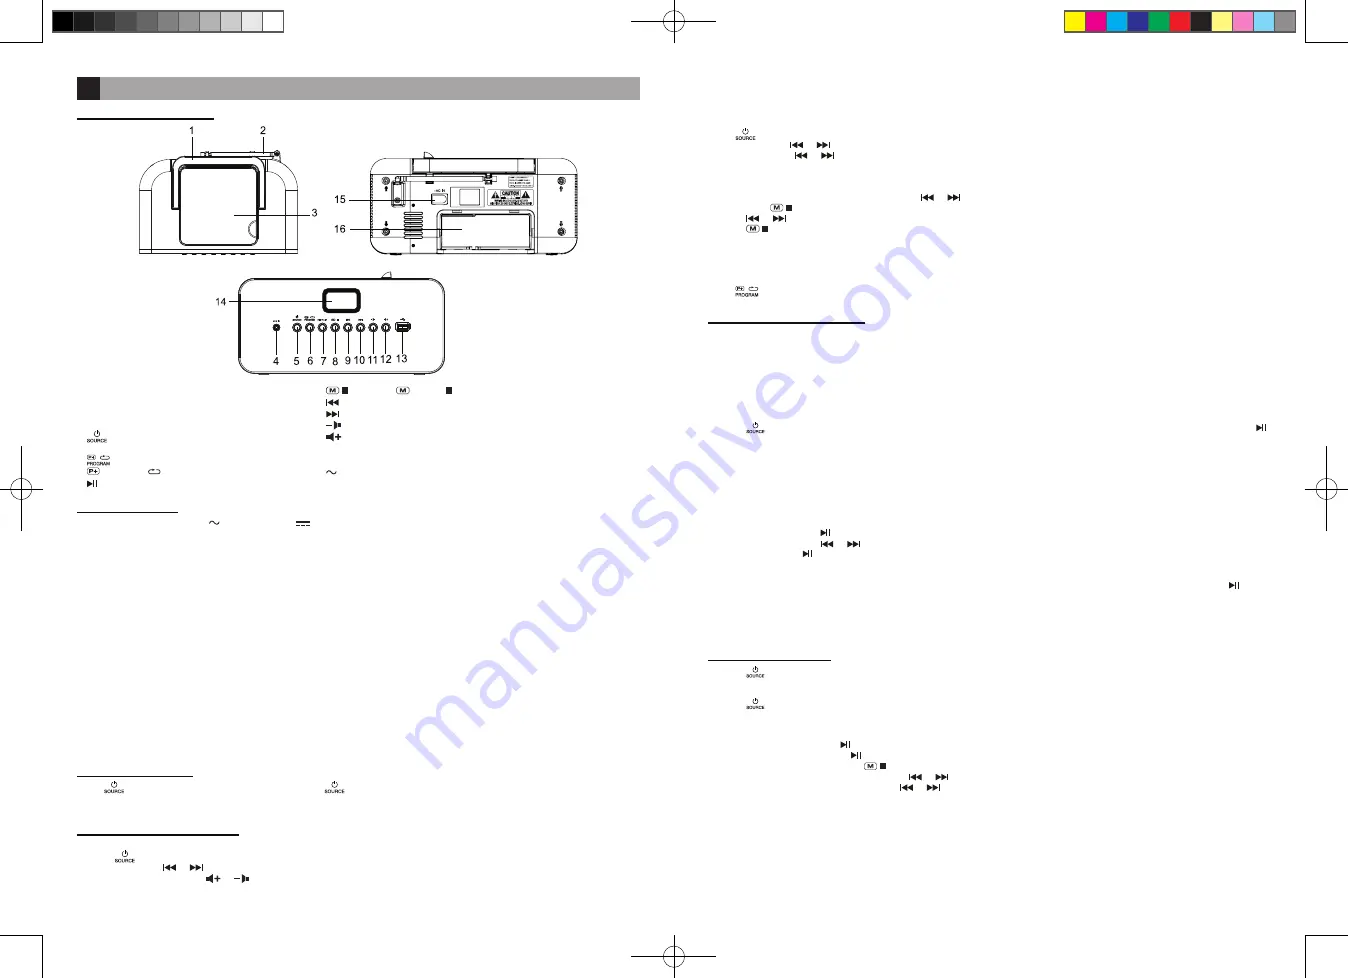
GENERAL CONTROLS
1. HANDLE
2. FM TELESCOPIC ANTENNA
3. CD COMPARTMENT
4. AUX. IN: AUXILIARY INPUT
5.
POWER ON-OFF/SOURCE: FM, AM (MW),
CD, USB, AUX IN, BLUETOOTH
6.
PROGRAM / RADIO PRESET STATIONS
/ REPEAT
7.
/ PAIR
: PLAY / PAUSE /PAIR
8. MEMORY / STOP
9. SKIP/SEARCH /TUNING BACKWARD
10. SKIP/SEARCH /TUNING FORWARD
11.
VOLUME DOWN
12.
VOLUME UP
13. USB PORT
14. LCD DISPLAY
15.
AC IN
POWER INPUT
16. BATTERY AND AC POWER CORD COMPARTMENT
POWER SUPPLY
This unit operates on AC (230V 50 Hz) or DC (9V
) 6 x 1.5V Type UM-2 /R 14 / ’’C’’ (Batteries not included).
AC OPERATION
Connect the AC power cord from the unit to the mains. Make sure that the voltage is compatible with your device before turning it on.
Disconnect the AC power cord from the mains when not in use.
NOTE: In a concern of saving energy, when playback has reached to the end or listening volume is set at a very low level and no control
is operated on the device for a period of 10 minutes, the unit will automatically switch to Standby mode.
BATTERY OPERATION:
Open the battery compartment at the rear of the unit and insert 6 batteries, observing the polarity diagram indicated inside the
compartment and close the compartment. To switch from AC power to battery power, disconnect the AC power cord.
BATTERY REPLACEMENT:
Batteries should be replaced when the volume decreases or the sound distorts.
Notes on batteries
• Do not mix batteries of different types or new batteries with used batteries
• Do not recharge, heat it and never remove the batteries.
• The batteries cannot be exposed to excessive heat such as sunshine, fire or the like
• Please respect the environment when disposing of used batteries.
NOTE:
To prevent leakage, always remove the batteries from the device when it is not used for an extended period.
AUDIO CONTROLS
Press
to turn the unit on. When the unit is on, press
again to select your listening source: FM, AM (MW), CD, USB, AUX
IN, BLUETOOTH.
LISTENING TO THE RADIO
FOR OPTIMAL RADIO RECEPTION:
FM: Extend and position the telescopic antenna.
AM (MW): Rotate the unit horizontally.
AUTOMATIC SEARCH
Press
to select FM or AM (MW).
Press and Hold on or for about 2 seconds to start the search. The automatic search function locates stations whose signal is
strong. Press again or to continue the search.
Note:
Stations with weak signals can be searched manually. The sound is automatically muted during search.
RADIO PRESET STATIONS
1. Select a station manually or automatically with or .
2. Press once , “P01” blinks on the display for a few seconds.
3. Press or to select a preset number.
4. Press again to store the radio station on the selected memory number.
5. Repeat steps 1-4 to store other stations.
Note:
When you store a station in a memory number already occupied, the existing station is automatically erased.
LISTENING TO PRESET STATIONS
Press
button to select a preset station.
MANUAL SEARCH
1. Press
to select FM or AM (MW).
2. Press repeatedly or
to find your station
3. Adjust the sound level with
or
.
BLUETOOTH OPERATION
The
Bluetooth
®
word mark and logos are registered trademarks owned by Bluetooth SIG, Inc. and any use of such marks by New
One S.A.S is under license. Other trademarks and trade names are those of their respective owners.
• Before operate the Bluetooth function, make sure your mobile phone supports Bluetooth function.
• For different model of mobile phone, Bluetooth emissive power has some difference. It is recommended that the distance between
the mobile phone and the unit is within 10 meters.
• Don’t put any metal object or any obstacle between the path of the mobile phone and the unit.
MANUAL PAIRING
1. Press
to select bt (Bluetooth) mode. The display will show “ bt ” and the Bluetooth indicator will start to blink, then press
/
PAIR
for several seconds, then the Bluetooth indicator will blink rapidly.
2. Turn on the Bluetooth function of your mobile phone. (Please refer to the instruction manual of your mobile phone on how to
operate Bluetooth.)
3. Select the item of searching the Bluetooth device and enter it. Your mobile phone starts to search for Bluetooth devices within
range (10 meters). Select this radio “M-30BT” and confirm it.
Note:
- Enter 0000 for the password if necessary and confirm it
- If you have made Bluetooth connectivity before, a list of the previous search results is displayed. Select “M-30BT” and confirm
4. When pairing is successful, you can hear pairing sound and Bluetooth logo will stop blinking.
5. During playback, press
/ PAIR
button to pause playback, press again to resume.
6. During playback, press or to skip tracks.
7. Press and hold the
/ PAIR
button until “ bt ” flashes on display to disconnect the Bluetooth connection.
RECONNECT TO THE BLUETOOTH AUDIO SOURCE DEVICE
If your Bluetooth audio source device has already been paired with M-30BT but accidentally disconnected, long press
/ PAIR
button to do connection again.
Hereby, NEW ONE S.A.S, declares that this MUSE M-30 BTB / M-30 BTN is in compliance with the essential requirements and other
relevant provisions of Directive 2014/53/EU. The declaration of conformity may be consulted at www.muse-europe.com
PORTABLE BLUETOOTH RADIO CD/MP3 PLAYER WITH USB
GB
LISTENING TO DISC
1. Press
to turn the unit on.
2. Open the CD door.
3. Insert the disc with the label facing up and then close the compartment.
4. Press
to select the CD mode.
5. After a few seconds, the total number of tracks and the CD icon will appear on the display.
To:
- Pause Playback: Press once
/ PAIR
- Resume playback: Press again
/ PAIR
- Permanently stop playback: Press
- Search forward or backward: Press and hold or .
- To skip to the next or previous track: press or .
DISK ERROR
Note: If the disc is dirty, damaged or unreadable or if it is placed upside down, “NO” is displayed. If this happens, clean the disc,
insert the disc correctly or try another disc.
If you encounter CD playback problem, either of the following ways may help:
1. Turn off the unit. Disconnect the AC power cord from AC outlet and reconnect it again.
2. Clean your CD disc.
RD-3353BT IB MUSE 001 REV0.indd 4
2018/1/10 13:06:47


