background image

 MultiScree

Channel


Then click on the “

Finish >

” button. 


[c]


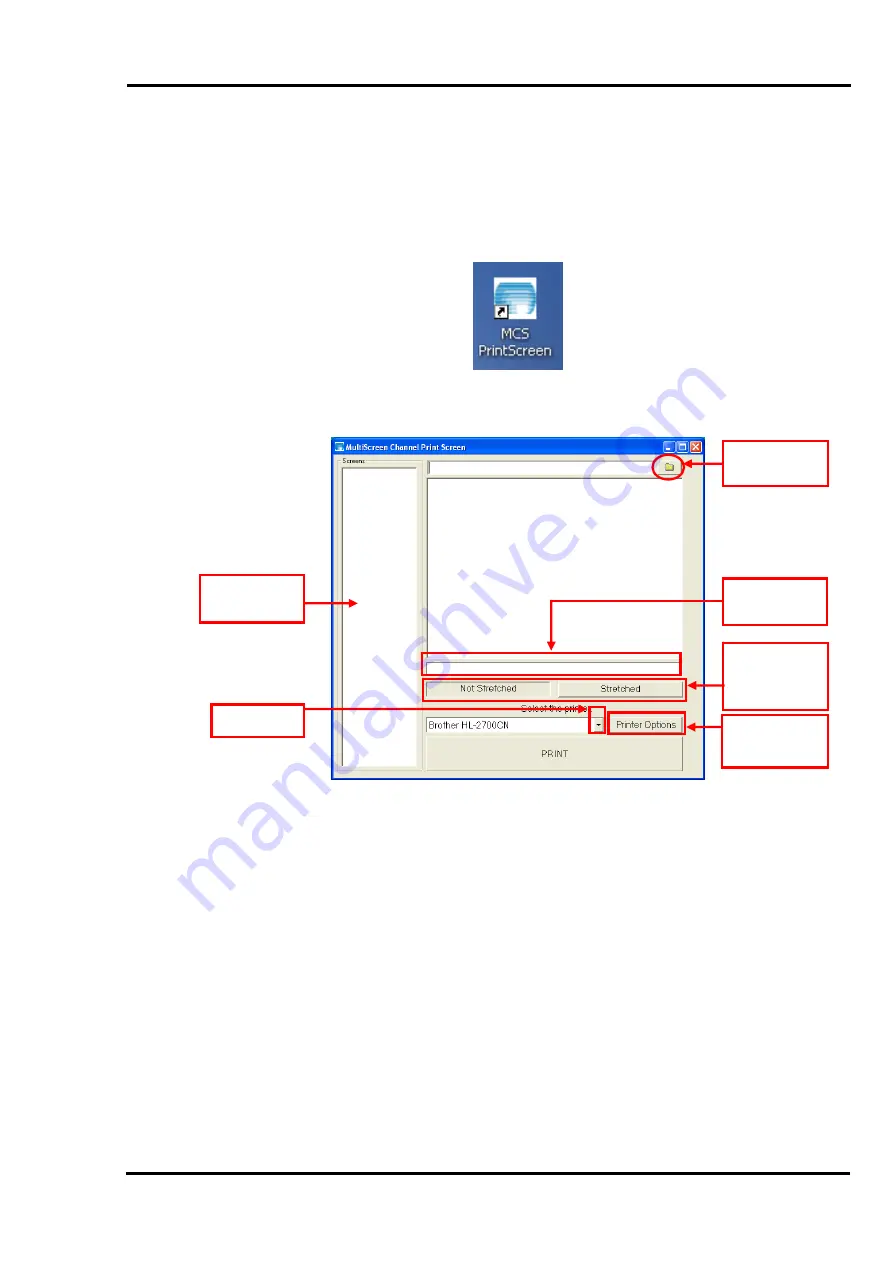
On the desktop of your computer a new icon will appear that looks similar 
to this :- 


Double-click on this icon & a window similar to the following will appear : 


3. Location 

Folder

1. Screens 

panel

4. Screen 

Name

5. Screen 

Printing 
Options 

6. Printer 

Options 

2. Printer 


[d]


Next you will specify the folder where the screen images sent from your 
MultiScreen Channel unit will be located. Click on the folder icon, labelled 
above as Location Folder (

3

). Navigate through the tree menu to the 

PrintScreen

 folder created in the Adding Networks Folder section of this 

manual as shown below. 


70 


Summary of Contents for Channel

Page 1: ...Operator s Manual www multiscreen biz channel multiscreen biz ...

Page 2: ...rantee its accuracy after publication and disclaims liability for any changes errors and omissions or damages resulting there from WARRANTY The MultiScreen Channel system is fully guaranteed against any manufacturing defects or faulty workmanship for one full year from the date of purchase MultiScreen Channel Pty Ltd warrants that it will repair or at its option replace any part of a MultiScreen C...

Page 3: ...re of the Production Unit 14 Shock Precautions 15 Transporting the System 16 Cleaning the System 16 General Operation 17 Using the Keyboard and Mouse 19 Using On Screen Controls 21 Using the Sequence Editor 22 Sequence Preview Mode and Display Mode 25 Preview Mode 25 Display Mode 26 Keyboard Lock 26 Inserting a New Screen 27 Moving a Screen 28 Cloning a Screen 29 Deleting a Screen 30 Copy Cut and ...

Page 4: ...lecting a Screen 74 Deleting a Screen 74 Deleting All Screens 74 Using the Sequence Scheduler 75 The Master Sequence 76 Scheduling a Sequence 77 Using the DVD Scheduler 79 Scheduling a DVD 79 Scheduling Multiple DVD Titles 82 DVD Format 83 Shutting down the Production Unit 84 Advanced Operation 85 Setting Defaults 86 Setting the Time and Date 88 Changing the System Settings 90 Positioning the Scre...

Page 5: ...ernal Keypad 140 Overview of Operation 141 Setting the Random Number Generator Options 142 Setting the Random Number Limits in Display Mode 147 Drawing a Random Number 148 The Summary Screen 151 The Countdown Timer 153 Resuming a Draw 154 Viewing the RNG Draw History 155 Playing a Bingo Draw 156 Configuring the Bingo Draw 157 Meal Number Control 160 The External Keypad 160 Keypad Operation 161 Add...

Page 6: ...ssage 179 Setting up Instant Messages 180 Setting up a Sequence as an Instant Message 181 Setting up a Sound as an Instant Message 183 Setting the Instant Message Configuration 185 Key Command Summary 187 Display Mode 187 Preview Mode 187 Sequence Editor 187 Screen Editor 188 Graphic Selector 188 Text Editor 188 Text Appearance Selector 189 Glossary 190 Warranty 192 Index 193 6 ...

Page 7: ...ximise your point of sale advertising and or information distribution Incorporated into this machine is the latest technology that will ensure simple trouble free operation Various optional features are available to help customise the TV Production Unit to suit your particular installation Should you have any further enquires regarding this machine whether it be for service or maximising its poten...

Page 8: ... colours and a wide range of fonts that may be expanded The ability to display the current time on screen using a virtual analogue or digital clock Can generate animated scrolling text messages over any informa tion screen in a range of colours speeds and styles Scheduling software allows individual screens or whole sequences to be displayed at specific times Animated transitions between informati...

Page 9: ...acking your MultiScreen Channel In House TV Communi cation System you should find the following items included in the container MultiScreen Channel TV Production Unit MultiScreen Channel Keyboard MultiScreen Channel Mouse MultiScreen Channel Operator s Manual this book 1 GB USB Flash Disk 9 ...

Page 10: ...ectricity Heat is probably the single most damaging environmental element to the Production Unit Because of this never push the rear of the unit against a bookcase wall or anything that restricts the air from circulating freely around the entire case Do not place a TV or monitor directly on top of the unit If the fan outlet on the back of the Production Unit or any of the ventilation holes are blo...

Page 11: ...tic backups 11 AUDIO OUT MAINBOARD STEREO 3 5mm Mainboard Audio output Nominal 0 7V RMS 12 VGA OUT D15HD May be used to connect to a VGA computer monitor with speakers 13 UHF OUT F type Modulated RF output for connection via TV Antenna Distribution System Nominal output level 70dBmV 3mV adjustable over range 470 859 MHz 5 5MHz Audio carrier PAL G Set at factory to channel 25 506 MHz 14 VIDEO OUT M...

Page 12: ...tor output by pressing CTRL ALT F12 after the system has finished starting up If using a TV monitor connect the A V OUT MONITOR sockets to the A V inputs of the TV using a twin RCA Male Male lead The lowest socket is the Audio output with the Video output just above it Select the A V input on the TV Connection to a Television Monitor If you have a monitor style television equipped with VIDEO IN an...

Page 13: ... provide a standard composite video and line level audio signal for connection to devices which require A V inputs such as external RF modulators video matrix switchers video distribution amplifiers and PA systems Both of these outputs will display an Updating system please wait message whenever the system is not running in Display mode during editing for example The audio signal is muted The S Vi...

Page 14: ...the Production Unit s circuitry Avoid dropping or jarring your Production Unit This loosens memory chips and expansion cards and can severely damage the hard disk drive Always shut down the Production Unit prior to moving it even if it s only to the other side of the desk Do not set up your system in a room with extreme conditions of temperature and or humidity Do not allow heat to build up inside...

Page 15: ...ll cables are free from table or desk legs resting on them Arrange cables out of traffic areas Unplug all power cords from their power sources if severe weather threatens When you disconnect a cable always pull on the plug or connector not on the cable itself Know the static electricity precautions Do not open the Production Unit case The components inside the Production Unit can easily be damaged...

Page 16: ...leaning the System Use a damp lint free cloth to clean the Production Unit and monitor if present Avoid abrasives or solvents as they can permanently damage the finish Use a soft cloth and window cleaner to clean the monitor Turn off the monitor then squirt a little cleaner on the cloth and apply it to the screen Subjecting a system to a dusty or smoky environment significantly shortens its life a...

Page 17: ... the operator sounds clocks showing the current time or a combination of these things Once the Production Unit is up and running it will be operating in its Display Mode where it will continually cycle through a sequence of information screens To switch from Display Mode to Editing Mode press Esc Pause Break or alternately click both mouse buttons simultaneously Editing Mode is used to create and ...

Page 18: ...ppears This is chosen from the sound library A clock either analogue or digital showing the current time A clock cannot be used on a screen that contains text or a scroller Screens may be created altered or deleted as necessary and you can individually set the amount of time for each screen to be displayed You may also search through the sequence for a particular screen arrange the screens into a ...

Page 19: ...Alt keys are different from the other keys on the keyboard They change the functions of other keys In this manual it may say to press for example Ctrl C In this case you would press and hold down the Ctrl key and then press the C key You will notice several keys have two symbols on them for example the key with the number 4 also has the dollar symbol To access the higher character hold down the Sh...

Page 20: ... Mode will return you to the Sequence Editor The mouse is used to move a pointer around the television screen There are two buttons on the mouse The mouse is used as follows To move the pointer simply put your hand over the mouse and move The pointer will move around on the screen in the same direction that you move your hand Pressing the left hand button once is referred to as a Left Click or sim...

Page 21: ...utton and drag the handle up or down the scrollbar Alternately to move up or down one row of items left click on the up or down buttons on the scrollbar A checkbox shown left is used to turn certain options on and off For example checkboxes are used to set screens to display or not display on particular days If the option is turned on the checkbox will appear as a green tick If the option is turne...

Page 22: ...eak or both mouse buttons Selected Screen Screen Information Scroll Bar Shutdown System Configuration Editor Sequence Scheduling Preview Mode Display Mode Sequence Selector Sequence Menu Clipboard Information A Screen can contain a graphic text scroller clock sound or a combination of these elements Screens are grouped together as part of a Sequence Whilst a sequence is active it will show each sc...

Page 23: ...the new sequence into the box provided and click OK If you decide you don t want to create a sequence click Cancel The new sequence is initially empty and will only contain a single blank screen known as the End marker This non displaying screen will always mark the end of the sequence and may be used to add new screens to the sequence See page 27 Inserting a New Screen for details Clone Sequence ...

Page 24: ...re only delete the sequence if you are absolutely sure you won t need it again If you just want to stop the sequence from displaying then you should use the Sequence Scheduler page 75 instead It should be noted that when a sequence is deleted any graphics or sounds that were used in that sequence will NOT be deleted Instead they remain available in the graphics or sound library ready for reuse at ...

Page 25: ...view Mode you can quickly skip forwards or backwards through the screens by pressing NEXT F2 or PREV F1 This will abort the current screen and immediately cut to the next or previous screen with no transition To exit Preview Mode press Enter or Spacebar or left click This will return you to the Sequence Editor The selected screen in the Sequence Editor will be the screen most recently displayed in...

Page 26: ...g the Sequence Scheduler for more details To leave Display Mode press Esc Pause Break or alternately click both mouse buttons This will return you to the Sequence Editor Note On systems using the optional Random Number Generator Display Mode must be running in order for the RNG keypads to be operational Keyboard Lock Your MultiScreen unit s keyboard can be disabled or locked out of operation by pr...

Page 27: ...r Select a screen by left clicking on it Press Insert on the keyboard Alternately right click and a menu of options will appear Select Insert New Screen The newly created screen will be inserted immedi ately before the previously selected screen To add graphics text or other elements to the new screen please refer to page 32 Using the Screen Editor Another way to insert a new screen is to double c...

Page 28: ... press Esc Pause Break to open the Sequence Editor You can move screens around within a sequence changing the order in which they are displayed Point to the screen you wish to move hold down the left mouse button and drag the screen to the new position Move the pointer over the screen you wish to drop it onto and release the mouse button The screen will be moved to the position before the screen i...

Page 29: ...ck Cloning a screen can also be used if you want to make a particular screen appear multiple times during a sequence If the Production Unit is running in Display Mode press Esc Pause Break to open the Sequence Editor Right click on the screen you wish to clone A menu of options will appear Select Clone Screen The new screen created will be identical and can be altered in any way independently of t...

Page 30: ... Press the Delete key Alternately right click on the screen A menu of options will appear Select Delete Screen You will be asked if you really want to delete the screen If you are sure you want to delete the screen click Yes Otherwise click No A screen can also be deleted by using the Screen Editor See page 33 When a screen is deleted any text scroller or clock attached to the graphic is deleted a...

Page 31: ...creen Press the Copy F7 key Alternately right click the screen and a menu of options will appear Select Copy Screen Alternately you may select Cut Screen This is not generally recommended as it will remove the original screen The screens that are copied or cut will be placed on the clipboard The number of screens in the clipboard is displayed at the bottom right hand corner of the Sequence Editor ...

Page 32: ...o edit in the Sequence Editor The current screen is shown in the top left hand corner You can name the screen by clicking in the Screen Name box and typing the name you want on the keyboard When you are satisfied with the name press Enter Alternately if the screen has a graphic attached then right clicking on the screen name box will make the screen s name the same as the graphic s name Sequence N...

Page 33: ...are satisfied with the screen s settings click Save or press SAVE F6 to save the screen to hard disk and return to the Master Sequence Otherwise click Cancel or press Esc to quit without saving changes Additional functions can be carried out from the Screen Editor You can move backward and forward through screens in the sequence by clicking the Previous Screen and Next Screen buttons Alternately p...

Page 34: ... to add a graphic to a screen is as follows a b In Sequence Editor view first double click the screen you wish to add the graphic to Next click Add or Change under the header Graphics Alternately press G on the keyboard This will bring up the Graphic Selector Graphic Category Selector Scrollbar Selected Graphic Graphic Name Graphic Width Graphic Height Clicking the Graphic Category selector will b...

Page 35: ...cking on the Select button or pressing Enter Once you select the graphic you will return to the Screen Editor If you decide you don t wish to change the graphic click Close There are several boxes at the bottom of the graphic library screen that contain blue text describing certain attributes of the selected graphic Each graphic has a unique name displayed in the Graphic Name box The format of the...

Page 36: ...the keyboard Choose a transition by clicking on its icon The transition will be previewed in the top right corner of the screen If you are not satisfied with the transition try choosing another Once you are satisfied with the chosen transition click Select If you decide you don t want to change the transition click Cancel Selecting the question mark will result in a random transition being used ea...

Page 37: ...ou wish the screen to display This is the number of seconds the screen will display each time it appears in a sequence If you want the screen to display for several minutes remember that 60 seconds one minute Therefore to display a screen for two minutes you could enter 120 seconds The boxes containing the letters SMTWTFS are used to display the screen on certain days of the week Clicking a weekda...

Page 38: ...on the keypad You can also increase or decrease the number by one by pressing or on the keyboard or pressing the up and down arrows at the right side of the entry box Continue changing numbers until the start time and finish time are set as you want them The screen will only display between these times The bottom control can be used to set a range of dates This is similar to setting a time range T...

Page 39: ...and year to cycle forward or backward one month d To select a specific month click the current month and select the month you want from the drop down list e To select a specific year click the current year Two buttons will appear to the left of the date Click the top button to increase the year by one and the bottom button to decrease the year by one f Finally select the date from the list availab...

Page 40: ...e screen you may move the cursor around Left click the position where you wish to enter text Alternately use the arrow keys on the keyboard to move the cursor You may need to select text in order to alter its appearance or move it around To select the text you can either use the mouse or the keyboard To use the mouse first move the pointer to the start of the text you want to select and click and ...

Page 41: ...T F9 Alternately right click to bring up the Text Editor Menu then select the option Text Appearance This will open the Text Appearance Editor For information on using the Text Appearance menu see page 47 Do not move the cursor immediately after changing the Text Appearance If you move the cursor then the new text s appearance will match that of the text around it rather than using the new text ap...

Page 42: ...ne of text line up with both the left and right side of the screen for example this paragraph of text has justified alignment To change the position of a line of text on the screen position the cursor on that line then right click and select Alignment Alternately press Shift ALIGN F8 to cycle through alignments Examples of the four different alignments are shown below You may also change the align...

Page 43: ...appear c The bar can be moved up and down the screen by dragging with the left mouse button to enable tab stop points to be set using other items on the screen as reference points d e In the picture above the first tab stop point would need to be to the right of the cherry stick at the top To move the bar left click on the blue area around the buttons then without letting go of the mouse button dr...

Page 44: ...set h i j k In this example we will type a heading on the first line and then add further tab stops on the second Left click on the screen anywhere outside of the tab bar This will exit out of the tab stop mode and enable addition of text Press the Tab key which will move the cursor to the previously set tab stop and type a heading Press Enter to start a new line and then bring up the tab bar by r...

Page 45: ...g procedure a In the Screen Editor click on the Change Text button b Right click and select Tab Stops or press Ctrl Tab c The tab stops that have already been set will appear in black To delete all set tab stops click on the button Delete All Tabs Deleting all tab stops will left align all text d To delete one tab stop click on the left or right Tab Stop Selectors as shown on page 43 or press Tab ...

Page 46: ...r Shift CUT F7 Alternately right click and select Copy or Cut c To paste position the cursor where you want the text to appear and press PASTE F8 Alternately right click and select Paste Undo If you make a mistake you may be able to use the Undo function to correct it Undo will undo the most recent change you have made To Undo right click and select Undo Save Exit When you are satisfied with the t...

Page 47: ...ur Palette Decrease Highlight Decrease Shadow Increase Highlight Increase Shadow a Select a font style from the font list by clicking on its name A sample of the text style is shown to the right of the font list You can also move up and down the list with the up and down cursor keys b Click the appropriate checkboxes to make the text Bold or Italic Alternately press B to toggle Bold text and I to ...

Page 48: ...eate drop shadows or the appearance of raised text f To create a drop shadow select any colour for the text colour then select black as the text shadow colour Click the right hand arrow on the text shadow selection box to increase the size of the shadow until it is an appropriate size Note that a black shadow won t show up on a black background g To create a raised text effect select a colour a sh...

Page 49: ...is will bring up the Scroller Editor pictured below b Click the text entry box in the top right part of the screen Use the keyboard to enter the text you wish to appear on the scroller c You can choose a font from the list of fonts in the top left hand corner of the screen Simply click the name of the font you wish to use Click and drag the scroll bar to move up and down the list of fonts d You ca...

Page 50: ... the number by 1 or to decrease it i To change the scroller s speed adjust the Speed Slider by clicking and dragging the slider The further to the right the slider is the faster the scroller will be j If you have chosen to use a background colour behind your scroller then the transition defines how the scroller s background appears on the screen and how it disappears once it has finished Click the...

Page 51: ... see what the scroller will look like on the screen If you are satisfied with it click Save Otherwise you can change the text or other settings by following the previous steps If you decide you don t want a scroller at all click Cancel 51 ...

Page 52: ...ay both analogue and digital clocks To add a clock to a screen first open the Screen Editor by double clicking the screen in the Sequence Editor Then click Add Clock This will open the Clock Editor You will not be able to add a clock if the screen already contains text The current time is shown at the top of the screen If this time is incorrect click it to adjust it The full procedure to change th...

Page 53: ...ed a clock with numbers there are graphics available on the Production Unit with numbers or roman numerals in the correct positions e If you decide you don t want to use the marks at all click the Use Clock Marks checkbox If the box contains a green tick marks will be used if it contains a red cross the marks will not be used You should deselect this option if using a graphic that already contains...

Page 54: ...s to the right of the Text Appearance button will allow you to change the clock format HH MM will only display the hours and minutes of the current time HH MM SS will also display seconds HH MM SS DD MM YY will display the current time including seconds as well as the current date below Clicking on the Text Appearance button will open a new window that contains various ways to change the text appe...

Page 55: ...t Size you want by clicking on the letters Aa in the size required The clock text colour can be changed To change the colour Click Text Colour and select the colour you want at the bottom right of the screen The text can be displayed three styles It can be plain flat text it can drop a shadow or it can have a highlight along the top and left Simply click the name of the display style you want You ...

Page 56: ... bring up the Sound Selector To select the sound you wish to add to the screen left click on its name from amongst the list of available sounds Click the Preview button to listen to the sound If you wish to select a different sound simply click on its name You can preview any number of sounds before making your selection To adjust the sound s volume click and drag the volume control slider to the ...

Page 57: ... by clicking Change Clock If you alter the time of day it will affect all clocks not just the one you are changing See Adding a Clock to a Screen page 52 If a Scroller is present it can be altered by clicking Change under the Scroller heading See page 49 Adding a Scroller to a Screen In addition the scroller s repeat times and speed can be altered without invoking the Scroller Editor Simply enter ...

Page 58: ... be removed by clicking Remove Clock Once removed all settings for the clock will be forgotten If you add a clock at a later date it will revert to the default settings A Scroller can be removed by clicking the Remove button located under the Scroller section at the right hand side of the screen Once removed all settings for the scroller are forgotten if you need to use it again you will have to r...

Page 59: ... Selector as described on page 34 Adding a Graphic to a Screen Select the category you want the graphics to come from You may only add graphics from one category at a time Rather than selecting only one graphic select all the graphics you wish to add To select multiple graphics press and hold down Ctrl on the keyboard whilst you click each graphic you wish to add All selected graphics should be hi...

Page 60: ...ated click Current Screen If you click Defaults each new screen will use the system defaults If you do not want to create the new screens after all click Cancel Once the screens have been created you can alter them individually as described on page 57 Changing an Element on a Standard Screen 60 ...

Page 61: ...ing to the criteria specified on that screen after which the sequence will continue on from the following screen To insert a DVD title into sequence perform the following procedure a b c d e Firstly ensure that the DVD disc containing the title that you want to program is loaded in the unit s DVD drive shiny side down In the Sequence Editor select the thumbnail of the screen which you want the DVD...

Page 62: ...changes to a green tick The grey time boxes will turn white allowing the times to be edited Set the Start Time and End Time for the daily time range you require To do this click on the hours minutes or seconds value that you wish to change Then there are several ways to change the value You can type a new number on the keyboard Or you can increase or decrease the current value by one by either pre...

Page 63: ...To enable the Auto Delete Screen feature then click on the red cross next to it so it changes to a green tick The boxes containing the letters SMTWTFS are used to display the DVD title on certain days of the week Clicking on a weekday box will toggle it from green to red and vice versa The DVD title will be shown on a weekday that is displayed in green and not on days shown in red Holding down the...

Page 64: ...quence will be invoked and displayed for the specified number of times during the specified hours on the specified days between the specified dates if applicable before returning to the main sequence and then continuing on from where it left off To create a link to a sequence perform the following procedure a b c d e In the Sequence Editor select the thumbnail of the screen which you want the link...

Page 65: ...me boxes will turn white allowing the times to be edited Set the Start Time and End Time for the daily time range you require To do this click on the hours minutes or seconds value that you wish to change Then there are several ways to change the value You can type a new number on the keyboard Or you can increase or decrease the current value by one by either pressing the up or down arrow keys on ...

Page 66: ...Start End Dates If you specify an End Date then you also have the option for the screen to be automatically deleted after this date has passed By default this option Auto Delete Screen is turned off To enable the Auto Delete Screen feature then click on the red cross next to it so it changes to a green tick The boxes containing the letters SMTWTFS are used to display the linked sequence on certain...

Page 67: ...d screen then it can be reused for a different purpose Alternatively the screen can be deleted from the Sequence Editor just like any standard screen as follows a b c To delete a screen from the Sequence Editor right click on the screen s thumbnail and select Delete A prompt will appear that says Are you sure you want to delete the screen If you are sure click Yes if not or you have changed your m...

Page 68: ...zen To freeze a sequence ensure it is running in Preview Mode then press the Ctrl Alt Scroll Lock keys all together To unfreeze the screen and continue running the current sequence press Ctrl Alt Scroll Lock again Whilst the sequence is frozen you may use the Previous F1 and Next F2 buttons to skip to the previous or next screen in the sequence Note that if the frozen screen contains a clock sound...

Page 69: ...ion computer that is connected via a network to your MultiScreen Channel unit insert the CD disc titled Install CD PrintScreen Installer into its CD drive This disc is located in a plastic pocket at the back of this manual Double click on the My Computer icon on the desktop When the My Computer window appears double click on the name of the CD usually located on the D Drive to display its contents...

Page 70: ...Location Folder 1 Screens panel 4 Screen Name 5 Screen Printing Options 6 Printer Options 2 Printer d Next you will specify the folder where the screen images sent from your MultiScreen Channel unit will be located Click on the folder icon labelled above as Location Folder 3 Navigate through the tree menu to the PrintScreen folder created in the Adding Networks Folder section of this manual as sho...

Page 71: ...trait orientation then click on the Printer Options 6 button By default it is set up to print in landscape layout as this best suits the dimensions of the screen Paper Orientation b c To change to Portrait view click on the round button next to Portrait It should be noted that when the Portrait page orientation is selected the image will be printed at full width exactly in the centre of the page l...

Page 72: ... will appear 2 Refresh 1 Destinations d Click on the drop down arrow 1 to view the available destinations to save the screen If there are no options available press the Refresh 2 button Select the NET PrintScreens option as shown below e f g Click on Save This has now sent a copy of the screen image via the network across to the PrintScreens folder located on the companion computer On the keyboard...

Page 73: ... be a thin white margin at the left right sides of the image when printed To make the image fill an entire landscape A4 page click on the Stretched 5 button As this stretches the image so that it becomes slightly wider there will be some distortion which will be more noticeable on some screens than others To print the screen ensure that your printer is turned on and then click on the Print button ...

Page 74: ...two ways to select which screen you want to print a a b a b a b Left click on the desired image in the Screens panel OR Right click on the image Select Select Image from the drop down menu Deleting a Screen Right click on the image in the Screens panel Select Delete Image from the drop down menu Deleting All Screens Right click on any of the images in the Screens panel Select Delete All Images fro...

Page 75: ...the Sequence Editor left click the button labelled Sched pictured at left This will bring up a screen similar to the following Each sequence in the scheduler has a priority if two sequences are scheduled to be displayed at the same time the sequence with the highest priority will be displayed The highest sequence on the list has highest priority number two has second priority and so on To change t...

Page 76: ...ollowing day The weekday range SMTWTFS can be used to display the sequence on certain days of the week The sequence will display only on the days enabled in green For example the sequence Sunday Specials will only display on Sundays This is indicated with a green S for Sunday and red letters for the other days of the week You can combine these conditions for example a sequence could be set to only...

Page 77: ...e range use the following procedure 1 Click the time range checkbox If you want the sequence to display at all times of the day leave this box with a red cross If you want the screen scheduled for a specific time click the box so that it turns into a green tick The grey boxes will turn white allowing the times to be edited 2 Click the number you wish to change There are several ways to change the ...

Page 78: ...te Click the top button to increase the year by one and the bottom button to decrease the year by one 6 Finally select the date from the list available by clicking on it 7 Repeat these steps for the finishing date 8 The sequence will only display between these dates Ensure that the end date is actually later than the start date f g h Click Add Entry to add the sequence to the schedule Move the seq...

Page 79: ...lly available DVD titles are not suitable for use with the system due to copyright legal security issues Scheduling a DVD Scheduling video titles from a DVD is similar to scheduling sequences to play throughout the day a To start with insert your DVD disc into the Production Unit s DVD ROM Drive To access the DVD Scheduler first open the Configuration Editor then click on the DVD Scheduler button ...

Page 80: ...DVD title to repeat click the checkbox marked Repeat Every You can then set the length between activations of the DVD This is the time between successive starts of the DVD title Eg If a 5 minute video is set to play every 15 minutes the title will start once every 15 minutes with a 10 minute gap in between h If you have set a repeat time you must also set the time you want the title to stop repeat...

Page 81: ... the schedule then clicking the Remove Entry button This will remove that selected entry from your schedule but will not delete the title from the DVD p Click on the Clear button to clear the entire schedule All entries will be removed You should use this if you change DVD discs and want to create a schedule for the new disc q The up and down arrows are used to change the priority of each entry in...

Page 82: ...number of titles to play by the gap you want between titles In this case since you have four titles to play each title will play every twenty minutes Set the Start Time for the first title In this case you want to play the titles from 9 00am until 5 00pm so set this as 9 00am The Start Time for the second title should be set a number of minutes later than the start time of the first title equal to...

Page 83: ...ata rate may be variable It should use PAL DVD MPEG2 compression The disc should use LPCM audio stereo at 48kHz Each programme on the DVD must be a separate title from 01 to 99 and should have one second of black at the end There must be no introductory title ie first play or auto play Examples of some DVD video production software which can be used to create DVDs in the correct format are Sothink...

Page 84: ...in use for a period of time To shut down the Production Unit press the Shutdown button in the top right corner of the Sequence Editor screen This button is marked with a large X as shown left The dialog shown above will be displayed Click Yes to shut down The unit will shut down and automatically switch off This may take a few minutes If you have pressed the Shutdown button by mistake or decide yo...

Page 85: ...ettings and managing the Graphic and Sound Libraries It is suggested that you familiarise yourself with General operation before reading the Advanced section Many advanced operations are initiated from the Configuration Editor To open the Configuration Editor first open the Sequence Editor Next click the button labelled Config as shown at left The following screen will appear 85 ...

Page 86: ... Configuration Editor The button is located at the top right hand corner of the screen On the Configuration Editor screen click Set Defaults to enter the Set Defaults screen A preview of the default Font Properties and Background Colour is shown at the bottom of the screen An explanation of each setting is given on the following page Once you are satisfied with the settings click Save to save the ...

Page 87: ... analogue clocks you create Then click the digital clock check button and set the defaults for new digital clocks Finally decide whether you want new clocks to be analogue or digital by default and click the appropriate check button Scroller Defaults Click the Scroller Defaults button to alter the appearance of new scrollers added to screens Here the Transition type Repeat Times Colour Speed etc c...

Page 88: ...he number by 1 by pressing the cursor up or down keys or by clicking the up and down arrow icons at the right side of the entry box b Continue changing numbers until the time is correct Also ensure that the AM or PM setting is appropriately set c Click the drop down button next to the date to bring up the Calender The month and year are shown at the top of the calendar You can click the small grey...

Page 89: ...MultiScree Channel f Finally select the date from the list available by clicking on it g Click Save when you are satisfied with the settings Click Cancel to exit without changing the date 89 ...

Page 90: ... the system such as output settings and so on In general you should not need to change the System Settings unless instructed to do so by MultiScreen staff To open the System Settings form a Open the Configuration Editor as described on page 85 Click the System Settings button b The following screen will appear 90 ...

Page 91: ...e following procedure a b c Open the System Settings editor as described on page 90 Click the Position Screen button The following panel will appear Click the arrow on screen that points in the direction that you wish the screen to be moved Alternately use the cursor keys on the keyboard Continue to do so until the system s output is centred on your TV screen When you are satisfied with the screen...

Page 92: ... Click the Set Output Frequency button A screen similar to the one shown below will be displayed Ensure that the correct country is set by choosing it from the Location drop down menu Next select the channel you wish to use from the Channel drop down menu and then click the Set button just below the Channel drop down menu Once you have tested the channel and are satisfied with it click Current to ...

Page 93: ...ecommended that you schedule automatic reboots if the system will be left switched on all the time a b c d Open the System Settings editor as described on page 90 Click the Automatic System Reboot button The following screen will be displayed Select the time that you wish the Automatic Reboot to occur at each day Select the days you wish the reboot to occur The system will not reboot on a day with...

Page 94: ...puter accessible over a network which then become available as additional locations to load or save data from or to Adding Network Folders a Firstly the folders must be created and or shared on the network accessible computer To do this open My Computer on that computer and navigate to the C drive b Open the C drive by double clicking on it and ensure that the Windows Explorer title bar shows the ...

Page 95: ...ultiScreen by double clicking on it and repeat step c and this time name the new folder PrintScreens Repeat step c again and this time name the folder Sequences again inside the MultiScreen folder Now that the necessary folders have been created in order to access them over the network they must be shared To do this first click on the Local Disk C drive so that is it highlighted then click on the ...

Page 96: ...ng XP PROFESSIONAL click on the Share this folder option type in MultiScreen as the Share name then click on the Apply button Click on the General tab and untick Read only if it is already ticked If asked click OK to Apply changes to this folder subfolder and files Click on the OK button This completes the necessary setup required on the network accessible computer On the MultiScreen Channel unit ...

Page 97: ...twork Folder to allow us to access the MultiScreen folder we have just created on the C Drive on your network accessible computer Click on the button labelled above as Folder Number 2 Next type MultiScreen in the box labelled Folder Name 1 above Click on the Choose Folder button A window similar to the following will appear Please note that the names of your network workgroups domains and computer...

Page 98: ...ll turn into a minus sign This is called a Tree Menu s Navigate through the tree menu to the previously created folder MultiScreen Select the folder and then click the OK button Your screen should appear similar to below Plus Sign Minus Sign t u Click on the Add Folder button Repeat steps n to r to create Network Folder entries for the PrintScreens and Sequences folders 98 ...

Page 99: ...ove the folder down in the list click on the Down 3 button d To change the name of the folder put the cursor in the Folder Name box change name and then click on the Update Folder 2 button Removing Network Folders The following information instructs how to remove folders from the Network Folders Please note that this only makes them unavailable from the MultiScreen Channel system and does not remo...

Page 100: ...er click Yes if not or you change your mind click No b The Clear 4 button removes all folders from the list As with Remove Entry a warning message will appear If you are sure that you want to remove the all the network folder entries then click Yes if not click No 100 ...

Page 101: ...new unit in the event of fire or theft The USB Flash Disk Backups are performed onto a USB Flash Disk A USB Flash Disk for automatic backups is included with the system If you wish to store a separate offsite backup or need a larger USB Flash Disk to store a large amount of data you can purchase a new USB Flash Disk from any computer retailer See page 104 Manual Backups for details on the size of ...

Page 102: ...hoosing To access the Automatic Backup settings a Enter the Sequence Editor and click on the Config button to open the Configuration Editor b Click the button labelled Backup Restore The Backup Restore screen will appear with three options c Click the button labelled Automatic Backup Settings A screen similar to the following will appear 102 ...

Page 103: ...ay a red letter indicates that a backup will not be performed e When satisfied with the settings click Save Otherwise click Cancel StartUp Backups StartUp Backups are performed when you turn the TV Production Unit on This is a better option than Scheduled Backups if you turn the unit off overnight or when not in use You can set up the unit to perform a Backup after a given number of times that you...

Page 104: ...itor click on the Config button to open the Configuration Editor c Click the button labelled Backup Restore The Backup Restore screen will appear with a number of options d Click the button labelled Manual BackUp e The Production Unit will then scan your data to see what size Flash Disk is required Once it has determined the amount of space required a prompt similar to the following will be displa...

Page 105: ...cking up along with a progress meter The backup procedure may take some time h When the backup procedure is finished a dialog will appear i Click OK You may now remove the flash disk j Optional If you removed your flash disk used for automatic backups you may now replace it 105 ...

Page 106: ...her flash disk is plugged in b From the Sequence Editor click on the Config button to open the Configuration Editor c Click the button labelled Backup Restore The Backup Restore screen will appear with a number of options d Click the button labelled Manual Restore A message similar to the following will appear You are about to restore the BackUp information that was saved at hh mm ss on dd mm yyyy...

Page 107: ... be changed unless you are instructed to do so g Click OK to perform the restoration h A message will appear saying Please wait while restoring The restoration may take some time i When the restoration process is complete a message saying The restoration has completed successfully The USB Flash Disk may now be removed safely will appear Remove the Flash Disk and click OK 107 ...

Page 108: ...ch the selected sequences are composed are all bundled together into one Sequence Transfer File which can then be used to load those sequences onto another MultiScreen Channel unit a b c From the Sequence Editor click on the Config button to open the Configuration Screen Click on the button labelled BackUp Restore Click on the button labelled Save Sequences This will bring up the following screen ...

Page 109: ... more than one use one of the following procedures 1 To select all of the available sequences click on the Select All button OR 2 To select multiple sequences hold the Ctrl key down while left clicking on the desired sequences OR 3 Alternately to select multiple sequences in a group left click on the first of the group 109 ...

Page 110: ... while pressing the Shift key select the last of the group e f If you change your mind click on the Select None button Once the desired sequences have been selected click on the Next button The following window will appear 110 ...

Page 111: ... which will end with today s date To change the name simply select the text in that box and type in the desired sequence transfer file name instead i The next step is to specify the destination you want the sequence transfer file to be saved Click on the drop down arrow next to the Refresh button to see what drives are available to save the sequence transfer file to Drop Down Arrow 111 ...

Page 112: ...el j Select the destination from the drop down box and then click Save If you are not saving the sequence transfer file to an external storage device it is recommended that you save it in NET Sequences if available 112 ...

Page 113: ...at was saved previously using the Save Sequences function from an external source whether it be over a network or from a storage device a b c From the Sequence Editor click on the Config button Click on the button labelled BackUp Restore Click on the button labelled Load Sequences This will bring up the following screen labelled Load Sequences 113 ...

Page 114: ...folder or drive click on the button with the red cross and it will change to a red tick Select where to load the sequences from by clicking on the drop down arrow next to the box labelled above as Source 1 The source can be either an external storage device or one of the Network Folders that has been set up previously Once a source has been selected your screen should look similar to below f Selec...

Page 115: ...date existing sequences replaces the existing sequence with the sequence from the loaded sequence transfer file If this option is disabled by clicking on the button changing the green tick to a red cross then the existing sequence will remain with the same name while the sequence being loaded will be renamed adding _01 onto the end 2 Backup existing sequences is available when the option to Update...

Page 116: ...lick on No If you click on No it will return you to the Back Up and Restore screen without having loaded on any new sequences A progress meter will appear while the data in the sequence transfer file is being loaded Once the sequence data has completed loading then the following window will appear k Click on OK 116 ...

Page 117: ...een similar to the one shown below will appear To preview a graphic right click on its thumbnail The graphic will be previewed full screen To return to the Graphic Manager press Esc To select a graphic left click on its thumbnail The selected graphic will be highlighted with a red outline You can also select multiple graphics in order to rename or delete a group of graphics simultaneously Hold dow...

Page 118: ...ory The menu shown at left will appear Create New Category You may create a new graphic category to load new graphics into Enter the name for the new graphic category when prompted Rename Category Selecting this option will prompt you to enter a new name for the currently selected graphic category Delete Category Selecting this option will permanently delete the entire category and all graphics co...

Page 119: ...TIF or BMP Before a particular digital camera can be used with the system a once off initialisation procedure should be performed as described in the chapter called Digital Camera Initialisation a To load graphics firstly either select an existing category that you want to load them into from the graphics category selector on the Graphics Manager screen as described on the previous page Next click...

Page 120: ...ect that image for loading will also display a small preview version of the graphic Left clicking the Preview button beneath the small image will display that image full screen Left click again to exit the full screen preview In order to select multiple graphics for loading hold down the Ctrl key while left clicking on each of the required graphic names Alternately to select a continuous group of ...

Page 121: ...m To rename a graphic first open the Graphic Manager and select the graphics you wish to rename as described on page 117 Using the Graphic Manager Click the Rename button A dialog similar to that below will appear Use the keyboard to enter the new name for the graphic The Backspace key can be used to correct mistakes Once you are satisfied with the new name click OK If you decide you do not wish t...

Page 122: ...it is currently in to make it easier to find To move a graphic first open the Graphic Manager and select the graphics you wish to move as described on page 117 Using the Graphic Manager Click the Move button A dialog similar to that below will appear Use the drop down menu to select the category you wish to move the graphic to then click OK If you decide you do not wish to move the graphics click ...

Page 123: ...a graphic first open the Graphic Manager and select the graphics you wish to delete as described on page 117 Using the Graphic Manager Click the Delete button The Production Unit will scan all sequences to ensure that the graphic is not in use by any screen Clicking Abort at this time will stop the scan cancel the delete operation and return to the Graphic Manager without deleting any selected gra...

Page 124: ... close that program down so that just the Windows desktop can be seen If you do not know how to close down the program try pressing Alt F4 e Unplug the USB cable from the MultiScreen Channel unit if the digital camera is currently connected f Ensure that the power to the digital camera is on and that it is set to either USB mode MEMORY mode REPLAY mode or PLAYBACK mode as usually indicated by a ic...

Page 125: ...Apply button followed by the OK button m Either left click on the small X icon in the top right corner or else press Alt F4 to exit the Scanners Cameras window n Unplug and then reinsert the digital camera s USB cable back into the unit and confirm that no application program automatically starts up this time o Double left click on the MultiScreen Channel icon to restart the program 125 ...

Page 126: ... Manager button A screen similar to that below will appear To preview a sound either right click on its name or left click on the loadspeaker icon The selected sound will then be played at the current volume setting To select a sound left click on its name The selected sound will be highlighted in blue You can also select multiple sounds in order to rename or delete a group of sounds simultaneousl...

Page 127: ...s from a CD ROM insert the CD ROM into the CD ROM drive then click on the CD ROM checkbox After a short while a list of the names of all the sounds found in the root folder of the USB disk or CD ROM will be shown A sound may be selected by clicking on its name To listen to the currently selected sound click the Preview button Use the volume slider to change the preview volume To access sounds in s...

Page 128: ... Ctrl key then click on the name of each sound you wish to select To select all of the sounds click the Select All button Click on the Load button to load all of the selected sounds into the Production Unit If you decide you do not wish to load any sounds click Cancel 128 ...

Page 129: ...anager and select the sounds you wish to rename as described on page 124 Using the Sound Manager Click on the Rename button A dialog similar to that below will appear To check the sound you are renaming click the Preview button shown left Use the keyboard to enter the new name for the sound The Backspace key can be used to correct mistakes Once you are satisfied with the new name click OK If you d...

Page 130: ...om a Screen for more details To delete a sound first open the Sound Manager and select the sounds you wish to delete as described on page 124 Using the Sound Manager Click the Delete button The Production Unit will scan all sequences to ensure that the sound is not in use by any screen Clicking Abort at this time will stop the scan cancel the delete operation and return to the Sound Manager withou...

Page 131: ...units over the network can take place your MultiScreen Channel unit needs to be configured so that it is aware of each of the other MultiScreen Channel units available on the network This procedure only has to be done once each time a new MultiScreen Channel unit is added to the network a On the MultiScreen Channel unit that will be used for transferring sequences from enter the Sequence Editor an...

Page 132: ...ame it Bistro Unit Next click on the button Choose MC Unit 3 A window similar to the following will appear Please note that the names of your network workgroups domains and computers will be different to what appear below To view the network computers on the network and folders on the computers click on the plus sign next to the desired item When an item is expanded the plus sign will turn into a ...

Page 133: ...e of your other MultiScreen Channel unit that you want to transfer sequences to The name will usually be MCS followed by 4 or 5 numbers Click on OK Click on Add Unit Click Save The Transfer Sequences screen should now appear similar to below 133 ...

Page 134: ...equence you wish to transfer by clicking on it with the left mouse button If you wish to transfer more than one use one of the following procedures 1 To select all of the available sequences click on the Select All button OR 1 To select multiple sequences hold the Ctrl key down while left clicking on the desired sequences OR 1 Alternately to select multiple sequences in a group left click on the n...

Page 135: ...to transfer the selected sequences to If you have more than one other MC Unit available you can transfer the sequences to more than one unit at a time by selecting multiple MC Unit names in the same way as you select multiple sequence names Click on the Transfer 3 button The selected sequences will now be transferred via the network to the selected MC Units When the sequences have been transferred...

Page 136: ...Channel Bistro Unit g h Click on OK This will return you to the Transfer Sequences screen If you wish to transfer more sequences repeat steps a to f If you have finished transferring sequences click on Cancel 136 ...

Page 137: ...tisfied with the preview press MAIN F11 again to switch it over to your main system If you don t want to output the video or it is not present press SHIFT MAIN F11 to return your monitor to Display Mode Once the main output is displaying the external source your monitor will return to Display Mode This gives you the opportunity to make changes to your sequences etc whilst the external video is pla...

Page 138: ...size non standard sized images to best fit the TV screen Note that graphics larger than 1600x1200 are unsuitable for use on the system Once you have created a suitable graphic you must save it in one of the following MultiScreen Channel compatible file formats JPEG TIFF PNG BMP or GIF Unless graphics are saved in one of these formats then they will be unable to be loaded into the Production Unit L...

Page 139: ... Options The following section describes the optional components that may be added to the MultiScreen TV Production Unit These components include the Random Number Generator Meal Number Controller and Instant Message Activator 139 ...

Page 140: ...andom Number Generator can be used to draw raffles lotteries member draws etc An optional upgrade allows the Random Number Generator to perform Bingo draws The External Keypad The Random Number Generator is operated using an external keypad connected to the Production Unit via a cable that can be up to 200 metres in length The keypad is shown left The cable from the external keypad should be conne...

Page 141: ...mber Screen will be displayed The Random Number Generator will select a number randomly from within a range of numbers specified The reels of numbers on screen will spin until the number had been generated You may continue to select numbers or end the draw When you end the draw a Summary Screen can be displayed The Summary Screen contains a summary of all the numbers drawn If you want the prize of...

Page 142: ...een Channel Each Game will have a different Winning Number and Summary Screen You can set up the options for each Game separately so for example you could have a nightly members draw using the numbers 100 300 and a weekly chook raffle using the numbers 1 50 with a different winning numbers screen and other settings Choose the name of the Game that you want to modify from the Game dropdown list b I...

Page 143: ...g zeroes shown on the random numbers For example if the Show Leading Zeroes checkbox is selected then if the random number 6 is chosen while the maximum digits is set to 3 the number would be displayed as 006 Without leading zeroes the number would simply be displayed as 6 f Similarly click the checkbox to select whether you want to allow repeated numbers during the course of a draw For example if...

Page 144: ...xt to the Stand By Screen to alter the screen The procedure to edit the Stand By Screen is exactly the same as that for editing any other screen A Stand By Screen cannot be scheduled and cannot contain a clock The screen editor is slightly modified as shown below Once you are satisfied with the Stand By Screen click Save 144 ...

Page 145: ...een click Change The following screen will appear k Select whether you want the chosen numbers displayed on the Summary Screen to appear in numerical order or the order in which they were randomly chosen When this option is active ie the green tick is showing the numbers will be displayed in sorted numerical order Click the checkbox labelled Summary in Numerical Order to change this option l If yo...

Page 146: ...ange to change this screen The procedure is the same as that for editing a standard screen This screen will be shown to let customers know that their time to collect their prize is up o Click Save to save changes and return to the Random Number Generator Options Screen Clicking Cancel will return without saving changes p If you are satisfied with all the settings click Save to finish and return to...

Page 147: ... s remote RNG keypad The LCD display will show the number as it is being entered c Press the LOW key on remote keypad to enter this number into the system The LCD display will display the new low and high number limits d Similarly enter in the highest number of the range The LCD display will show the number as it is being entered e Press the HIGH key on remote keypad to enter this number into the ...

Page 148: ...e name of the current Game on the keypad s screen Press SHIFT 0 again to cycle through all available games If you have created a Stand By Screen you may show it before the draw begins If you don t want to display the Stand By Screen or have not created one skip forward to the next step To show the Stand By Screen hold down SHIFT on the RNG keypad and press the DRAW key The Game s Stand By Screen w...

Page 149: ... is also displayed on the keypad s LCD screen The most recently generated random number is displayed in the centre At the bottom left and right corners of this screen the range s lowest and highest numbers are shown displayed at a smaller size In between the range s low and high limits is a number indicating how many random numbers have been chosen in the current draw To clarify the example above ...

Page 150: ...DRAW key has been pressed You may need to know which numbers have been drawn previously during the current game without displaying the Summary Screen Previously drawn numbers can be displayed on the keypad s LCD Press the key whilst the winning number screen is displayed The previously drawn number will appear on the keypad screen Press to cycle backwards through drawn numbers and SHIFT to cycle f...

Page 151: ...raw the Summary Screen will automatically appear and will remain on the screen until the END DRAW key is pressed once more If there have been more random numbers selected than will comfortably fit on the Summary Screen pressing the END DRAW key after the first screenful of numbers will display the next screenful of numbers and so on until all of the selected numbers have been shown Pressing the ke...

Page 152: ...umbers that may be redisplayed ie Pressing will show the previous screenful of selected numbers When no symbols are shown in the left and right corners then this is the only screenful of random numbers The RNG keypad will report which page is currently displayed and which numbers are currently displayed For example if the second page out of three was on screen then the keypad would display PAGE 2 ...

Page 153: ...the Random Number Generator Options Please note that if the Summary Screen is not active then the countdown timer will not be utilised In addition the countdown timer will not come into operation if a value of zero minutes is specified for the countdown period or if a red cross appears in the Use Countdown Timer checkbox If the DRAW button is pressed while the Summary Screen is still showing and o...

Page 154: ...ected Game To redisplay the Summary Screen from the last draw press END DRAW on the keypad Press the DRAW button to resume the draw Subsequent random numbers will be selected as a continuation of the draw To silently resume the last draw press SHIFT END DRAW on the keypad The keypad will display the draw to be resumed For example if the current Game were Bingo the keypad would display DRAW TO RESU...

Page 155: ...at you wish to review A list of the numbers drawn will be displayed along with the settings that were in place for that draw You can view the numbers in the order they were drawn or in numerical order You can save this information onto a disk Insert the disk into the drive Click Save The draw history for the currently selected draw will be saved onto the disk as a text file You can open this text ...

Page 156: ...keypad then press either HIGH or LOW to enter it e Now press DRAW to select the first random number continue pressing DRAW to select additional random numbers f If you want to review the previously selected numbers press the button to traverse backwards in the list displayed on the LCD only or SHIFT buttons to move forwards g When a player calls BINGO then press the END DRAW button h Then if you w...

Page 157: ...t have an exclamation mark and the new specialised Bingo game does On this RNG Configuration screen the Number of Digits Lowest Highest Number Allow Repeated Numbers settings are all displayed but they are unable to be modified To modify the Stand By Screen click on the Change button next to its thumbnail in the same manner as with a standard RNG game Whether a leading zero is displayed in front o...

Page 158: ...ts The speed at which the rolling random numbers appear on the Bingo Playing Screen can be set by using the Initial Spins Digit Spins Speed slider settings Initial Spins can be set from 0 to 5 and this specifies how many cycles that all the digits in the number will spin through before the first digit settles on its final value Digit Spins can also be set from 0 to 5 and this specifies how many cy...

Page 159: ...nce you have made all the necessary changes to the settings click on the Save button to exit from the RNG Configuration screen Then click on the Exit button to return to the Sequence Editor Before operating the RNG keypad be sure to click on the Display button to put the system into Display Mode 159 ...

Page 160: ...r that their meal is ready If desired a tone will sound the first time a new meal ticket number is displayed Reminder screens will display intermittently until that customer collects their meal The ticket number is then removed from the system The External Keypad The Meal Number Controller is operated using an external keypad as pictured left that is connected to the MultiScreen Channel TV Product...

Page 161: ... the keypad to correct errors while entering the number Pressing CLEAR will cause an incorrectly entered number to be blanked out allowing the number to be re entered c Press ADD on the keypad to add the number to the system The LCD will change to show that the number has been added d The Production Unit will now show a prompt screen displaying the number just entered If configured a sound may acc...

Page 162: ...to be shown one at a time on the LCD in either ascending or descending order Keep pressing these keys until the number you wish to delete appears on the LCD b Alternately you can simply enter the number to delete by using the numeric keypad c While the number you want to delete is showing on the LCD press the DELETE key on the external keypad The LCD will change to indicate that the number has bee...

Page 163: ...pts se quence display The meal number just entered is prominently displayed on the screen in large blinking numbers and if configured this screen is accompanied by a sound to attract the customer s attention to the screen The amount of time that this screen is displayed for is set on the Meal Number Control Configuration screen as described on page 166 An example of a New Meal Number Display Scree...

Page 164: ...specified number of seconds before the Meal Number Reminder Screens will be reshown The amount of time that each page of reminder screens is shown for as well as how many seconds of standard sequence display that will appear between each block of reminder screens is set via the Meal Number Control Configuration screen as described on page 166 164 ...

Page 165: ...rol button A screen similar to the following will be displayed a At the top of the screen you may type in the name of your restaurant There is a 16 character limit b It is necessary to enter the maximum number of digits that are used in the numbers on your meal tickets For example if your meal tickets range from 0 to 99 then the number of digits should be set to 2 Click in the box labelled Number ...

Page 166: ...the up and down cursor keys to increase or decrease the current number This value can range from 1 to 99 seconds f To set the numbers of seconds that each page of the meal number reminder screens are displayed on the TV screen for click in the box labelled Number List Display Time Then either type in the required number of seconds or use the up and down cursor keys to increase or decrease the curr...

Page 167: ...trol which may be accessed by clicking on the Advanced Settings button Refer to page 173 Advanced Settings for further information about these options j Once you are satisfied with all the settings click Save to finish and return to the Configuration Editor Click Cancel to return without saving any changes 167 ...

Page 168: ...ny standard sequence screen The Graphic Background Colour Transition Text and Sound can all be altered in the regular manner as described in the main section of this manual It should be noted however that meal numbers will appear over the top of the lower two thirds of the Meal Number Display Screen and so graphic imagery and text should best be constrained to the top third of the screen b When th...

Page 169: ... the top of the screen will show a full screen example of how a New Meal Number Display Screen will look with the current settings Press Esc or Enter to exit the preview f To alter the appearance of the meal numbers that are displayed on the Meal Number Display Screen click Meal Number Appearance Refer to Meal Number Appearance Settings on page 170 for more details g Once you are satisfied with th...

Page 170: ...eckbox if you wish the numbers to be Bold or Italic You ll see an example what of your selected text style looks in the sample area b To set the colour of the numbers click Number Colour then select the colour you want The Bg Colour option is only used to change the background colour for the sample area You may wish to select a colour similar to that of the background graphic used c If you wish to...

Page 171: ...ultiScree Channel d Once you are satisfied with the meal number s appearance click Save to finish and return to the Meal Number Display Screen Editor Click Cancel to return without saving any changes 171 ...

Page 172: ...umber click on the w or x buttons or use the left and right cursor keys Holding the Shift key down while you do this allows the size to change in larger amounts b To move the meal number up or down the screen click on the y or z or use the up and down cursor keys Holding the Shift key down while you do this allows the number to move in larger amounts c Once you are satisfied with the size and posi...

Page 173: ... above the numbers will blink on and off once a second A preview of the rate of the blinking number is displayed in the upper left corner This value may be set between 0 2000 milliseconds A value of 0 will prevent the number from blinking b Interrupted Screen Minimum Display Time When a Meal Number Reminder Screen is due to display while a regular sequence screen is showing it will first ensure th...

Page 174: ...y the Meal Number Reminder Screen This value may be set from 0 to 60 seconds If you want the Meal Number Reminder Screens to display instantly when they are due then set both the Interrupted Screen Maximum Minimum Display Times to 0 d Keypads If you have more than one Meal Number Control keypads you will need to set up each keypad to work with the current restaurant Each keypad must have an indepe...

Page 175: ...ternal Keypad The Instant Message Activator is operated using an external keypad connected to the MultiScreen Channel TV Production Unit via a cable that can be up to 200 metres in length The keypad is shown left LCD Numeric Display The cable from the external keypad should be connected to the KEYPAD socket on the back of the TV Production Unit Keypad for data entry Socket for cable to connect to ...

Page 176: ...sed messages as single digit message numbers are able be more instantly activated than 2 digit message numbers Each instant message may be given a name as well as a number The name can be used to identify the message before activating it b When the Production Unit is running in Display Mode and you want to activate an instant message you may do so via one of the following methods c If one touch ac...

Page 177: ...vate an instant message however you must set it up as described on page 180 To activate a message stored in slots 0 9 a Press the corresponding number s key on the IMA keypad For example to activate message number 4 press key 4 as shown below b If one touch activation is enabled then the message will be displayed immediately c If one touch activation is disabled the message number and name will be...

Page 178: ...t want to activate that message press CLEAR instead To activate a message using the up and down keys a b Press S or T shown below to cycle through the instant messages stored in the Instant Message Activator You may do this before pressing any numbers or after entering a number as above and before pressing the ACTIVATE key The currently selected message will be displayed on the keypad s LCD screen...

Page 179: ...se the instant message was activated by mistake or because the message is no longer relevant a To cancel a message first press the CANCEL button on the keypad shown below b If more than one message is currently active use the S and T keys shown below to select the message that you want to cancel c Finally press the CANCEL button again 179 ...

Page 180: ...nfiguration Editor will appear c Click the Instant Message Activator button The following screen will appear d The Instant Message Activator has 100 slots that you can assign instant messages to The slots 0 9 are able to be activated with one press It s a good idea to put messages you will use frequently in these slots Select the slot you wish to use by clicking it Alternately click the button lab...

Page 181: ...can set it up as an instant message by using the following procedure a Open the Instant Message Set Up Screen and select a message slot as described on page 180 b Select Sequence from the type drop down menu The screen will now look similar to the following c Select the sequence you wish to use from the Sequence drop down menu d You may choose to have the sequence play through a certain number of ...

Page 182: ...he instant message into the Name box at the top of the screen This name can be up to 16 letters long and is displayed on the IMA keypad when you are selecting a sequence to activate h Click the Add Msg button to add the newly created message to the Instant Message list i Click Save to save your changes to the Instant Message Activator j If you make a mistake and don t want to save your changes to ...

Page 183: ...e following procedure a Open the Instant Message Set Up Screen and select a message slot as described on page 180 b Select Audio from the type drop down menu The screen will now look similar to the following c Select the sound you wish to use from the Sound drop down menu Alternately click the Sound button and the Sound Selector will appear Select a sound from the Sound Selector and click OK d If ...

Page 184: ...age is activated or you may wish for them to be muted If the Mute Seq Mute Sequence checkbox is checked with a green tick then the sequence will be muted when the instant message plays Otherwise both sounds will play simultaneously i Enter a name for the instant message into the Name box at the top of the screen This name can be up to 16 letters long and is displayed on the IMA keypad when you are...

Page 185: ...with the Random Number Generator and Meal Number Control options To set the Instant Message Configuration a Enter the Sequence Editor Press Esc Pause Break or left right click while the Production Unit is operating in Display Mode b Click the Config button The Configuration Editor will appear c Click the Instant Message Activator button The Instant Message Set Up screen will appear d Click the Con...

Page 186: ...may not want instant messages to interrupt New Meal Number screens You may set this option independently for sequence messages Seq and audio messages Aud If the option is set then New Meal Number screens can be interrupted by instant messages Allow new meal num screens to interrupt If you have a Meal Number Control you may not want New Meal Number screens to interrupt instant messages If this opti...

Page 187: ... sequence Shift CLONE F3 Create new sequence by cloning current sequence MODIFY F4 Edit current screen invoke Screen Editor PREVIEW F12 Preview current sequence Shift DISPLAY F12 Invoke Display Mode Arrow Keys Move current screen cursor in appropriate direction Home Move current screen cursor to first screen in sequence End Move current screen cursor to last screen in sequence Page Down Display ne...

Page 188: ...ttached Graphic Selector Arrow Keys Move the current graphic cursor in the chosen direction Enter Select the current graphic return to the Screen Editor A B C X Y Z Move the current graphic cursor to the first graphic whose name begins with the selected letter Spacebar Preview the current graphic full screen Spacebar Esc Return to Graphic Selector from preview Enter Select the previewed graphic re...

Page 189: ...or Cursor left right Move cursor left right in font size selector Shift cursor keys Move cursor around in text colour palette Shift Ctrl cursor up down Text highlight offset up down Shift Alt cursor up down Text shadow offset up down B Toggle Bold setting on off I Toggle Italic setting on off Enter SAVE F6 Accept chosen text attributes and return to Text Editor Esc Abort from Font Selector leaving...

Page 190: ... Mode the Production Unit will cycle through a sequence of different screens Editing Mode Used to create and alter screens and sequences schedule sequences adjust the time and date and change the Production Unit s settings Elements A screen is composed of a number of elements Screen elements include graphics text sounds clocks scrollers transitions and background colours End marker This screen wil...

Page 191: ...of these elements Scrollbar A scrollbar is used to move up and down a screenful of thumbnails or a list of choices on a dropdown list See page 21 Using On Screen Controls Scroller Text that scrolls across the screen right to left at a speed specified by the user Sequence A series of screens displayed in a defined order Each screen is shown for a specified amount of time before the next is displaye...

Page 192: ...alled and used in accordance with the MultiScreen Channel Operator s Manual Please take note of the following conditions This warranty is issued only at the time of original purchase it is non transferable MultiScreen Channel Pty Ltd will not accept freight charges or insurance responsibility for any Production Units returned unless prior approval has been granted by MultiScreen Channel Pty Ltd Th...

Page 193: ...t 48 Comand summary 187 Connections 11 keyboard 12 other 13 power cable 12 television monitor 12 Copy Cut and Paste screens 31 text 46 Create graphics 138 screen 32 sequence 23 Defaults 86 Delete graphics 123 screen 30 sequence 24 sound 130 Digital camera 119 initialisation 124 Display Mode 17 25 187 Display time default 87 setting 37 Drag and drop 20 DVD format 83 insert a title into a sequence 6...

Page 194: ...mber Control 160 adding meal number 161 advanced settings 173 appearance settings 170 configuration 165 deleting meal number 162 display screens 163 display settings 168 keypad 160 new meal screen 163 options 165 reminder screen 163 size position 172 Mode display 17 25 187 editing 17 preview 25 187 Move graphics 122 screen 28 On screen controls 21 Positioning the screen 91 92 Preview Mode 25 187 R...

Page 195: ...31 Sequence editor 22 187 Sequence scheduler 75 Setting a screen s usage 37 background colour 33 current time and date 88 defaults 86 output frequency 92 system settings 90 transition 36 up the Production Unit 9 Shutting down 84 Slider 21 Sound adding to a screen 56 change 57 deleting 130 loading 127 mute 57 remove 58 renaming 129 volume 56 Sound manager 126 Specifications 8 Text adding 40 appeara...

Reviews: