– 43 –
(6) Save the contents of schedule
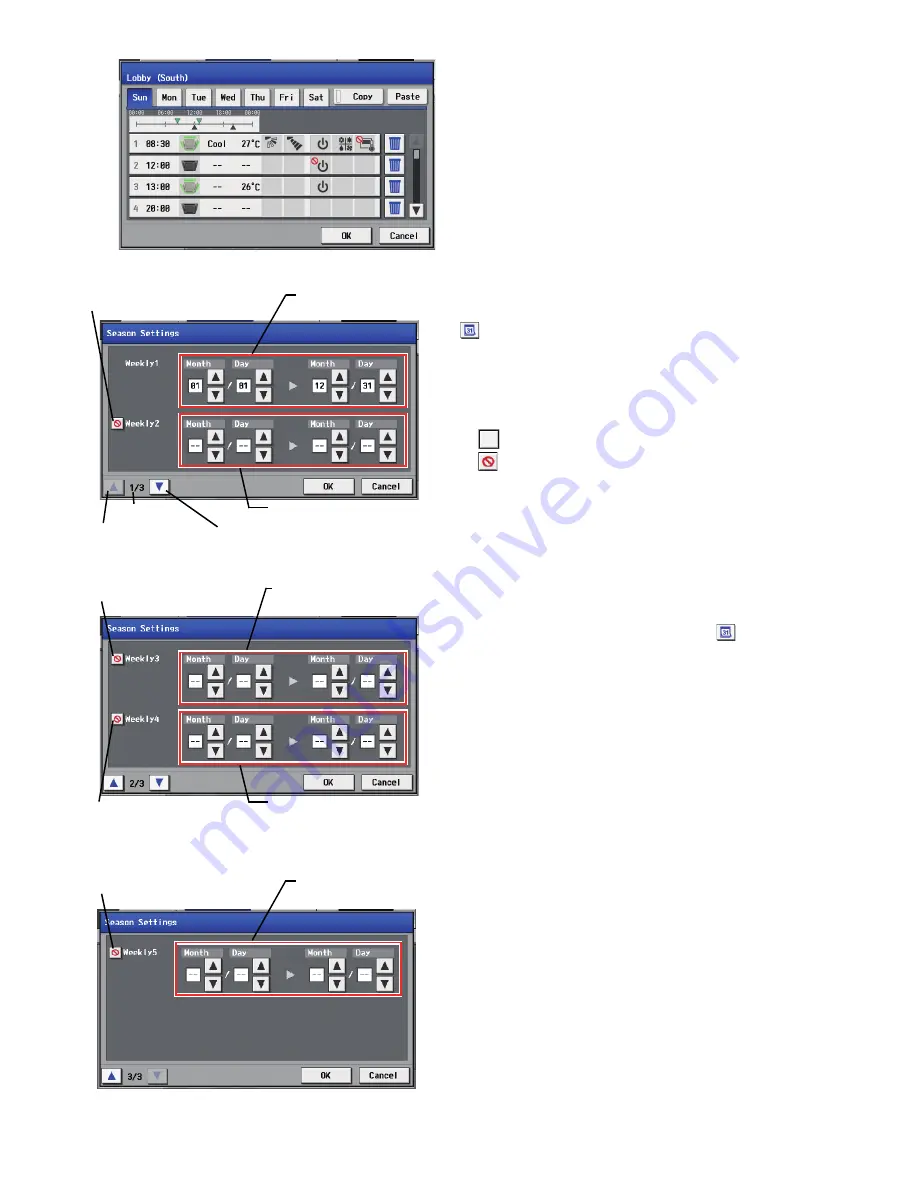
(7) Define the seasons
After all the settings have been made, touch the [OK] button to save
the schedule settings.
Touch the [Cancel] button to go back to the previously saved settings
without making any changes.
Pressing the Season Settings button on the schedule setting screen
(
) will bring up the Season Settings screen, and the applicable
period can be defined, to which [Weekly 1] through [Weekly 5]
schedules are applied. Pressing the “Next page button” and
“Previous page button” to switch the Season Settings screen.
Touch the “Enable/Disable switching button” to enable or disable the
settings of [Weekly 2] through [Weekly 5]. (Factory setting: Disable)
:
Enable
:
Disable
*The Season Setting screen has three pages. The current page can
be checked at the lower left.
*The period setting can go past 12/31 (i.e., 11/1~3/31).
*If the applicable periods for [Weekly 1] through [Weekly 5] overlap,
the highest-priority schedule will be executed based on the
following priority order.
[Weekly 1] > [Weekly 2] > [Weekly 3] > [Weekly 4] > [Weekly 5]
*If the Season setting is set to “Not Available” on the Advanced
settings screen, the Season Settings button (
) cannot be
pressed.
Enable/Disable
switching button (Weekly 2)
Weekly 2: Applicable period
Weekly 1: Applicable period
Previous page button
Page
Next page button
Enable/Disable
switching button (Weekly 3)
Weekly 3: Applicable period
Enable/Disable
switching button (Weekly 4)
Enable/Disable
switching button (Weekly 5)
Season Settings screen (Weekly 1, Weekly 2)
Season Settings screen (Weekly 3, Weekly 4)
Season Settings screen (Weekly 5)
Weekly 4: Applicable period
Weekly 5: Applicable period
WT05369X15.book Page 43 Wednesday, November 7, 2012 10:33 AM


