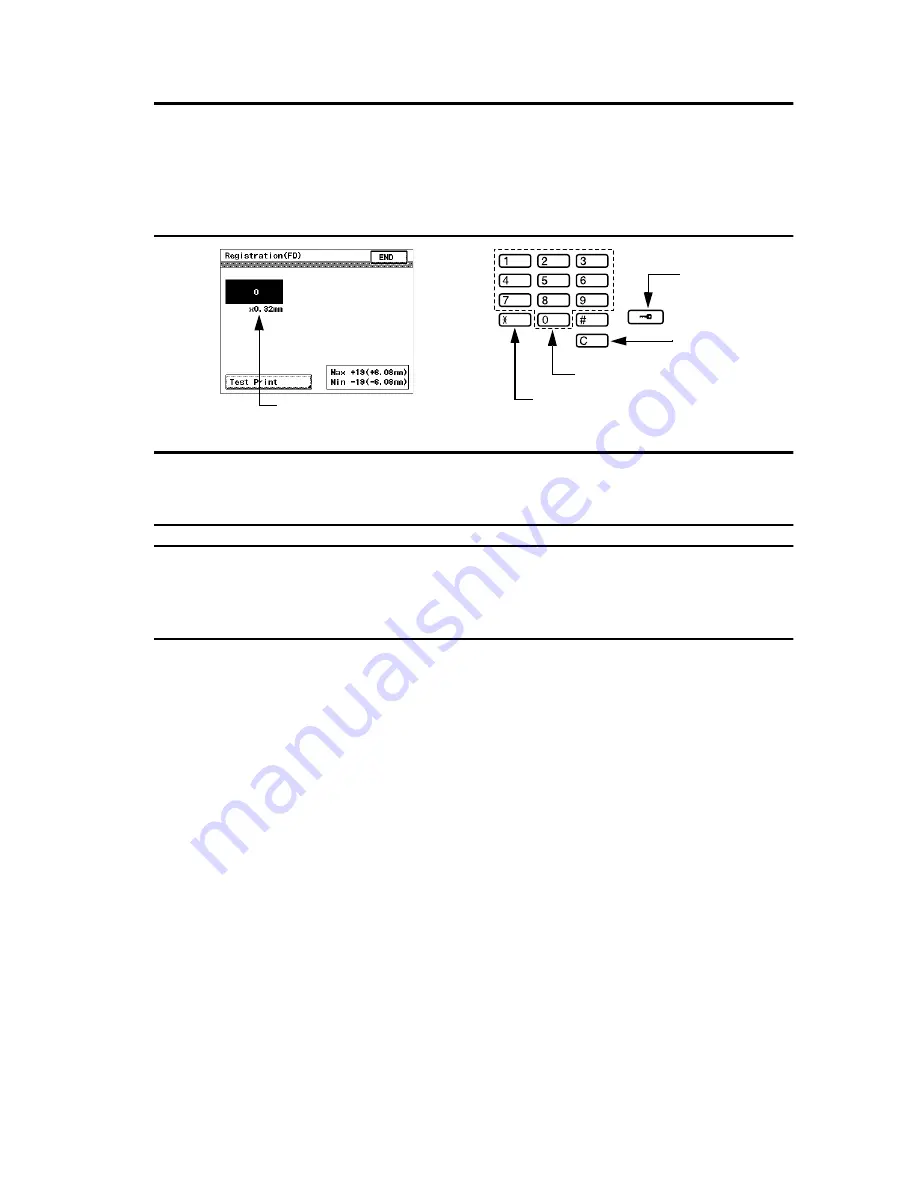
8. Enter the new setting value from the 10-Key Pad.
✽
Use the Access Mode key or "
✽
" to change the + or - sign.
Setting Instructions
If width A is wider than specifications, make the setting value smaller than the current one.
If width A is narrower than specifications, make the setting value greater than the current
one.
✽
If a single adjustment procedure does not successfully bring width A into the specified
range, try another setting value.
9. Touch "END" to validate the setting value.
NOTE
• Be sure to touch "END" to return to the normal operating mode. If the Panel Reset key is
used, the previous setting remains valid.
Checking for Each Paper Source
• 1-Sided: In step 3, touch "Test Print", select the paper source, then press the Start key.
• 2-Sided: In step 3, touch "Test Print", select the paper source and "Duplex", then press
the Start key.
4011P258CA
4011D001AA
Setting Value
Use to change
the + or- sign.
Use to clear
setting value.
Use to enter setting value.
Use to change the + or- sign.
Summary of Contents for Di251
Page 1: ...Di251 Di351 SERVICE MANUAL GENERAL 4011 7990 11 ...
Page 2: ...INDEX GENERAL GENERAL MECHANICAL ELECTRICAL ...
Page 3: ...GENERAL ...
Page 18: ...MECHANICAL ELECTRICAL ...
Page 24: ...M 4 3 DRIVE SYSTEM 1 Scanner Motor M10 2 Main Motor M2 3 I C Motor M1 1 3 2 4011M002AA ...
Page 71: ...Di251 Di351 SERVICE MANUAL FIELD SERVICE 4011 7991 11 ...
Page 83: ...Di251 Di351 Allgemein Mechanik Elektrik Rev 1 1 0 03 01 I 1 INSTALLATION 3 ...
Page 88: ...Di251 DI351 Rev 1 1 0 03 01 I 6 ...
Page 93: ...I 5 Di251 Di351 Rev 11 0 0 03 01 10 Grounding plate screws 3 1 2 3 4 5 6 7 8 9 10 ...
Page 99: ...I 11 Di251 Di351 Rev 11 0 0 03 01 6 Fit the Exit Tray 7 Close the Finisher Cover ...
Page 178: ...I 90 Di251 Di351 Rev 1 1 0 0 03 01 ...
Page 179: ...DIS REASSEMBLY ADJUSTMENT 10230 ...
Page 241: ...SWITCHES ON PWBs TECH REP SETTINGS 17196 ...
Page 296: ...TROUBLESHOOTING 14413 ...


