background image

10     Microtek ScanWizard EZ - Professional Mode Reference Manual

Overview, Prescan, Scan to

The Scan to button is one of ScanWizard EZ - Professional mode’s great features,
which functions the productivity tools under it. Click and hold the mouse button
to activate Scan to options menu, you can select Scan to, Copy

,  E-mail, OCR, or

To Web.

Overview

The Overview button offers a preliminary and low-resolution overview of the
image on the scan bed.  By the default, the entire scan bed is previewed when
you click the Overview button. You are not allowed to change the area size to be
previewed in the Preview window.

Prescan

The Prescan button offers a high-resolution preview image of the area selected
by the scan frame tool. Multiple prescans can be done if you have several
selected scan jobs. The prescans are performed one by one in an order that they
are listed in the Scan Job Queue window.

Scan to button

This is the default button when ScanWizard EZ - Professional mode is launched
as a stand-alone program. It performs the final scan and delivers the scanned
images to your selected folder or application.

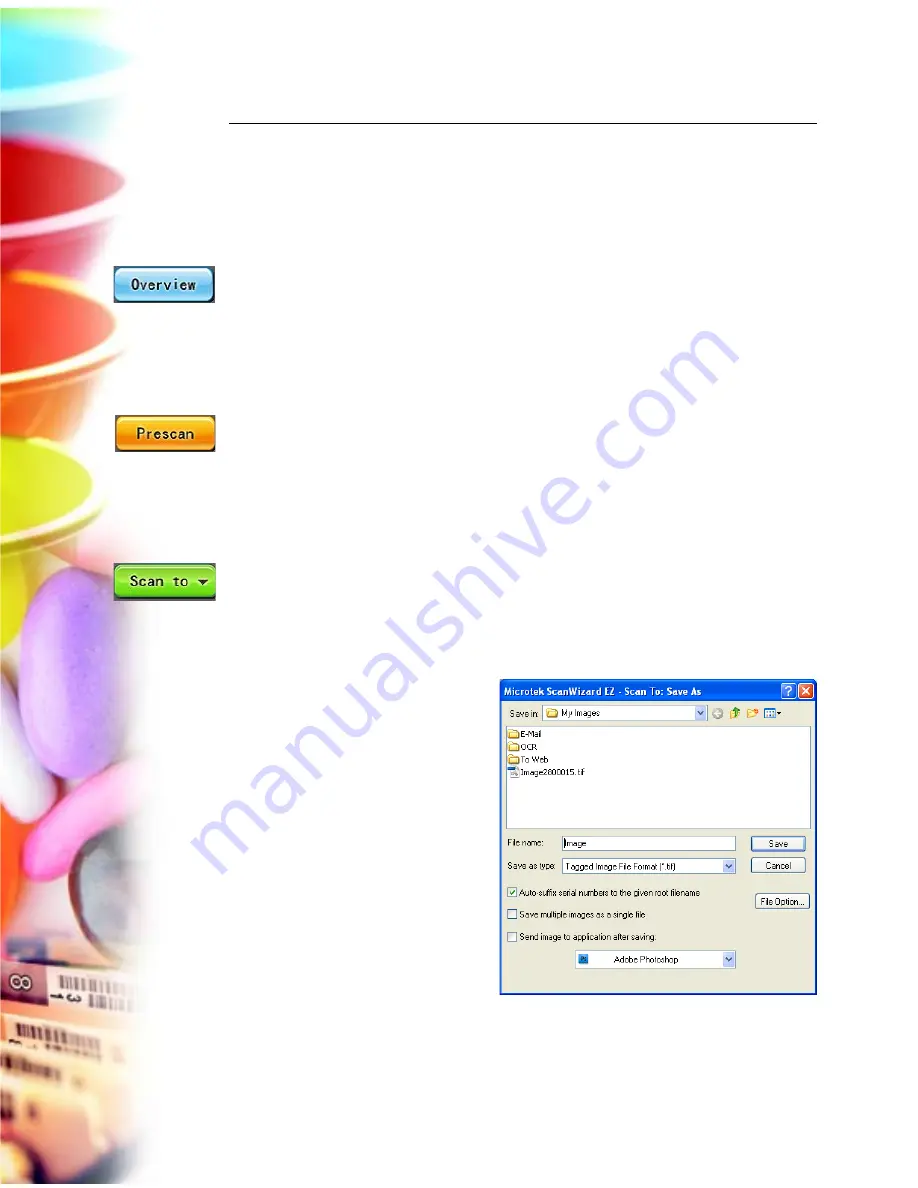
When the “Scan To:  Save As”
dialog box appears, key in a file
name, then select .tif, .bmp, .pcx,
.dcx, .pdf, or other as the export
file format, and  click Save to
perform the final scan.

Summary of Contents for ScanWizard EZ

Page 1: ...Reference Manual...

Page 2: ...aphical errors Important Documents that you scan may be protected under copyright law The unauthorized use of such documents could be a violation of the rights of the copyright holder Microtek bears n...

Page 3: ...ode Button 5 Preferences Button 6 Auto Settings Panel 6 Auto crop 6 Auto deskew 6 Auto Color Enhancement 7 Do preview at launch Advanced mode only 7 Scan Mode Panel 7 Scan Materials 7 Image Resolution...

Page 4: ...on 22 Nine Types of Image Effects 22 Scan Button 25 Cancel Button 25 Help Button 25 Preferences Button 25 EZ Mode Button 25 Professional Mode Button 25 Return Button 25 Zoom In Button 25 Zoom Out Butt...

Page 5: ...l find productive and easy to use The three scan modes of ScanWizard EZ are the EZ mode the Advanced mode and the Professional mode This Reference manual covers the various commands and features found...

Page 6: ...Wizard EZ Launching ScanWizard EZ ScanWizard EZ can be launched in either Stand alone or Plug in mode From Stand alone mode Double click the ScanWizard EZ icon on the desktop or choose Start Programs...

Page 7: ...ces Minimize and Exit buttons Details on how to use these buttons are discussed in later chapters 1 Scan button Press to start the scanning process 2 Professional Mode button Press to switch to the Pr...

Page 8: ...Wizard EZ will automatically detect the material on the scan bed and calibrate the scanner first then crop the image and at last carry out the final scan with scanning settings When the scan is done t...

Page 9: ...manual To cancel an ongoing scanning job press the Cancel button where the position of the Scan button The scanning job will be terminated immediately Professional Mode Button The ScanWizard EZ Profe...

Page 10: ...lt when ScanWizard EZ is launched for the first time You may uncheck the function by clicking the check box of each function in the panel Auto crop The Auto crop function automatically detects the siz...

Page 11: ...t launch Advanced mode only This function automatically detects and creates a preview image for your original material in the Preview area once when you activate the Advanced mode This function appear...

Page 12: ...mm slides or X ray films Negative Film such as 35mm filmstrips Note The Positive Film and Negative Film are available only when you are in the Advanced mode Image resolution EZ mode only The Image res...

Page 13: ...bit or higher Scanned data is delivered a little slower but in high quality and image data is processed in maximum bits per channel i e 10 12 bit or higher and then converted to the desired output dep...

Page 14: ...multiple images as a single file This option allows you to save the scanned images to a single file You can enable this function if the output image file format is PDF or TIF Save path This option al...

Page 15: ...ow will appear You are allowed to adjust image compression quality from a range of 0 to 100 PDF format When PDF is selected and then you click the File Option button the PDF Save Options window will a...

Page 16: ...n the BMP Save Options window will appear Two options are available for users to save a BMP file 1 Key in the application name as desired in the Application alias column 2 Assign the path where the ap...

Page 17: ...nce of the control panel for the EZ mode Three themes are available for you to choose They are Dashboard Clock and Remote Control The Dashboard is the default appearance when the EZ mode is launched f...

Page 18: ...ual Minimize Button When clicking the Minimize button ScanWizard EZ will be shrunk down to the Windows task bar Exit Button When pressing the Exit button ScanWizard EZ will be terminated and users exi...

Page 19: ...image effects in a composite display of nine images 3 Preference button Press to bring up a dialog box where you can customize your scanning settings for the output images 4 Help button Press to acce...

Page 20: ...e first time the EZ mode is the default scanning mode shown on your screen Press the Advanced mode button on the EZ mode interface and the EZ mode is immediately switched to the Advanced mode If you a...

Page 21: ...rt or Scan command from an application program When you launch ScanWizard EZ for the first time click the Advanced mode button on the EZ mode interface to switch to the Advanced mode The Advanced mode...

Page 22: ...review area with some auto function settings such as Auto crop and Auto deskew 5 After a preview image is shown in the Preview area if necessary you can resize the scan frame floating dotted line arou...

Page 23: ...mage effects At this stage the program allows you to decide how your scanned image will be manipulated based on two purposes Choose a desired purpose from the purposes below For Display For Display Fo...

Page 24: ...put Size Output Size You can choose an desired output size from a predefined list To do this press the drop down arrow next to the box and choose one output size from the list The default size is 4 x...

Page 25: ...Z will calibrate the scanner and perform the final scan with the scanning settings you made in the previous steps When the scan is done the output image can be saved in a file delivered to the specifi...

Page 26: ...button the ScanWizard EZ automatically and immediately performs a preview scan for your image with some automatic settings such as Auto crop and Auto deskew They help you to get a better viewing expe...

Page 27: ...effect restores faded colors of scan image back to life ACR Auto Shadow Highlight This effect restores faded colors of scan image back to life Also it balances light dark shades of scan image ACR Auto...

Page 28: ...black or white per pixel It is useful for images consisting purely of black and white or even single colors such as mechanical drawings or blueprints Document Adjustment Section This effect is specifi...

Page 29: ...using Click any of the tabs to customize the function settings according to your needs For more details see the topic Preference Button in the Function Buttons on the EZ Mode section EZ Mode Button Pr...

Page 30: ...erent image correction controls on the screen Image correction controls for Document Adjustment Section only Color Gray Line Art Threshold Auto Threshold v Brightness v v Contrast v v Descreen v v Aut...

Page 31: ...mage To darken the original drag the slider to the right or enter a value in the edit box This increases the Threshold value so that more pixels are turned to black resulting in a darker image To ligh...

Page 32: ...or previously printed material such as pictures from a newspaper or magazine These patterns appear to the naked eye like a series or grid of dots or as shown in the example below To set the screen fo...

Page 33: ...o Thr Auto Thr Auto Thr Auto Threshold eshold eshold eshold eshold This feature is active only when the Type setting is Line Art When you check this option the Threshold value is automatically given a...

Page 34: ...mma Gamma This lets you adjust the intensity of the midtones of an image making them consistent between the preview image and the final scanned image To change the Gamma of an image drag on the Gamma...

Page 35: ...For Professional Mode Microtek ScanWizard EZ Reference Manual...

Page 36: ...aphical errors Important Documents that you scan may be pr otected under copyright law The unauthorized use of such documents could be a violation of the rights of the copyright holder Microtek bears...

Page 37: ...erview Prescan and Scan to 10 Overview 10 Prescan 10 Scan to 10 Scan 11 Copy 11 E mail 11 OCR 12 To Web 12 Toolbar 13 Scan Frame Frame tool 13 Zoom Magnify tool 13 Pan Move tool 13 White Black Points...

Page 38: ...gsWindow 32 Scan Job 34 Image T ype 35 Resolution Settings 37 Resolution List Box 37 Resolution Unit 38 Scan Frame and RelatedSettings 39 Scan Frame Settings 39 Scaling 39 Output Settings 40 Image Siz...

Page 39: ...Output Meter 70 Sample Display Area 71 Color Meter Options 71 The Scan Job Queue Window 72 Elements of the Scan JobQueue window 72 One pass Scan for MultipleScan Jobs 75 Multiple Auto crop for EZ Loc...

Page 40: ...vi...

Page 41: ...on AIC tools for image enhancement and special features such as Auto Color Enhancement Auto Sharpnesss Correction and Automatic Color Restoration It also allows batch scanning of multiple images in a...

Page 42: ...ou start up the ScanWizard EZ Professional mode the main screen will look exactly like the last time you exited the program This means that if you had all four windows open the last time you quit the...

Page 43: ...Mode When you are in the ScanWizard EZ EZ mode click the Professional Mode button on the panel to switch to the ScanWizard EZ Professional Mode When you are in the ScanWizard EZ Advanced mode click t...

Page 44: ...and Professional mode by simply clicking on the corresponding button in the Preview window of the Professional mode Click on theEZ Mode button which is the 2nd button counted from the right side in t...

Page 45: ...The Preview window is the pr ominent window which includes the various commands and tools for controlling the scanner and a floating window Overview window for displaying overview or prescan image Det...

Page 46: ...scan image Tool buttons include the Scan Frame Frame tool Zoom Magnify Glass tool Move Pan tool and Pickers tool G Exit button Click to close the user interface of the ScanWizard EZ Professional mode...

Page 47: ...ermined by the current preview area dimension The bigger the preview area the higher the preview resolution When you perform a prescan the prescan image deteail is determined by the settings in the Pr...

Page 48: ...rinted material this is the appearance of the Scan Material icon When you click the icon and hold down the mouse you will see the Reflective option checked If you are scanning a positive transparency...

Page 49: ...or by clicking the r uler unit button at the 0 0 point of the rulers in theOverview window Depending on your selection the rulers can mark off measurement in these units inch centimeter millimeter po...

Page 50: ...owed to change the area size to be previewed in the Preview window Prescan The Prescan button offers a high resolution preview image of the area selected by the scan frame tool Multiple prescans can b...

Page 51: ...inter or any alternative printer from the options Specify the number of copies to be made then click OK A scan is then performed and the scanned image is sent to the specified printer E mail button Cl...

Page 52: ...on and is ready to be edited To Web button Click the Scan T o button and hold down the mouse until the Options menu appears then select To Web When the Scan to W eb dialog box appears save the file in...

Page 53: ...changed the actual size of the image remains unaffected Each click of the zoom tool magnifies or reduces by a factor of 2 Thus the magnification levels increase from 100 to 200 to 400 and to the maxi...

Page 54: ...l is displayed in the Info window based on the sample size selected in the Info window Pixel value information is useful especially when you are making color adjustments based on color value To change...

Page 55: ...er model and its scanner ID is shown at the top of the scanner If you have multiple scanners on your system all the scanners are shown with their respective IDs and the current scanner is indicated by...

Page 56: ...mpletely by unchecking theAuto Power Saving Mode check box Note Not all scanner models support these features If your scanner model is not supported the Scanner Controls command will be grayed out in...

Page 57: ...in the Preview window The image shows you whatever is on your scan bed The Overview image is always checked automatically whenever you launch the ScanWizard EZ Prescan image This is a detailed image...

Page 58: ...t This command brings the Settings window to the forefront which is useful if you have the Settings window hidden behind other windows or if you have expanded your Preview window such that it hides th...

Page 59: ...Create the invert effect Activate the smoked glass effect Set other options such as specifying a working directory for files Scan Material This command allows you to select your scan material which c...

Page 60: ...menu that appears select your scan material a check will appear next to the selected option Alternatively you can click the Scan Material button and then choose the correct scan material from the drop...

Page 61: ...izard EZ is installed For more information on this procedure refer to your Kodak documentation 2 The first time you launch ScanWizard EZ you will be prompted to set up color matching for your scanner...

Page 62: ...ll not generate the correct CMS effect RGB Destination This feature lets you select the RGB output device e g display monitor or RGB based printer for matching RGB Color family images including RGB co...

Page 63: ...tage by which the white and black points respectively can be clipped from the histogram The clipping is done after you click the Auto button in the AIC White Black Points dialog box For example if you...

Page 64: ...e 1 Choose the Cursor Auxiliary Lines command in the Preferences menu From the submenu that appears select how the cursor lines will appear On both x horizontal and y vertical axes On x axis only On y...

Page 65: ...ur maximum scan area is A4 size 210 mm x 297 mm you can customize the overview area so that it consistently overviews say 4 x 5 of the bed size As a rule of thumb it is best to use the default maximum...

Page 66: ...is obtained Overview Area Choose Maximum Size other fixed dimensions or choose Custom Size then enter the required dimensions You may also set the Overview Area by dragging the dotted borders Unit Thi...

Page 67: ...arameters Fast Prescan If checked a coarser or lower quality image is obtained but at a faster scanning speed If unchecked a better quality image is obtained but at a slower scanning speed Prescan Ima...

Page 68: ...he monitor gamma option is checked click the up down arrow buttons to make the gray level of the boxes as close as possible Click OK to confirm Invert This command creates a negative effect to an imag...

Page 69: ...is acquisition is performed If unchecked the prescan image is deleted when you exit ScanWizard EZ Confirmation Message If checked a confirmation message appears when image effects such as Rotate or F...

Page 70: ...ration results in the best image quality possible Working Directory This lets you specify a place to store temporary working files e g scan job files during a scanning session If the directory you spe...

Page 71: ...on AIC features of ScanWizard EZ The commands in the Correction menu correspond to the AIC buttons in the Settings window For more information see the section of the manual on Advanced Image Correctio...

Page 72: ...Settings window contains the parameters for outputting your scanned image for the current scan job and includes the advanced image correction tools of the program Elements of the Settings window G I...

Page 73: ...size This shows the size of the file when the image is scanned F Scan Frame options Includes Fixed Scan Frame Fixed Output Size and Keep Proportion G Unit of measurement This lets you chose your desi...

Page 74: ...tries in the Scan Job box of the Settings window To select from multiple scan jobs choose the scan job you wish in the Scan Job box this will automatically select the corresponding scan job in the Pre...

Page 75: ...vailable for the Microtek professional pre press scanners Grayscale Grayscale images use shades of gray to simulate gradations of color or tonal values and contain 8 bits per pixel The Grayscale 16 bi...

Page 76: ...256 Colors Custom option is selected the dialog box will appear Palette The Palette option lets you choose the method for creating the color palette table Uniform uses a 6 6 6 fixed color palette tab...

Page 77: ...een optical resolution and interpolated resolution Optical resolution is the real r esolution as measured by the scanner s optics Interpolated resolution is software enhanced resolution and can be use...

Page 78: ...e lpi if your scanned images are to be printed If you choose 1x for instance your scanned image will be printed at 133 lines per inch resulting in a 133 dpi image At 1 5x the image will be printed at...

Page 79: ...ettings enter the dimensions manually in the width and height edit boxes or use the Scan Frame tool to define or resize your scan frame Changes made in the Preview window are automatically displayed i...

Page 80: ...ght values first then check Fixed Scan Frame Y our scan frame will be fixed at those values So even if you move the scan frame around the preview image the dimensions of the frame itself will remain u...

Page 81: ...ixel pica for your image dimensions To choose the ruler unit click the arrow button next to the box and choose your setting from the list box Important Make sure you select the correct unit of measure...

Page 82: ...re seen only after you click the Scan button and scan the image The effects are not shown in the Preview or Overview modes To use the Flip T ransform command 1 Click the Flip T ransform button in the...

Page 83: ...anual 43 The Reset button The Reset button in the Settings window brings up a dialog box where you can specify the AIC settings to be reset to their default values To reset any or a combination of set...

Page 84: ...tics of your image right from within ScanWizard EZ Experiment with the tools to see what each does and to learn how to optimize your results The various AIC tools available for use will be shown depen...

Page 85: ...e AIC Tools 1 To access an AIC tool click a particular tool in the Settings window or choose its counterpart in the Correction menu in the Preview window 2 After clicking a tool the AIC dialog box app...

Page 86: ...enhancements are applied C 1 1 Thumbnails If checked the size of the thumbnail is about the same as the image shown in the Preview window If unchecked the image size appears fit into the shown dialog...

Page 87: ...ool G Action buttons These carry out a specific action See the next section for more details H Add To Menu button This button allows you to save a custom setting for an AIC tool Y ou may retrieve this...

Page 88: ...b and then closes the AIC dialog box The settings remained unchanged Reset button This button brings up the Reset dialog box where you can specify which settings are to be restored to their default va...

Page 89: ...adow setting as a custom setting The next time you wish to retrieve that particular shadow setting simply go to the White Black Point AIC drop down menu and choose that setting Adding Custom Settings...

Page 90: ...pop up menu When a dialog box comes up select the par ticular setting to be removed then clickRemove and Done in the dialog box Loading Retrieving Custom Settings To load or retrieve a custom setting...

Page 91: ...histogram is a graphic representation of how all the pixels in an image are distributed across brightness and darkness levels The darkest pixels are at the left the lightest pixels are at the right A...

Page 92: ...ut value For example if Percent is 15 and Input value is 2 it means that 15 of all pixels in the image have a value of 2 or less E Setup button This button provides you with advanced controls for sett...

Page 93: ...nel is available for selection 2 Move the black and white sliders to new points on the histogram Moving the black slider to the right will yield more contrast in the highlight areas of the image so th...

Page 94: ...scale for 12 bit images The T one Curve tool applies to grayscale and all color images and is not available for line art or halftone scan modes How to Read the Curve The Curve shows the relationship...

Page 95: ...ntation of the tone curve showing scanner input from dark on the left to light on the right B Method The Method sets the kind of curve you wish to have Select from Line Curve or Gamma C Channel The Ch...

Page 96: ...rve a black handle appears to mark your position To remove the handle drag it off the graph Use the Curve Zoom Frame tool to zoom in and out on a particular point in the curve Once the area is zoomed...

Page 97: ...y the Gray channel is available for selection 2 Choose the Method in which the curve will be modified Select from Line Curve or Gamma 3 Click the Curve Pointer tool then click on the curve to define t...

Page 98: ...s greater separation between the darkest and lightest areas of the image Brightness The Brightness control lets you change the brightness setting Too much brightness can make an image look washed out...

Page 99: ...neutralize the greenish hue of the image The Color Correction tool is available only for RGB and indexed color images A Color Wheel The Color Wheel allows you to add or remove a color cast from an im...

Page 100: ...to a closer truer gray The grays in an image may have a particular color cast which can be verified through the color information in the Info window A gray that tends towards a reddish tint for instan...

Page 101: ...ay differ from the way the image appears when you finally scan it in For the Unsharp Masking filter the final scan result can be simulated and previewed either from the thumbnail on the filters dialog...

Page 102: ...edges of defined lines and shaded areas Blur More produces an effect three or four times stronger than Blur Edge Enhancement The Edge Enhancement filter gives greater contrast to edges The filter can...

Page 103: ...ct than the Sharpen Medium filter which in turn has a greater sharpening effect than the Sharpen Low filter Sharpen High Unsharp Masking Unsharp Masking The Unsharp masking filter is used to adjust th...

Page 104: ...is sufficient For high resolution or large scale image files use 7x7 4 Enter a value in the Threshold box This option allows you to specify a tolerance range to prevent overall sharpening that might g...

Page 105: ...s or choose Custom to set your own descreen options When the Descreen dialog box comes up enter a value that best corresponds to the dot quality of the original in which the moir is to be removed You...

Page 106: ...hite resulting in a high contrast black and white representation of the image Using the Threshold feature 1 Drag the sliders to change the Threshold To darken the original drag the slider to the right...

Page 107: ...lm T ype option is enabled only when negative film is your film type selection Otherwise this option will not appear and switches instead to the Descreen option for positive film or reflective scannin...

Page 108: ...e or hassle Note This option will not work when the Image Type is set to Line Art or Black and White Diffusion For best results when using the Automatic Color Restoration feature marquee select only t...

Page 109: ...indow or the thumbnail in the Advanced Image Correction dialog box if it is open You can choose to show or hide the Infor mation window in ScanWizard EZ To do this click theShow Hide Info window toggl...

Page 110: ...will show the appropriate RGB values of that point in the image The significance of the numbers is explained below There are two numbers shown in the Color Output Meter The first number represents th...

Page 111: ...your setting from the drop down menu that appears Value and Percent If Value is chosen the numbers represent values in the 0 to 255 pixel scale regardless of the bit depth of your output image If Perc...

Page 112: ...he Scan Job Queue window two in the example below Scan jobs marked with a check are the ones designated to be scanned and the jobs are scanned in the order that they appear in the Scan Job Queue windo...

Page 113: ...type a new name when an edit box appears F Selected scan job The selected scan job is the highlighted item Y ou can have multiple selected scan jobs and clicking on a function button such as Check or...

Page 114: ...ingle pass for all the selected scan jobs The scanner s carriage moves only once and when it returns to the stand by position ScanWizard EZ then starts to process and finish all of the scan jobs To us...

Page 115: ...to auto crop multiple scanning frames To perform multiple auto crop preview of the film loaded onto the scanner click the Overview button When done you will see multiple scan frames that have been au...

Page 116: ...l the jobs simultaneously To select multiple scan jobs press theCtrl or Shift key and click on the jobs to be selected Editing Multiple Scan Jobs ScanWizard EZ lets you edit multiple scan jobs at the...

Page 117: ...on of a new scan job the new scan job becomes the current scan job Duplicating a Scan Job The Duplicate button lets you duplicate the settings of a scan job This function is very helpful if you have c...

Page 118: ...A check sign will appear next to the selected scan job To uncheck a scan job highlight the scan job then click the Check button The scan job will be unchecked and the scan job will not be scanned when...

Page 119: ...scan jobs by clicking the Folder icon yellow or use the current default folder 3 Highlight the scan jobs you want to save at the right column of the window 4 Click the Save button in the window The s...

Page 120: ...Remove or Remove all button in the window to remove the scan job from the Scan Job Queue New name auto given if the name already exists When you load or save scan jobs you may check or uncheck the Ne...

Page 121: ...is is indicated on the ScanWizard EZ scanning software Your system components or the devices on your system such as an exter nal hard drive CD ROM etc Software being used with your scanner Important A...

Reviews: