Introduction 1-3
English
Color Meter Display:
Displays input and output
pixel values relative to the
pointer position in
overview/prescan image as
previewed at the bottom
of the window (output
toggles between RGB &
LCH per Color Space Mode
in use)
Sample Display area: Shows
zoomed pixelized display of
the pointer position within
the preview image
Cursor Locator:
Shows x, y position of
mouse cursor on the
current overview /
prescan image
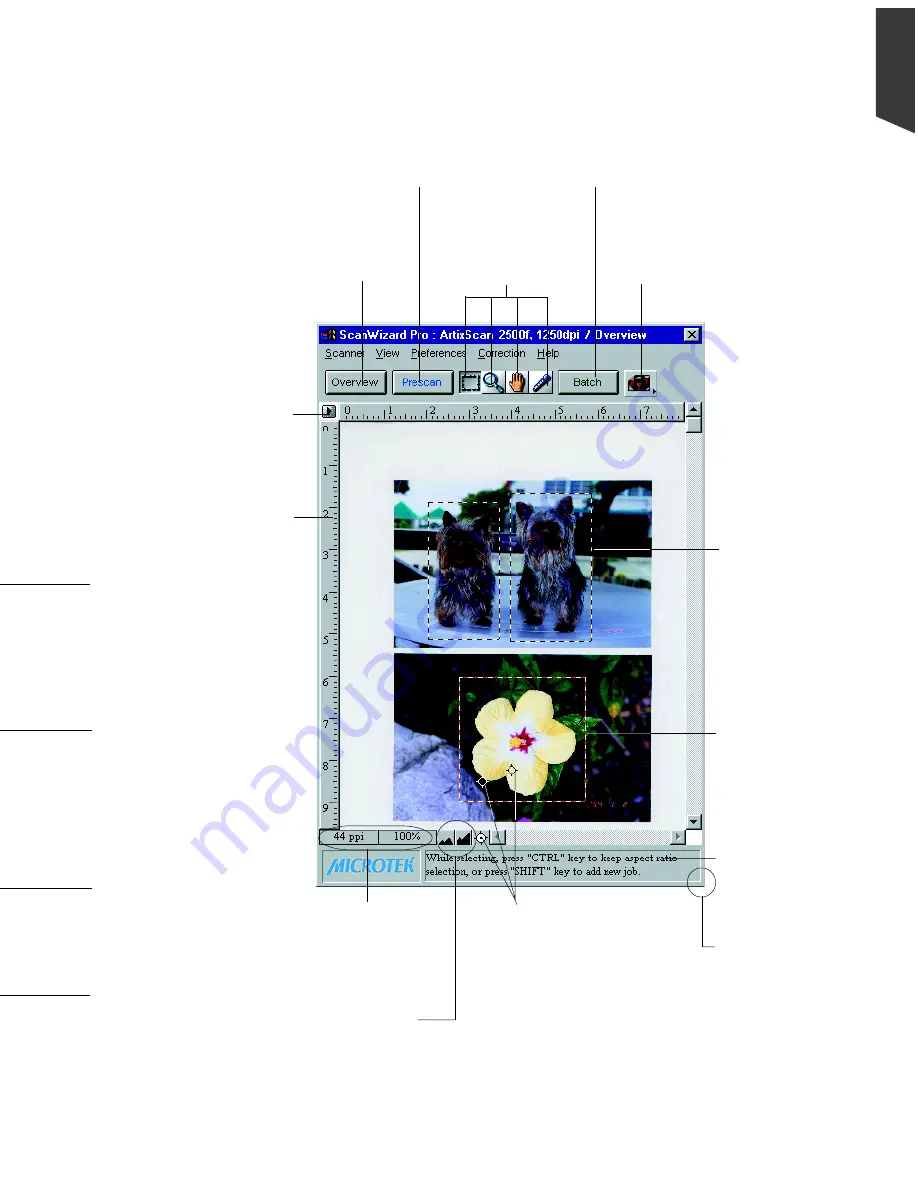
Preview window
Overview
button:
Previews the
entire scan
material
Prescan
button:
Previews a high-resolution
image of the area selected by
the scan frame.
Scan Material
icon:
Selects the type of
scan material.
Scan
button:
Starts the final scanning
process.
Unit of
measurement.
Options are inch,
cm, mm, point,
pixel, & pica
Ruler
Overview image
with multiple
Scan Frames
(press Shift key
to add new
frames)
Toolbar
:
Left to right, Scan
Frame, Zoom, Pane,
Tag Windows
Color Meter Options: Let
you choose the area of the
sample size shown in the
Sample Display area
(described below)
Drag this corner
to resize the
Preview
window.
Status bar
provides useful
tips relative to
the Toolbar tool
in use
Handy buttons
for zooming in/
out at twofold
magnification
Current Scan
Job shown with
scrolling
Scan
Frame
. Drag any
side or corner of
the frame to
resize
Current Scan Job
resolution & zoom
in/out status
Magic Diamonds markers
pinpoint shadow &
highlight points of the
current Scan Job. The
Markers can be made to
blink by clicking the
Flash
Marker
button from the
Status Bar for easy
detection
Summary of Contents for ScanMaker 5
Page 1: ...Microtek ScanWizard Pro User s Guide for Windows...
Page 49: ...Special Features 5 3 English 2 1 3 4 5 Kid Beach City View...
Page 51: ...Special Features 5 5 English 6 8 4 2 5 3 7...
Page 55: ...Special Features 5 9 English 1 5 3 4 2 5 7 6...
Page 57: ...Special Features 5 11 English 7 2 4 3 5 6...
Page 61: ...Special Features 5 15 English 4 5 2 8 3 7 6...
Page 68: ...Appendix 7 English...


