5-6 ScanWizard Pro for Windows Users Guide
English
The ScanWizard Pro working directory helps you get the most productivity out of your scanner,
especially if you need to perform several multiple scanning jobs. You can assign your own working
directory for each scanning session or use the default directory at windows\twain_32\scanpro\data\.
Current scan jobs are automatically save in the working directory whenever you -
• change to a new working directory for your next scanning session.
• quit ScanWizard Pro.
This will also help in preventing accidental loss of scan jobs in case of inadvertent system failure.
Suppose you want to scan several sets of 35 millimeter color filmstrips for your digital album. Here is
what you should do to allow the working directory helps speed up things for you.
1. If you are using a dual-bed scanner, load the
appropriate template with your first set of negative
filmstrips, and insert the tray into your scanner’s lower
bed. If you are using a flatbed, use a Transparent
Media Adapter.
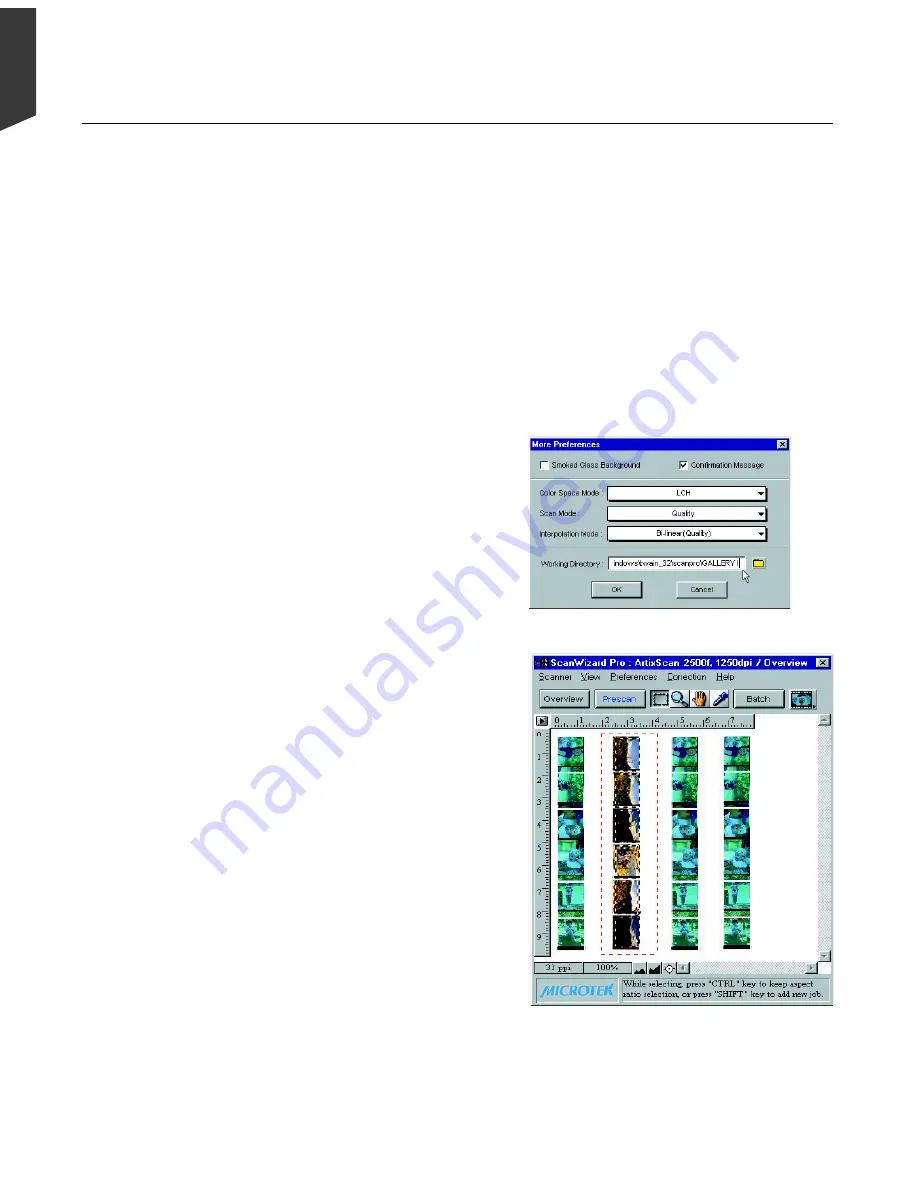
2. Go to the Preference menu and choose More. In the
dialog box, enter an appropriate folder name. e.g.,
Gallery I as your current scan session working
directory.
3. Select the appropriate Scan Material type (Negative
Film in this example) in the Preview window, and click
the Overview button. Notice that each frame of the
filmstrips is auto-selected (enclosed in scan frames)
and each frame has been auto-assigned with jobnames
as shown in the Scan Job window. You may on-line edit
the jobnames to provide your own jobnames.
How to Use ScanWizard Pro Working Directory
Summary of Contents for ScanMaker 5
Page 1: ...Microtek ScanWizard Pro User s Guide for Windows...
Page 49: ...Special Features 5 3 English 2 1 3 4 5 Kid Beach City View...
Page 51: ...Special Features 5 5 English 6 8 4 2 5 3 7...
Page 55: ...Special Features 5 9 English 1 5 3 4 2 5 7 6...
Page 57: ...Special Features 5 11 English 7 2 4 3 5 6...
Page 61: ...Special Features 5 15 English 4 5 2 8 3 7 6...
Page 68: ...Appendix 7 English...