UK: Martindale Automatic Welding Helmet 9/13 User Instructions
FR: Casque de soudage automatique (Teinte 9/13)
– Mode d’emploi
ES: Instrucciones de casco para soldar automático 9/13
DE: Automatischer Schweißhelm 9/13
– Gebrauchsanleitung
024-001-783 REV A 03/17 Pag
e
7 of 39 M23AWH/13
Centurion Safety Products Ltd. Howlett Way, Thetford, Norfolk, IP24 1HZ, UK
Tel. 0044 (0)1842 754266 Fax. 0044 (0)1842 765590
Main specifications
1.
Filter dimension
110x90x8.5 mm
2.
View area
97 x 47 mm
3.
Light shade number
4
4.
Dark shade number
5-9/9-13
5.
UV/IR protection
up to DIN15
6.
Time from light to dark
0.08ms
7.
Time from dark to light
0.1-0.9s
8.
Sensitivity /Delay
adjustable stepless solar
9.
Power supply
cells & replaceable battery
10.
Operating temperature
10°C-65°C (14°F-149°F)
11.
Grind function
Yes
12.
Optical Classification
1/2/1/1
13.
Battery
CR2450
14.
Warranty
12 months
Method of operation
1.
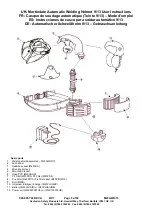
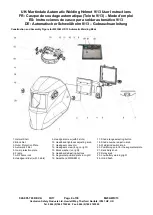
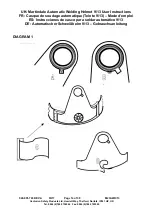
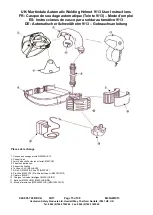
Assemble the mask as shown in the construction and assembly figure (see page 9)
2.
The power supply
The power of M23AWH 9/13 helmet is provided by solar cells with one lithium battery. Turning on or off is automatic controlled
by circuit. You can use this helmet at any time you need and take it away after working without operating any key. Using this
helmet is fully free like glass filter helmet.
3.
Darkness selection
Striking the arc, the observing window darkens immediately. At this moment, according to the technical requirement, the operator
adjusts the darkness knob 13 in the direction as shown by the arrow to select the optimum darkness.
Move the knob 17 leftward to choose shade from 5-9 and rightward to choose shade from 9-13.
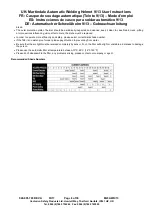
Please refer to page 8 for shade recommendations.
4.
Delay time selection
By moving the
DELAY
selector knob 22 on the rear of the cartridge, the time taken for the lens to lighten after welding can be
altered from 0• 1-0.9 second.
Turn to
MIN:
The time the lens lighten after welding changes to be shorter. The shortest time is about 0.1 second depending
upon welding point temperature and shade set. This setting is ideal for track welding or production welding with short welds.
Turn to
MAX:
The time the lens lighten after welding changes to be longer. The longest time is about 0.9second depending
upon welding point temperature and shade set. This setting is ideal for welding at high amperage where there is an after glow
from the weld.
5.
Sensitivity selection.
By moving the
SENSITIVITY
selector knob 21 on the rear of the cartridge, the sensitivity to ambient light changes can be altered.
Turn to
LO:
The photosensitivity changes to be lower.
Suitable for high amperage welding and welding in bright light conditions (lamp light or sun light).
Turn to
HI:
The photosensitivity changes to be higher.
Suitable for low amperage welding and using in pool light conditions.
Suitable for using with steady arc process such as TIG welding.
If the helmet can be used normally, we suggest using this helmet with a bit high sensitivity.
6.
Because the shape of man's head varies from person to person. The work position and the observing angle is different, operator
may adjust the headband adjusting button 14 and the segmental positioning plate 15 to select an appropriate observing angle.
By pushing and turning the adjustment screw 10, the perimeter of the head band can be adjusted.
7.
Lock & Unlock
Turn to left (*-) to unlock the ADF frame. Turn to right (-
*•) to lock the ADF frame.
8.
Welding/grinding function
Welding/grinding function can be selected by moving
the adjusting knob 19.
9.
Low battery warning light
The light 23 will flash when the battery is low.
10.
Grind flash
The light 24 will flash when using grind function.
To avoid any harm to eyes, do not conduct welding while on grinding mode
Points for attention
•
Be sure that the helmet is used in correct condition and check it according to WARNING content.
•
There is liquid crystal-valve in the filter, although it has inner and outer protection plate, it is important to avoid heavy knock to


