UK: Martindale Automatic Welding Helmet 9/13 User Instructions
FR: Casque de soudage automatique (Teinte 9/13)
– Mode d’emploi
ES: Instrucciones de casco para soldar automático 9/13
DE: Automatischer Schweißhelm 9/13
– Gebrauchsanleitung
024-001-783 REV A 03/17 Pag
e
3 of 39 M23AWH/13
Centurion Safety Products Ltd. Howlett Way, Thetford, Norfolk, IP24 1HZ, UK
Tel. 0044 (0)1842 754266 Fax. 0044 (0)1842 765590
7. CLEANING, MAINTENANCE & STORAGE
7.1 Maintenance
Routine maintenance is generally limited to cleaning of the equipment and replacement of respiratory filters/pre-filters.
Periodic replacement due to damage, wear and tear will be required for certain components, they are: -
•
Head harness, Lens and cassettes
•
Head/Face seal.
•
Air channel.
•
Sweatband and head comfort pad.
7.1.1 Head/Face seal removal/replacement
The head /face seal is fixed to the welding helmet by means of Velcro, to replace: -
1. With the helmet placed on a flat surface, detach the hose assembly from the Air channel by holding the air channel firmly and
twisting the bayonet fitting anti-clockwise.
2. Detach the old Head/face seal from the helmet Velcro.
3.
Attach the head/face seal Velcro to the helmet Velcro, starting from the centre point follow the contours of the helmet ensuring
that the joint is flat, even and without creases
.
7.1.2 Air channel removal/replacement
The Air channel is fixed to the head band by two ¼ turn bolts at the front and a mounting bracket at the rear, to replace: -
1. 1 With the helmet placed on a flat surface, detach the hose assembly from the Air channel by holding the air channel firmly
and twisting the bayonet fitting anti-clockwise, open the headband to maximum.
2. Detach the Head/Face seal from the helmet Velcro.
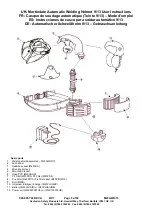
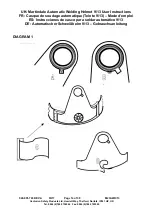
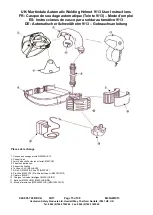
3. Detach the air channel mounting bracket
(see diagram 1)
by:- Removing both sides of the bracket from headband (C)
Removing bracket from headband adjusting ratchet by deforming central split location hole Item D.Rotating bracket through
45 degrees and detaching from air channel Item A & B.
4. Remove sweatband and turn the two mounting bolts 1/4 turn to release air channel from head band. Do not remove bolts
from headband.
5. Relocate sweat band on head band by locating the 4 x punched holes of the replacement sweatband over the 4 headband
retaining lugs.
6. Relocate 2 x ¼ turn bolts into air channel and secure.
7. Fold sweatband over the headband and locate on the 4 lugs.
8. Attach the head/face seal Velcro to the helmet Velcro, starting from the centre point follow the contours of the helmet
ensuring that the joint is flat, even and without creases
7.1.3 Sweat band/head comfort pad
Both Sweat band and head comfort pad can be replaced very easily,
To replace Sweatband: -
1
Remove 2 x ¼ turn bolts from air channel.
2
Remove old sweatband.
3
Locate the 4 x punched holes of the replacement sweatband over the 4 x headband retaining lugs.
4
Locate 2 x ¼ turn bolts into air channel and secure.
5
Fold sweatband over headband and locate on lugs.
To replace head comfort pad: -
1
Remove the old comfort pad, clean Velcro surface of any residue debris.
2
Refit new comfort pad, locate centrally on the headband and press Velcro firmly into place.
7.2 Cleaning
Avoid inhaling any dust during cleaning
To clean all components wipe with damp cloth dipped in warm soapy water. Dry with a soft, clean cloth
Do not use abrasive cleaning agents or organic solvents to clean the power unit or hose.
Do not attempt to clean the filters, once fully loaded they must be replaced.
Do not immerse the Power unit in water or allow water to enter the unit via the air outlet or inlet.
Refer to separate headpiece instructions for cleaning instructions
7.3 Storage.
All equipment should be stored in a clean dry atmosphere (R.H. < 90%) within the temperature range -5
C to +55
C in the packaging
provided. It should be protected from direct sunlight and any material known to damage plastics, e.g. petrol and solvent vapours.
Equipment should be transported in the original packaging. If stored correctly this equipment has a shelf life of 5 years.


