


Wartungs- und Reparaturanleitung
BETASTAR
Maintenance and Repair Instructions
1131 / 1211 / 1223
9490.6154 03
11.10.99
Seite/Page:
3.02
3. Elektrische Einrichtungen
3.1. Trafo mit Leiterplatte und Spannungswähler
Der OP-Tisch kann mit Netzspannung von 100 - 120 Volt und 200 - 240 Volt betrieben werden.
Die Anpassung an die vorhandene Netzspannung geschieht über den Spannungswähler (3)
Mit einer Münze Spannungswähler auf vorhandene Netzspannung einstellen.
Im Fehlerfall spricht die Netzsicherung (2) an.
Gerätesicherung (2): 100 - 120 Volt:
T4A;
200 - 240 Volt:
T2A
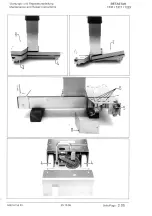
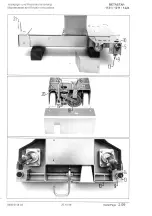
3.2. Trafo ausbauen
OP-Tisch vom Netz trennen
nur bei Varianten mit Trapezfuß (siehe Bild I)
Sicherungsschraube im Schubfachgriff entfernen und Schubfach (Schmalseite) herausziehen.
nur bei Varianten mit T-Fuß
Fußverkleidung entfernen und Deckel über Traforaum abnehmen.
Steckanschlüsse (5) an Trafo und Anschlußleitung (6) der Netzversorgung abklemmen.
Schrauben (7) lösen; Trafo herausnehmen.
Vor Einbau des neuen Trafos, am ausgebauten Trafo die Isolierplatten abschrauben (Trafounterseite)
Isolierplatte am Austauschtrafo montieren.
Trafo-Montage in umgekehrter Reihenfolge.
3. Electrical equipments
3.1
Transformer with circuit board and voltage selector
The operating table can be used with line voltages of 100 - 120 V and 200 - 240 V. Set the voltage selector (3) for
the appropriate voltage.
Use a coin to set the voltage selector to correspond to local voltage.
If an error is made here, the line fuse (2) will blow.
Fuse rating (2) (slow-blow):
100 - 120 Volt 4A
200 - 240 Volt 2A
3.2
Removing the transformer
Isolate the operating table from the line power source.
Models with trapezoid base only (see illustration I)
Remove the locking screw at the compartment handle and pull out the compartment (short edge).
Models with T-shaped base only
Remove the base cover and the transformer compartment top cover panel.
Disconnect the plug connectors (5) at the transformer and at the cable reel connector lines (6). Remove the
screws (7); lift out the transformer.
Before installing the new transformer, unscrew the isolating plate from the bottom of the old transformer (lower
surface). Mount the isolating plate on the new transformer.
Reinstall in reverse order.
Summary of Contents for Betastar 1131
Page 1: ......
Page 6: ......
Page 8: ......
Page 10: ......
Page 12: ......
Page 14: ......
Page 16: ......
Page 18: ......
Page 20: ......
Page 22: ......
Page 24: ......
Page 26: ......
Page 28: ......
Page 30: ......
Page 32: ......
Page 34: ......
Page 36: ......
Page 38: ......
Page 40: ......
Page 42: ......
Page 44: ......
Page 46: ......
Page 48: ......
Page 50: ......
Page 52: ......
Page 54: ......
Page 56: ......
Page 58: ......
Page 60: ......
Page 62: ......
Page 64: ......
Page 66: ......
Page 68: ......
Page 70: ......
Page 72: ......
Page 74: ......
Page 76: ......
Page 78: ......
Page 80: ......
Page 82: ......
Page 84: ......
Page 86: ......
Page 88: ......
Page 90: ......
Page 92: ......
Page 96: ......
Page 111: ......
Page 112: ......
Page 113: ......
Page 114: ......
Page 115: ......
Page 116: ......
Page 117: ......
Page 118: ......
Page 119: ......
Page 120: ......
Page 121: ......
Page 122: ......
Page 123: ......
Page 126: ......
Page 127: ......
Page 128: ......
Page 129: ......
Page 130: ......
Page 131: ......
Page 132: ......
Page 133: ......
Page 134: ......
Page 135: ......
Page 136: ......
Page 137: ......
Page 138: ......
Page 139: ......
Page 140: ......
Page 141: ......
Page 142: ......
Page 143: ......
Page 144: ......
Page 145: ......
Page 146: ......
Page 147: ......
Page 148: ......
Page 149: ......
Page 150: ......
Page 151: ......
Page 152: ......
Page 153: ......
Page 154: ......
Page 155: ......
Page 156: ......
Page 157: ......
Page 158: ......
Page 159: ......
Page 160: ......
Page 161: ......
Page 162: ......
Page 163: ......
Page 164: ......
Page 168: ...Prüfanleitung Fehlersuche Hydraulische OP Tische 9491 0354DE 02 10 06 2000 Seite Page 1 01 ...
Page 174: ...Prüfanleitung Fehlersuche Hydraulische OP Tische 9491 0354DE 02 10 06 2000 Seite Page 2 05 ...
Page 178: ...Prüfanleitung Fehlersuche Hydraulische OP Tische 9491 0354DE 02 10 06 2000 Seite Page 3 01 ...
Page 180: ...Prüfanleitung Fehlersuche Hydraulische OP Tische 9491 0354DE 02 10 06 2000 Seite Page 3 03 ...
Page 182: ...Prüfanleitung Fehlersuche Hydraulische OP Tische 9491 0354DE 02 10 06 2000 Seite Page 3 05 ...
Page 184: ...Prüfanleitung Fehlersuche Hydraulische OP Tische 9491 0354DE 02 10 06 2000 Seite Page 3 07 ...
Page 186: ...Prüfanleitung Fehlersuche Hydraulische OP Tische 9491 0354DE 02 10 06 2000 Seite Page 4 01 ...
Page 188: ...Prüfanleitung Fehlersuche Hydraulische OP Tische 9491 0354DE 02 10 06 2000 Seite Page 4 03 ...
Page 190: ...Prüfanleitung Fehlersuche Hydraulische OP Tische 9491 0354DE 02 10 06 2000 Seite Page 4 05 ...
Page 225: ......
Page 226: ......
Page 227: ......
Page 228: ......
Page 229: ......
Page 230: ......
Page 231: ......
Page 232: ......