background image

18

3. Global

SQ16

3. Global

3.1. Panic

In the case of so called "hanging notes" (the connected expander won't turn off certain notes anymore) you can force those
notes to stop with this function. "Panic" sends the following to the MIDI Out:

• All Notes Off (Channel 1...16)

• Reset All Controllers (Channel 1...16)

Selecting "Panic"

1. Activate "Global - Panic".

2. Press "Enter" button (step button 4) to send the Panic messages. If the SQ16 is in Start/Continue mode (currently play-

ing) it is stopped.

3. Leave "Global" by pressing "Exit" (step button 13) or repeat Panic.

3.2. MIDI Dump

You can externally (for example on a computer or MIDI file player) store SQ16 data to archive your settings or to extend your
storage capacity if the eight Blocks in the SQ16 isn't enough. Those data of course can be written back into the SQ16. A MIDI
dump for the SQ16 contains all data, e.g.:

• Rotate 1...16

• Chain 1...16

• MIDI Set 1...16

• Step Set 1...16

• Song 1...8

• Pattern 1...64

• Mute Setting 1...15

• Global data: Tempo + Common P Clock  Clock Out ON/OFF + Autostart ON/OFF, including Note rec

mode for Note Tracks 14, 15 and 16.

Sending a MIDI dump

All data residing in the Edit Buffer are sent as a MIDI dump. If you want to send one of the 8 blocks of the SQ16 you first nee d
to load it into the Edit Buffer (see 3.5.4).

1. If a Song, Chain or pattern is currently playing stop the SQ16 by pressing the "Start/Stop" button.

2. Activate "Global - Write Dump".

3.

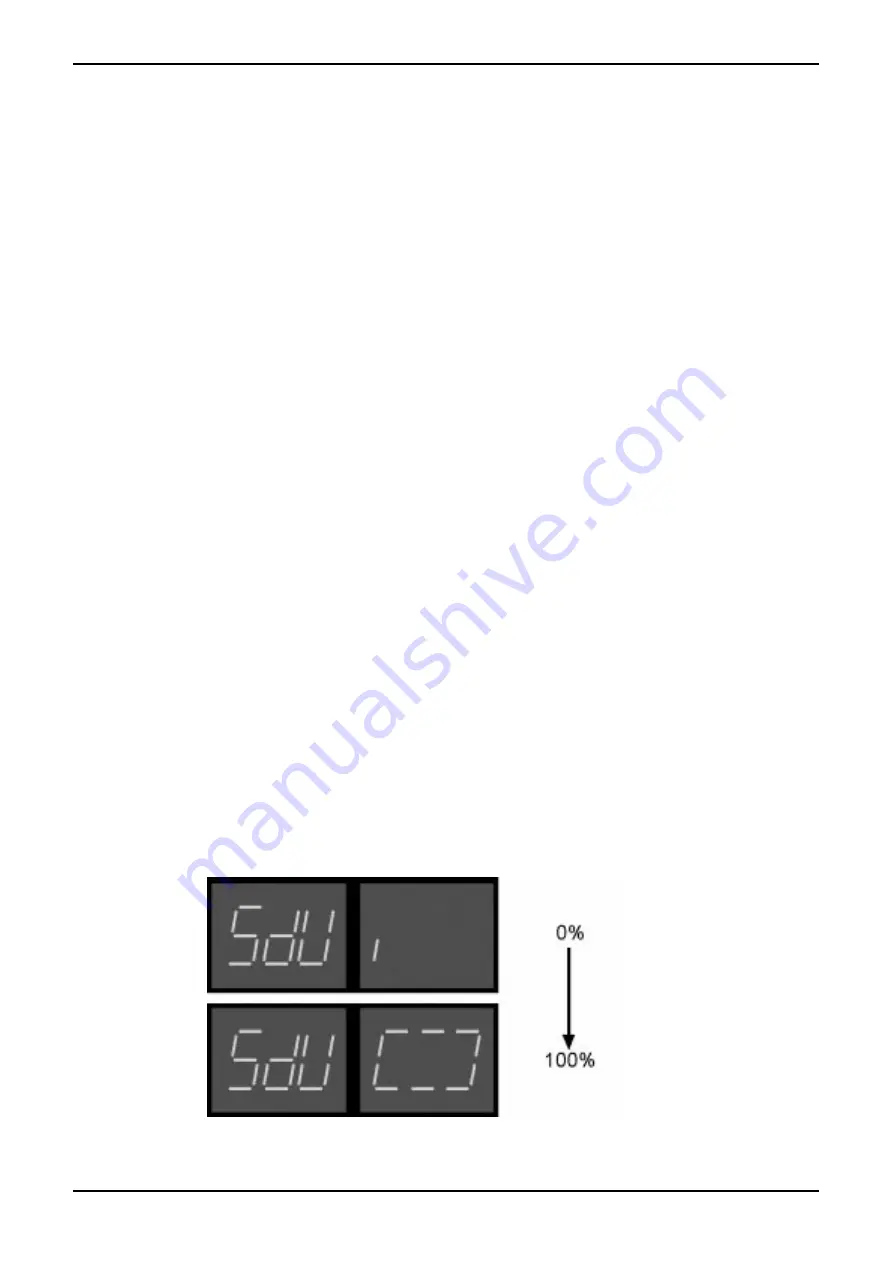
a. Press the "Enter" button (step button 14) to start the MIDI dump. While the MIDI dump is sent (for about 9 seconds)

the left display reads "SdU" while the right display shows the progress. After sending the MIDI dump "Global" is exited
automatically.

b. Do not start the MIDI dump and exit "Global" by pressing the "Exit" button (step button 13).

Summary of Contents for SQ16

Page 1: ...Owners Manual SQ16 ...

Page 2: ... 4 Pattern functions Overview 28 4 2 Instrument tracks 29 4 2 1 Structure and data of instrument tracks 29 4 2 2 Editing the instrument tracks of a pattern 31 4 2 3 Copying the currently edited On Off track or Accent Track 32 4 3 Note Tracks 33 4 3 1 Structure and data of note tracks 33 4 3 2 Editing the On Off track Accent track and Hold track of a Note Track 37 4 3 3 Editing Inserting Notes 38 4...

Page 3: ...Steps 74 10 4 3 Copying Song Steps without inserting 75 10 5 Deleting Song Steps 76 11 Recording note tracks 77 11 1 Recording in Play Mode Pattern 77 11 1 1 Selecting a Pattern and a note track within the Pattern 77 11 1 2 Setting the MIDI receive channel for the selected note track 77 11 1 3 Editing the Step recording track 78 11 1 4 Selecting Recording Mode 78 11 1 5 Recording Modes SGL STP SGL...

Page 4: ...r to a hardware sequencer It would also defeat the purpose of the SQ16 creating and editing drum sequences in a simple manner The SQ16 offers a wealth of functions which go far beyond a step sequencer in the usual sense like Delay Echo Arpeggio or Rotate which helps create irregular rhythms Using the SQ16 as master Example 1 The SQ16 controls the sounds and drumsets of a synthesizer Simultaneously...

Page 5: ...6 is triggering a drum expander each instrument track plays a single drum instrument drum expanders usually are built around drumsets in which each note is assigned to exactly one instrument Note tracks track 14 16 can use different notes per step If the SQ16 is triggering a synthesizer each note track plays back a melody which can be assigned to certain sounds If the synthesizer also contains dru...

Page 6: ...te Transpose notes Recording from an external keyboard Songs and Chains Playing back different patterns sequentially can create longer rhythmical structures This is done with either so called Chains pattern chains in fixed order or Songs in which patterns can be grouped freely MIDI Sets A MIDI set is used to assign a note number and a MIDI channel to each instrument track or a MIDI send channel an...

Page 7: ...it operations Anatomy of a SQ16 session 1 After powerup Block 1 is loaded automatically into the Edit Buffer You can load a different block but only one Block at a time into memory 2 If you just play back the Edit Buffer data without performing edit operations the Edit Buffer plays back an exact copy of the data of the loaded Block 3 By performing edit operations only the data in the Edit Buffer i...

Page 8: ...s Master SQ16 controls external sequencer or as Slave SQ16 is controlled by external sequencer This mode depends on the settings for Clock Source Clock OUT On Off and Autostart On Off in the global settings see 3 4 Synchronizing drum machines with DIN sync The SQ16 can control drum machines that have a DIN sync input The SQ16 sends the commands Start Stop ad Clock 24 ppq ...

Page 9: ...heck for Wrong connections Incorrect MIDI setup in the expander for example disabled MIDI In The expander possibly doesn t have any drumkits or they are not set to receive on channel 10 If the instrumentation is not musically useful the expander probably uses a drum mapping different from the General MIDI standard In this case you will have to change the instrument assignments in the SQ16 see sect...

Page 10: ... make the necessary edits to the On Off track to activate Steps 1 2 3 4 and 5 7 Editing an instrument track Accent track This section shows you how to edit the velocity and hereby the volume of single steps This of course requires a velocity sensitive bass drum in the connected expander 7 1 Activate the Inst Step Accent function With the help of the light band interface you can see which step is c...

Page 11: ... 11 This changes the mode to dn You ll here an echo that starts on Step 3 accent set and decreases in volume from ACC High to ACC Low 8 6 Press the Up button again This switches to dr mode You ll here an echo that starts on Step 3 accent set and increases in volume from ACC Low to ACC High 8 7 Press the Up button again This switches to drn mode You ll here an echo that starts on Step 3 accent set ...

Page 12: ...signed one of the 16 MIDI Sets in the SQ16 A MIDI Set contains all the note numbers and MIDI channels for the instrument tracks those settings are edited directly in the MIDI Sets The pattern contains just a pointer to a certain MIDI Set the instrument tracks use the MIDI channels and note numbers of the assigned MIDI Set When assigning instruments to instrument tracks it is useful to hear just th...

Page 13: ...ton The song is playing The left display shows the currently playing Song Step the right display shows the pattern loop Changing the Mute track for Song Steps 12 3 Activate Song Edit On Off while the song is playing The song stops and the current Song Step is played back 12 4 Press the Arrow Up or Arrow Down button in the left Select Edit section to access Song Steps 1 14 the num ber is shown in t...

Page 14: ...s you to play back the pattern with double or half speed While Pattern 1 is playing activate Pattern Scale The current scale setting is 16 step length 1 16 Press Up step button 13 The speed has doubled step length 1 32 Press Down step button 12 until Scale 8 is displayed The pattern plays now with half the speed compared to a setting of 16 step length 1 8 15 3 Pattern Step Set You can assign a Ste...

Page 15: ...button step buttons 11 and 12 16 4 Press Enter step button 14 When the left display reads YES press Enter again 16 5 Press Exit step button 13 to leave Global 17 Note tracks Activating single steps and setting accents is the same as for instrument tracks The same applies for Accent settings in Step Sets However there exist additional functions for recording a note track and for arpeggios Those fun...

Page 16: ...o a With the up down buttons step buttons 11 and 12 b Entering the value directly with step buttons 1 9 and 0 The Tempo value must always have three digits For a tempo of 25 it is necessary to enter 025 e g you must press the buttons 0 2 and 5 If you press a button and the display doesn t change you have tried to enter an illegal value 2 2 Start Stop Continue Start Stop This is used to start or st...

Page 17: ...ction select again depending on the current function patterns Songs Step Sets MIDI Sets Chains or Rotates An LED shows which data type is affected The Select button and both arrow buttons have the same functionality in both sections Select Selecting an instrument track left section or for example a pattern right section is done by holding down the Select button and pressing one of the step buttons...

Page 18: ...can be written back into the SQ16 A MIDI dump for the SQ16 contains all data e g Rotate 1 16 Chain 1 16 MIDI Set 1 16 Step Set 1 16 Song 1 8 Pattern 1 64 Mute Setting 1 15 Global data Tempo Common Pattern Clock Source Clock Out ON OFF Autostart ON OFF including Note rec mode for Note Tracks 14 15 and 16 Sending a MIDI dump All data residing in the Edit Buffer are sent as a MIDI dump If you want to...

Page 19: ...ou have used different lengths for your patterns but now want all Patterns to have a length of 16 steps Activate Common Pattern and set as a common value for all Patterns the length to 16 steps the individual length settings are still there but no longer active the Common Pattern setting overrides them If you at a later point want to use the individual lengths again you simply need to disable the ...

Page 20: ... Set 2 3 4 Clock Source Clock out On Off Autostart On Off Those settings control the MIDI synchronization to other sequencers drum computers and are common to patterns chains and Songs Clock Source Autostart On Off Clock Source IC The SQ16 always uses its internal clock regardless if it is started internally via Start Stop Continue buttons or externally via Start Continue message External start is...

Page 21: ...s for Clock Source Clock OUT On Off and Autostart On Off 1 Activate Global and the desired function Clock Source Clock OUT On Off or Autostart On Off 2 Using the up down buttons step buttons 11 and 12 make the desired changes IC or IEC Clock Source On or Off Clock OUT On Off or Autostart On Off 3 Leave Global by pressing Exit step button 13 ...

Page 22: ... store them into one of the 8 Blocks single data types or the whole block The data in the Edit Buffer is lost when you power down the SQ16 while the data in the 8 Blocks is retained see also 1 3 3 5 1 Loading Writing Rotates Songs Chains MIDI Sets Step Sets or Mute settings 1 Activate Global 2 Press Load From Block or Write To Block until the LED for the desired data type lights up Examples 3 Sele...

Page 23: ...ropriate Pattern group button no Patterns are loaded from written into the unselected Pattern groups a Press step buttons 1 16 shortly to select several Patterns Step buttons 1 to 16 equal Patterns 1 to 16 if Pattern Group 1 16 is selected Patterns 17 to 32 if Pattern group 17 32 is selected Patterns 33 to 48 if Pattern group 33 48 is selected and Patterns 49 to 64 if Pattern group 49 64 is select...

Page 24: ...press a Again Enter to load write b Exit step button 13 to abort and to leave Global 5 After loading writing press Exit step button 13 to leave Global 3 5 4 Loading Writing a complete Block All Rotates Chains MIDI Sets Step Sets Songs Patterns Mute settings and the Global settings are loaded written 1 Activate Global 2 Press Load From Block or Write To Block until the LED for ALL in the right Sele...

Page 25: ...for a Pattern The following picture shows the step data for a Pattern please note the limitation of 16 steps maximum A Step contains exclusively note data up to 16 different notes per step Each step contains only a note number but not velocity or MIDI channel Let s start with an explanation how to edit the note numbers for each step Editing the note numbers for each step For simplicity s sake we h...

Page 26: ...They are used to play back simple monophonic melodies As with instrument tracks each note track uses one single MIDI channel There exist two different methods to input notes into a note track Recording notes from an external MIDI keyboard see section 11 Manual input and editing of single notes How to edit a note track how to assign a MIDI channel to it and how to control its velocity is described ...

Page 27: ... then starts from the beginning The Step Play Position is the currently playing step within the pat tern For each bar the instrument tracks and note tracks are played but but only if the On Off track for the instrument track and note track is set to On on the Step Play Position If the On Off track is Off a rest is played e g nothing An instrument track triggers the same note for all active steps w...

Page 28: ...ay edit On Off tracks Accent display edit Accent tracks Hold display edit Hold tracks Note Edit display edit notes Pattern common pattern settings Length set Pattern Length Scale set Pattern Scale Step Set assigning a Step Set to a pattern Midi Set assigning a MIDI Set to a pattern Note Rec recording the note track of a pattern Mode selecting record mode common for all patterns Step display edit s...

Page 29: ...ignment of note numbers and MIDI channels to an instrument track is done via MIDI Sets A MIDI Set contains the note numbers and MIDI channels for the instrument tracks all editing of those settings also takes place there A pattern con tains just a pointer to a MIDI Set The instrument tracks of a pattern then use the note number and MIDI channel assignments made in the MIDI Set Example The instrume...

Page 30: ...iting the velocity settings for Accent On and Accent Off ACC High and ACC Low The assignment of different Low and High values is done via Step Sets A Step Set contains the Low and High velocity values for the instrument tracks all editing of those settings also takes place there A pattern contains just a pointer to a Step Set The instrument tracks of a pattern then use the Low and High velocity se...

Page 31: ...Accent is active you can copy the On Off track or Accent track for the currently edited instru ment or Pattern For example you are editing the On Off track for Pattern 1 and instrument track 1 You can copy this On Off track to other instrument tracks within the same Pattern or to other Patterns 1 Activate Copy To in the Select Edit section 2 Select the instrument tracks to which the current On Off...

Page 32: ...Q16 Example 1 Copying the currently edited On Off track to the On Off tracks of instrument I2 I13 in pattern 1 Example 2 Copying the currently edited On Off track to the On Off track of instrument I1 in pattern 17 32 ...

Page 33: ... editing of those settings also takes place there A Pattern contains just a pointer to a MIDI Set The note tracks of a Pattern then use the MIDI channel assignments made in the MIDI Set Example The note tracks n14 n15 and n16 from Pattern 1 shall play different sounds from a connected expander Pattern 1 is assigned a certain MIDI Set for example MIDI Set 1 To achieve the desired sound assignment f...

Page 34: ...r this step additionally this step can not be activated in the On Off track On Off Each of the note tracks n14 n16 does have its own On Off track in which you can activate single steps Steps can only be activated if the Note Edit track contains a note number for this step Accent Similar to the instrument tracks each note track also has its own Accent track to control the velocity of the activated ...

Page 35: ...ACC Mode HL ACC Low 100 and ACC High 127 for note track n14 All active steps On Off On with an active accent use velocity 127 while all active steps with non active accent use velocity 100 For Step 5 Hold is active this results in the note C1 being held until the next active step e g Step 9 Something similar can be found at Step 11 Note F2 is held until the end of Step 12 ...

Page 36: ...st step of a hold phrase step 6 in the below example n step SLd The note length is the same as the step length If a note without hold Step 5 follows a note with hold Step 4 the Note On and Note off commands are exchanged e g after step 4 first a Note On is sent for the Note F2 in Step 5 then a Note Off for the Note F1 in Step 4 This is triggering a Slide effect Portamento at the MAM devices MB33 a...

Page 37: ...D s shows which step contains a note number step is not lighting at all Step does not contain a note number and cannot be set to On step is blinking short Step contains a note number but isn t set to On in the On Off track step is lighting permanently Step contains a note number and is set to On in the On Off track Editing Accents An active accent has only audible results if the same step is also ...

Page 38: ...now select Note Step Note Edit you have the following choices If the note track already contains notes you can transpose them delete them edit single notes set all selected notes to the same note number If the note track contains just empty steps you can select one or more of those steps and insert the same note into all those steps insert different notes ...

Page 39: ...ton to return to the step selection b Transposing all selected notes Press the Select button in the left Select Edit section until the display reads Ud 000 Use the up down buttons step buttons 11 and 12 to enter the transposition value Press the Enter button to transpose or the Exit button to return to the step selection c Setting all selected notes to the same note number Press the Select button ...

Page 40: ...example the ALL ON button was used to select all empty steps 4 Inserting notes a Inserting the same note into all selected steps Press the Select button in the left Select Edit section until the left dis play reads InS The right display shows the note number you are about to insert Use the up down buttons step buttons 11 and 12 to enter the desired value Press the Enter button to insert the notes ...

Page 41: ...on to select all note tracks 3 Select the Pattern into which the current On Off track shall be copied Hold down the Select button in the right Select Edit section and make the following selections a Press step buttons 1 16 shortly to select several Patterns Step buttons 1 to 16 equal Patterns 1 to 16 if Pattern Group 1 16 is selected Patterns 17 to 32 if Pattern group 17 32 is selected Patterns 33...

Page 42: ...ction and press the step button for the displayed Rotate setting The left display goes off Rotate is deactivated for Play Mode Pattern and Play Mode Chain Selecting a Pattern for Playback 1 Activate Play Mode Pattern The right display shows the current Pattern the left display shows the current Rotate setting The left display is empty if no Rotate setting is selected 2 Selection of the 64 Patterns...

Page 43: ...Mode Pattern you need to activate Inst Note and to sel ect a Mute setting which has instrument tracks 3 13 and all note tracks muted A detailed description can be found in section 8 1 Activate Inst Note On Off 2 Selecting the active Mute setting Co 001 Co 014 SNG or SGL a Using the arrow buttons in the left Select Edit section b Hold down the Select button in the right Select Edit section and pres...

Page 44: ...pends on two things First the tempo determines how many beats quarter notes per minute are being played The SQ16 sends 24 MIDI clocks per beat to synchronize external sequencers The second thing responsible for playback speed is the Scale setting which determines how many steps are played per beat You have the fol lowing choices Scale 1 one step takes a whole note 1 step per 4 beats Scale 2 one st...

Page 45: ...the Select Edit section 2 Select the Pattern into which the current Pattern length shall be copied Hold down the Select button in the right Sel ect Edit section and make the following selections a Press step buttons 1 16 shortly to select several Patterns Step buttons 1 to 16 equal Patterns 1 to 16 if Pattern Group 1 16 is selected Patterns 17 to 32 if Pattern group 17 32 is selected Patterns 33 t...

Page 46: ...Channel Instrument tracks are used to trigger drum sounds in drum expanders Each instrument track is triggering exactly one drum instrument This is done by assigning the note number for this drum instrument to the instrument track of course also the MIDI channel must match Example Because different note numbers were assigned to them instrument tracks 1 4 trigger different instruments in a drumset ...

Page 47: ... 2 in the connected expander that s why you must set the MIDI send channel to 2 5 2 Why and how to use MIDI Sets You can create different MIDI Sets in the SQ16 and assign those to different Patterns or you can assign the same MIDI Set to all Patterns see sections 3 3 and 4 5 Depending on the settings made in the MIDI Set the Patterns use different note numbers and MIDI channels instrument tracks o...

Page 48: ...pander 2 it could happen that you get a completely different instrumentation because expander 2 uses different note numbers and maybe also different MIDI channels for its drum sounds If you want to use the same instrumentation as with expander 1 you would either have to re program MIDI Set 1 or to re program expander 2 However the SQ16 has a very elegant solution for this problem you simply create...

Page 49: ...pander 1 instrument track 1 bass drum instrument track 2 snare drum instrument track 3 hihat The instrument tracks in Pattern 2 are trigge ring instruments in expander 2 but basically the same drum instrument types I Pattern 3 both expanders are triggered instru ment track 1 plays bass drum in expander 1 instrument track 2 plays snare in expander 1 instrument track 3 plays hihat in expander 1 inst...

Page 50: ...rent value for instrument track 1 A3 4 Select one of the instrument tracks i1 i13 or one of the note tracks n14 n16 4 1 Selecting an instrument track to edit settings I Note and I Channel a Using the arrow buttons in the left Select Edit section b Keep pressed the Select button in the left Select Edit section and use step buttons 1 13 to select an instrument track 4 2 Selecting a note track to edi...

Page 51: ...ument tracks b Press step button 1 13 for at least a second to select a single instrument track c Press ALL OFF button to select instrument track 1 d Press ALL ON button to select all instrument tracks 3 Select the MIDI Set s to which you want to copy the current setting Please note that the setting is copied to all in Step 2 selected tracks Hold down the Select button in the right Select Edit sec...

Page 52: ...Press ALL OFF button to select note track 14 d Press ALL ON button to select all note tracks 3 Select the MIDI Set s to which you want to copy the current setting Please note that the setting is copied to all in Step 2 selected note tracks Keep pressed the Select button in the right Select Edit section and make the selection as fol lows a Press step buttons 1 16 shortly to select several MIDI Sets...

Page 53: ...and note track can have its own ACC mode setting ACC Low High These are the two velocity values possible values 10 127 which are used depending on the accent track if the ACC mode setting is HL If one of the delay modes is active those settings determine the shape of the echoes Each instru ment track and note track can have its own ACC Low High values Delay Repeat Number of echoes 1 16 if one of t...

Page 54: ...le steps a higher velocity and hereby a higher volume one needs simply to activate the accent for this step and track Then you assign a Step Set to the Pattern that has different settings for ACC Low and ACC High assigning Step Sets see sections 3 3 and 4 5 Examples In Pattern 1 and 2 ACC Mode HL is active for instrument tracks 1 to 5 If no accent is set for those tracks velocity value 90 is used ...

Page 55: ...ity value ACC High all active steps without active Accent are sent with velocity value ACC Low Accents for non active steps are ignored ACC Mode dn forward delay A Delay is started at an active step with active accent this step has the velocity value ACC High A number of echoes is created this number is determined by the setting Delay Repeat The velocity decreases for each echo and has the velocit...

Page 56: ...continues into the next Pattern As an example if you are triggering at the final step of a Pattern Pattern length 16 steps a delay with 5 Delay Repeats and Delay Time 1 the echoes will occur on the first 5 steps of the next Pattern If the ACC Low value is higher than the ACC High value you will get an uneven delay contour depending on the settings Each active step with or without accent uses the A...

Page 57: ... High velocity value All active steps with activated accents always use the ACC High velocity value If a delay isn t finished at the end of a Pattern it continues into the next Pattern As an example if you are triggering at the final step of a Pattern Pattern length 16 steps a delay with 5 Delay Repeats and Delay Time 1 the echoes will occur on the first 5 steps of the next Pattern If the ACC Low ...

Page 58: ...rent value for instrument track 1 A3 4 Select one of the instrument tracks i1 i13 or one of the note tracks n14 n16 4 1 Selecting an instrument track to edit settings I Note and I Channel a Using the arrow buttons in the left Select Edit section b Keep pressed the Select button in the left Select Edit section and use step buttons 1 13 to select an instrument track 4 2 Selecting a note track to edi...

Page 59: ...ument tracks b Press step button 1 13 for at least a second to select a single instrument track c Press ALL OFF button to select instrument track 1 d Press ALL ON button to select all instrument tracks 3 Select the MIDI Set s to which you want to copy the current setting Please note that the setting is copied to all in Step 2 selected tracks Hold down the Select button in the right Select Edit sec...

Page 60: ...Press ALL OFF button to select note track 14 d Press ALL ON button to select all note tracks 3 Select the MIDI Set s to which you want to copy the current setting Please note that the setting is copied to all in Step 2 selected note tracks Keep pressed the Select button in the right Select Edit section and make the selection as fol lows a Press step buttons 1 16 shortly to select several MIDI Sets...

Page 61: ...opy To This is possible for the following data types or functions Inst Step all subfunctions Note Sep all subfunctions Rotate all subfunctions Note Rec Step Pattern all subfunctions Inst Note On Off Mute settings Step Set Edit all subfunctions MIDI Set Edit all subfunctions As an example You have activated Inst Step Accent and you are editing the Accent track for instrument 1 in Pattern 1 Using th...

Page 62: ...ct Edit section and press step button 1 16 for the desired selection step button 1 8 when copying Songs 3 Activate Copy To to select the Rotates Chains MIDI Sets Step Sets or Songs to which you want to copy Keep pressed the Select button in the right Select Edit section and make your selection as follows a Use step buttons 1 16 to select several Rotates Chains MIDI Sets Step Sets step buttons 1 8 ...

Page 63: ... if Pattern group 49 64 is selected b Press step button 1 16 for at least a second to select a single Pattern c Press ALL OFF button to select the first Pattern 1 17 33 49 within the selected Pattern group d Press ALL ON button to select all Patterns within the selected Pattern group 4 3 Several Patterns were selected in step 3 as an example Patterns 1 2 3 selected Pattern group 1 16 a Copying Pat...

Page 64: ... abort 6 Repeat steps 1 5 to copy other patterns or leave Copy with Exit step button 13 Example 1 Copying Pattern 1 to all Patterns Example 2 Copying Pattern 1 to Patterns 2 16 Example 3 Copying Pattern 1 2 3 to Patterns 4 5 6 1 to 4 2 to 5 3 to 6 Example 4 Copying Pattern 1 2 3 to Patterns 24 25 26 kopieren 1 to 24 2 to 25 3 to 26 ...

Page 65: ... note tracks just the edited track becomes audible all other tracks are muted As an example you have selected Inst Step On Off If you start to edit instrument 4 you will also hear just instrument 4 If you them switch to instrument 1 you will again hear just instrument 1 This automatic Mute switching works for the following functions Inst Step all subfunctions Note Step all subfunctions Rotate Dela...

Page 66: ...in the right Select Edit section and make your selection as follows a Press step buttons 1 15 shortly to select several Mute settings b Press step button 1 15 for at least a second to select a single Mute setting c Press ALL OFF button to select Mute setting 1 d Press ALL ON button to select all Mute settings 3 Press Enter button step button 14 Press Enter again to copy or Exit step button 13 to a...

Page 67: ...r the left display shows the current Rotate setting If no Rotate setting was selected the display is empty a Activating Rotate If no Rotate setting is active keep pressed the Select button in the right Select Edit section and press step button 1 16 to select a Rotate setting for both Play Mode Pattern and Play Mode Chain b Deactivating Rotate If a Rotate setting is active keep pressed the Select b...

Page 68: ...ction and press step button 1 16 to select the desired Mute setting After releasing the Select button the LED s above the step buttons show which tracks are muted LED off and which are unmuted LED on Editing a Chain Assigning Patterns to a Chain A Chain can contain any of the 64 Patterns 1 Select Pattern group 1 16 to assign Patterns 1 to 16 to the Chain 2 Press step buttons 1 16 to assign a patte...

Page 69: ...while no Rotate setting as active The same applies to Song Step 2 however instrument tracks 2 and 3 are muted Song Step 3 uses Pattern 5 that is repeated 2 times and has instrument track 1 muted Finally in Song Step 4 Pattern 5 is used uses Rotate setting 10 and is repeated 4 times 10 2 Playing a Song Selecting Song number and Song start position 1 Activate Play Mode Song 2 Press step buttons 1 8 ...

Page 70: ... you press Start Stop the Song starts with the selected Song Step The left display shows the currently playing Song Step and the right display shows the current repeat for this Pattern If you stop playback by pressing Start Stop again and continue using the Continue button the Song will start at the same position it was stopped 10 3 Editing a Song Selecting the Song and Song step you want to edit ...

Page 71: ...pressing Enter again The right display shows the Pattern Number and simultaneously whether Rotate is active or not Please note The function Song Edit Rotate is used to select which Rotate setting is active Editing Pattern repeats 1 Activate Song Edit Repeat 2 Use the up down buttons step buttons 11 and 12 to enter how often the assigned Pattern shall be played 1 to 32 times alternatively you can u...

Page 72: ... the instruments Turning on those instruments after another is achieved by using the same Pattern for different Song Steps and programming different Mute set tings per Song Step 1 Activate Song Edit On Off 2 Use step buttons 1 16 to mute the desired tracks If the LED isn t lighting the instrument is muted Example If a bass drum is assigned to instrument 1 a hihat to instrument 2 and a snare to ins...

Page 73: ...er Song Edit Rotate Song Edit Pattern or Song Edit Repeat 2 Select the Song Step you want to copy and insert using the arrow buttons in the left Select Edit section Song Step is shown in the left display 3 Press Ins step button 16 The default insert position is the Song end the selected Song Step gets copied and inser ted at the end of the Song 4 If desired select a different insert position using...

Page 74: ...display reads 006 3 Press Ins again left display blinks Use the up down buttons step buttons 11 and 12 to enter the Song Step number at which the group you want to copy starts 4 Press Ins again right display blinks Use the up down buttons step buttons 11 and 12 to enter the Song Step num ber at which the group you want to copy ends 5 Press Enter step button 14 to copy and insert or Exit step butto...

Page 75: ...e start step of the source area using the up down buttons step buttons 11 and 12 as an example Song Step 2 4 Press again Copy From in the Select Edit section right display blinks 5 Enter the end step of the source area using the up down buttons step buttons 11 and 12 as an example Song Step 5 6 Press Copy To in the Select Edit section 7 Enter the start step of the target area using the up down but...

Page 76: ...y blinks Enter the start Song Step of the area you want to delete using the up down buttons step buttons 11 and 12 as an example Song Step 2 left display reads 002 3 Press Del again the right display blinks Enter the end Song Step of the area you want to delete using the up down buttons step buttons 11 and 12 as an example Song Step 5 left display reads 005 If you want to delete just a single step...

Page 77: ...he selected Pattern 2 Selecting a pattern a Using the arrow buttons in the right Select Edit section b Keep pressed the Select button in the right Select Edit section and press step buttons 1 16 to select a pattern within the currently selected Pattern group c Select a different Pattern group 3 Select note track n14 n16 onto which you want to record a Using the up down buttons in the left Select E...

Page 78: ...LL ON to select all steps c Press ALL OFF to deselect all steps Example Only Steps 1 8 are going to be recorded Please note You can copy the step recording track to other note tracks or other Patterns If you have selected Note Rec Step press Copy To in the Select Edit section Select target Patterns and target note tracks The whole procedure is similar to copying On Off tracks Accent tracks and Hol...

Page 79: ...nly the last played note is recorded Mode SGL STP The played note is recorded into the current step The current Step Play Position is displayed if you press Note Rec Step Is a note held over several steps it is only recorded into the first step the following steps are not recorded Example Recording of note track n14 Pattern length 8 Loop On During the first pass Steps 1 4 and 6 are recorded Step 2...

Page 80: ...ntinue to record in mode SGL STP after having made a recording in mode SGL LEG Hold is tur ned off again for all recorded Steps Example Recording of note track n14 Pattern length 8 Loop On During the first pass Steps 1 4 and 6 are recorded and simultaneously Hold is also set for Steps 1 4 and 6 After this the recording continues in mode SGL STP Steps 3 6 are recorded now and Hold is again turned o...

Page 81: ...le 1 the note F2 is recorded into all steps For example 2 the step recording tracks was changed so that only Steps 1 2 3 and 7 are recorded Steps 2 5 6 and 8 remain unchanged 5 Deleting notes only possible in modes SGL STP SGL LEG and SGL ALL Using the Overdub button you can easily delete notes during recording While you keep pressed the Overdub button the notes at the current Step Play Position a...

Page 82: ...those three notes Each time you release one key or press an additio nal key the arpeggio is immediately updated Release all keys and the arpeggio stops Use this mode for live arpeggios Rec On The arpeggio is recorded into the note track e g when using Rec On the arpeggio is both played back and simulta neously recorded into the note track If you turn off Rec On the note track contains the recorded...

Page 83: ... lowest note then a copy of the notes is transposed down by one octave and appended Then the resulting notes are assigned one after another to steps Mode Arp Ud1 The notes are sorted from the lowest to the highest note then a copy of the notes is appended in reverse direction Then the resulting notes are assigned one after another to steps Mode Arp Ud2 The notes are sorted from the lowest to the h...

Page 84: ...er another to the steps as if all steps would be enabled in the Step recording track However all non enabled steps are left empty when playing back the arpeggio the result is a pat tern with gaps Modes Arp Co1 Arp Co2 Arp Co3 Those modes are different combinations of modes Arp Up1 Arp ST2 The resulting arpeggios have a more random character 3 Finishing recording Press the Rec On or Overdub button ...

Page 85: ... recording track for Patterns 1 2 and 3 see section 11 1 4 3 Select mode Arp Ud1 for note track 14 see section 11 1 4 4 Press either Overdub or Rec On 5 Start the Chain using the Start Stop button Overdub Regardless of the currently playing Pattern you can create your arpeggio Note track 14 for each Pattern remains unchanged Rec On If you press keys on the connected keyboard the arpeggio is record...

Page 86: ...and after com pleting the Pattern it jumps back to Step 1 With each new Step the instruments which are enabled in the On Off track are sent If an instrument is set to Off a rest is played As an example for Step 1 are sent instruments I1 and I2 while instrument I3 remains silent The rhythm of a Pattern is derived from the On Off tracks for the instrument tracks and is the same for each Pattern repe...

Page 87: ...is played Step Play Position is marked dark If I4 is set to Off for a Step a rest is played Step Play Position is marked light Result During the two passes of the Pattern different rhythms are generated although the actual Pattern rhythm On Off track for I4 remains the same At the end of the third pass after 24 Steps the Step Play Position has again reached Step 1 and the same rhythm as in pass 1 ...

Page 88: ...ent Rotate settings Rotates Each Rotate holds individual settings for the Step Play Position for each instrument track and note track Additionally you can turn the function on and off individually for each instrument track and note track You can activate the Rotate function while being in Play Mode Chain or Play Mode Pattern in this case you can select one of the 16 Rotates The instrument tracks a...

Page 89: ...ts in different meters e g Instrument Track 1 play in 4 4 Instrument Track 2 in 3 4 regardless of the fixed Pattern length Creating rests Creating different rhythms for Pattern repeats 12 4 Rotate Data The following picture shows the various Rotate Data 12 5 Operation principles of the Rotate function 12 5 1 Delay Shift Reset Mode Those settings are used to create different Step Play Positions for...

Page 90: ...the Delay setting is larger than 1 the Step Play Position after starting is 1 The first Step Shift happens after Delay 1 after two Steps at Step Play Position 2 The new Step Play Position then is 2 1 Shift Steps Step 5 The Step Play Position is incremented as usual until after Delay Steps 3 Steps a new Step Shift takes place at Step Play Position 7 In theory the Step Play Position would again be i...

Page 91: ...ngs here In mode d the rhythm always repeats itself after Reset steps regardless of the Delay and Shift settings Example1 Pattern Length 8 Delay 3 Shift 2 Reset 16 Up to including step 16 the rhythm is similar to the one in example 1 for mode d After 16 steps at step 17 a Reset is performed and the whole Rotate starts over The next Reset again takes place after 16 steps at Step 33 The rhythm repea...

Page 92: ... for each Step as usual by one the Delay setting isn t used here Every 5 steps a Reset to Step 1 takes place this makes Instrument I4 react as if its Pattern Length would be 5 steps All other instruments without Rotate use the normal Pattern Length of 8 steps You can use this mode to create different meters for various tracks ...

Page 93: ...rmal output after Delay steps output stops after Reset steps a Reset takes place the SQ16 returns to normal output and the current Step Play Position is incremented by Shift steps Example 1 Pattern Length 8 Delay 8 Reset 16 Shift 0 For the first 8 steps Delay the notes play normally for the next 8 steps the output is suppressed After 16 steps Reset with Step 17 the notes start again playing and ev...

Page 94: ...ay the notes are played normally for the next 4 steps the output is suppressed After 8 steps Reset at step 9 the playing starts again additionally the Step Play Position is incremented by 2 steps now everything starts over The Step Shift generates an irregular rhythm for the next Pattern passes ...

Page 95: ...ed for Delay steps If the Shift value is larger than 0 after each Reset the Step Play Position is additionally incre mented by Shift steps Start Step Play Position Step 1 no output after Delay steps output starts after Reset steps a Reset takes place the output again is suppressed and the current Step Play Position is incre mented by Shift steps Example 1 Pattern Length 8 Delay 8 Reset 16 Shift 0 ...

Page 96: ...t 16 Shift 0 I5 mode c Delay 8 Reset 16 Shift 0 During the first pattern pass step 1 to 8 instrument I4 is played normally while the output for instrument I5 is suppres sed During the second pass I4 s output is suppressed while I5 plays normally This switches for any subsequent pattern pass ...

Page 97: ...nter button step button 14 to select the desired mode The mode is shown in the right display together with the Delay setting 12 5 2 On Off You can activate the Rotate function separately for each track this is also stored with the Rotate setting 1 Activate Rotate On Off 2 Select one of the 16 Rotate settings a using the arrow buttons in the right Select Edit section Rotate number is shown in the r...

Page 98: ...s set at the same position the note is played with an Accent Note tracks play the programmed note and also use information from the Hold track The Step Play Position hereby affects all data in an instrument track or note track As an example if the current Step Play Position is 5 On Off track Accent track Hold track and the programmed note are taken into account Now let s look at what happens when ...

Page 99: ...levant The LED s show the current Destination setting for the instrument tracks 2 Press Ins Step button until the desired Destination setting is displayed Important note If Rotate was pressed the Inst Step button is used for changing the Rotate destination and no longer used to edit the On Off track or Accent track of a Pattern To do the latter you need to exit Rotate by pressing Pattern or Inst N...

Page 100: ...played at their normal step position and so are only active at Steps 1 and 17 Theoretically there s also an Accent at Step 9 however since no note is played here nothing happens Destination 3 The notes are played at their normal step position Step 1 2 9 10 The Accents are affected by the Rotate settings and are theoretically active at Steps 1 6 11 16 21 however they are naturally only audible if a...

Page 101: ...unction irrelevant The LED s show the current Destination setting for the note tracks 2 Press Note Step button until the desired Destination setting is displayed Important note If Rotate was pressed the Note Step button is used for changing the Rotate destination and no longer used to edit the Note track of a Pattern To do the latter you need to exit Rotate by pressing Pattern or Inst Note If you ...

Page 102: ... 17 and 18 however have only an audible effect if a Note is played at the same step at Steps 1 9 and 18 Since the Rotate setting affects the On Off track the rhythm of the Pattern repeats itself every 5 Steps while the Notes repeat every 8 Steps Destination 8 The Rotate settings affect only the Note data The Rhythm and the Accents remain as if Rotate wasn t active and remain identical for each Pat...

Page 103: ...opied to all in Step 2 selected tracks Keep pressed the Select button in the right Select Edit section and make the selection as follows a Press step buttons 1 16 shortly to select several Rotates b Press step button 1 16 for at least a second to select a single Rotate c Press ALL OFF button to select Rotate 1 d Press ALL ON button to select all Rotates 4 Press Enter button step button 14 Press En...

Page 104: ... or the Pattern length Play Mode Song If a Song Step without Rotate is followed by a Song Step with Rotate an internal Reset of the Step counter takes place So the first Step using a Rotate will always have the same Rotate effects On the other hand if you have activated Rotate for all Song Steps and if you now insert a new Song Step for example after Song Step 5 or if you change the number of repe...

Page 105: ...e operating instructions and as marked on the product The power supply of the SQ16 should be unplugged from the outlet when left unused for a long period of time Care should be taken so that objects do not fall and liquids are not spilled into the enclosure of the SQ16 through openings The product should be serviced by qualified service personnel when the power supply cord has been damaged or Obje...

Page 106: ...ettings Play modes Pattern Song sequential playback of arbitrary Patterns Chain chaining Patterns Special functions recording note tracks inrealtime via MIDI In different recoed modes Step Arpeggio creation of rhythmical variations using the Rotate function Delay Echo function Controls 47 buttons Displays 62 LEDs 7 segment displays Connections MIDI In MIDI Out MIDI Thru Sync Out Connector for exte...

Reviews: