background image

LRP GRAVIT GPS VISION


2.4GHZ F.H.S.S.

μια επαναφορτιζόμενη μπαταρία, μια μπαταρία ή μεμονωμένα στοιχεία τους.  Φορτίζετε την 

μπαταρία μόνο υπό επιτήρηση.  Κατά τη φόρτιση, η μπαταρία πρέπει να βρίσκεται πάνω σε 

μη εύφλεκτη, θερμοάντοχη επιφάνεια. Εκτός αυτού, δεν επιτρέπεται να υπάρχουν εύφλεκτα ή 

πολύ εύφλεκτα υλικά κοντά στην μπαταρία.  Μην υπερβαίνετε σε καμία περίπτωση το μέγιστο 

ρεύμα φόρτισης/εκφόρτισης, που προτείνεται από την.  Σε καμία περίπτωση δεν επιτρέπεται η 

βαθιά εκφόρτιση μιας επαναφορτιζόμενης μπαταρίας NiMh/LiPo.  Η μπαταρία δεν επιτρέπεται να 

έρχεται σε επαφή με φλόγες, νερό ή άλλα υγρά.  Πραγματοποιήστε τη φόρτιση μόνο σε στεγνούς 

χώρους.  Χρησιμοποιήστε για τη φόρτιση μπαταριών LiPo μόνο φορτιστές/εκφορτιστές, που 

προβλέπονται  από  τον  κατασκευαστή.  Σε  καμία  περίπτωση  μη  χρησιμοποιείτε  φορτιστές/

εκφορτιστές NiCd/NiMH.  Δεν επιτρέπεται να υποστεί ζημιά το εξωτερικό της μπαταρίας LiPo. 

Προσέχετε επομένως οπωσδήποτε ώστε να μην υποστεί ζημιά από αιχμηρά αντικείμενα, όπως 

μαχαίρια, εργαλεία, ακμές από ανθρακονήματα ή παρόμοια.  Προσέξτε ώστε να μην υποστεί 

ζημιά η μπαταρία από πτώση, κρούση, λυγισμό ή παρόμοιες ενέργειες.  Δεν επιτρέπεται να 

χρησιμοποιείτε πλέον τις μπαταρίες που έχουν υποστεί ζημιά. Εάν οι μπαταρίες παρουσιάζουν 

σημάδια  παραμόρφωσης,  ορατές  ζημιές  ή  παρόμοια,  δεν  επιτρέπεται  να  τις  χρησιμοποιείτε 

πλέον.  Θέτετε πάντα πρώτα σε λειτουργία τον πομπό πριν θέσετε σε λειτουργία το δέκτη ή το 

ρυθμιστή ταχύτητας. Ο δέκτης θα μπορούσε να λάβει σήματα παρεμβολής ή να ενεργοποιήσει το 

ρυθμιστή ταχύτητας, να επιταχύνει πλήρως και να προκαλέσει ζημιά στο μοντέλο σας. Κατά την 

απενεργοποίηση βεβαιωθείτε ότι ακολουθείτε την αντίστροφη σειρά. Απενεργοποιήστε πρώτα το 

δέκτη και το ρυθμιστή ταχύτητας και στη συνέχεια τον πομπό. Δεν επιτρέπεται να χρησιμοποιείτε 

ταυτόχρονα διαφορετικούς τύπους μπαταριών ή καινούργιες και παλιές μαζί.  Μην κλείνετε ποτέ 

τον ανεμιστήρα ή τις σχισμές ψύξης του προϊόντος. Φροντίστε να υπάρχει καλή κυκλοφορία 

αέρα γύρω από το προϊόν.  Συνδέετε σχολαστικά όλα τα εξαρτήματα του εξοπλισμού. Εάν οι 

συνδέσεις  αποσυνδεθούν  λόγω  κραδασμών,  μπορεί  να  χάσετε  τον  έλεγχο  του  μοντέλου.  

Ο  κατασκευαστής  δε  φέρει  ευθύνη  για  ζημιές  που  προκαλούνται  λόγω  παράβλεψης  των 

υποδείξεων ασφαλείας και των προειδοποιήσεων. Χρησιμοποιείτε μόνο γνήσια ανταλλακτικά.  

ungarisch

Nem játék. Nem alkalmas 14 évnél fiatalabb gyermekek számára. Tárolja a terméket úgy, hogy 

kisgyermek ne férhessen hozzá. Kötelezően tartsa be a következő utasításokat, másképp a ter

-

mék károsul és ez kizárja a garancia-igényeket. Ezen utasítások figyelmen kívül hagyása esetén 

anyagi és személyi károk keletkezhetnek és fennáll a súlyos sérülések veszélye! Ne hagyja a 

terméket felügyelet nélkül, amíg be van kapcsolva, üzemel, vagy áramforráshoz van csatlako-

ztatva. Meghibásodás esetén tűz keletkezhet a termékben vagy a környezetében. Kerülje el a 

termék hibás csatlakoztatását vagy a polaritás felcserélését. Minden kábelt és csatlakoztatást 

jól kell szigetelni. A rövidzárlatok adott esetben tönkretehetik a készüléket. Ez a termék vagy 

más elektronikus alkatrész sohasem kerülhet kapcsolatba vízzel, olajjal, üzemanyagokkal vagy 

más villamosságvezető folyadékokkal, mivel ezek tartalmazhatnak olyan ásványokat, amelyek 

korrodálhatják az áramköröket. Ha a termék ilyen anyagokkal kerül kapcsolatba, azonnal meg 

kell állítani és alaposan meg kell szárítani. Amikor nem használja a terméket, vegye ki az ak-

kut ill. kapcsolja le a terméket az árramforrásról. Kerülje az akku ill. egyes cellák rövidzárlatát, 

túltöltődését vagy hibás polarizációját. Ez tüzet vagy robbanást okozhat.  Sohase nyissa ki az 

akkut, az elemet, vagy egyes cellákat  Csak felügyelet mellett töltse fel az akkut.  Töltéskor 

helyezze az akkut tűz- és hőálló alapra. Az akku közelében nem lehetnek éghető vagy könnyen 

gyúlékony tárgyak.  Semmi esetre se lépje túl a által ajánlott maximális töltő/kisütő áramot.  Sem

-

miképpen nem szabad NiMH/LiPo akkut teljesen lemeríteni.  Az akku nem érintkezhet tűzzel, 

vízzel, vagy más folyadékkal.  Csak száraz helyiségben töltse fel az akkut.  A LiPo akkuk feltöl

-

téséhez csak a megfelelő akkutípus számára specifikált töltő-kisütő készülékeket használjon. 

Semmiképpen ne használjon NiCd/NiMH töltő-kisütő készülékeket.  A Li/Po akkuk külső tokját 

nem szabad megsérteni. Mindenképpen figyeljen tehát arra, hogy éles tárgyak, pl. kés, szerszá

-

mok, szénrostszegélyek stb. ne károsíthassák az akkut.  Figyeljen arra, hogy az akku ne káro-

sodjon leesés, ütés, hajlítás vagy hasonló által.  Hibás cellákat nem szabad tovább használni. 

Ha a cellákon alakváltozást, látható károsodást vagy hasonlót tapasztal, ne használja tovább.  

Mindig előbb az adót kapcsolja be, mielőtt bekapcsolná a vevőt vagy a sebességszabályozót. 

A vevő hibás jeleket vehet, teljes sebességre kapcsolhat és károsíthatja az ön modelljét. Kikap

-

csoláskor figyeljen a fordított sorrende. Kapcsolja ki előbb a vevőt és a sebességszabályozót, 

utána az adót. Sohase használjon egyidejűleg különböző elemtípusokat vagy új és használt 

elemeket.  Sohase zárja el a ventillátort vagy a termék szellőző nyílásait. Biztosítsa mindig a 

termék jó levegőkeringését.  Gondosan csatlakoztassa a berendezés öszzes alkatrészét. Ha 

a csatlakozások a vibráció folytán kilazulnak, elveszítheti az uralmát a modell fölött.  A gyártó 

nem vállal felelősséget a biztonsági utasítások és figyelmeztetések be nem tartásából eredő 

meghibásodásokért. Csak eredeti cserealkatrészeket használjon.  

türkisch

Oyuncak  değildir.  14  yaş  altı  çocuklar  için  uygun  değildir  Ürünü  çocukların  ulaşamayacağı 

yerde muhafaza ediniz. Ürününüzün zarar görmesini engellemek üzere ve garanti kapsamında 

değerlendirilmesi  için  aşağıdaki  talimatlara  mutlaka  uyunuz.  Bu  talimatlara  uyulmaması  ha

-

linde can ve mal kaybına ve ağır yaralanmalara yol açılabilir!  Ürünü, devrede veya işletimde 

olduğunda ya da bir akım kaynağına bağlı olduğu sürece asla denetimsiz bırakmayınız. Bir 

arıza meydana geldiğinde söz konusu arıza, ürünün kendisinde veya çevresinde alevlenmeye 

yol açabilir. Ürünün yanlış bağlanmasını ya da yanlış kutuplanmasını önleyiniz. Bütün kablo ve 

bağlantılarda iyi bir izolasyon uygulanmalıdır. Kısa devreler bazı koşullarda ürüne zarar vere

-

bilir. Bu ürün ya da diğer elektronik bileşenler asla su, yağ, yakıt ya da başka elektrik iletkeni 

sıvılarla temas etmemeli, aksi halde mineral içerebilecekleri için elektronik kumanda devresinde 

korozyona neden olabilirler. Bu maddelerle temas halinde derhal işletimi ayarlamalı ve ürünü 

tamamen  kurutmalısınız.  Ürününüz  kullanılmadığı  zamanlar  daima  ürününüzden  bataryayı 

çıkartın ve/ veya ürünü akım kaynağından ayırın. Bataryada ya da münferit hücrelerde kısa 

devreyi, aşırı şarj edilmesini ve yanlış kutuplanmayı önleyiniz. Bu, yangın oluşturabilir ya da 

patlamaya yol açabilir.  Asla bir bataryayı, bir pili ya da münferit bir hücreyi açmayınız.  Bataryayı 

ancak denetim altında şarj ediniz.  Şarj işlemi esnasında batarya yanmayan, ısıya dayanıklı bir 

altlık üzerinde bulunmalıdır. Bunun dışında bataryanın yakınlarında yanıcı ya da kolay alevlenir 

nesneler bulunmamalıdır.  Tarafından tavsiye edilen maksimum şarj/ deşarj akımını hiçbir şartta 

aşmayınız.  Bir NiMH/LiPo batarya hiçbir şartta aşırı deşarj edilmemelidir.  Batarya ateş, su ya 

da diğer sıvılarla temas etmemelidir.  Şarj işlemini sadece kuru odalarda gerçekleştirin.  LiPo 

bataryaların şarj edilmesinde sadece bu batarya tipi için özelleştirilen şarj/ deşarj cihazlarını 

kullanınız. Asla NiCd/NiMH şarj/ deşarj cihazlarını kullanmayınız.  LiPo bataryanın dış yüzeyi 

hasar görmemelidir. Bu nedenle muhakkak bıçak, el aleti, karbon fiber köşelerin ya da ben

-

zeri keskin nesnelerin bataryaya hasar vermesini önleyin.  Bataryanın düşerek, vurularak, bü

-

külerek veya benzer şekilde hasar görememesine dikkat edin.  Hasar görmüş hücreler tekrar 

kullanılmamalıdır. Hücrelerde şekil bozukluğu, görsel hasar ya da benzer bir durum söz konusu 

ise bunları tekrar kullanmayınız.  Alıcıyı ya da sürüş regülatörünü çalıştırmadan önce daima 

vericinizi devreye alın. Alıcı arıza sinyalleri alabilir, tam gaz verebilir ve modele zarar verebilir. 

Kapatırken ters sıralamayı dikkate alın. Önce alıcıyı ve sürüş regülatörünü kapatın, sonra vericiyi 

kapatın. Aynı olmayan pil tipleri ya da yeni ve kullanılmış piller beraber kullanılmamalıdır.  Asla 

ürünün fanını ya da soğutma deliğini bloke etmeyin. Ürünün çevresinde iyi bir hava sirkülasyonu 

sağlayın.  Donanımın bütün parçalarını dikkatlice bağlayın. Şayet bağlantılar vibrasyondan kay

-

naklanarak çözülürlerse, model üzerindeki kontrol kaybedilebilir.  Üretici, emniyet talimatlarının 

ve  uyarıların  dikkate  alınmamasından  kaynaklanan  hasarlardan  sorumlu  tutulamaz.  Sadece 

orijinal yedek parça kullanınız.  

tschechisch

Toto není hračka. Nevhodné pro děti do 14 let. Uchovávejte výrobek mimo dosah malých dětí. 

Bezpodmínečně dodržujte následující pokyny, aby nemohlo dojít k poškození výrobku a za

-

niknutí záruky. Nedodržování těchto pokynů může vést k věcným škodám a vážným zraněním 

osob!  Výrobek nikdy nenechávejte bez dohledu, pokud je zapnutý, je v provozu nebo je připojen 

ke zdroji proudu. V případě závady by mohlo dojít k požáru výrobku nebo jeho okolí. Vyvarujte se 

nesprávného připojení nebo záměny pólů výrobku. Všechna připojení a kabely musejí být dobře 

izolované. Zkraty mohou za určitých okolností zničit výrobek. Tento výrobek nebo jiné elektro

-

nické součásti nesmějí nikdy přijít do styku s vodou, olejem, pohonnou látkou nebo jinými elektri

-

cky vodivými tekutinami, protože mohou obsahovat minerály, které mohou způsobit korozi elek

-

tronických obvodů. Při kontaktu s těmito látkami musíte ihned přerušit provoz a výrobek pečlivě 

vysušit. Vždy vyjměte baterii z výrobku, resp. odpojte výrobek od zdroje proudu, když se výrobek 

nepoužívá. Vyvarujte se zkratu, přebití a záměny pólů baterie nebo jednotlivých článků. Toto 

může vést ke vzniku požáru nebo výbuchu.  Nikdy neotevírejte baterii nebo jednotlivé články.  

Baterii nabíjejte pouze pod dohledem.  Během nabíjení musí být baterie umístěna na nehořlavé, 

teplovzdorné podložce. Kromě toho se v blízkosti baterie nesmějí nacházet žádné hořlavé nebo 

snadno vznětlivé předměty.  Za žádných okolností nepřekračujte maximální nabíjecí/vybíjecí 

proud, který je doporučen společností.  Za žádných okolností nesmí být NiMH/LiPo baterie hlu

-

boce vybita.  Baterie nesmí přijít do styku s ohněm, vodou nebo jinými tekutinami.  Nabíjení se 

smí provádět pouze v suchých prostorách.  K nabíjení LiPo baterií používejte pouze nabíječky/

vybíječky, které jsou určené pro tento typ baterie. Nikdy nepoužívejte nabíječky/vybíječky pro 

NiCd/NiMH  baterie.    Vnější  plášť  LiPo  baterie  nesmí  být  poškozený.  Bezpodmínečně  tedy 

dbejte na to, aby baterii nemohly poškodit ostré předměty, jako nože, nástroje, hrany s uhlí

-

kovými  vlákny  apod.    Dávejte  pozor,  aby  se  baterie  nepoškodila  v  důsledku  pádu,  nárazu, 

ohnutí apod.  Poškozené články se nesmějí dále používat. Pokud by články byly zdeformo

-

vané, viditelně poškozené apod., nesmějí se už používat.  Vždy nejprve zapněte vysílač, než 

zapnete přijímač nebo regulátor rychlosti. Přijímač by mohl zachytit rušivé signály, spustit plný 

plyn a poškodit váš model. Při vypínání dodržujte postup v opačném pořadí. Nejprve vypněte 

přijímač a regulátor rychlosti, poté vypněte vysílač. Nesmí se používat různé typy baterií nebo 

nové a použité baterie najednou.  Nikdy neblokujte ventilátor nebo ochlazovací drážky výrobku. 

Zajistěte dobrou cirkulaci vzduchu okolo výrobku.  Připojte pečlivě veškeré díly vybavení. Pokud 

se spoje uvolní v důsledku vibrací, může se model vymknout vaší kontrole.  Výrobce nemůže 

být činěn odpovědným za škody, které vznikly v důsledku nedodržování bezpečnostních pokynů 

a varování. Používejte pouze originální náhradní díly.  

slowenisch

Ni igrača. Ni primerno za otroke pod 14. letom. Proizvod hranite izven dosega otrok. Obvezno 

upoštevajte sledeča opozorila, ker lahko sicer pride do uničenja proizvoda in izključitve garan

-

cije. Nedodržování těchto pokynů může vést k věcným škodám a vážným zraněním osob!  Pro

-

izvoda ne smete nikoli pustiti brez nadzora, medtem ko je vklopljen, obratuje ali je priključen na 

elektriko. V primeru okvare lahko pride do vžiga na proizvodu ali v njegovi okolici. Preprečite 

napačno priključitev proizvoda ali priključitev z obrnjeno polariteto. Vsi kabli in povezave morajo 

biti dobro izolirani. Kratki stiki lahko morebiti uničijo proizvod. Ta proizvod ali druge elektronske 

komponente ne smejo nikoli priti v stik z vodo, oljem, gorivi ali drugimi električno prevodnimi 

tekočinami, saj lahko slednje vsebujejo minerale, ki lahko poškodujejo elektronsko vezje. V pri

-

meru stika s tovrstnimi snovmi morate takoj prekiniti obratovanje in proizvod skrbno posušiti. 

Kadar proizvoda ne uporabljate, vedno odstranite baterije oz. ga izklopite iz elektrike. Preprečite 

kratek stik, prenapolnjenost in obrnjeno polariteto polnilne baterije ali posameznih celic. Slednja 

lahko povzroči požar ali eksplozijo.  Polnilne baterije, baterije ali posamezne celice nikoli ne 

odpirajte.  Polnilno baterijo polnite le pod nadzorom.  Med polnjenjem se mora polnilna baterija 

nahajati na negorljivi, na toploto odporni podlagi. Razen tega se v njeni bližini ne smejo nahajati 

gorljivi ali lahko vnetljivi predmeti.  V nobenem primeru ne prekoračite maksimalnega polnil

-

nega/razelektritvenega toka, ki ga priporoča podjetje.  NiMH/LiPo polnilna baterija se ne sme 

v nobenem primeru globoko izprazniti.  Polnilna baterija ne sme priti v stik z ognjem, vodo ali 

drugimi tekočinami.  Polnite le v suhih prostorih.  Za polnjenje LiPo polnilnih baterij uporabljajte 

le polnilnike, ki jih proizvajalec dopušča za ta tip baterij. V nobenem primeru ne smete uporabljati 

NiCd/NiMH polnilnikov!  Zunanja obloga LiPo polnilne baterije ne sme biti poškodovana. Zato 

obvezno pazite, da baterije ni možno poškodovati z ostrimi predmeti, kot so noži, orodja, robovi iz 

grafitnih vlaken ali podobno.  Pazite, da se polnilna baterija ne poškoduje zaradi padca, udarca, 

krivljenja ali podobnega.  Poškodovanih celic ne smete več uporabljati. Če na celicah opazite de

-

formacije, vidne poškodbe ali podobno, jih ne smete več uporabljati.  Pred vklopom sprejemnika 

ali regulatorja hitrosti vedno najprej vklopite oddajnik. V nasprotnem primeru lahko sprejemnik 

ulovi moteče signale, sproži polno hitrost in poškoduje vaš model. Pri izklopu se obvezno držite 

obratnega vrstnega reda. Najprej izklopite sprejemnik in regulator hitrosti, nato pa oddajnik. Ne 

uporabljajte različnih tipov baterij hkrati in ne mešajte novih in rabljenih baterij.  Nikoli ne blokirajte 

ventilatorja ali hladilnih rež na proizvodu. Poskrbite za dobro cirkulacijo zraka v okolici.  Skrbno 

priključite vse dele opreme. Če se povezave zaradi vibracij zrahljajo, lahko izgubite nadzor nad 

svojim modelom.  Proizvajalec ne odgovarja za škodo, povzročeno zaradi neupoštevanja var

-

nostnih navodil in opozoril. Uporabljajte le originalne nadomestne dele.  

schwedisch

Ingen leksak. Lämpar sig inte för barn under 14 år. Förvara produkten utom räckhåll för små 

barn. Beakta ovillkorligen följande hänvisningar, eftersom dessa punkter kan förstöra din produkt 

och ogiltiggöra garantin. När dessa hänvisningar inte beaktas kan detta leda till sak- och per-

sonskador samt allvarliga olycksfall!  Lämna aldrig produkten utan övervakning, så länge som 

den är inkopplad, i drift eller förbunden med en strömkälla. Om det skulle uppstå en defekt, så 

kan detta orsaka att produkten eller dess omgivning tar eld. Undvik en felaktig anslutning eller 

att förväxla polerna på produkten. Alla kablar och förbindningar måste vara ordentligt isolerade. 

I vissa fall kan kortslutningar förstöra produkten. Denna produkt eller andra elektroniska kom-

ponenter får aldrig komma i kontakt med vatten, olja, drivmedel eller andra elektriskt ledande 

vätskor, eftersom de kan innehålla mineralier som kan orsaka att de elektroniska styrkretsarna 

korroderar. Vid kontakt med dessa ämnen måste du genast avsluta driften och omsorgsfullt torka 

produkten. Ta alltid ut ackumulatorn ur din produkt alternativt skilj produkten från strömkällan, när 

produkten inte används. Undvik att kortsluta, överladda och omkasta polerna på ackumulatorn 

eller enstaka celler. Detta kan leda till att det uppstår en brand eller en explosion.  Öppna aldrig 

en ackumulator, ett batterie eller enstaka celler.  Ladda ackumulatorn endast under övervak-

ning.  Under laddningen måste ackumulatorn befinna sig på ett icke brännbart, värmebeständigt 

underlag. Dessutom får det inte finnas några brännbara eller lätt antändliga föremål i närheten 

av produkten.  Överskrid under inga omständigheter den maximala laddnings -/urladdnings-

strömmen som rekommenderas av.  NiMH/LiPo-ackumulatorn får under inga omständigheter 

laddas ur komplett.  Ackumulatorn får inte komma i kontakt med eld, vatten eller andra vätskor.  

Genomför laddförloppet endast i torra lokaler.  För att ladda LiPo-ackumulatorer, använd endast 

laddare/urladdare som har specifierats för denna typ av ackumulator. Använd i inget fall NiCd/

NiMH laddare/urladdare.  LiPo-ackumulatorns yttre hölje får inte skadas. Ge alltså ovillkorligen 

WARNING NOTES

WARNING NOTES

44

Summary of Contents for gravit GPS

Page 1: ...USER GUIDE LRP GRAVIT GPS VISION 2 4GHZ F H S S ...

Page 2: ...SION Check you camera mount 14 ONLY FOR GRAVIT GPS VISION PRO Gimbal calibration 14 Mount your propellers 15 ATTENTION Check wireless status of your Gravit s camera 15 COMPASS CALIBRATION 16 TAKE OFF PREPARATIONS 17 TAKE OFF 17 BASIC FLIGHT OPERATION 18 Throttle control 18 Yaw control rudder 18 Pitch control elevator 18 Roll control aileron 18 Keep an eye on your status LED 19 LANDING YOUR GRAVIT ...

Page 3: ...mbal Tweaking 32 THE STANDARD CAMERA MOUNT 32 REPLACING PROPELLERS 33 SOFTWARE 33 Disclaimer 33 AutoPilot 34 Frame 34 System 35 Geo Fencing 35 Voltage alarms 35 EndPoint 36 ModeMap 36 Firmware 37 Transmitter calibration 37 IMU Gyro calibration 38 iSmart DV 38 MANUAL IMU AND TX CALIBRATION 38 TROUBLESHOOTING GUIDE 39 SPARE PARTS 40 REPAIR PROCEDURES LIMITED WARRANTY 42 WARNING NOTES 42 GENERAL NOTE...

Page 4: ...LRP GRAVIT GPS VISION 2 4GHZ F H S S 4 ...

Page 5: ...ring your flight Since your Gravit GPS is a very complex quadrocopter with many functions we strongly advise to read through this manual carefully in order to understand all the functions and to get the maximum fun out of your Gravit GPS INTRODUCTION 1x Gravit GPS quadrocopter 1x 8 channel 2 4GHz transmitter 4x black propellers 4x white propellers spare 1x Full HD WiFi action cam 1x Standard mount...

Page 6: ... Altitude Hold GPS mode Transmitting frequency 2 4GHz Flight controller configuration yes Battery technology LiPo Propeller 9443 self tightening Battery capacitiy 3300mAh PLEASE NOTE The Gravit GPS ships in 2 different kinds of configurations a 220720 Gravit GPS Vision Gravit with action cam b 220721 Gravit GPS Vision Pro Gravit with action cam and 2 axis gimbal Depending on the version you have b...

Page 7: ...his LiPo has a capacity of 4400 mAh which will give you extra 4 6 minutes of flight depending on your Gravit version and flying style The tuning LiPo will give you a flight time of awesome 14 18 minutes The order no of the tuning LiPo is 430060 you can buy it from your LRP retailer Flight speed When you first fly your Gravit you may note that the flight speed seems rather slow This is because the ...

Page 8: ... will show this by a continuous yellow light Try to move your Gravit to a different location If the light continues to shine yellow do a compass calibration according to the manual chapter Compass calibration PLEASE NOTE Also check the connector that goes into the compass module on your Gravit s landing feet If this connec tor is not properly seated into the compass module s socket this will also ...

Page 9: ...USB Port Battery compartment WiFi camera Compass module Status LED THE GRAVIT GPS Propeller Brushless Motor Landing feet Battery compartment Camera mount WiFi camera Position lights 9 ...

Page 10: ...eturn to Home don t work 2 blue blinks signalize BALANCE MODE with full satellite lock 1 green blink signalizes ALTITUDE MODE with full satellite lock AND ALL control sticks CENTERED NO MOVEMENT 2 green blinks signalize GPS MODE with full satellite lock AND ALL control sticks CENTERED NO MOVEMENT 3 green blinks signalize AOC MODE HEADLESS CIRCULAR POI CRUISE with full satellite lock AND ALL contro...

Page 11: ...ng the throttle stick forwards the Gavit evenly increases the rotation speed of its two rear rotors By doing so the two rear rotors generate a stronger ascending force than the two front ones and therefore your Gravit pitches forward and flies in the correspondent direction QUADROCOPTER MOVEMENT Movement around vertical axis Yaw Movement around lateral axis Pitch Movement around longitudinal axis ...

Page 12: ...wly and the TX is emitting a continuous beep sound Step 2 The red power LED of your TX blinks faster the bee ping sound stops again Shortly after the TX switches off You should make sure that you replace the batteries as soon as the first low voltage warning kicks in Don t panic At this point in time you will have plenty of time left to safely land your Gravit in case you should be flying at this ...

Page 13: ...function SWA Pos SWB Pos Active flight mode 0 0 BALANCE Mode 0 1 ALTITUDE Mode 0 2 GPS Mode 1 Any AOC Mode 2 Any RTH Those switch assignments may be changed using the soft ware for details check chapter Software For a detailed description of the different flight modes please see chapter The flight modes Charge your flight battery Before the first operation please charge your flight battery To do s...

Page 14: ...p your gimbal without a camera attached to it Otherwise you may seriously dama ge or even destroy the gimbal Also make sure that your Gravit is standing on an even surface and is not moved while performing the gimbal calibration 4 Connect the flight battery to your Gravit and let it initialize 5 When looking on the gimbal from the left side you will see a small black button on the left side of the...

Page 15: ...tors in place Please check the screws on a regular basis Take special care of the motor screws and make sure that they are always suffi ciently tightened Also make sure to tighten the motor screws in a way that the motor will not grind against the plastic arms surrounding it You can check this by manually spinning the motor with you hand Do NOT overt tighten the screws by using too much force just...

Page 16: ...ocess has been finished during initialization the status LED will continuously blink BLUE GREEN RED PAUSE repeat and the Gravit is blinking either blue or blue red SWA SWB Pos 0 2 Wiggle the right 3 position switch SWB of your transmit ter completely up and down quickly until the Status LED of your Gravit GPS is blinking green rapidly leave SWB in top POS 0 after doing so 3 Grab the Gravit on the ...

Page 17: ... should be familiar with the status LED and its blink codes Both of your transmitter switches should be in Pos 0 top Experienced pilots can handle this differently on their own risk Your throttle control stick left stick should be completely down The WiFi of your camera MUST BE disabled You should be comfortable to fly quadrocopters and in case you are NOT you should have someone at your side who ...

Page 18: ...and 150 m in horizontal distance so keep this in mind when flying However those limits can be changed within the software of your Gravit details see chapter Software Throttle control By moving the left control stick up and downwards you control the thrust of your Gravit The lower the stick the lower the thrust and vice versa Depending on the amount of thrust you are providing with your throttle co...

Page 19: ... moment the low voltage warning is triggered the Gravit behaves differently For BALANCE and ALTITUDE mode the Gravit will CONTINUE to fly until the second low voltage warning kicks in When flying in GPS mode the Gravit will instead initiate a Return to home and fly back to its take off position When the second warning kicks in for BALANCE and ALTITUDE mode the Gravit will either return to home OR ...

Page 20: ...ravit suddenly drifts away in any direction because of a gust of wind for example you won t get hit by the Gravit because it will fly drift OVER your head b In case that there should be a noticeable or even strong wind Approach the Gravit with the wind in your BACK NOT in your face By doing so you can avoid the Gravit is accidentally being pushed TOWARDS you by the wind Instead if you approach it ...

Page 21: ...acquired and a new home point was recor ded the Return to Home maneuver may result in the Gravit flying towards an OLD recorded home point This home point may be far away from your last take off position and the Gravit may seem to fly away from your instead of towards you If at any time your feel uncomfortable with the auto landing or notice some unexpected behaviour of the Gravit cancel the Retur...

Page 22: ...ntation in the sky compared to an airplane for example Your Gravit is equipped with very bright LEDs on the bottom side of each arm The front LEDs have green color the rear LEDs have red color Keep this in mind in case you should loose control over the orien tation of your Gravit When you are too far away or when flying in very bright daylight against the sun you will notice that the LEDs are not ...

Page 23: ...ood for flying fast as the flight control ler will not limit the angle of tilt as restrictively as it is done in GPS mode for example Control of your Gravit is just normal standard all stick inputs work like described in the chapter Basic flight operation PLEASE NOTE This mode may NOT be assigned to any other channel switch position it will ALWAYS be selected by SWA 0 and SWB 0 ALTITUDE mode SWA 0...

Page 24: ...ng that your current height is kept In order to enter GPS position hold you have to let go off the right control stick and bring the throttle stick to center neutral Depending on the wind conditions your Gravit may not always manage to stay on spot 100 but it will try its best to compensate for any unwanted change in position as good as possible Return to Home mode RTH SWA 2 and SWB ANY The Return...

Page 25: ... you have to push the right control stick to the right which equals clockwise to slow down the flight you have to push the stick to the left which equals counter clockwise If you slow down the flight the Gravit will eventually come to a standstill and if you keep on pushing the stick into the same direction the Gravit will start to fly COUNTER CLOCKWISE Moving throttle up and down increases and de...

Page 26: ...r decrease the speed and it can me moved to the left or right to yaw turn into the appropriate direction right control stick left and right replaces the function of left control stick left and right To exit CRUISE mode simply switch to a different flight mode other than AOC MANUAL mode PLEASE NOTE When switching to MANUAL mode the status LED of your Gravit will give out NO signal at all If sticks ...

Page 27: ...ption in the options settings menue see Camera settings as well as for taking a picture and to start and stop recor ding a movie In addition it enables and disables the WiFi of your came ra when it is being pressed and held for 2 seconds see WiFi function 3 UP and DOWN button The UP and DOWN buttons on the side of the camera have function to go up and down when you are in a menu thus changing your...

Page 28: ...Color LCD The color LCD is used for making easy adjustments to the camera and for playing back recorded video or photo Charging the camera Before you can use the camera we advise to charge it fully first To charge the camera simply connect the provided Micro USB cable or any other suitable cable you may have at hand to the camera and the power supply Put the power supply into a power outlet The ca...

Page 29: ...e on off mode button once Camera settings To enter the camera settings press the DOWN button when the camera is on There are two settings screens available One is marked with a camera icon That is the screen you are in by default The other is marked with a gear icon To switch to this screen press the OK button DIRECTLY after you have entered the settings menue by pressing the DOWN button You can s...

Page 30: ... in the second row is the password for the wireless access point that the camera is making up and which you will have to enter when connecting to the camera using your smart phone this is 1234567890 as default LRP does NOT recommend to delete or edit this file unless you know what you are doing The other drive contains the data of the Micro SD card you have put into the camera When you browse the ...

Page 31: ...ate You should NOT over tighten the 2 screws that hold the camera with force as this could damage the camera s housing But the camera should be kept safe in its cage Can the gimbal move freely Check if the gimbal can roll freely before turning on the Gravit Is the gimbal attached tightly to the bottom side of the copter Are all 4 silicone dampers correctly sitting in the mounting plates holes Are ...

Page 32: ...f your gimbal depends on many factors and you will notice that the video footage is not always exactly the same quality wise For example things like environmental influences like tempe rature and wind have a strong impact on the performance of your gimbal and thus on the quality of your video footage In order to get the best out of your gimbal you can experiment with the following settings 1 The 4...

Page 33: ...is app is available for Android and iOS and can be downloaded either from the Google Play Store or from Apple s app store This app must be installed on your smartphone if you want to access your Gravit s action cam via wireless LAN see section iSmart DV in this chapter PLEASE NOTE DISCLAIMER The iSmart DV app and the Flight Tools 2 0 software and its authors are not associated with LRP electronic ...

Page 34: ...o your inputs If the values are set TOO HIGH then the Gravit becomes twitchy and nervous If the values are set TOO LOW the Gravit will become sluggish and and unresponsive LRP recommends leaving the settings at default In case you should wish to experiment with the settings do so carefully and change ONLY ONE value at a time The go out and fly your Gravit to get a feel for the results Don t forget...

Page 35: ...untries or areas the maximum flight height may be restricted Please check with your local authorities for details b When flying the Gravit too far away you may loose it out of sight In this case initiate a Return to home RTH by switching the SWA of your TX to the lowest Pos 2 c In some countries you may NOT allowed to fly the Gravit out of your line of sight So if you fly it too far away you might...

Page 36: ...nd SWB switches as shown in the diagramme below SWA Pos SWB Pos Active selected channel 0 0 CH5 A 0 1 CH5 B 0 2 CH5 C 1 ANY CH6 B 2 ANY CH6 C As you can see you will have the 3 channels 3 switch positions CH5 B CH5 C and CH6 B for free assignment LRP s advise on how to handle flight mode assignments Basically the flight mode assignment should be planned carefully in advance and according to your o...

Page 37: ...se upgrades should become available for your Gravit they will be distributed in other form and will be availa ble from the LRP homepage along with a description of HOW to do the firmware upgrade Again do NOT use the upgrade button in the software Data The Data tab is being used to keep track on the sensors of your flight controller and for calibrating your IMU as well as your transmitter Transmitt...

Page 38: ... detail Depending on the language settings of your smartphone the app will adjust its language to match the smartphone s langu age if possible Although doing IMU and TX calibration via the Flight Tools 2 0 software see chapter Software is the most convenient way to get the job done it could be necessary to do those cali brations manually that is without the software from time to time When you are ...

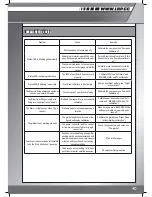
Page 39: ...e Compass Calibration The Gravit is drifting strongly or is flying into any direction by herself Probably the transmitter is not correctly calibrated Calibrate your transmitter see Soft ware and MANUAL IMU and TX calibration The Gravit is tipping over when I try to take off Probably you are not applying enough throttle Make sure you are in BALANCE Mode and apply throttle very quickly upon take off...

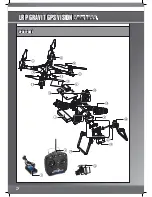
Page 40: ...LRP GRAVIT GPS VISION 2 4GHZ F H S S SPARE PARTS 1 11 11 12 12 14 18 7 8 6 13 16 5 19 21 20 9 10 22 15 4 3 40 ...

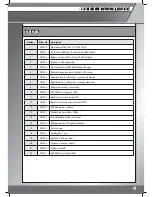
Page 41: ...counter clockwise 8 222847 Propeller black 1x clockwise 1x counter clockwise 9 222848 Cage for Action cam incl mount 10 222849 ESC 20A for motor green LEDs 11 222850 Brushless motor clockwise CW 12 222851 Brushless motor counter clockwise CCW 13 222852 GPS module incl compass 14 222853 Wireless Lan Action Cam 1080p 15 222854 2 axis brushless gimbal incl mount 16 222855 Shielding pad for GPS module...

Page 42: ...er ausschalten dann Sender ausschalten Ungleiche Batterietypen oder neue und gebrauchte Batterien dürfen nicht zusammen verwendet werden Blockieren Sie niemals den Lüfter oder die Kühlschlitze des Produkts Sorgen Sie für gute Luftzirkulation um das Produkt Schließen Sie sämtliche Teile der Ausrüstung sorgfältig an Falls sich die Verbindungen durch Vibrationen lösen können Sie die Kontrolle über da...

Page 43: ... de ventilación o de refrigeración del aparato Asegúrese de que el aparato disponga de una buena circulación de aire Conecte todos los elementos del equipo minuciosamente En caso de que las conexiones se soltaran por causa de las vibraciones es posible que pierda el control sobre el modelo El fabricante no asume la responsabilidad por daños ocasionados por la inobservancia de las medidas de seguri...

Page 44: ...ğlantılar vibrasyondan kay naklanarak çözülürlerse model üzerindeki kontrol kaybedilebilir Üretici emniyet talimatlarının ve uyarıların dikkate alınmamasından kaynaklanan hasarlardan sorumlu tutulamaz Sadece orijinal yedek parça kullanınız tschechisch Toto není hračka Nevhodné pro děti do 14 let Uchovávejte výrobek mimo dosah malých dětí Bezpodmínečně dodržujte následující pokyny aby nemohlo dojít...

Page 45: ...i doar piese de schimb originale portugiesisch Nenhum brinquedo Não apropriado para crianças com menos de 14 anos Mantenha o produto fora do alcance de crianças pequenas Preste muita atenção às seguintes indicações visto poderem destruir o produto e anular a garantia A não observância destas indicações pode causar danos materiais e pessoais assim como ferimentos graves Mantenha o produto sob vigil...

Page 46: ...ą ar greičio reguliatorių Imtuvas gali sugauti trukdžio signalus įjungti didžiausią pagreitėjimą ir sugadinti Jūsų modelį Kai išjungiate būtinai darykite tai atvirkštine tvarka Pirmiausia išjunkite imtuvą ir greičio reguliatorių tada išjunkite siųstuvą Tuo pačiu metu nenaudokite skirtingų tipų baterijų ir nemaišykite naudotų su naujomis Niekada neužblokuokite gaminio ventiliatoriaus arba aušinimo ...

Page 47: ...asutatud patareisid Ärge kunagi blokeerige toote ventilaatorit ega jahu tusavasid tagage toote ümber hea õhuvahetus Kinnitage hoolikalt kõik varustuse osad Kui ühendused vibratsiooni tõttu lahti tulevad võite kaotada mudeli üle kontrolli Tootja ei vastuta kahjustuste eest mis on tekkinud ohutusjuhiste ja hoiatuste eiramise tagajärjel Kasutage üks nes originaalvaruosi finnisch Tämä ei ole lelu Ei a...

Page 48: ...24 0900 LRP GMBH 0 49eur Minute aus dem deutschen Festnetz Mobilfunkpreise können abweichen Technik Service Hotline für A 0900 270 313 0 73eur Minute aus dem österreichischen Festnetz Mobilfunkpreise können abweichen info LRP cc www LRP cc HA00084 2016 by LRP electronic GmbH LRP GRAVIT GPS VISION 2 4GHZ F H S S ...

Reviews: