background image

35

Installation

Due to our policy of continuous product innovation, some specifications may change without notification.  

©LG Electronics U.S.A., Inc., Englewood Cliffs, NJ. All rights reserved. “LG” is a registered trademark of LG Corp.

GAS HEATER CONNECTION AND STARTUP

Pressure Testing the Gas System

• When test pressures exceed 14 in. w.c., the heater must be disconnected from the supply gas piping.
• When test pressures are 14 in. w.c. or less, the heater must be isolated from the supply gas piping by closing its individual manual shutoff valve.
• The gas pressure to the unit must be checked to make sure that the gas pressure does not fall out-side of the maximum and minimum 

allowable gas pressures listed on the unit nameplate.

DANGER

Carbon monoxide is a lethal, colorless, odorless gas.

Fuel gas poses a danger of explosion which can cause personal injury, product damage, or property damage. 

Do not use 

matches, candles, flame, of other sources of ignition to check for leaks.

Gas-fired equipment is designed to provide safe, controlled combustion. The installer must ensure that the correct amount 

of supply combustion air and a properly operating vent system is provided. If the installation does not permit the burner to 

receive the proper supply of combustion air, complete combustion may not occur and carbon monoxide may be produced. 

For your safety, if you smell gas:

Check both the supply lines and factory piping for leaks. Apply a soap and water solution to all piping and watch for bubbling. Some soap used for 

leak detection are corrosive to some metals. Carefully rinse to remove soap and clean the pipe after leak test is completed.

• Open windows.

• 

Don’t touch electrical switches.

• Extinguish any open flame.

• Vacate the area.

• Immediately call your gas supplier.

DANGER

The use and storage of gasoline or other flam

-

mable vapors and liquids in open containers in 

the vicinity of the furnace is hazardous. There is 

a risk of fire, explosion, physical injury or death.

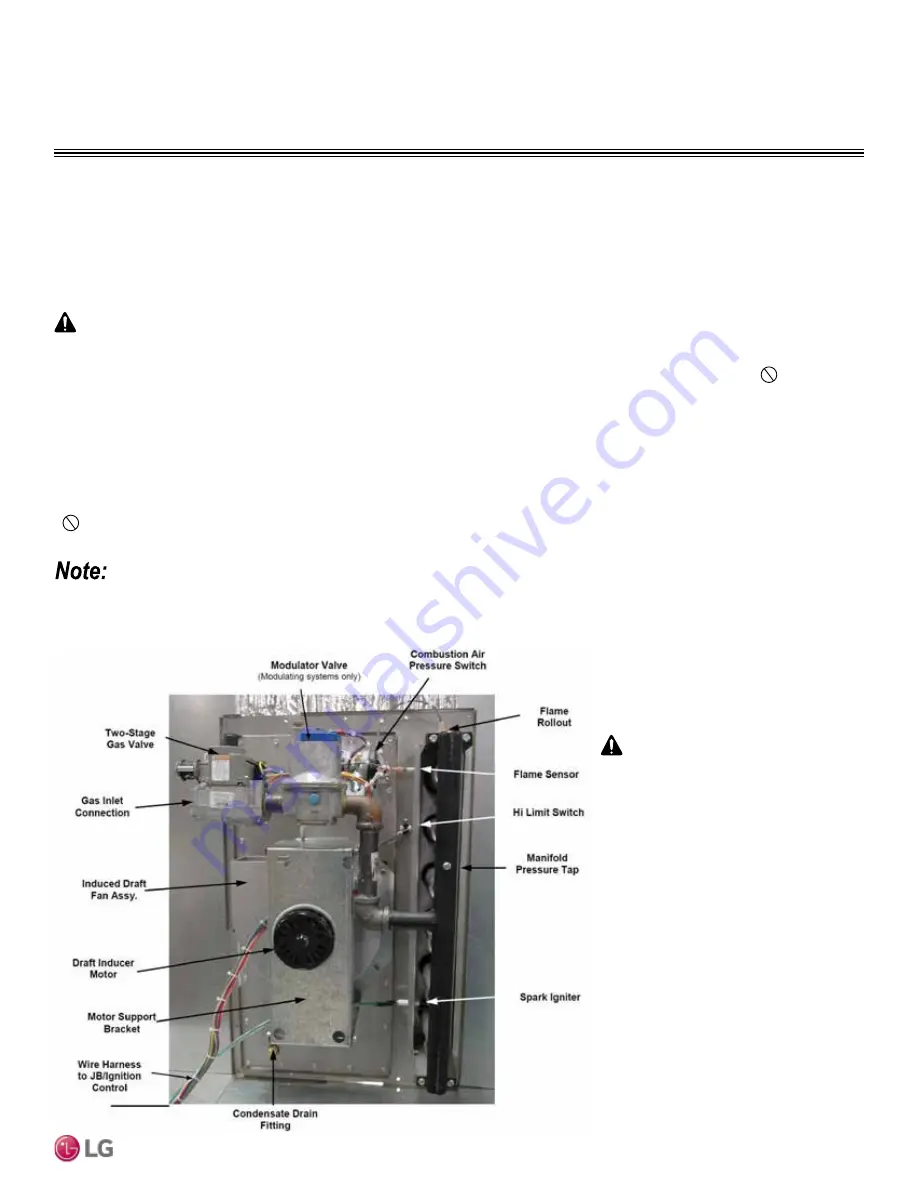
Figure 43: 

Furnace Module Component Description.

Summary of Contents for AR-DE11-05A

Page 1: ...ROOFTOP DEDICATED OUTDOOR AIR SYSTEMS DOAS INSTALLATION AND OPERATION MANUAL Base Rooftop DOAS 650 to 12 000 CFM Energy Recovery Wheel Rooftop DOAS 650 to 18 000 CFM ...

Page 2: ...tent familiarity is required for proper installation The instructions included in this manual must be followed to prevent product malfunction property damage injury or death to the user or other people Incorrect operation due to ignoring any instructions will cause harm or damage The level of seriousness is classified by the symbols described by the summary list of safety precautions on page 4 Thi...

Page 3: ...Hood Assembly 23 28 Standard Intake Hood w Bird Screen Assembly 23 26 Intake Hood w Aluminum Filter Assembly 27 28 Duct and Condensate Drain Connections 29 Access Holes 30 Electrical Connections 31 32 Gas Heater Connection and Startup 33 39 Refrigeration System Startup 39 42 Energy Recovery Wheel AR DE Models 43 47 Controller 48 105 Overview 48 59 AC Smart Setup 60 62 Sequences of Operation 63 74 ...

Page 4: ...ry Dispose of the packing materials safely Packing materials such as nails and other metal or wooden parts may cause puncture wounds or other injuries Tear apart and throw away plastic packaging bags so that children may not play with them and risk suffocation and death Do not install the unit in any location exposed to open flame or extreme heat Do not touch the unit with wet hands There is risk ...

Page 5: ...damage to walls Do not use the product for special purposes such as pre serving foods works of art wine coolers or other precision air conditioning applications There is risk of property damage Do not make refrigerant substitutions Use R410A only If a different refrigerant is used or air mixes with original refrigerant the unit will malfunction and become damaged Do not install the unit in a noise...

Page 6: ...Failure to carefully read and follow all instructions in this manual can result in injury or death Ensure the unit is connected to a dedicated power source that provides adequate power If the power source capacity is inadequate or the electric work is not performed properly it may result in fire electric shock physical injury or death Refer to local state and federal codes and use power wires of s...

Page 7: ... on during the operational season Do not block the inlet or outlet Unit may malfunction Securely attach the electrical cover to the indoor unit Non secured covers can result in fire due to dust or water in the service panel Periodically verify the equipment mounting hardware has not deteriorated If the base collapses the unit could fall and cause property damage or product failure Do not allow wat...

Page 8: ... registered trademark of LG Corp UNIT NOMENCLATURE AR D R 11 05 Cooling Capacity Chassis Size 11 110 21 210 31 310 35 352 ERV Option R Base Unit E Energy Recovery Wheel Type D Dedicated Outdoor Air System DOAS Family AR Air Source Packaged Rooftop Unit R410A Refrigerant A Series A First Series 05 5 Tons 08 8 Tons 10 10 Tons 13 13 Tons 16 16 Tons 18 18 Tons 20 20 Tons 25 25 Tons 30 30 Tons 40 40 To...

Page 9: ...ved LG is a registered trademark of LG Corp PRODUCT OVERVIEW Base Rooftop DOAS AR DR Models Energy Recovery Wheel Rooftop DOAS AR DE Models Refrigerant Access Furnace Electrical Panel Supply Air Supply Fan Return Air Outside Air Damper DX Coil Refrigerant Access Furnace Electrical Panel Area Supply Air Supply Fan Return Air Outside Air Damper DX Coil Energy Recovery Exhaust Fan ...

Page 10: ...lewood Cliffs NJ All rights reserved LG is a registered trademark of LG Corp PRODUCT OVERVIEW Electrical Panel View Other components may be present depending on the chosen options Field Wiring Terminal Blocks Compressor Overloads and Contactors Phase Volt Monitor Digital Scroll Compressor Control Board Control Relays Transformers Disconnect CAREL Controller Supply Fan VFD Condenser Fan VFD ...

Page 11: ...32 9 267 8 Sensible Cooling Capacity MBH 43 6 62 79 7 86 4 105 2 126 5 144 2 164 1 Hot Gas Reheat Coil Capacity MBH 21 32 34 9 41 7 50 6 62 2 73 8 82 3 Evaporator Coil Depth Rows 6 6 6 6 6 6 6 6 No of Compressors 1 1 1 2 2 2 2 2 Compressor Type s Digital Scroll Digital Scroll Digital scroll Digital Scroll Fixed Speed Digital Scroll Fixed Speed Digital Scroll Fixed Speed Digital Scroll Fixed Speed ...

Page 12: ...5 3 318 2 381 3 409 3 503 1 375 482 612 9 705 1 882 5 Sensible Cooling Capacity MBH 187 2 196 8 234 1 251 1 310 1 229 9 295 8 375 8 434 6 538 6 HotGasReheat CoilCapacity MBH 86 4 92 107 3 121 2 141 9 136 7 155 1 171 5 182 8 199 9 Evaporator Coil Depth Rows 6 6 6 6 6 6 6 6 6 6 No ofCompressors 2 4 4 4 4 4 4 4 4 4 Compressor Type s DigitalScroll FixedSpeed 2 Digital Scroll 2 Fixed Speed Refrigerant ...

Page 13: ...181 1 204 5 Hot Gas Reheat Coil Capacity MBH 25 8 38 7 41 1 51 61 74 7 88 2 97 5 100 8 Evaporator Coil Depth Rows 6 6 6 6 6 6 6 6 6 Number of Compressors 1 1 1 2 2 2 2 2 2 Compressor Type s Digital Scroll Digital Scroll Fixed Speed Refrigerant Charge lbs 10 7 15 6 20 2 17 8 23 9 29 9 33 2 36 4 39 7 Heating Fuel Natural Gas Natural Gas Natural Gas Natural Gas Natural Gas Natural Gas Natural Gas Nat...

Page 14: ... 220 1 259 2 284 1 328 6 261 4 332 7 409 1 485 6 581 3 Hot Gas Reheat Coil Capacity MBH 108 8 125 1 141 4 162 1 173 7 191 7 205 9 217 1 231 4 Evaporator Coil Depth Rows 6 6 6 6 6 6 6 6 6 No of Compressors 4 4 4 4 4 4 4 4 4 Compressor Type s 2 Digital Scroll 2 Fixed Speed Refrig Charge lbs 43 9 50 2 56 5 58 2 75 3 90 5 104 1 111 5 116 8 Heating Fuel Natural Gas Natural Gas Natural Gas Natural Gas N...

Page 15: ...Fines and or incarceration may be levied for non compliance ASHRAE Standards 15 2101 and 34 2010 offer guidelines that address refrigerant safety and the maximum allowable concentration of refrigerant in an occupied space Refrigerant will dissipate into the atmosphere but a certain volume of air is required for this to occur safely For R410A refrigerant the maximum allowable concentration of refri...

Page 16: ...sting to desired location Do not use belt type slings Do not twist the lines holding the unit while it is being lifted Failure to follow proper instructions could result in serious injury or death Use the appropriate crane equipment to transport each unit ensure the crane is capable of supporting the weights listed in the specification tables If the crane is not properly secured it may result in a...

Page 17: ...ces The minimum allowable clearances around each unit are as follows INSTALLATION Clearances Figure 3 AR DR Models 11 XX 21 XX 31 XX Chassis 36 Clearance on All Sides Failure to abide by these minimum clearances will prevent serviceability or affect unit performance Figure 4 AR DR Models 35 XX Chassis 48 Clearance on All Sides Figure 5 AR DE Models 11 XX 21 XX 31 XX Chassis Clearance Figure 6 AR D...

Page 18: ...nit To avoid leakage do not drill or punch holes in the floor of the unit Hanging Installation DO NOT permanently suspend the unit from the lifting lugs If the unit is to be hung additional supports are required under the unit Hang the unit from the supports making sure the unit is level Failure to keep the unit level will result in operational problems Pad Installation Check to make sure the pad ...

Page 19: ...rk must be connected to the curb directly The actual opening sizes in the floor of the unit are not specified as they are slightly undersized from the duct dimensions shown on the following curb drawings Curb and Ductwork Dimensions AR DR Models 11 XX 21 XX and 31 XX Chassis Only AR DR 11 XX chassis have two cross members Dimension B see dimensional drawing below The supply air ductwork on AR DR 2...

Page 20: ...G Electronics U S A Inc Englewood Cliffs NJ All rights reserved LG is a registered trademark of LG Corp Figure 8 Curb and Ductwork Dimensions Diagram for AR DR Model 35 XX Chassis Table 6 Curb and Ductwork Dimensions Table for AR DR Model 35 XX Chassis Chassis A B C D E F AR DR 35 XX 86 5 in 52 in 43 75 in 54 in 24 5 in 175 75 in INSTALLATION Installation Location ...

Page 21: ... with 6 x 6 notch es to accommodate cross members in one 1 to two 2 locations depending on unit configuration Figure 9 Curb and Ductwork Dimensions Diagram for AR DE Models 11 XX 21 XX 31 XX Chassis Table 7 Curb and Ductwork Dimensions Table for AR DE Models 11 XX 21 XX 31 XX Chassis Chassis A B C D E F G H I J K Bottom Return Air Side Return Air Bottom Return Air Side Return Air AR DE 11 XX 42 5 ...

Page 22: ...served LG is a registered trademark of LG Corp Figure 10 Curb and Ductwork Dimensions Diagram for AR DE Model 35 XX Chassis Table 8 Curb and Ductwork Dimensions Table for AR DE Model 35 XX Chassis Chassis A B C D E F G H I Bottom Return Air Side Return Air Bottom Return Air Side Return Air AR DE 35 XX 86 5 in 52 in 43 75 in 54 in 24 5 in 175 75 in 12 in 67 in 110 in 254 75 in 297 75 in INSTALLATIO...

Page 23: ...rd Screen Parts Description Table Item No Description Part Number Quantity For AR DR AR DE 11 XX Chassis For AR DR AR DE 21 XX Chassis For AR DR AR DE 31 XX Chassis For AR DE 35 XX Chassis For AR DR 35 XX Chassis 2 Screen Side Support 2501 2 2506 2 2511 2 2035 2 4615 2 3 Hood End 2502 1 2507 1 2512 1 2038 1 4619 1 4 Screen Center Support 2503 1 2508 1 2513 1 2036 3 4894 3 5 Screen Support Flashing...

Page 24: ...od and the screws these will be used in a later step 3 Remove and discard the shipping foam or tape Do not remove the adhesive backed gray gasket from the unit 4 Remove and take inventory of parts shipped in the sill of the opening 5 Remove the lug channel screw on each side of the unit if not already removed 6 Install the Left Side Triangle support by aligning the pre punched holes with the dimpl...

Page 25: ...rackets WARNING Assistance is required to perform this step for the larger hoods on the 31 XX and 35 XX chassis There is a risk of the product falling and causing physical injury or death 10 Attach the left and right edges of the top of the hood to the triangular supports using the provided 5 16 hex head screws 11 Align the pre punched holes in the Hood End piece with the leading edge of the hood ...

Page 26: ...he width of the hood 15 Install Right Side screen support slide screen in channel between Right Side Triangle and Side Screen Support then install Left Side Screen Support while inserting the screen in slot between Left Side Triangle and Left side screen support 16 Fasten the perimeter of the Framed Bird Screen s to the hood assembly using 5 16 sheet metal screws spaced at 12 centers as shown 17 P...

Page 27: ...N A 20 x 25 x 1 in 4 3 Hood End 2502 1 2507 1 2512 1 2038 1 4619 1 6 Hood Top A 2500 1 2505 1 2510 1 N A N A 7 Hood Top B N A N A N A 2032 1 4612 1 8 Hood Top C N A N A N A 2037 1 4616 1 9 Right Side Triangle 1317 1 4087 1 8087 1 2033 1 4613 1 10 Left Side Triangle 1318 1 4088 1 8088 1 2034 1 4614 1 11 Bottom Flashing 1229 1 4297 1 8297 1 2039 1 4617 1 12 Aluminum Filter Bottom N A 4431 1 N A 2308...

Page 28: ...s by aligning the Aluminum Filter Rail tab holes with the dimples on both Triangles Fasten with the provided 5 16 hex head screws see figures For 31 XX Chassis Install an Aluminum Filter Top Rail as the top filter rail Install one 1 Aluminum Filter Rail as the bottom filter rail For 31 XX and 35 XX Chassis Install the additional Aluminum Filter Rails at the midpoint of the Hood Triangles Align the...

Page 29: ...Drain Sizes and Locations Drains are located on the access side of all units and are sized as shown in the following diagrams DUCT AND CONDENSATE DRAIN CONNECTIONS Figure 33 AR DR AR DE 11 XX 21 XX and 31 XX Chassis Drain Sizes and Locations Table 11 AR DR AR DE 11 XX 21 XX 31 XX and 35 XX Chassis Drain Sizes and Locations Chassis Size A in B in Diameter in 11 XX 58 7 1 0 21 XX 65 7 1 0 31 XX 75 7...

Page 30: ... is a registered trademark of LG Corp ACCESS HOLES Access Holes A number of pre punched holes openings are provided on the cabinet for electrical and gas connections for each unit Figure 35 AR DR AR DE 11 XX Chassis Access Holes Figure 36 AR DR AR DE 21 XX Chassis Access Holes Figure 37 AR DR AR DE 31 XX Chassis Access Holes Figure 38 AR DR AR DE 35 XX Chassis Access Holes 11 XX Cabinet 21 XX Cabi...

Page 31: ...ng Location Supply Air Temperature Sensor 1 500 feet Supply Air Ductwork Downstream of Ventilator Minimum ten 10 feet downstream of unit in straight run of duct Space Temperature Sensor 1 500 feet Wall Mounted in the Space Space Relative Humidity Sensor 1 500 feet Wall Mounted in the Space Space CO2 Sensor 1 500 feet Wall Mounted in the Space Table 12 Field Mounted Sensor Information Special contr...

Page 32: ...TB3 SP1 13 SP2 14 SN 4 SN 5 Shield G Table 13 Space Temperature Sensor Terminations Wiring between the ventilator and the space humidity sensor must be through a field supplied three conductor 22 AWG twisted shielded and stranded communication cable Terminations must be made per the following chart Table 14 Space Humidity Sensor Terminations Space Humidity Sensor Terminal Strip TB3 SIG 6 7 HB Do n...

Page 33: ...NPT 800 2 for 31 XX Chassis 1 2 in NPT for 35 XX Chassis 1 000 1 2 in NPT 1 200 1 2 in NPT Table 16 Gas Connection Sizes Gas Connection Sizes All gas furnace sections require one 1 two 2 or three 3 gas connections usually 3 4 in NPT based on the total heating capacity as shown in the chart Flue Venting Outdoor Installations The venting system is designed for direct discharge of flue gases to the o...

Page 34: ...tion in the vent pipe is likely during heater start up cycle and provision for drainage must be provided GAS HEATER CONNECTION AND STARTUP Figure 40 Outdoor Vertical Venting Diagram DANGER Flue gases must be directed away from combustion air inlets to avoid recirculation into combustion air supply There is risk of fire explosion and physical injury or death WARNING Flue gases must be directed away...

Page 35: ...es candles flame of other sources of ignition to check for leaks Gas fired equipment is designed to provide safe controlled combustion The installer must ensure that the correct amount of supply combustion air and a properly operating vent system is provided If the installation does not permit the burner to receive the proper supply of combustion air complete combustion may not occur and carbon mo...

Page 36: ...rcing or attempting to repair the gas valve may result in fire or explosion WARNING Forcing or attempting to repair the gas valve may result in fire or explosion which can lead to injury and or death Start Up 1 Adjust the unit controller discharge air temperature set point to lowest setting 2 Turn OFF gas supply at the manual shut off valve 3 Turn OFF power to the unit at the disconnect switch 4 R...

Page 37: ...efore lockout of control occurs 5 Furnace controller can be brought out of lockout by turning unit controller to its lowest discharge air set point no call for heat and waiting five 5 seconds and then turning back up to call for heat Furnace controller will automatically reset after one hour and initiate a call for heat Manifold Pressure Adjustment A pressure tap is provided in each furnace module...

Page 38: ...Poorly defined substantially yellow flames or flames that appear lazy indicate poor air supply to burners or excessive burner input Verify gas supply type and manifold pressure with rating plate 3 Poor air supply can be caused by obstructions or blockage in heat exchanger tubes or vent discharge pipe Inspect and clean as neces sary to eliminate blockage Vacuum any dirt or loose debris Clean heat e...

Page 39: ...odule before the air temperature reaches 250 F Reduced airflow may be caused by restriction upstream or downstream of the circulating air blower such as dirty or blocked filters or restriction of the air inlet or outlet to the unit The high limit switch will shut off the gas when the temperature reaches its setpoint and then automatically reset when the temperature drops to 30 F below the setpoint...

Page 40: ... 1 and Two 2 If Needed One 1 and Two 2 Three 3 and Four 4 If Needed Controls Compressor Labels One 1 and Two 2 Three 3 and Four 4 If Needed Three 3 and Four 4 One 1 and Two 2 If Needed REFRIGERATION SYSTEM STARTUP Cooling Mode The Digital Scroll compressor Circuit B will engage to maintain cooling demand If more cooling is needed than the Digital Scroll compressor can provide the Standard Scroll c...

Page 41: ... will wait for the two 2 minute anti short cycle timer to time out and if the system controller demand signal is still greater than 1 44VDC it will energize the compressor contactor again If compressor current is detected on the restart the ALERT code and alarm relay output will reset The Digital Compressor Controller will attempt to restart compressor as long as the system controller demand is ab...

Page 42: ...ose The unloader solenoid will remain energized causing the compressor to run unloaded as long as the system controller demand signal is less than 1 44VDC If the system controller demand is greater than 1 44VDC the unloader solenoid will de energize causing the compres sor to run loaded The ALERT code and alarm relay output are reset when current is no longer detected while system controller deman...

Page 43: ... its laminar flow characteristics Smaller particles pass through larger particles land on the surface and are blown clear as the flow is reversed Any material that builds up on the face of the wheel can be removed with a brush or vacuum The primary need for cleaning is to remove oil based aerosols that have condensed on energy wheel surfaces Such films can close off micron size pores at the surfac...

Page 44: ...elerate in rotation Failure to maintain control of the wheel rotation while installing all segments could cause severe injury to fingers or hand caught between revolving spokes and the bearing support beam Handle of hammer or other stop should be inserted through spokes and above or below bearing support beams to limit rotation of unbalanced wheel Both installation and removal procedures must be p...

Page 45: ...e hub plates 3 Ease the segment downward until its outer rim clears the inside of the wheel rim then press the segment inward against the spoke flanges 4 Close and latch segment retaining brackets to the correct posi tion Verify the retaining bracket is fully engaged under the catch 5 Slowly rotate by hand the first installed segment to the bottom of the cassette Install the second segment opposit...

Page 46: ... latch and the wheel rim at the left side of a spoke 8 Rotate the wheel counterclockwise to position the red belt retainer close to the wheel bearing beam 9 Create slack in the belt by removing it from the rim between the location of the pulley and the red belt retainer and then place the belt over pulley 10 Rotate the wheel clockwise until the belt is fully stretched around the wheel rim and the ...

Page 47: ...o minimize transfer of air between counter flowing air streams To adjust the diameter seals 1 Loosen the diameter seal adjusting screws and back seals away from wheel surface Larger wheels may have a center seal 2 Rotate wheel clockwise until the two 2 opposite spokes are hidden behind the bearing support beam Using a folder piece of paper as a feeler gauge position paper between the wheel surface...

Page 48: ... Some unit configurations require control expansion boards CAREL c pCO2 or CAREL EVD evolution Expansion boards communicate with the controller through MODBUS protocol Electrical Specifications The DOAS controller receives 24 VAC power from a transformer on the main control panel and is energized when the main disconnect is on The size of the CAREL cpCO board varies with unit configuration Connect...

Page 49: ...5 06 07 Optional Handheld Keypad Display 32 pLAN addresses are visible on the main controller and on c pCOe expansion boards as shown Table 21 DIP Switch Settings for CAREL c pCOe Expansion Board Figure 69 pLAN Address Windows pLAN address windows The main controller s pLAN address is 01 c pCO expansion board pLAN addresses are 02 03 04 05 06 or 07 Figure 70 CAREL c pCOe Expansion Board with DIP S...

Page 50: ...er s default address may need to be changed This address can be set manually at the Main Ctrl Variables Advanced Network Settings screen A service password is required to change this setting Main Control Board Terminal Connections Identifying Input and Output Terminals The following terminal markings are on the control boards and indicate ID Digital Inputs NO Normally Open Digital Outputs NC Norma...

Page 51: ...ts Drawing Reference Terminal Label Unit Connection Sensor Type Range 3 J2 U1 Refrigerant pressure transducer Circuit A 0 5 4 5 Va 0 650 psig 3 J2 U2 Refrigerant pressure transducer Circuit B 0 5 4 5 Va 0 650 psig 3 J2 U3 Supply air temperature CAREL NTC 10K Type 4 3 J3 U4 Cooling coil leaving air temperature CAREL NTC 10K Type 4 3 J3 U5 Outside air temperature CAREL NTC 10K Type 4 3 J6 U6 Outside...

Page 52: ...5 J12 NO1 Compressor 1 start Closed start compressor 15 J12 NO2 Compressor 2 start Closed start compressor 15 J12 NO3 Compressor 3 start Closed start compressor 15 J13 NO4 Compressor 4 start Closed start compressor 15 J13 NO5 Supply fan start Closed start fan 15 J13 NO6 Exhaust fan start Closed start fan 15 J14 NO7 Actuator power Closed enabled 15 J15 NO8 Global alarm output BMS output Closed enab...

Page 53: ... air temperature CAREL NTC 10K Type 4 1 J2 U6 Exhaust air temperature CAREL NTC 10K Type 4 1 J2 U7 Space humidity 0 10 Vdc 0 100 1 J2 U8 Space static pressure 0 10 Vdc 0 5 0 5 wc 1 J2 U9 Supply air duct static pressure 0 10 Vdc 0 to 5 0 wc 1 J2 U10 Space set point adjustment Resistance 0 to 10 kΩ 3 0 3 0 F Analog Outputs Drawing Reference Terminal Label Unit Connection Sensor Type Range 1 J2 U1 He...

Page 54: ... or 0 0 5 wc 1 J2 U4 Supply fan air flow measuring station 0 10 Vdc 0 30 wc 1 J2 U5 Exhaust fan air flow measuring station 0 10 Vdc 0 30 wc 1 J2 U6 OA RA damper control BMS input b 0 10 Vdc 0 100 1 J2 U7 Supply fan control BMS input c 0 10 Vdc 0 100 1 J2 U8 Exhaust fan control BMS input c 0 10 Vdc 0 100 1 J2 U9 Unassigned 1 J2 U10 Used as digital input Analog Outputs Drawing Reference Terminal Lab...

Page 55: ...factory configured connection points Figure 73 Expansion Valve Driver Terminal Connections Table 27 Expansion Valve Driver Terminal Connections VBAT G0 G NO A COM A 4 2 3 1 GND V REF S1 S2 S3 S4 DI1 DI2 GND Tx Rx Power Supply Ex V connection A Relay A EVD evolution Analog Digital Inputs Network Analog Inputs Label Unit Connection Sensor Type Range S1 Suction refrigerant pressure transducer 0 5 4 5...

Page 56: ... when there is an active alarm Press to view active alarms Press twice to go to the alarms reset screen Escape Access from the Main Menu to view the Unit Status screen Press to navigate one menu level back Press when editing a variable to cancel editing Up Navigates through the menus screens Press after entering a variable to increase a current value Enter Press to enter a highlighted menu or scre...

Page 57: ...d Upper Left Quadrant Displays the current value of the primary control variable For example this could be supply air temperature room air temperature return air temperature or coil leaving temperature Upper Right Quadrant Displays all temperature and humidity values that pertain to the air handler Lower Left Quadrant Displays the set point that corresponds to the primary control variable in the u...

Page 58: ...configuration Screens may include but are not limited to Occupancy Damper positions Fan status Airflow Set points Economizer Energy recovery Cooling Circuit pressure Heating Dehumidification Humidification Static pressure Multi zone air conditions Humidification Alarm History Refrigeration Compressor Control Clear History Pressure Control Export History Heat Pump Control Multi zone Control Evap Co...

Page 59: ...nu Ctrl Variables Advanced Login screen Press the Enter and Up or Down Arrow buttons to enter the service pass word 4800 2 Go to Main Menu Ctrl Variables Advanced Backup Restore screen 3 Press the Up or Down Arrow buttons to navigate to the Backup Settings screen 4 Press the Enter and Up or Down Arrow buttons to select the backup location internal memory or USB If creating a backup to the USB driv...

Page 60: ...patible with CAREL controller 1 Confirm control wiring between rooftop unit CAREL controller and AC Smart 5 Channel 1 Wiring is 18 AWG 2 conductor twisted stranded shielded and must comply with all applicable local and national codes Figure 79 DOAS Controller to AC Smart 5 Connections Figure 80 AC Smart 5 2 On the CAREL controller under Network Settings set the Device I D as For AR DE DOAS models ...

Page 61: ...86 Adding Units Step 5 Figure 87 Clicking Send All to Finish Adding Devices Step 6 CONTROLLER AC Smart Controller Setup 1 Under the AC Smart Settings tab find and click on Installing 2 Press on the AC Smart 00 tab go to Registration Status and change the CH1 setting to MODBUS_9600 3 Click Auto Search to find the devices connected to the controller 4 After the search is complete click Send All 5 Un...

Page 62: ...ing View Details Step 9 Figure 91 Selecting Info Step 10 CONTROLLER AC Smart Controller Setup continued 7 Under the AC Smart Control tab find and select Device Control 8 Find the Installation tab and select AC Smart A list of devices available for view will appear in the middle of the screen 9 Click on the device to be viewed A new section will appear on the right side of the screen Click View Det...

Page 63: ...cupancy override button The unit then remains occupied for the occupancy override duration Unoccupied Start The unit operates in the unoccupied mode under any of the following conditions Unoccupied heating Unoccupied cooling Unoccupied humidification Unoccupied dehumidification Unoccupied multi zone heating Unoccupied multi zone cooling System On System on mode occurs when there is an active occup...

Page 64: ...or occupied start command and the supply temperature is greater than or equal to the soft shutdown enable set point The following occur during a soft shutdown Thermodynamic outputs immediately revert back to their off value while Dampers remain open and fans continue to run until The supply air temperature falls below the soft shutdown enable set point minus 5 0 F or The soft shutdown delay timer ...

Page 65: ...pressure Supply tracking with offset CFM control Hardwired input Return duct static pressure Winter Ramp The winter ramp function prevents the supply temperature from dropping below set point under the following conditions Outside air temperature is below the winter ramp enable setpoint and Heating capacity is at 100 One of the following is used to perform the winter ramp function Supply fan speed...

Page 66: ...perature is between the heating and cooling set point the last active set point is used Start between set points if the unit starts while in between set points the heating set point is active Single Set point Mode If a deadband of zero is entered the unit is in single set point mode and controls directly to the user entered tem perature set point Outside Reset The heating and cooling devices modul...

Page 67: ...during a sensor failure to continue econo mizing Energy Recovery The heat wheel or flat plate heat exchanger face bypass damper is controlled to maintain the supply temperature set point Defrost Energy recovery devices may require defrosting if the exhaust air temperature gets too cold The following methods are available depending on the type of energy recovery installed in the unit Modulating Ene...

Page 68: ...when the unit is allowed to dehumidify 1 Temperature Over Dehumidification Determines when the unit is allowed to dehumidify based on the space return air temperatures Temperature If temperature is set as the priority and the space or return air is overcooled dehumidification is locked out until the space or return temperature is no longer overcooled Dehumidification If the priority is dehumidific...

Page 69: ... compressor will be replaced by the next available compres sor specified in the sequence Chilled Water Coil If a chilled water coil is installed the chilled water valve modulates to maintain the active temperature set point when the unit is in cooling mode The chilled water valve can optionally be held open to maintain flow when the unit is off Hot Water Coil If a hot water coil is installed the h...

Page 70: ...led The operating envelope is comprised of mini mum and maximum evaporating and condensing temperatures that create an envelope of desired operating limits based on the compressor manufacturer s limitations Units Without Electronic Expansion Valves If any of the following alarm conditions occur the modulating capacity of the compressor is reduced or the fixed stage compressor is turned off These a...

Page 71: ...er compressor s speed according to the compressor control algorithm to prevent the compressor from leaving Zone 1 If the compressor is outside Zone 1 for a period an alarm activates corresponding to the following zones Zone 2 High Pressure Ratio Zone 3 High Discharge Pressure Zone 4 High Motor Current Zone 5 High Suction Pressure Zone 6 Low Pressure Ratio Zone 7 Low Delta Ratio Zone 8 Low Discharg...

Page 72: ...ture determines when a defrost cycle occurs The following conditions must be true Saturated suction temperature is less than the fluid freeze temperature set point and Cold weather start is not active and The unit has controls enabled 2 Termination The defrost cycle terminates when the active circuit s saturated suction temperature is greater than the cancel set point At defrost cycle termination ...

Page 73: ... saturated suction temperatures of all circuits are greater than or equal to the cancel set point or The maximum allowed defrost time has been exceeded At defrost cycle termination the unit reverts back to heating mode operation 3 Auxiliary Heat Auxiliary heat is enabled with the following constraint during auxiliary heat the unit will use heating sources other than the heat pump in order to maint...

Page 74: ...following variables may be used by the BMS in place of hardwired sensors Outside_RH_from_BMS Outside_Temp_from_BMS Return_RH_from_BMS Return_Temp_from_BMS Space_1_CO2_from_BMS Space_2_CO2_from_BMS Return_CO2_from_BMS Space_RH_from_BMS Space_Static_from_BMS Space_Temp_from_BMS Unit Alarms Refer to the Alarms Data Table for a list of available alarms Global Alarm Output The global alarm output is ac...

Page 75: ...Mode Maximum 100 0 F 70 0 F 100 0 F Minimum 50 0 F 50 0 F 70 0 F Supply Set points Heating Mode Maximum 100 0 F 70 0 F 100 0 F Minimum 55 0 F 50 0 F 70 0 F Outside Set points Outside Reset Maximum 80 0 F 30 0 F 130 0 F Minimum 30 0 F 30 0 F 130 0 F Mode Switch Delay 120 sec 30 sec 600 sec Startup Delay 30 sec 0 sec 600 sec Cooling Ambient Lockout 55 0 F 30 0 F 100 0 F Heating Ambient Lockout 80 0 ...

Page 76: ...rity Enabled Temperature Priority Heat Dehum Enabled Disabled Enabled X Disabled Heating Priority Enabled Dehumidification Priority Overcool Coil Offset 0 0 Δ F 0 0 Δ F 10 0 Δ F Dehumidification Force Comp On Clg Ramp 1 Enabled X Disabled Enabled X Table 31 Dehumidification Control Set Points Data Table Set point availability varies based on unit configuration Table 32 Refrigeration Compressor Con...

Page 77: ...ata Table Control Variable Default Min Max Notes WSHP Cold Start OAT Enable 30 0 F 0 0 F 60 0 F Duration 60 sec 0 sec 600 sec WSHP Fluid Freeze Set point 32 0 F 0 0 F 32 0 F ASHP Low Ambient Lockout 17 0 F 10 0 F 50 0 F WSHP Low Saturated Suction Lockout 15 0 F 30 0 F 0 0 F Heat Pump Defrost WSHP Cancel Set point 95 0 F 55 0 F 110 0 F ASHP Cancel Set point 60 0 F 55 0 F 80 0 F Max Time 10 min 5 mi...

Page 78: ...e Control Variable Default Min Max Notes Supply Fan Control Enable Delay 5 sec 0 sec 60 sec Minimum Speed 50 50 100 Maximum Speed 100 50 100 Constant Volume Set point Occupied 100 50 100 Unoccupied 60 50 100 Duct Static Set point 1 00 wc 0 00 wc 5 00 wc Space Static Set point 0 05 wc 0 50 wc 0 50 wc Airflow Set point 0 CFM 0 CFM 999999 CFM Soft Shutdown Enable Set point 85 0 F 70 0 F 150 0 F Delay...

Page 79: ... Day Monday Monday Tuesday Wednesday Thursday Friday Saturday Sunday All days on one screen Choose the day to change then the operation and start stop times Mode Occupied Occupied Unoccupied Schedule Start Time 00 00 06 00 AM 12 00 AM 11 59 PM Stop Time 00 00 06 00 PM 12 00 AM 11 59 PM Occupied Timed Override Enable Disabled Disabled Enabled X Duration 60 min 0 min 240 min Occupied Auto Mode Enabl...

Page 80: ...st Off On Compressor Signal Override Auto Auto Manual Compressor Signal Comp 1 8 Current Signal 0 100 Cooling Ramp 1 4 Override Auto Auto Manual Cooling Ramp 1 4 Demand Current Ramp 0 100 Furnace Request Override Auto Auto Manual Furnace Request Furnace Stage F1 8 S1 2 Current State Off On Electric Heat Override Auto Auto Manual Electric Heat Elec Heater 1 2 Current Ramp 0 100 Heating Ramp Overrid...

Page 81: ...0 F 50 0 F OAD Airflow Ramp P Gain 0 015 0 001 999 999 OAD Airflow Ramp I Time 30 sec 0 sec 1800 sec Min OAD Airflow Ramp P Gain 0 020 0 001 999 999 Min OAD Airflow Ramp I Time 250 sec 0 sec 1800 sec Heat Wheel Bypass P Gain 2 000 0 001 999 999 Heat Wheel Bypass I Time 60 sec 0 sec 1800 sec Circuit Pressure P Gain 1 800 0 001 999 999 Circuit Pressure I Time 20 sec 0 sec 1800 sec Economizer P Gain ...

Page 82: ...00 1200 2400 4800 9600 19200 38400 57600 76800 115200 MODBUS RTU Config J25 BMS2 Onboard MODBUS RS485 Address 1 1 277 Baud Rate 76800 1200 2400 4800 9600 19200 38400 57600 76800 115200 Stop Bits 2 1 2 Parity None None Odd Even BACnet IP Config Ethernet Onboard BACnet TCP IP Device 77077 1 4194302 UDP Port 47808 0 65535 MODBUS TCP Slave Ethernet Onboard MODBUS TCP IP Device ID 1 1 277 BMS Watchdog ...

Page 83: ...rd Parity None None Odd Even Airflow Monitoring Density Calc Disabled Disabled Enabled X Supply Fan Control Type Constant Volume Constant Volume Duct Static Space Static Hardwired Input Single Zone VAV CFM Control Supply Fan Control K Factor 0 0 0 0 99999 9 Default determined by the unit purchased Exhaust Fan Control Type Not Installed Not Installed Constant Volume Space Static Sup Track w Off Poo...

Page 84: ...s an ASHP Max Elec Heat 100 0 100 CMN Breakout BMS Comm Stand Alone Lontalk BACnet IP BACnet MSTP MODBUS RTU MODBUS IP CMN CMN Breakout Dmp Ctrl 100 Outside Air Recirculating CMN CMN Breakout Sup Fan Constant Volume VAV Duct Static Hardwired Input BMS CV Damper Static Space Static Single Zone VAV CFM Control CMN CMN Breakout CO2 Ctrl Disabled Enabled CMN CMN Breakout Exh Fan None Supply Tracking S...

Page 85: ...e Jan 1 2000 Dec 31 2099 Temperature F F C Static Pressure wc wc Pa Air Flow CFM CFM m3 h Pressure psi psi bar Enthalpy Btu lb Btu lb kj kg Fluid Flow gpm gpm l min Distance in in cm Unit Altitude 830 ft 0 ft 10000 ft Advanced Alarm Logging Enable Enabled X Disabled Enabled X Power Loss Startup Auto Restart Enabled X Disabled Enabled X Service Information Unit Information Prg Initials Read Only Un...

Page 86: ...emp Low Limit Delay 5 min 0 min 15 min Supply Temp High Limit Alarm Set point 120 0 F 90 0 F 120 0 F Supply Temp High Limit Delay 3 min 0 min 15 min Space High Static Alarm Set point 0 200 wc 0 500 wc 0 500 wc Shutdown Alarm Lockout Enable Enabled X Disabled Enabled X Supply Fan Alarm Shutdown Unit Enabled X Disabled Enabled X Exhaust Fan Alarm Shutdown Unit Enabled X Disabled Enabled X General Al...

Page 87: ...o Disable Supply RH Dewpoint Control 20 HX Leaving RH Sensor Value Not Valid Auto Informational 21 Outside RH Sensor Value Not Valid Auto Disable OA RH Dewpoint Control 22 23 Cold Coil x RH Sensor Value Not Valid Auto Informational 24 Exhaust Air RH Sensor Value Not Valid Auto Informational 25 Preheat Leaving RH Sensor Value Not Valid Auto Informational 26 29 Low Pressure Switch Circuit x Auto unt...

Page 88: ...22 Space Setpt Adj Slider Sensor Value Not Valid Auto Informational 123 Space 2 CO2 Sensor Value Not Valid Auto Disable CO2 124 Return CO2 Sensor Value Not Valid Auto Disable CO2 125 132 Discharge Press Ckt x Sensor Value Not Valid Auto Disable Compressor Circuit 133 140 Suction Press Ckt x Sensor Value Not Valid Auto Disable Compressor Circuit Only with EVD 141 148 Discharge Temp Ckt x Sensor Val...

Page 89: ...r Compressor Auto Disable Inverter Circuit 293 Supply Water Temp 2 Sensor Value Not Valid Auto Disable Compressors WSHP 294 Return Water Temp 2 Sensor Value Not Valid Auto Disable Compressors WSHP 295 296 Low Suction SH ExV x EVD Alarm Auto Disable Inverter Circuit Only with EVD 297 298 LOP x EVD 1 Low Operating Pressure Auto Disable Inverter Circuit Only with EVD 299 300 MOP x EVD 1 Max Operating...

Page 90: ...Compressor Auto until Lockout 3x in 1 hr Disable Inverter Circuit Only with Inverter Scroll 323 Low Pressure Ratio Inverter Compressor Auto until Lockout 3x in 1 hr Disable Inverter Circuit Only with Inverter Scroll 324 Low Delta P Inverter Compressor Auto until Lockout 3x in 1 hr Disable Inverter Circuit Only with Inverter Scroll 325 High Discharge Press Inverter Compressor Auto until Lockout 3x ...

Page 91: ...1 30282 Input 2 Supply_Temp_Analog_Input Supply Temperature 45 AI ReadCOV_NoWrite 0 1 30284 Input 2 Entering_Water_Temp_1_ Analog_Input Entering Water Temperature Circuit A 46 AI ReadCOV_NoWrite 0 1 30286 Input 2 Outside_RH_Analog_Input Outside Relative Humidity 86 AI ReadCOV_NoWrite 0 1 30350 Input 2 Return_RH_Analog_Input Return Relative Humidity 88 AI ReadCOV_NoWrite 0 1 30354 Input 2 Space_RH_...

Page 92: ... Setpoint 7 AV ReadCOV_ Commandable 0 1 40014 Holding 2 Unocc_Inside_ Dewpoint_Setpoint Unoccupied Inside Dewpoint Dehumidification Trigger Setpoint 9 AV ReadCOV_ Commandable 0 1 40018 Holding 2 Unoccupied_Cooling_ Setpoint Unoccupied Cooling Setpoint 10 AV ReadCOV_ Commandable 0 1 40020 Holding 2 Unoccupied_ Dehumidification_ Setpoint Unoccupied Dehumidification RH Setpoint 11 AV ReadCOV_ Command...

Page 93: ...nt Cooling Ambient Lockout Set point 31 AV ReadCOV_ Commandable 0 1 40062 Holding 2 Heating_Lockout_ Setpoint Heating Ambient Lockout Set point 32 AV ReadCOV_ Commandable 0 1 40064 Holding 2 Preheat_ Lockout_ Setpoint Preheat Ambient Lockout Set point 33 AV ReadCOV_ Commandable 0 1 40066 Holding 2 Space_Static_ Pressure_Setpoint Space Static Pressure Set point 37 AV ReadCOV_ Commandable 0 1 40074 ...

Page 94: ...adCOV_NoWrite 1 30044 Input 2 OAD_CFM_Ramp OAD CFM Ramp 64 AV ReadCOV_NoWrite 1 30050 Input 2 Space_CO2_Control_ Ramp Space CO2 Control Ramp 71 AV ReadCOV_NoWrite 1 30064 Input 2 Supply_Duct_Static_ Pressure_Ramp Supply Duct Static Pressure Ramp 72 AV ReadCOV_NoWrite 1 30066 Input 2 Supply_Fan_CFM_ Control_Ramp Supply Fan CFM Control Ramp 73 AV ReadCOV_NoWrite 1 30068 Input 2 Supply_Fan_Space_ Sta...

Page 95: ... 1 30588 Input 2 Circuit_B_Sat_Discharge_ Temperature Circuit B Saturated Discharge Temperature 287 AV ReadCOV_ NoWrite 0 1 30590 Input 2 Binary Inputs Read Only Comp_Circ_A_High_ Pressure_Digital_ Input Circuit A High Pressure Switch Alarm Normal 3 BI ReadCOV_ NoWrite 0 10052 Discrete Comp_Circ_A_Low_ Pressure_Digital_Input Circuit A Low Pressure Switch Alarm Normal 4 BI ReadCOV_ NoWrite 0 10053 ...

Page 96: ... System_Enable Master system enable Enabled Disabled 2 BV Read_ Commandable 0 3 Coil BMS_Occupancy_ Command Occupancy Command Unoccupied Occupied 3 BV Read_ Commandable 0 4 Coil Reset_All_Alarms Alarm Reset Command Reset Normal 4 BV Read_ Commandable 0 5 Coil Outside_RH_Source_ BMS Outside RH Source Selection BMS Local 5 BV Read_ Commandable 0 6 Coil Outside_Temp_ Source_BMS Outside Temp Source Se...

Page 97: ...m point Optionally set to indicate any alarm is active or a shutdown alarm is active Alarm Normal 24 BV ReadCOV_ NoWrite 0 10010 Discrete System_Shutdown_ Alarm Shutdown alarm status When true System Enable will be set to false and the unit will remain off Alarm Normal 25 BV ReadCOV_ NoWrite 0 10011 Discrete Damper_Open Indicates there is a open air path and the supply fan can run Open Closed 26 B...

Page 98: ...oWrite 0 10165 Discrete Compressor_3_Enable_ Digital_Output Compressor 3 Enable On Off 113 BV ReadCOV_NoWrite 0 10166 Discrete Compressor_4_Enable_ Digital_Output Compressor 4 Enable On Off 114 BV ReadCOV_NoWrite 0 10167 Discrete Condenser_Fan_1_Digital_ Output Condenser Fan Stage 1 On Off 119 BV ReadCOV_NoWrite 0 10172 Discrete Condenser_Fan_2_Digital_ Output Condenser Fan Stage 2 On Off 120 BV R...

Page 99: ...V_NoWrite 0 10374 Discrete Exhaust_Temperature_Sensor_ Alarm Active Exhaust Temperature Sensor Alarm Alarm Normal 433 BV ReadCOV_NoWrite 0 10383 Discrete Expansion_Board_1_Alarm Active Expansion Board 1 Alarm Alarm Normal 434 BV ReadCOV_NoWrite 0 10384 Discrete Expansion_Board_2_Alarm Active Expansion Board 2 Alarm Alarm Normal 435 BV ReadCOV_NoWrite 0 10385 Discrete Expansion_Board_3_Alarm Active...

Page 100: ...ormal 546 BV ReadCOV_NoWrite 0 10496 Discrete Supply_Air_Temp_Low_Limit Active Supply Air Temp Low Limit Alarm Alarm Normal 551 BV ReadCOV_NoWrite 0 10501 Discrete Supply_Air_Temperature_ Sensor_Alarm Active Supply Air Temperature Sensor Alarm Alarm Normal 552 BV ReadCOV_NoWrite 0 10502 Discrete Supply_Duct_Static_Pressure_ Analog_ Input_Alarm Active Supply Duct Static Pressure Analog Input Alarm ...

Page 101: ...gh Current Alarm Alarm Normal 600 BV ReadCOV_NoWrite 0 10550 Discrete Al_HiRatioP_COMP Active Compressor Envelope High Pressure Ratio Alarm Alarm Normal 601 BV ReadCOV_NoWrite 0 10551 Discrete Al_HiT_Cond_EVD_1 Active Al_HiT_Cond_EVD_1 Alarm Normal 602 BV ReadCOV_NoWrite 0 10552 Discrete Al_IncompleteClosing_EVD_1 Active EVD Incomplete Closing Alarm Alarm Normal 603 BV ReadCOV_NoWrite 0 10553 Disc...

Page 102: ...mp_2_Alarm Active Return Water Temp 2 Alarm Alarm Normal 626 BV ReadCOV_NoWrite 0 10576 Discrete Supply_Water_Temp_2_Alarm Active Supply Water Temp 2 Alarm Alarm Normal 627 BV ReadCOV_NoWrite 0 10577 Discrete Water_Leak_Detector_Alarm Active Water Leak Detector Alarm Alarm Normal 628 BV ReadCOV_NoWrite 0 10578 Discrete HP_Defrost_Active Active Heat Pump Defrost Alarm Alarm Normal 631 BV ReadCOV_No...

Page 103: ...Emergency Purge 2 Occupied Start 18 Unassigned 3 Opening Dampers 19 Fans Only 4 End Switch 20 Economizing 5 Dampers Open 21 Cooling 6 Fan Start Delay 22 Heating 7 Fans Starting 23 Dehumidifying 8 Fans Starting 24 Humidifying 9 Heat Cool Delay 25 HGRH Purging 10 System On 26 Defrost Active 11 Soft Shutdown 27 Pool Purge 12 System Disabled 28 Cooling Heating 13 Remote Off 29 Dehum w Heat 14 Shutdown...

Page 104: ...ve Humidity nvo SpaceRH lev_percent 81 Space Relative Humidity nvo SupFan1Out lev_percent 81 Supply Fan Speed Analog Output nvo Space1CO2 ppm 29 Space 1 CO2 ppm nvo SpacePress press_p 113 Space Static Pressure nvo SupDuctPress press_p 113 Supply Duct Static Pressure nvo DigAlarms state 83 Digital Alarm States 16 bit packed nvo DigAlarms bit00 state bit00 Circuit A High Pressure Switch 0 Normal 1 A...

Page 105: ...ntering Water Temperature Circuit B nvo MixedTemp temp_p 105 Mixed Temperature nvo OutsideTemp temp_p 105 Outside Air Temperature nvo SpaceTemp temp_p 105 Space Temperature nvo SupplyTemp temp_p 105 Supply Temperature Write Only Points nvi EconEnthTrig enthalpy 153 Economizer Enthalpy Enable Se tpoint Allow Econ when OA Enthalpy Spt nvi ExhCFMSetpt flow_p 161 Exhaust Fan CFM Set point Divide desir...

Page 106: ... screen and set VFD to Auto Motor doesn t come up to speed Motor under designed for the application Replace with larger motor Voltage too low at motor terminals Check across AC line and correct if possible Line wiring to motor too small Install larger wiring 60 Hz motor connected to 50 Hz line supply Replace unit with 50 Hz motor Motor wired for wrong voltage Check wiring Motor takes too long to a...

Page 107: ...orrosive material is moving through flow passages Housing Check for foreign material in housing Check if block off or other part is loose rattling during operation Electrical Confirm that lead in cable is secure Check for AC hum in motor or relay Check for starting relay chatter Check if 3 phase motor is wired for single phase High air velocity Check if duct work is too small for application Check...

Page 108: ...tricted fan inlet s Excessive airflow System Check for oversized duct work Check if access door is open Check if registers or grilles are not installed Check if filters are not in place Fan Check if backward inclined impeller is installed backward horsepower will be high Check if fan speed is too fast reduce fan speed System fan or interpretation of measurements The static pressure measured in a l...

Page 109: ...generally commanded open before supply fan start See Troubleshooting for Outdoor Air Damper Fan status A fan shutdown alarm will be generated if fan status is not confirmed within one minute after commanding the supply fan to run This alarm must be manually reset from the handheld LCD before normal fan operation is enabled Fan Status comes from the supply fan proving switch Also check the variable...

Page 110: ...cted or operating properly dehumidification may not operate The outdoor air temperature and relative humidity may be sent by the BAS Space dewpoint dehumidification cutout Dehumidification of the space is disabled when the space dewpoint falls below this threshold Check the space temperature and relative humidity sensors for proper operation Space temperature and relative humidity reading may be s...

Page 111: ...wn in the following photo and move the latch closer to the door Cooling Coil Coils need to be periodically cleaned to operate at design efficiency Soiled fins re duce the capacity of the coil demand more fan energy and provide an environment for odor and bacteria to grow and to be spread throughout the conditioned zone High pressure water can be used to clean coils Spray in the direction opposite ...

Page 112: ...le for deterioration MAINTENANCE Blower Motor Lubrication The ball bearings in the blower motor have been lubricated at the factory Motors that cannot be re greased are factory lubricated for the normal life of the bearings For motors that can be re greased lubrication is recommended at the following intervals New motors that have been stored for a year or more should also be re lubricated For inf...

Page 113: ...t 6 Check the automatic gas valve to insure that the gas valve seat is not leaking 7 Check the wiring connections to be sure they are secure and inspect wiring for any deterioration WARNING If any of the original wiring needs to be replaced it must be replaced with wiring material suitable for 221 F 105 C Improper wiring may generate heat cause a fire and physical injury or death 8 Label all wires...

Page 114: ...Final Resistance 2 1 0 W G 4 1 0 W G 2 4 1 25 W G Filter Media Sizes and Quantities Table 75 Filter Media Sizes and QuantitiesTable Chassis Quantity Outdoor Air Exhaust Air Supply Air 11 XX 4 20 x 20 2 20 x 20 4 20 x 20 21 XX 6 16 x 25 3 16 x 25 6 16 x 25 31 XX 6 20 x 24 4 16 x 25 9 20 x 24 35 XX 30 40 tons 9 20 x 24 3 20 x 20 6 20 x 24 2 20 x 20 6 row DX coil 4 20 x 24 4 20 x 20 4 row DX coil 6 2...

Page 115: ...dress ______________________________________________________________ City ______________________ State ______________ Zip ____________________ Phone _____________________ Startup Technician Name Print ___________________________________________________________ Phone __________________________ E Mail _______________________________ Unit Information Sales Order _______________________ Tag Mark _____...

Page 116: ...ensors and instruments are installed and wired Unit controls are off Electrical service matches unit voltage Electrical field wiring is complete All electrical connections are tightened Compressor and motor breakers or fuses are open disabled Main power is wired to the disconnect Discharge air sensor is installed per the Wiring instructions in the Rooftop DOAS Installation Manual Space temperature...

Page 117: ...mponent Nameplate Amps Running Amps Rotation Direction VFD Speed Hz Shaft Speed RPM L1 L2 L3 Supply Fan No 1 Supply Fan No 2 Supply Fan No 3 Exhaust Fan No 1 Exhaust Fan No 2 Exhaust Fan No 3 Refrigeration Component Nameplate Amps Running Amps Rotation Direction L1 L2 L3 Condensing Fan No 1 Condensing Fan No 2 Condensing Fan No 3 Condensing Fan No 4 Condensing Fan No 5 Condensing Fan No 6 Condensi...

Page 118: ...ty MBH _____________________ Gas Type _________________ F1 Capacity MBH __________________ F2 Capacity MBH ______________________ Verify pilot spark Parameter Low Fire 0 High Fire 100 Outdoor Air Temperature F Discharge Air Temperature F Natural Gas IDF Furnace Manifold Pressure InWc Set to Low Fire 0 355 InWc High Fire 100 3 5 InWc LP Gas IDF Furnace Manifold Pressure InWc Set to Low Fire 0 1 0 I...

Page 119: ...ectronics U S A Inc Commercial Air Conditioning Division 4300 North Point Parkway Alpharetta Georgia 30022 www lghvac com IM_LG_Rooftop_DOAS_02_19 Supersedes IM_LG_Rooftop_DOAS_11_17 IM_LG_Rooftop_DOAS_07_17 ...

Reviews: