background image

Fel! Använd fliken Start om du vill tillämpa

見出し

1 för texten som ska visas här.

62

8-3

PRINTING DIRECTLY FROM “LETATWIN PC EDITOR”

With using USB cable connection and “LETATWIN PC EDITOR” for Windows® personal

computer, the edited document can be directly printed.

1. Connect the LM-390A/PC with a personal computer with USB cable.

2. Press

OPTION .

The

[PC connection / OPTION setting screen]

appears.

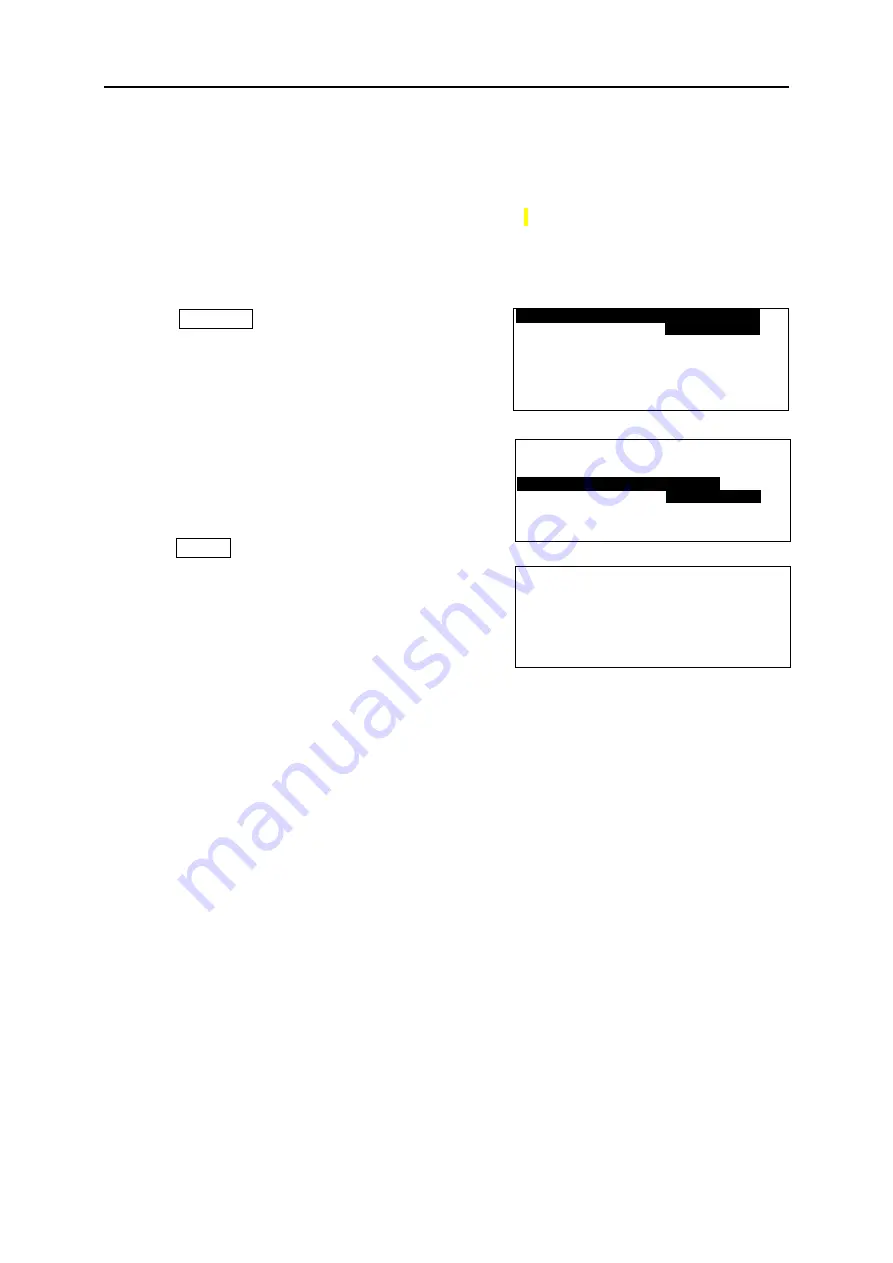
3. Press ▲/▼ key to select “

DIRECT PRINTING FROM

PC

".

4. Press ENTER.

5. The following message is displayed, which shows the

machine is ready to receive data from PC.

6. Operate

“PRINT”

on the

“LETATWIN PC EDITOR”

.

Note: How to use “LETATWIN PC EDITOR”

Please see the “HELP” menu of “LETATWIN PC EDITOR” after installing it.

The instruction manual is included in the “HELP” menu.

8-4

SAVING DATA DIRECTLY FROM “LETATWIN PC EDITOR”

With using USB cable connection and “LETATWIN PC EDITOR” for Windows® personal

computer, the edited document can be directly saved in the LM-390A/PC.

D A T A   F I L E   T R A N S F E R  

F R O M   P C  

D I R E C T   P R I N T I N G  

F R O M   P C  

O P T I O N  

D I R E C T   F I L E   T R A N S F E R

F R O M   P C

D I R E C T   P R I N T I N G  

F R O M   P C  

O P T I O N  

[ P C   C O N N E C T I O N ]  

R E A D Y   T O   R E C E I V E  

D A T A  

Summary of Contents for LM390

Page 1: ...USER MANUAL LM390 MK9 USB ...

Page 2: ...n of the machine The indications and their meanings are as follows WARNING Negligence of this could lead to death or serious injury of a worker CAUTION Negligence of this could lead to an injury of a worker damage to your properties or cause created data be lost Describes operation which may cause a trouble to the instrument and require a repair or operation which requires resetting operation etc ...

Page 3: ...r touch the printer head When just after printing it is very hot and it may cause burn on the hand and or the fingers Never touch the cutter part the blade of Half cutter and Full cutter of the instrument Touching the cutter part the blade may cause serious injury CAUTIONS Data cannot be stored permanently in the USB memory and the internal memory Please note that we are not responsible for damage...

Page 4: ...d dirt or foreign material attached to the tubes may cause trouble of the printer head 4 Do not clog the exit of the tapes and tubes Do not insert things in it Do not pull the tapes or tubes when it is being printed 5 Do not lift up the machine having its cassette cover The machine may fall 6 If there is strong external noise or shock applied to the machine during operation abnormal displays may a...

Page 5: ...achine due to the rapid change of the temperature In this case leave the machine in the room for more than 30 minutes and use it after confirming that the dew has disappeared 15 To avoid the cause of trouble do not use or store the machine in the following places 1 The place where direct sun light comes or the place near a thermal source such as a heater 2 There is a lot of dust or humidity 3 Do n...

Page 6: ...MABLES 17 3 1 INSTALLING OR REPLACING THE INK RIBBON 17 3 2 LOADING THE TUBES AND THE INK RIBBON CASE 19 3 3 LOADING THE TAPE CASSETTE AND THE INK RIBBON CASE 22 3 4 REPLACING THE HALF CUTTER 24 3 5 INSERTING THE USB MEMORY EXTERNAL MEMORY 24 4 BASIC OPERATION 25 4 1 PRINTING ON THE TUBE PITCH PRINT 26 4 2 PRINTING ON THE TAPE 28 4 2 1 PITCH PRINT ON THE TAPE 28 4 2 2 NORMAL PRINT ON THE TAPE 30 5...

Page 7: ... 12 LCD BRIGHTNESS 47 6 13 13 LCD BACKLIGHT 47 6 14 COPY PASTE 52 6 14 1 COPY 52 6 14 2 PASTE 52 6 15 MEMORY 53 6 15 1 INTERNAL MEMORY 53 6 15 2 EXTERNAL MEMORY 55 7 PRINTING 57 7 1 PRINT RANGE SETTING SCREEN 57 7 2 PRINTING LENGTH ALIGNMENT 57 7 3 CONTINUE PRINTING AFTER THE CONSUMABLES RUNNING OUT 57 8 EDITING DATA AND PRINTING BY A PERSONAL COMPUTER 59 8 1 INSTALLING LETATWIN PC EDITOR AND PRIN...

Page 8: ... characters and the external memory USB memory as option are available Usable tubes and tapes are as follows Max genuine tubes φ3 2mm φ3 6mm φ4 2mm φ5 2mm φ6 4mm Generic tubes φ2 5mm φ3 2mm φ3 6mm φ4 2mm φ5 2mm φ5 5mm φ6 5mm Shrinkable tubes φ2 5mm φ3 2mm φ3 6mm φ4 2mm φ5 2mm φ5 5mm φ6 5mm PVC free tubes φ3 2mm φ3 6mm φ4 2mm φ5 2mm Max genuine tapes width 5mm 9mm 12mm Half cutting allows you to ca...

Page 9: ...ACKAGE CONTENTS This machine comes with the following accessories Confirm that they are included before using the machine Main unit Carrying case Instruction manual AC adapter Not included in the shipment for Korea CD ROM Application software Winsign and the printer driver Ribbon case Ink ribbon black ...

Page 10: ... USB Memory slot Tape cassette Guide Ribbon case Winding core black Ribbon core green or blue Button A Button B M roller gold color Platen roller Head pressure switching lever Head release lever green Tube holder A Half cutter guide white Half cutter yellow color Ink ribbon setter M roller lever silver Tape cassette setter Lock button Half cutting depth adjusting lever AC adapter inlet USB cable p...

Page 11: ...for the NORMAL PRINT MODE See 6 5 NORMAL PRINT WIDTH Press this key to set the WIDTH of characters See 6 2 WIDTH C SPC Press this key to set the CHARACTER SPACE and LINE SPACE See 6 3 CHARACTER LINE SPACE VRT SHIFT C SPC Press these keys to set the VERTICAL PRINTING See 6 6 VERTICAL PITCH Press this key to set the PITCH LENGTH See 6 4 PITCH PRINT P CUT SHIFT PITCH Press these keys to set the way o...

Page 12: ...ize After deleting the entire document press SHIFT DELET execute the initialization DELET Press this key to delete the character on the cursor Press this key to initialize user default or factory default value under the function keys menu CLEAR SHIFT DELET Press this key to delete the entire documents on the INPUT screen 5 Ten key Press this key to input numbers comma and period 6 Press these keys...

Page 13: ...In PITCH PRINT MODE display the PITCH LENGTH See 6 4 PITCH PRINT In NORMAL PRINT MODE displays the PRINT LENGTH See 6 5 NORMAL PRINT 5 PITCH CUT Displays the way of the PITCH CUTTING See 6 4 2 PITCH CUT 6 BLOCK No Displays the BLOCK NO on the cursor 7 INPUT screen Displays the characters entered and the edit marks 8 STATUS screen The upper field displays the status of the sequential number if it h...

Page 14: ... set See 6 8 SEQUENCE 2 6 SELECTING THE SCREEN LANGUAGE Multiple screen languages can be selected according to the model type of your machine Model type Language LM 390A PC A11 T A12 TH English or Chinese T Traditional Chinese Character LM 390A PC A12 C A11 BS SASO C72 English or Chinese C Simplified Chinese Character LM 390A PC CE English German French Italian or Spanish HOW TO SELECT 1 Turn the ...

Page 15: ...ing C press ON OFF for about 3 seconds Then release ON OFF first while displaying the logo of LETATWIN 3 FEED screen appears 4 Slide the switching lever silver until it stops as shown in the figure 5 Put wet cloth with water or alcohol to the platen roller and clean it using key Note If the tube is jammed remove the consumables using this FEED function Do not pull the tube by hand F E E D ...

Page 16: ...t need to change the strength unless the printed result is too dark Changing from the standard pressure to the low pressure 1 Check that the release lever is at the middle position The lever is standing 2 While pressing the lock button then slide the printing pressure switching lever to the right 3 Now the strength of the printing pressure is low Changing from the low pressure to the standard pres...

Page 17: ...the ribbon case Name of each section Top Transparent Bottom Ribbon case Winding core Black Ribbon core Green or Blue The side with letters comes the top Button B Button A Insert Press Release Button B 2 While pressing Button B set the ribbon core green or blue as shown in the figure Then release the Button B to lock the ribbon Pay attention to the top and bottom of ribbon case 1 Holding the Windin...

Page 18: ...black surface appears The color changes in the order of transparent blue black When the surface black has appeared stop rotating 2 Replacing the ink ribbon first remove the ink ribbon from the ribbon case 1 While pressing Button B take out the ribbon core green or blue from the ribbon case 2 Next while pressing Button A take out the winding core black from the ribbon case Button B Winding core Bla...

Page 19: ...ver 2 Push the head release lever green 3 Slide the switching lever silver until it stops 4 a Pass the tubes under the holding plate b Extrude the tip of the tubes by 1 2cm from the machine 5 Place and hold the tube on the TUBE label and slide the Switching lever to lock Holding plate Pull out Switching lever Head release lever Switching lever 1 2cm ...

Page 20: ...Make sure the tube is loaded as illustrated bellow 6 Make sure the ribbon is not slack If the ribbon is slack rotate the winding core black toward the direction of the arrow to remove the slack of the ribbon 7 Hold the ink ribbon case as illustrated below and load it completely Check the slack Proper loading ...

Page 21: ...te cover 2 Push the head release lever 3 Slide the switching lever silver until it stops then remove the tube Note You don t need to remove the ink ribbon case when removing tube 4 Pull the head release lever green then close the cassette cover until it clicks Caution Be careful when operating the Head release lever If the lever is slipped off during operating the lever it might cause the injury ...

Page 22: ...l it stops as shown in the figure 4 Load the tape cassette Before loading the tape cassette prepare it as illustrated below 1 Pass the tape through the guides 2 Pull out the tip of the tape by about 4cm 1 5 8 5 Make sure the ribbon is not slack If the ribbon is slack rotate the winding core black toward the direction of the arrow to remove the slack of the ribbon Remove about 4cm Guide Head releas...

Page 23: ...not slack 7 Pull the head release lever green 8 Close the cassette cover until it clicks Removing the tape cassette 1 Open the cassette cover 2 Push the head release lever 3 Remove the tape cassette Note You don t need to remove the ink ribbon case when removing tape cassette 4 Pull the head release lever green then close the cassette cover until it clicks Proper loading ...

Page 24: ... sure to use the exclusive half cutter LM HC340 yellow color LM HC320 orange color cannot be used for LM 390A PC Warning Never touch the blade of the cutter The blade has sharp edge Touching the blade might cause injury 3 5 INSERTING THE USB MEMORY EXTERNAL MEMORY 1 Open the USB memory slot cover at the bottom of the machine 2 Insert the USB memory completely Check the top and bottom of the USB me...

Page 25: ...ial with pressing SHIFT Esc P MATERIAL the CHARACTER SIZE is automatically changed to AUTO However when the selected printed material is TAPE CHARACTER SIZE is not changed to AUTO If any document is remained in the INPUT screen before turning off the power the right screen appears when turning the power on next time Press key to select INITIALIZE or CONTINUE key Move the cursor between MATERIAL an...

Page 26: ...tters Press key to move the cursor to 3 Press PITCH to set PITCH LENGTH See 6 4 1 PITCH LENGTH Press key to set 18 0 Press ENTER Note It is also possible to input the value directly with the Ten keys 4 Press key to move the cursor after Press RPT to set REPEAT See 6 7 REPEAT Press key to set 1 Press ENTER Note It is also possible to enter the value directly with Ten key 5 Input U 1 Press BLOCK to ...

Page 27: ... set the END NUMBER Input 1 0 0 7 in the END Press ENTER 11 Press PRINT PRINTING RANGE setting screen appears See 7 PRINTING 12 Press ENTER PRINTING LENGTH ALIGNMENT screen appears Press ENTER to start printing 13 The printed result is as shown below P R I N T C O P I E S 1 S T A R T N O 1 E N D N O 3 1 8 0 C U T 0 0 3 U1 COM T U B E 3 2 m m AUTO STD STD 005 B B 1 8 0 C U T 0 0 3 1 COM X S E Q U E...

Page 28: ...ymbol is indicating A capital letters Press key to move the cursor to 3 Press PITCH to set PITCH LENGTH See 6 4 1 PITCH LENGTH Press key to set 15 0 Press ENTER Note It is also possible to input the value directly with Ten key 4 Press key to move the cursor after Input U 1 Press BLOCK to create a new block 5 Input S L D then X 6 Press SEQ to set SEQUENCE See 6 8 SEQUENCE Press key to select 16 SCA...

Page 29: ...NTER Note It is also possible to input the value directly with Ten key 10 Press PRINT See 7 PRINTING PRINTING RANGE setting screen appears 11 Press ENTER PRINTING LENGTH ALIGHNMENT screen appears Press ENTER again to start printing 12 The printed result is as shown below 1 SLD X 1 5 0 L I N E 0 0 2 S T A R T 1 8 E N D 1 D B X COM 1 5 0 L I N E 0 0 3 T A P E 9 m m AUTO STD STD 001 B N X COM 1 5 0 L...

Page 30: ...letters Press key to move the cursor to 3 In order to change to NORMAL PRINT MODE press DELET to delete See 6 5 NORMAL PRINT 4 Press SHIFT SIZE TP LNG and set PRINTING LENGTH See 6 5 1 Printing length Press key to select AUTO OFF Then press key to set the LENGTH and input 4 0 5 Press ENTER MARGIN setting screen appears Press ENTER 40mm 12mm A U T O C U T 0 0 1 T A P E 1 2 m m 3 0 STD STD 001 B P R...

Page 31: ...NPUT screen appears Press key to move the cursor after Input M A X SPACE L E T A T W I N L M SHIFT A 3 9 0 A SHIFT F P C 7 Press PRINT to start printing See 7 PRINTING 8 The printed result is as shown below MAX LETATWIN LM 390A PC LM 390A 4 0 C U T 0 0 1 T A P E 1 2 m m 3 0 STD STD 001 ...

Page 32: ...hat the arrow symbol is indicating A capital letters 2 Press 2 To input the small letter a 1 Press A a and make sure that the arrow symbol is indicating a small letters 2 Press 3 To input 1 Press SHIFT and check that the symbol SHIFT is on 2 Press 5 2 DELETING CHARACTERS 1 DELET 1 Press DELET 2 The character on the cursor is deleted 2 BS 1 Press BS 2 The character before the cursor is deleted A A ...

Page 33: ...l m n o 7 p q r s t u v w z When selecting Chinese C or Chinese T as the screen language you can input the Chinese characters according to GB code or BIG5 code See 2 6 SELECTING SCREEN MESSAGE Inputting with CODE function 1 Press CODE The CODE setting screen appears 2 Press 4 0 key according to the table of code to input 3 Press ENTER Note You can input the characters without the table of code 1 P...

Page 34: ... Frame NO Feed the head of tube YES Printing length AUTO Low temp mode NO Margin 2 mm each LCD backlight LIGHT Repeat TAPE 1 TUBE 2 Note By pressing SHIFT BS INIT in INPUT screen all of setting items can be returned to the default values The italic characters show that these setting items are unable to return to the default value by initializing 6 1 SIZE Setting the CHARCTER SIZE of the line at th...

Page 35: ...erial is TAPE AUTO cannot be selected in CHARACTER SIZE 6 2 WIDTH Setting the CHARACTER WIDTH at the cursor position Note You can select CHARACTER WIDTH according to the following table PRINTING MODE PRINTING DIRECTION STANDARD CONDENSED EXTENDED Pitch print Tube Horizontal Vertical Pitch print Tape Horizontal Vertical Normal print Tape Horizontal Vertical Note For Vertical printing direction see ...

Page 36: ...ACE 3 Press key to select the value of the L SPACE 4 Press ENTER Note In some cases the error message SIZE OVER may appear depending on the size of the material or character and the number of lines If the error message appears check the size of the material character and the number of lines See 9 1 ERROR MESSAGE LIST A B C C D E Character space Line space C H A R A C T E R L I N E S P A C E C S P ...

Page 37: ...to the NORMAL PRINT MODE See 6 5 NORMAL PRINT Note In the PITCH PRINT MODE it prints every block at the same pitch length and centers the texts as illustrated bellow Example Tube Tape X10 SLD19 SLD20 COM X10 SLD19 SLD20 COM Pitch length Block Block Block Block Block PITCH PRINT MODE NORMAL PRINT MODE 3 0 0 C U T 0 0 1 ABC T A P E 1 2 m m AUTO STD STD 002 B P ABC 3 0 0 C U T 0 0 1 T A P E 1 2 m m A...

Page 38: ...TO is selected pitch length is automatically adjusted according to the number of characters character size character width etc 6 4 2 PITCH CUT Setting how to divide each block Selectable items No LINE DOTS HALF CUTTING ABC 123 ABC 123 ABC 123 ABC 123 1 Press SHIFT PITCH P CUT The PITCH CUTTING select screen appears 2 Select by pressing key and press ENTER Then the INPUT screen appears Note PITCH C...

Page 39: ...IFT SIZE TP LNG to display the PRINTING LENGTH setting screen 2 Press key or Ten key to input the value of the LENGTH Press ENTER And then the MARGIN setting screen appears 6 5 2 MARGIN Setting the left and right MARGIN of a document 1 After setting the PRINTING LENGTH the MARGIN setting screen appears 2 Press key or Ten key to input the value of the MARGIN Press ENTER Setting range LENGTH 10 300m...

Page 40: ...een appears 2 Press key to select 3 Press ENTER Note Both of VERTICAL and HORIZONTAL cannot be set in a same document If the error message SIZE OVER appears check the size of the material character size and the number of lines See 9 1 ERROR MESSAGE LIST 6 7 REPEAT Setting the number of multiple copies of a particular block A1 COM U1 A1 COM COM COM U1 COM COM COM REPEAT 1pc REPEAT 3pcs Selectable i...

Page 41: ...screen appears 2 After selecting the type of the SEQUENCE using key press ENTER The START and the END number setting screen appears 3 Press key or Ten key to input the value of the START 4 Press key to move the cursor to the END And then Press key or Ten key to input the value of the END Selectable items 8 SCALE 0 7777 10 SCALE 0 9999 16 SCALE 0 FFFF ALPHABET A Z 2 0 0 C U T 0 0 1 ABC R E P E A T ...

Page 42: ... document When you change the PITCH PRINT MODE to the NORMAL PRINT MODE all the SEQUENCE settings are automatically cancelled except for the first SEQUENCE setting 6 9 FRAME Setting to frame a document This function allows you to surround the text with a frame LM 390A PC LM 390A PC 1 Press SHIFT RPT FRAME The FRAME setting screen appears 2 Press key to select YES and press ENTER Note In the PITCH ...

Page 43: ...lowing 8 symbols Selectable group of symbols NUMERAL ALPHABET IN CIRCLE UNIT OFFICE SYMBOLS SUPERSCRIPT SUBSCRIPT ELECTRICAL INSTALLATION ITALIC GREEK LARGE RUSSIAN SMALL RUSSIAN Note LARGE RUSSIAN and SMALL RUSSIAN can be displayed in the LM 390A PC A12 C A11 BS C72 SASO and CE when the screen language is English Please check the model of your LM 390A PC 2 0 0 C U T 0 0 1 N U M E R A L B P 2 0 0 ...

Page 44: ...irst character of the word to be saved And then press ENTER The ENDING POSITION setting screen appears 3 Press key to move the cursor to the last character of the word And then press ENTER The FILE NO setting screen appears 4 Press key or Ten key to input the file No 5 Press ENTER to register the selected word in the file Setting range 1 30 Selectable Items RECALL SAVE DELETE INITI INITIALIZE 2 0 ...

Page 45: ... Select DELET And then press ENTER 2 Press key or Ten key to input file No 3 Press ENTER to delete the saved word INITI INITIALIZE Deleting all of the registered WORD 1 Select INITI And then press ENTER 2 Press key to select YES 3 Press ENTER to initialize 2 0 0 C U T 0 0 1 M E M O R Y O F W O R D R E C A L L B P 2 0 0 C U T 0 0 1 F I L E N O 1 MAX B P 2 0 0 C U T 0 0 1 M E M O R Y O F W O R D D E...

Page 46: ...configure then press ENTER while the cursor is positioned at the desired item Note Press ESC key to cancel changes O P T I O N P R I N T I N G D E N S I T Y L O W T E M P M O D E F E E D T H E H E A D O F T U B E O P T I O N 6 9 M A R K P O S I T I O N O F P R I N T I N G L I N E C U T T I N G P O S I T I O N O P T I O N A U T O P O W E R O F F D E F A U L T V A L U E O F P I T C H L E N G T H D E...

Page 47: ...In such a case besides adjusting the PRINTING DENSITY the printing result might be improved slightly by activating LOW TEMP MODE Note When this function activates printing speed is changed as the above table 6 13 3 FEED THE HEAD OF TUBE Setting the FEED THE HEAD OF TUBE After selecting the item by pressing key press ENTER to register the setting Note This function is activated only for printing on...

Page 48: ...By pressing key changing the vertical position of printing line Increment higher Decrement lower Press ENTER to register the setting 6 13 6 CUTTING POSITION Adjusting the CUTTING POSITION By pressing key changing the cutting position Increment margin at right side getting bigger Decrement margin at left side getting bigger Press ENTER to register the setting Selectable items 6 9 6_ 9_ 6 9 6 9 M A ...

Page 49: ...esirable value by pressing key or Ten key press ENTER to register the setting Note If you press the DELET the value is initialized to the factory default value 6 13 9 DEFAULT VALUE OF REPEAT Setting the default value of REPEAT Note The default value is set initially as TUBE 2pcs and TAPE 1pcs at our factory After setting the desirable value by pressing key or Ten key press ENTER to register the se...

Page 50: ...11 22 33 at our factory When you use the REPEAT and SEQUENCE function at the same time you can select the printing style from A 11 22 33 or B 123 123 Example REPEAT 2 pcs SEQUENCE 01 03 A 11 22 33 01 01 02 02 03 03 B 123 123 01 02 03 01 02 03 1 Select the PRINTING STYLE OF RPT SEQ in the OPTION menu 2 Press to select the printing style Note If you press the DELET key the selection is initialized t...

Page 51: ...llowing way 1 Turn on the power 2 In the PRINTED MATERIAL setting screen To increase the LCD BRIGHTNESS press P key To decrease the LCD BRIGHTNESS press L key Depending on the temperature LCD BRIGHTNESS adjustment might improve the visibility of the screen 6 13 13 LCD BACKLIGHT Adjusting the LCD BACKLIGHT power level To save the power consumption or to optimize the screen visibility adjust the LCD...

Page 52: ... a block can also be copied and pasted 6 14 1 COPY 1 Press key move the cursor under the block you want to copy 2 Press SHIFT MEMORY COPY 6 14 2 PASTE 1 Press key move the cursor under the block you want to paste 2 Press SHIFT USB MEM PASTE 2 0 0 C U T 0 0 1 COM T U B E 3 2 m m AUTO STD STD 002 B P 2 0 0 C U T 0 0 1 COM C O P I E D B P 2 0 0 C U T 0 0 1 COM T U B E 3 2 m m AUTO STD STD 002 B P COM...

Page 53: ...le items RECALL SAVE DELETE INITI INITIALIZE SAVE Saving the created document in the selected file No 1 Select SAVE And then press ENTER The FILE NO selection screen appears Note The first 10 characters of the document that has been saved are displayed in this screen If any document is not saved in the selected file No NO FILE appears 2 Press key or Ten key to select the file No that NO FILE is di...

Page 54: ...en the message which asks overwriting appears DELETE Deleting the saved document 1 Select DELETE And then press ENTER The FILE NO inputting screen appears 2 Press key or Ten key to select the desired file No Press ENTER to delete the file INITIALIZE Deleting all of the file in the internal memory 1 Select INITIALIZE And then press ENTER 2 After selecting YES by pressing key press ENTER to initiali...

Page 55: ... USB memory into LM 390A PC See 3 5 INSERTING THE USB MEMORY 2 Press USB MEM The USB MEMORY setting screen appears 3 After selecting the item by pressing key press ENTER 4 The following screens are displayed according to the selected item Press key to select the item U S B M E M O R Y R E C A L L S A V E D E L E T E S A V E F O L D E R S A M P L E E X T L M F F I L E D A T E D E L E T E F O L D E ...

Page 56: ...etting data Selects LMF or CSV FILE Displays the file name To save input the file name within 8 alphanumeric characters Displays the previous next file DATE Displays the date when the file is created To save input the last two digits of the year month date manually 5 To save the document input all of the above items with alphanumeric characters The following alphanumeric characters can be input 0 ...

Page 57: ...LIGNMENT screen appears 7 2 PRINTING LENGTH ALIGNMENT Adjusting the total printing length The total printing length of tubes or tapes can be adjusted 1 PRINTING LENGTH ALIGNMENT screen appears The upper field automatically displays the total calculated length to be printed The lower field displays the value to adjust 2 Press key to decrease or increase the alignment value If 8mm is input as the al...

Page 58: ...ing after replacing them with new ones 1 During the printing when the consumables such as TUBE and or INK RIBBON run out the following message appears on the screen 2 Replace the used consumable with new one 3 Press ENTER to continue printing Note When continue printing the one last printed block might be printed again to prevent incompletely printed block U N P R I N T E D B L O C K S R E M A I N...

Page 59: ...TWIN PC EDITOR terminate other application software and resident type software 2 Insert the included CD ROM into the computer 3 Start installing the software by clicking the Install Uninstall the LETATWIN PC EDITOR 4 Proceed with the installation process according to the message displayed on the screen Note If the previous version of LETATWIN PC EDITOR has been installed to the computer already ma...

Page 60: ...d 2 Insert the included CD ROM into the computer 3 Connect the LM 390A PC to the computer with USB cable then turn it on Select printed material 4 Press OPTION The PC connection OPTION setting screen appears 5 Press key to select DIRECT PRINTING FROM PC 6 Press ENTER 7 Press key to select YES 8 Press ENTER 9 The following message is displayed which shows the machine is ready to receive data from P...

Page 61: ...n be used without problems Message displayed for Windows Vista 12 When the following message appears on the computer select Yes Restarts immediately then click Finish 13 Restart the computer Installation complete 8 2 EDITING DATA ON A PERSONAL COMPUTER The CSV and LMF data can be created and be edited with LETATWIN PC EDITOR in the personal computer CSV data includes only document data LMF data in...

Page 62: ...ws the machine is ready to receive data from PC 6 Operate PRINT on the LETATWIN PC EDITOR Note How to use LETATWIN PC EDITOR Please see the HELP menu of LETATWIN PC EDITOR after installing it The instruction manual is included in the HELP menu 8 4 SAVING DATA DIRECTLY FROM LETATWIN PC EDITOR With using USB cable connection and LETATWIN PC EDITOR for Windows personal computer the edited document ca...

Page 63: ...TTING RANGE 0 50 When 0 is selected the data is loaded into the INPUT SCREEN When 1 50 are selected the data is saved into the INTERNAL MEMORY SEE 6 15 INTERNAL MEMORY Note The existing data on the INPUT SCREEN or in the INTERNAL MEMORY is overwritten Note How to use LETATWIN PC EDITOR Please see the HELP menu of LETATWIN PC EDITOR after installing it The instruction manual is included in the HELP...

Page 64: ...ers were in PITCH PRINT MODE In PITCH PRINT MODE only up to 15 sequential numbers can be set in a file SET ONLY ONE N Attempted to set more than 2 sequential numbers per file in NORMAL PRINT MODE In NORMAL PRINT MODE only one sequential number can be set in a file DELETE OTHER P FIRST When there are several P marks attempted to delete the first P Delete all the other P then delete the first P SET ...

Page 65: ...ITCH LENGTH Or reduce the character space character width number of characters or change the character size to smaller size OVER TOTAL PRINT LENGTH The total print length is too long Tube maximum 20m Tape maximum 5m Reduce the PRINTING LENGTH such by dividing the file to two files or dividing the print range using the print range setting OVER THE NUMBER OF COPIES The total print length is too long...

Page 66: ...d only file in the USB memory To overwrite or delete the read only file change its property to rewritable file on a personal computer PRIOR TO START PRINTING LOAD THE MATERIAL TUBE TAPE Attempt to start printing from LETATWIN PC EDITOR on a computer without setting the print material in the LM 390A PC Set the print material prior to start printing PC CONNECTION DATA ERROR The data received from a ...

Page 67: ...e that the tube diameter is correct Make sure that the ink ribbon has been set properly Make sure that there is no dirt stain etc adhered to the tube Make sure that there is no dirt stain etc adhered to the thermal head If the ambient temperature becomes lower than 10 or higher than 35 printing faults may occur Note Try adjusting PRINTING DENSITY in OPTION menu When under the low temperature by ma...

Page 68: ...as been set properly Make sure that the Half cutting depth adjustment lever is properly set TUBE position Check the cutter has been worn out or not If the cutter has been used more than 5 000 cuttings replace it with new one Make sure to use the exclusive half cutter LM HC340 yellow color LM HC320 orange cannot be used for LM 390A PC Check that there is no waste of the tape or tube caught in the e...

Page 69: ...mum printing length Tube 20m Tape 5m Maximum number of characters to input 5 000 characters per file Character size 2 3 4 6mm height Usable tube φ2 5 to 6 5 PVC tube Shrinkable tube Usable tape Width 5 9 12mm Max genuine tape Tube cutting method Auto half cut manual full cut Internal memory 100 000 characters Maximum 50 files External memory USB memory Interface USB 2 0 full speed Power supply DC1...

Page 70: ... with the instructions may cause harmful interference to radio communications However there is no guarantee that interference will not occur in a particular installation If this equipment does cause harmful interference to radio or television reception which can be determined by turning the equipment off and on the user is encouraged to try to correct the interference by one or more of the followi...

Page 71: ...Fel Använd fliken Start om du vill tillämpa 見出し 1 för texten som ska visas här 71 11 APPENDICES GREEK ...

Page 72: ...Fel Använd fliken Start om du vill tillämpa 見出し 1 för texten som ska visas här 72 CE 自己宣言書コピーを貼付 ...

Page 73: ...Fel Använd fliken Start om du vill tillämpa 見出し 1 för texten som ska visas här 73 ...

Page 74: ...Fel Använd fliken Start om du vill tillämpa 見出し 1 för texten som ska visas här 74 ...

Page 75: ...Fel Använd fliken Start om du vill tillämpa 見出し 1 för texten som ska visas här 75 ...

Reviews: