


The battery normally requires no charging or maintenance throughout its life; however, no battery lasts
forever. If the battery fails, the date, time, and configuration information (including passwords) are lost. An
error message is displayed when you turn on the computer.
Refer to the “Lithium coin cell battery notice” in the
Safety, Warranty, and Setup Guide
for information about
replacing and disposing of the battery.
To replace the battery, do the following:
1. Remove all media from the drives and turn off all attached devices and the computer. Then, disconnect
all power cords from electrical outlets and disconnect all cables that are connected to the computer.
2. Remove the computer cover. See “Removing the computer cover” on page 111.
3. Locate the battery. See “Locating parts on the system board” on page 35.
4. Remove any parts that might impede your access to the battery. Depending on your computer model,
you might need to remove the PCI card for easier access to the battery. See “Installing or replacing a
PCI card” on page 160 or “Installing or replacing a full-length PCI card” on page 165.
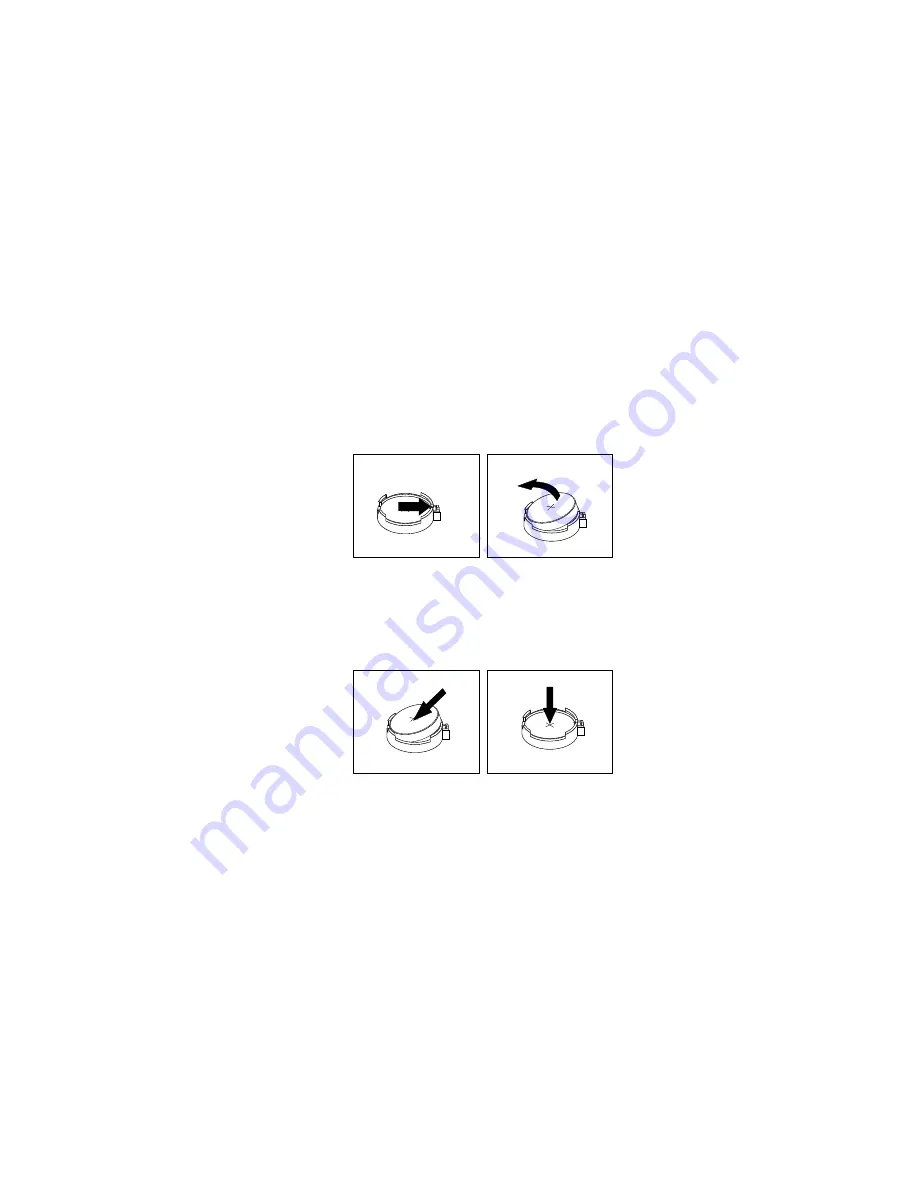
5. Remove the old battery.
Figure 120. Removing the battery
6. Install a new battery.
Figure 121. Installing a battery
7. Reinstall the PCI card if you have removed it. See “Installing or replacing a PCI card” on page 160 or
“Installing or replacing a full-length PCI card” on page 165.
8. Reinstall the computer cover and connect the cables. See “Completing the parts replacement” on
Note:
When the computer is turned on for the first time after replacing the battery, an error message
might be displayed. This is normal after replacing the battery.
9. Turn on the computer and all attached devices.
10. Use the Setup Utility program to set the date, time, and any passwords. See “Using the Setup Utility
What to do next:
• To work with another piece of hardware, go to the appropriate section.
Installing or replacing hardware
179
Summary of Contents for ThinkStation P500
Page 1: ...ThinkStation P500 and P700 Hardware Maintenance Manual Machine Types 30A6 30A7 30A8 and 30A9 ...
Page 14: ...8 ThinkStation P500 and P700 Hardware Maintenance Manual ...
Page 18: ...12 ThinkStation P500 and P700 Hardware Maintenance Manual ...
Page 19: ...1 2 Chapter 1 Read this first Important safety information 13 ...
Page 20: ...1 2 14 ThinkStation P500 and P700 Hardware Maintenance Manual ...
Page 25: ...1 2 Chapter 1 Read this first Important safety information 19 ...
Page 26: ...1 2 20 ThinkStation P500 and P700 Hardware Maintenance Manual ...
Page 29: ...Chapter 1 Read this first Important safety information 23 ...
Page 39: ...Figure 5 Locating major FRUs and CRUs Chapter 2 Product overview 33 ...
Page 52: ...46 ThinkStation P500 and P700 Hardware Maintenance Manual ...
Page 60: ...54 ThinkStation P500 and P700 Hardware Maintenance Manual ...
Page 66: ...60 ThinkStation P500 and P700 Hardware Maintenance Manual ...
Page 100: ...94 ThinkStation P500 and P700 Hardware Maintenance Manual ...
Page 108: ...102 ThinkStation P500 and P700 Hardware Maintenance Manual ...
Page 216: ...210 ThinkStation P500 and P700 Hardware Maintenance Manual ...
Page 220: ...214 ThinkStation P500 and P700 Hardware Maintenance Manual ...
Page 230: ...224 ThinkStation P500 and P700 Hardware Maintenance Manual ...
Page 231: ......
Page 232: ......