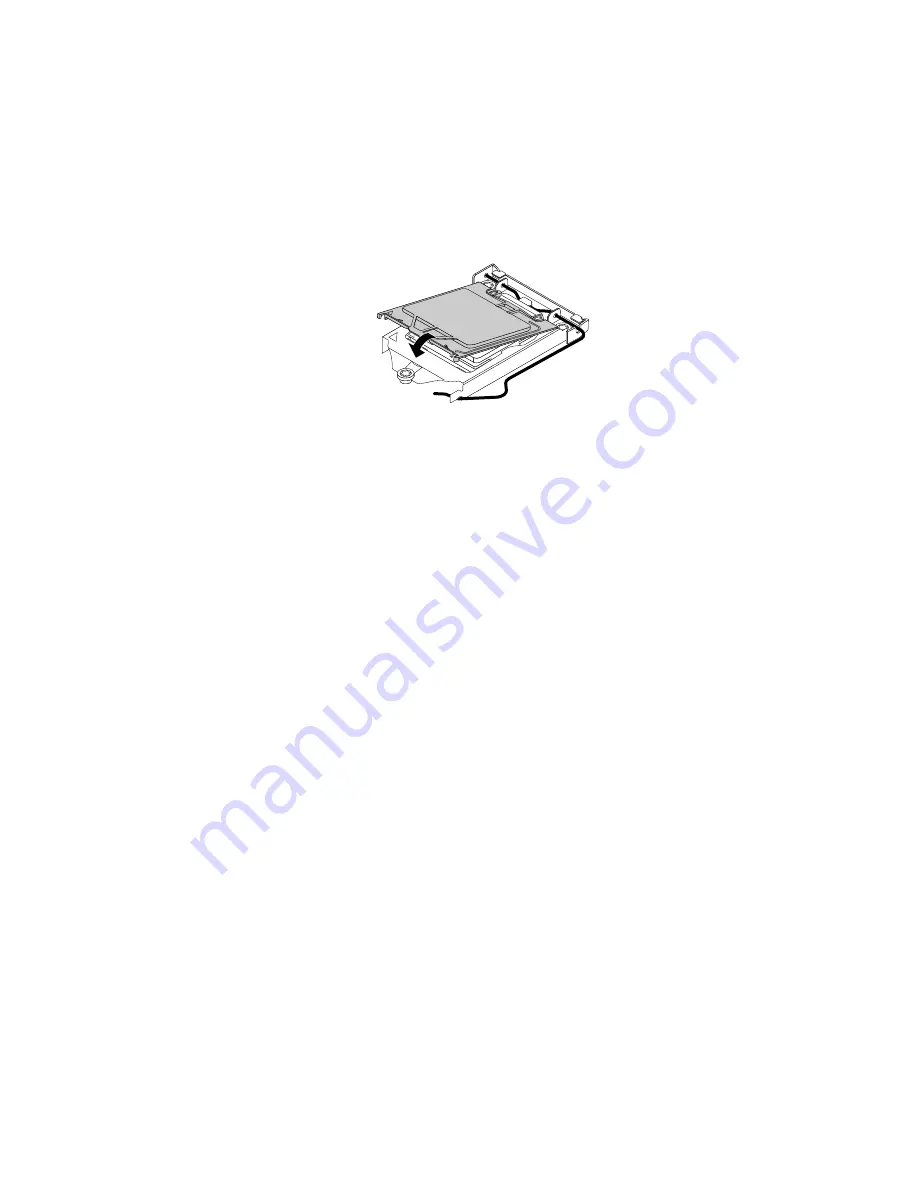
1. After you have removed the microprocessor from the failing system board, close the microprocessor
retainer and then put the lever to the locked position to secure the retainer in place.
2. Note the orientation of the socket cover, and install one side of the socket cover onto the microprocessor
socket. Carefully press the other side of the socket cover downward until the socket cover snaps
into position.
Note:
Your microprocessor socket and cover might look slightly different from the illustration.
Figure 53. Installing the socket cover onto the microprocessor socket
3. Carefully check the four corners of the socket cover to ensure that the cover is seated securely.
4. Follow any additional instructions included with the replacement part you received.
Replacing the front audio and USB assembly
Attention:
Do not open your computer or attempt any repair before reading and understanding the Chapter
1 “Read this first: Important safety information” on page 1.
To replace the front audio and USB assembly, do the following:
1. Remove any media from the drives and turn off all attached devices and the computer. Then, disconnect
all power cords from electrical outlets and disconnect all cables that are connected to the computer.
2. Remove the computer cover. See “Removing the computer cover” on page 105.
3. Remove the front bezel. See “Removing and reinstalling the front bezel” on page 106.
4. Pivot the drive bay assembly upward and disconnect the front audio and USB assembly cables from the
system board and note the cables routing. See “Locating parts on the system board” on page 34.
5. Lower the drive bay assembly. See “Accessing the system board components and drives” on page 108.
Chapter 11
.
Installing or replacing hardware
137
Summary of Contents for ThinkCentre M79
Page 1: ...ThinkCentre M79 Hardware Maintenance Manual Machine Types 10CT 10CU 10CV and 10CW ...
Page 6: ...iv ThinkCentre M79 Hardware Maintenance Manual ...
Page 8: ...vi ThinkCentre M79 Hardware Maintenance Manual ...
Page 16: ... 18 kg 37 lb 32 kg 70 5 lb 55 kg 121 2 lb 8 ThinkCentre M79 Hardware Maintenance Manual ...
Page 19: ...1 2 Chapter 1 Read this first Important safety information 11 ...
Page 20: ...1 2 12 ThinkCentre M79 Hardware Maintenance Manual ...
Page 21: ...Chapter 1 Read this first Important safety information 13 ...
Page 27: ...Chapter 1 Read this first Important safety information 19 ...
Page 31: ...Chapter 1 Read this first Important safety information 23 ...
Page 40: ...Figure 4 Component locations 32 ThinkCentre M79 Hardware Maintenance Manual ...
Page 68: ...Figure 8 Installing a padlock 60 ThinkCentre M79 Hardware Maintenance Manual ...
Page 80: ...72 ThinkCentre M79 Hardware Maintenance Manual ...
Page 98: ...90 ThinkCentre M79 Hardware Maintenance Manual ...
Page 112: ...104 ThinkCentre M79 Hardware Maintenance Manual ...
Page 168: ...160 ThinkCentre M79 Hardware Maintenance Manual ...
Page 172: ...164 ThinkCentre M79 Hardware Maintenance Manual ...
Page 175: ...Appendix D China Energy Label Copyright Lenovo 2014 167 ...
Page 176: ...168 ThinkCentre M79 Hardware Maintenance Manual ...
Page 178: ...170 ThinkCentre M79 Hardware Maintenance Manual ...
Page 184: ...176 ThinkCentre M79 Hardware Maintenance Manual ...
Page 185: ......
Page 186: ......


