8
EN
SEAT
Seat regulation is the most important adjustment which must be made by the bicycle user. This adjustment must be performed by
the user after the purchase. Over time (as height, forces, cycling experience change), seat adjustment should change. The adjust-
ment influences comfort and positioning during the ride and the pedalling force. The seat may be adjusted in three planes:
Height
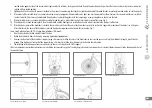
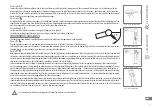
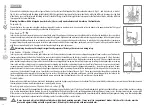
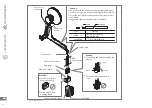
It is adjusted by pushing in and pulling out the seat from the frame, Fig. 8. One has to remember that the support must be inserted into
the frame at least 2,5 x the diameter of the underseat pipe and it must not protrude at more than the mark of maximum protrusion.
•
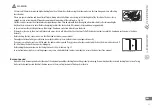
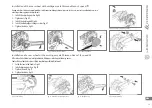
Sit on the bicycle,
•
Place the heel on the pedal,
•
Set the crank so the pedal reaches the lowest position,
•
The seat is located at proper height it your leg is stretched to the maximum. However, you must not lean down on the seat to reach the pedal or to lift the heel
off pedal. Fig. 9.
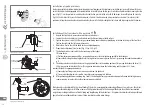
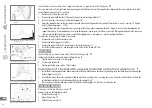
After the adjustment is done, check if the seat is located in the axis of symmetry of the bicycle. At the end, following the values of moments listed in this user manual,
tighten the screw or clip locking the support. Fig. 10. A shock absorbing bracket should be adjusted using a screw 1, which, turned left – becomes unscrewed and
thus we make the hardness lower. By turning screw 1 to the right, we increase hardness of its operation. Fig. 8.1.
Front-back and up-down
These settings result from individual preferences and constitution characteristics of the biker. However, improper adjustment may lead to back pains, aching shoulder
or knees. The closer to the handlebars the seat is and the lower its nose – the bigger the force we apply while pressing the pedals, and the crotch area of the biker is
less strained. However, in the beginning, it is the best to adjust the seat to a neutral, flat position. Any corrections should be introduced along with gained experience
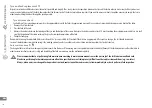
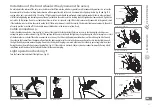
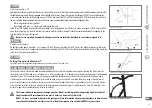
and increasing skills. The adjustment is made by setting the seat tracks in the yoke, Fig. 11 and Fig. 12. Tighten yoke screws with the moment engraved in the
component, then according to moments listed in this manual. In case of bicycles with full shock absorption one has to pay attention to the minimum seat height. The
bracket set in too deep may hit the elements of the back rocker arm during operation.
NOTE:
In case of bicycles with frame made of carbon (carbon fibre), the seat support must be seated in the frame earlier, applying special paste (attached to every
bicycle with carbon frame) along the entire circumference of the seat support placed in the frame. It is necessary in order to eliminate minimum loose spaces at joints
between elements of a bicycle made of carbon.
HANDLEBARS
Handlebars height setting provides comfort and effective pedalling. Handlebars height is regulated depending on the support type – with a wedge, Fig. 13, or
a-head, Fig. 14. Check which type is used in your bicycle. Some handlebars supports in Kross and Le Grand bicycles have a regulated setting angle. It enables each
user to adjust the handlebars to their own needs.
Bracket with wedge
In order to adjust the height of this type of bracket, unscrew the fixing screw located at the top of the bracket. It causes the locking wedge in the steering pipe to
loosen, and the bracket may be easily slid in and out. While adjusting the handlebars, one must pay attention to maximum protrusion of the handlebars bracket so
the upper edge of the warning mark is not exceeded. If there is no warning mark, the handlebars must be installed in such a way that 6.5 cm of the bracket remains
inside the fork. After the adjustment has been finished, tighten the bracket screw with a 18-22 Nm moment.
A-head bracket
In the a-head system, changing the handlebars height is impossible. Because of this, if the height needs to be adjusted, please turn to an authorised service station.
Tightening the handlebars support with the handlebar – in order not to destroy the thread – must be performed by tightening uniformly, 3 threads at one, starting
with diagonally positioned screws.
i
Fig. 8.1.
Fig. 8. Seat height regulation
Fig. 9. Properly adjusted seat height
Fig. 10. Clip of seat bracket
Fig. 11. Seat yoke


