


Reference
Multisample Edit
OASYS PCI
103
Group settings for all Multisamples are controlled by the top Multisample. The
Exclusive Group parameters for all other Multisamples will be grayed out.
Exclusive Group settings not available in some Patches
Some Patches may not support Exclusive Group functionality. If a Multisample is
placed in such a Patch, all Exclusive Group parameters will be grayed out.
Show Parameter
This menu allows you to choose one parameter, such as Volume or Pan, to be
displayed for all of the Key Ranges simultaneously. The value is shown as a slider
within the Key Range boxes above the onscreen keyboard, allowing you to see the
settings for all Key Ranges at once.
For complete explanations of the individual parameters, see their descriptions
above.
None.
This makes the sliders disappear, for easier viewing of the Sample names.
Volume.
This shows the sliders for the Volume offset.
Pan.
This shows the sliders for the Pan offset.
Cutoff.
This shows the sliders for the Cutoff offset.
Tune.
This shows the sliders for the Tune offset.
Decay.
This shows the sliders for the Decay offset.
Exclusive Group.
This shows the sliders for the Exclusive Group assignments.
To select the parameter being displayed, use the Show Parameter menu. The
selections include most of the numeric edit
fi
elds at the top of the window: Volume,
Pan, Cutoff, Tune, Decay, and Exclusive Group. A
fi
nal setting, None, makes the
sliders disappear, for easier viewing of the sample names.
To edit the parameter for a speci
fi
c range, just move the on-screen slider. The value
is shown within the slider handle. To edit the value numerically (using keypad,
inc/dec etc.), use the normal edit
fi
elds at the top of the window.
Sliders are drawn on top of sample names. If you need to have an unobstructed
view of all of the names, choose “None” from the Show Parameter menu to
temporarily hide the sliders.
Note that the Multisample does not actually contain
fi
ltering, panning, and so on;
these offsets depend on the Patch to support these functions. Some Patches may not
support all of the parameters seen here.
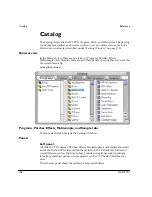
Assigning a Sample to a new Key Range
To add a Sample and create a new Key Range containing the Sample, drag the
Sample from the Catalog onto the keyboard graphic. Keys hilight as you drag over
them; the assignment is made when you release the mouse button.
Summary of Contents for Soundlink DRS OASYS PCI
Page 4: ...iv OASYS PCI English ...
Page 5: ...Introduction OASYS PCI 1 Introduction ...
Page 9: ...Using the OASYS PCI OASYS PCI 5 Using the OASYS PCI ...
Page 63: ...Using the OASYS PCI Working With Files OASYS PCI 59 File and folder organization ...


