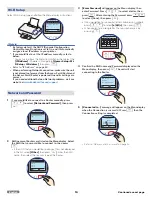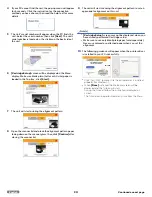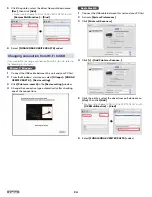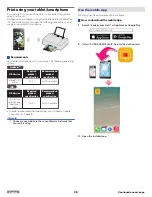
Print media
Specifications for print media
Supported Paper
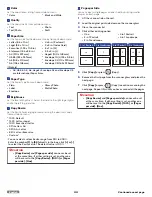
You can set up normal printer paper, envelopes or printed
documents (forms) onto the Top tray.
Paper support
Paper
Sizes
Letter · Legal · JIS B5 · A4 · Executive · A5 · Statement
· A6 · 3x5 in. · 4x6 in. · 5x7 in. · Hagaki · 3.5x5 in.(L) ·
10 Envelope · DL Envelope · C5 Envelope
Weight
Plain paper: 17 - 24 lb. (64 - 90 g/m2)
Cards: 90 - 110 lb. (163 - 200 g/m2)
Envelopes: 20 - 24 lb. (75 - 90 g/m2)
Photo paper: 50 - 65 lb. (180 - 240 g/m2)
Capacity
Plain paper (20 lb. or 75 g/m2): Up to 60
Cards (110 lb. or 200 g/m2): Up to 15
Envelopes (24 lb. or 90 g/m2): Up to 5
Photo paper (65 lb. or 240 g/m2): Up to 10
●
Borderless printing is supported with paper sizes Letter, A4, A5,
A6, 3x5 in., 4x6 in., 5x7 in. and Hagaki, when printing from your
PC.
Note(s)
●
A4, JIS B5, A5, A6, Hagaki, DL Envelope and C5 Envelope
are International Paper Sizes.
CAUTION
Unsuitable Paper!
●
DO NOT insert any sheets of paper into the Top tray...
–
that are wet, have been edited with correction fluid, are
soiled or have a coated surface.
–
that are held together with office or notebook staples
or with tape or glue.
–
that are pasted with note paper.
–
that are creased, crumpled or torn
–
that are curled.
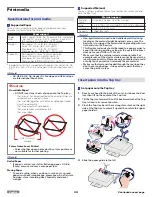
0.08 in. (2 mm)
or more
Forms from a Laser Printer!
●
Forms that have been printed out by a laser printer are
not suitable for further printing.
Note(s)
Curled Paper
●
If paper is curled, use it after flattening paper. 0.08 in.
(2 mm) or more curl may cause paper jam.
Storing Paper
●
To avoid curling, when you do not use the unit, unused
paper is put back into package, please keep it in a flat state.
And also, store it avoiding heat, humidity and direct
sunlight.
Supported Material
You can set up cardstock, fabric, faux leather or custom material
onto the Rear tray.
Material support
Material
Type
Cardstock · Fabric · Leather · Custom
Size
3 x 5 in. (76 x 127 mm) to 8.5 x 14 in. (216 x 356 mm)
Thickness
Up to 0.05 in. (1.2 mm)
Capacity
1 sheet (Manual)
Note(s)
●
Non-rigid materials need to be handled carefully during
loading as the material might bend and cause a jam. The
best way is to support the material during loading with two
flat hands into the Rear tray.
●
Thin flexible materials should be taped to a paper carrier to
keep it flat during printing as long as the overall thickness
does not exceed 0.05 in. (1.2 mm).
●
Make sure that the material selected are printable. For
example some of the vinyl materials cannot be used as the
ink will smear/not dry. Please use only printable vinyl or add
an Inkjet print primer (not included) to your material.
●
Make sure that materials loaded through the rear input tray
don’t have rough edges, strings or loose parts that may
cause the printer to jam.
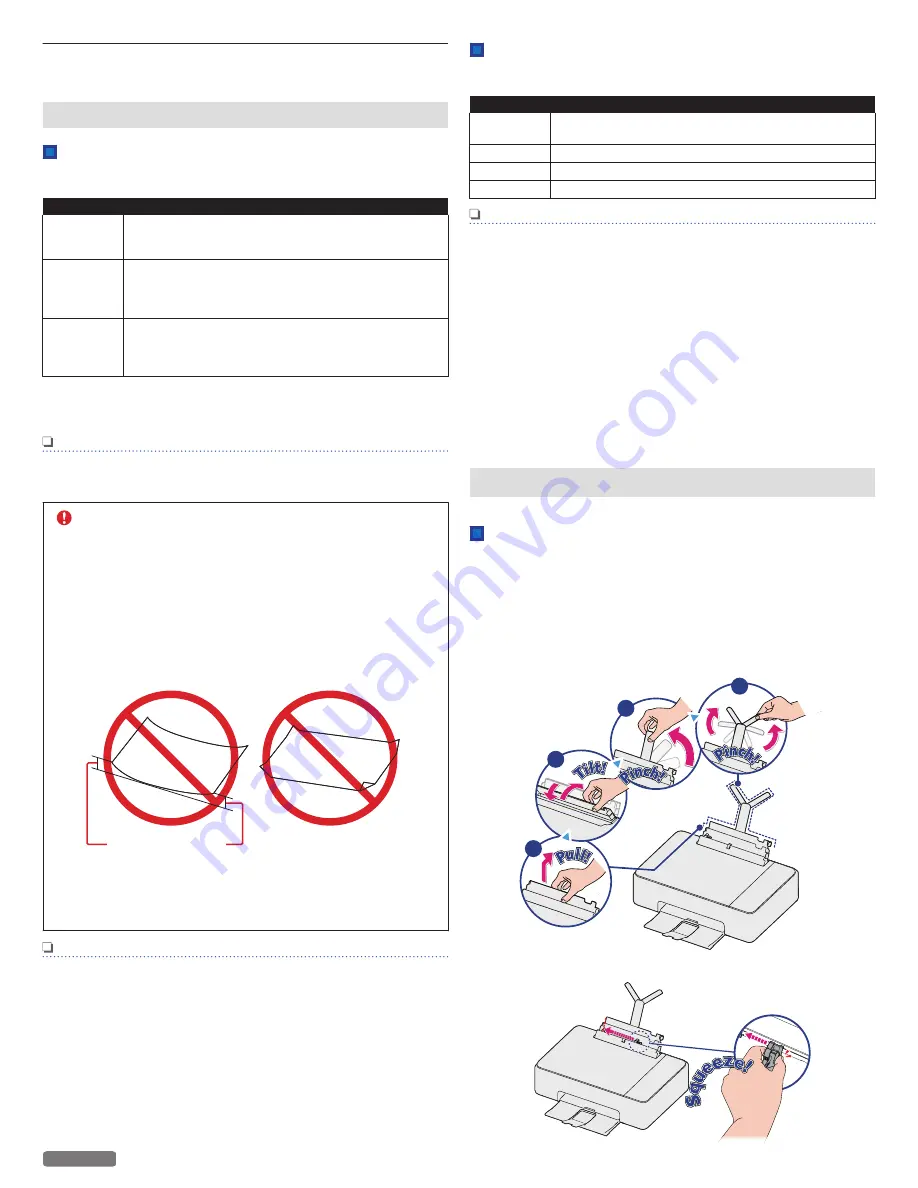
Insert paper into the Top tray
Set paper onto the Top tray
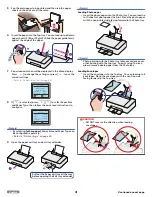
1
Reach your hand to the back of the unit, just above the Rear
tray then lift up the center of the Top tray.
2
Tilt the Top tray forward, then tilt it backward so that the Top
tray is fixed in its correct position.
3
Pinch the Top tray bar at the rectangular cutout on the right
side of the Top tray to rotate it up and then rotate the upper
paper holders.
1
2
3
4
4
Slide the paper guide to the left.
30
English
Continued on next page.

