


Section 9
High Pressure Water System
20428754
7-2007/Rev 03
9-21
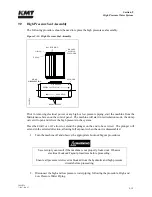
6.
Fill the cylinder with water and slide the seal removal tool or a used plunger into the
bronze packing follower to ensure a good seal for the removal of the seal assembly.
7.
Place a shop towel around the plunger or seal removal tool to avoid splash back. Use a
dead blow hammer to drive the removal tool or plunger into the cylinder until the seal
components move up and out of the cylinder.
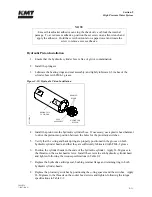
8.
Remove the cylinder liner from the bore and inspect for possible heat or wear damage, or
for debris. If cracks or brittleness are detected on the tabs on the ends of the liner, the
liner must be replaced.
9.
Feel approximately one inch into the cylinder bore for obvious ridges or grooves. If seal
debris is present, follow the procedure, High Pressure Cylinder Maintenance.
10.
Inspect the plunger surface for flaws. Rotate the plunger 360 degrees by hand while
viewing light reflection on the surface to detect any dullness, streaks, pits or other defects.
Run a fingernail perpendicular to the direction of the suspected flaws to determine the
severity of defects. Depending on the seal life achieved with the removed seal assembly,
make a judgment regarding plunger and/or cylinder replacement. If seal debris is present
on the plunger, polish with 600-grit wet/dry sandpaper, using a radial motion.
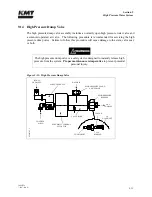
11.
Lightly coat the new seal components with FML-2 grease and install the new components
on the plunger. Ensure the proper orientation of the backup rings as illustrated in Figure
9-13, High Pressure Seal Assembly.
12.
Slide the cylinder liner over the plunger.
13.
Install the high pressure cylinder assembly into the hydraulic cylinder head, following the
procedure, High Pressure Cylinder Assembly Installation.
14.
Reconnect the high and low pressure water piping and turn the low pressure water supply
on.
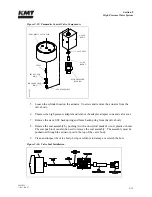
9.10
Hydraulic Cartridge Seal and Plunger Removal
The following procedure is used to remove the hydraulic cartridge seal and the plunger.
Prior to removing electrical power or any high or low pressure piping, start the machine from the
Maintenance Screen on the control panel. The machine will start in recirculation mode, the dump
valve will open and relieve the high pressure in the system.
Press the
RIGHT
or
LEFT
arrow to extend the plunger on the end to be serviced. The plunger will
extend in the selected direction, allowing full exposure when the unit is disassembled.
1.
Turn the machine off and observe the appropriate Lockout/Tagout procedures.
Summary of Contents for STREAMLINE SL-V SRP 100
Page 23: ......
Page 25: ......
Page 174: ...Section 12 Parts List 20428786 2 2008 Rev 05 12 5 Figure 12 1 SL V SRP 100 Intensifier Unit ...
Page 176: ...Section 12 Parts List 20428786 2 2008 Rev 05 12 7 Figure 12 2 Intensifier Assembly ...
Page 184: ...Section 12 Parts List 20428786 2 2008 Rev 05 12 15 Figure 12 7 High Pressure Piping ...
Page 188: ...Section 12 Parts List 20428786 2 2008 Rev 05 12 19 Figure 12 9 Hydraulic Power Package ...
Page 190: ...Section 12 Parts List 20428786 2 2008 Rev 05 12 21 Figure 12 10 Motor Pump Assembly ...
Page 192: ...Section 12 Parts List 20428786 2 2008 Rev 05 12 23 Figure 12 11 Hydraulic Manifold Assembly ...
Page 194: ...Section 12 Parts List 20428786 2 2008 Rev 05 12 25 Figure 12 12 Hydraulic Hose Connections ...
Page 196: ...Section 12 Parts List 20428786 2 2008 Rev 05 12 27 Figure 12 13 Reservoir Assembly ...
Page 199: ...Section 12 Parts List 20428786 2 2008 Rev 05 12 30 Figure 12 14 Bulkhead Pipe Assembly ...
Page 201: ...Section 12 Parts List 20428786 2 2008 Rev 05 12 32 Figure 12 15 Cover Assembly ...
Page 205: ...Section 12 Parts List 20428786 2 2008 Rev 05 12 36 Figure 12 17 Electrical Assembly 230 50 60 ...
Page 223: ...Section 12 Parts List 20428786 2 2008 Rev 05 12 54 Figure 12 25 High Pressure Transducer ...
Page 224: ......
Page 225: ......
Page 226: ......
Page 227: ......
Page 228: ......
Page 229: ......
Page 230: ......
Page 231: ......
Page 232: ......
Page 233: ......
Page 234: ......
Page 235: ......
Page 236: ......
Page 237: ......
Page 238: ......
Page 239: ......


