Chapter 8---Software and Protocol
8-8
Model 250 Service Manual
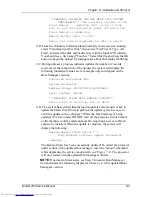
| Import Configuration |
| Start SEND TEXT Upload from |
| Host on Serial PORT A |
| -To Abort: |
| ->Stop Host Upload, |
| ->THEN Press ESC to Abort |
=================================
6.
Windows TERMINAL: Tra Send Text File....
6.1 Directories - set directory to desired upload directory (C:\TEMP)
6.2 File Name: - Type desired File Name (for example: import1.txt)
6.3 Select OK with mouse or press Enter key (upload begins)
6.4 Verify TERMINAL screen shows status line at bottom:
Stop, Pause, “% complete bar”, Sending: EXPORT1.TXT
6.5 Data transfer will continue until complete or an error occurs or the
User Aborts: Expect 10 minutes to import 20 sources (500,000 bytes)
at 9600 baud.
6.6 At successful end, TERMINAL will remove the bottom line.
7.
Model 250 Menu:
When the projector detects the successful end of the transfer the following
screen is displayed:
=================================
| Import Configuration |
| IMPORT COMPLETE |
| New Configuration is active |
| |
| - Press ESC to Continue |
=================================
Press ESC to exit the projector Import operation and return to the
Maintenance Menu. There is a 10 second
pause before the screen is
redrawn.
8.
USER ABORT:
Windows TERMINAL: FIRST press STOP to end the Host Upload
transfer.
Model 250 Menu: THEN press ESC to abort the projector Import
operation.
=================================
| Import Failed |
| IMPORT ABORTED BY USER |
| Old Data was Restored. |
| - STOP Host SEND DATA, |
| THEN Press ESC |
=================================
Summary of Contents for 250
Page 16: ...Chapter 2 System Description Model 250 Service Manual 2 9 ...
Page 43: ...Chapter 4 Optical 4 10 Model 250 Service Manual Figure 4 6 Optical Path ...
Page 55: ...Chapter 5 Optical 3 4 22 Model 100 Service Manual ...
Page 91: ...Chapter 5 Electronics 5 36 Model 250 Service Manual Figure 5 22 Scan Reversal PCB I O Diagram ...
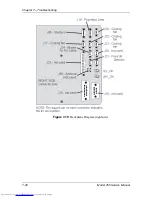
Page 131: ...Chapter 5 Electronics 5 76 Model 250 Service Manual Figure 5 44 Backplane Diagram right side ...
Page 132: ...Chapter 5 Electronics Model 250 Service Manual 5 77 ...
Page 138: ...Chapter 6 Miscellaneous Items 6 6 Model 250 Service Manual ...
Page 167: ...Chapter 7 Troubleshooting Model 250 Service Manual 7 29 ...
Page 181: ...Chapter 8 Software and Protocol 8 14 Model 250 Service Manual ...
Page 185: ...Chapter 9 Parts List 9 4 Model 250 Service Manual ...


