Juniper HarvestMaster mirus H2 User Manual Download Page 63

Mirus for H2 Classic GrainGage

                                                                                                                                                                                                      63

H2 Classic GrainGage Calibration

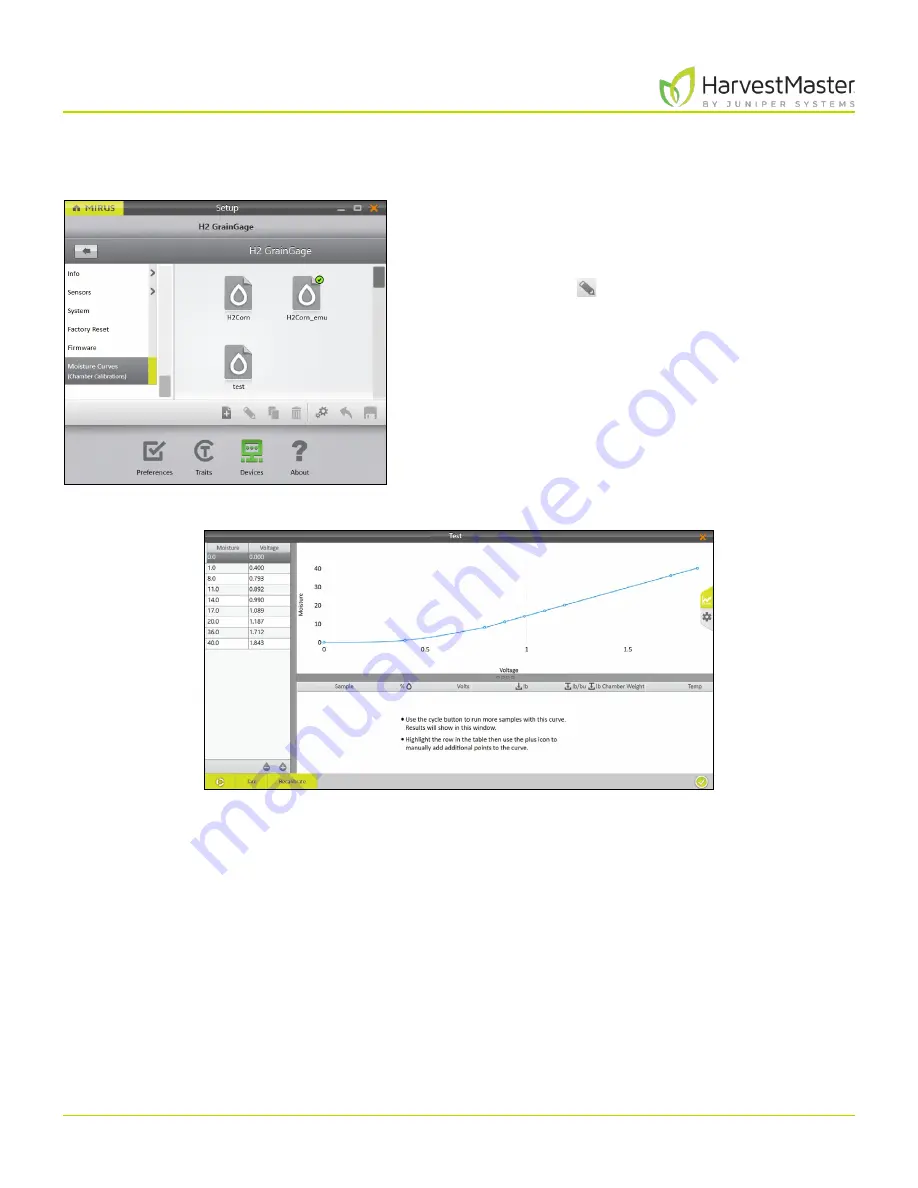
4.4.7  M2.0 Moisture Model Recalibration

To adjust an M2.0 moisture calibration,

1.  Open Mirus.

2.  Go to 

Setup 

>

 H2 GrainGage 

>

 Moisture Curves

.

3.  Select the moisture curve you want to adjust. 

4.  Tap the edit icon  . 

5.  Tap 

Recalibrate

Adjusting the M2.0 calibration does not factor in the samples originally used in the calibration. The 

adjustment only uses new samples to create a new calibration. However, your initial EM curve will remain 

unchanged.

Summary of Contents for HarvestMaster mirus H2

Page 1: ......

Page 2: ...nc All other trademarks are registered or recognized by their respective owners Disclaimer Information is subject to change without notice Cautions CAUTION This symbol indicates that failure to follow...

Page 3: ...4 2 2 2 Set Preferred Units of Measure 14 2 2 3 Set Preferred Language 15 2 2 4 Set Preferred Backup Log Location 16 2 2 5 Clear Cached Settings 16 2 3 Setup H2 Classic GrainGage 17 2 3 1 Open Setup 1...

Page 4: ...ion Calibration 43 4 2 Weigh Bucket Calibration 45 4 2 1 Calibrate Weigh Bucket 45 4 2 2 Check Weigh Bucket Calibration 48 4 3 Test Weight Calibration 48 4 3 1 Calibrate Test Weight 48 4 3 2 Check Tes...

Page 5: ...p Data 93 5 6 1 Export Data 93 5 6 2 Export a Heat Map 95 6 Harvest Mode 99 6 1 Options for Opening Harvest Mode 99 6 2 Open Harvest Mode 99 6 3 Configure Harvest Screen Options 103 6 3 1 Configure Cy...

Page 6: ...8 1 2 Find and Send Error Logs 124 8 2 Enable Debug Streaming 125 8 3 Common Errors 125 8 3 1 Inaccurate Plot Weight 125 8 3 2 Not Meeting Minimum Weight Threshold 126 8 3 3 Can t Connect to GrainGage...

Page 7: ...CHAP TER ONE Mirus Ins tallation...

Page 8: ...ge 500 MB available disk space Display Resolution 1280 x 800 or higher 1 2 Download and Install Mirus 1 2 1 Download and Activate Mirus After you have purchased a license for Mirus 1 Go to http www ha...

Page 9: ...here is a newer version download it 5 Follow the installation instructions 1 3 Preparing the GrainGage 1 3 1 Verify GrainGage Readiness Verify the GrainGage is ready for operation by checking the foll...

Page 10: ...To turn on the H2 Classic GrainGage 1 Start the combine 2 Activate the GrainGage by pressing the red button on the system controller 3 Open Mirus Note HarvestMaster recommends verifying the weight and...

Page 11: ...Mirus and GrainGage S etup CHAP TER T WO...

Page 12: ...on your Windows desktop Mirus opens the Home screen 2 1 1 Load H2 GrainGage Plugin On the Mirus Home screen 1 Tap Connect Plugin 2 Tap H2 GrainGage 3 Tap the check icon Note Mirus for H2 GrainGages d...

Page 13: ...ecommended for setting up the H2 Classic GrainGage After adding the H2 GrainGage plugin Mirus displays an icon for the H2 GrainGage on the Main Menu screen If you upgraded Mirus to a new version befor...

Page 14: ...Mirus and H2 Classic GrainGage Setup 2 2 Setup Mirus Preferences 2 2 1 Open Setup On the Home screen 1 Tap Setup Mirus opens the Setup screen 2 2 2 Set Preferred Units of Measure On the Setup screen 1...

Page 15: ...nces screen 2 Tap Units of Measure 3 Select your preferred units of measure 4 Tap Save 2 2 3 Set Preferred Language On the Setup Preferences screen 1 Select Language 2 Choose your preferred language 3...

Page 16: ...3 Tap Save Note Changing the Backup Log location is not recommended If you do change it be sure to record the new location 2 2 5 Clear Cached Settings This option can be found on the Setup Preferences...

Page 17: ...1 Tap Setup Mirus opens the Setup screen 2 3 2 Configure Actuators Note Changing actuator times should only be done under the direction of a HarvestMaster Field Service Engineer This is especially tr...

Page 18: ...nGage 18 Mirus and H2 Classic GrainGage Setup 2 Tap Actuator Mirus opens the Actuator Setup screen on which you can configure settings for each actuator in the GrainGage Tap Description for more infor...

Page 19: ...ate These settings can only be changed with the help of HarvestMaster Field Service Engineers See 8 4 2 Contact a HarvestMaster Field Service Engineer on page 128 Bottom Gate Settings Setup Parameter...

Page 20: ...te Settings Setup Parameter Default Value Description Actuator Dual The type of actuator Close Transition Time 200 msec The amount of time it takes the actuator to close the gate Limit Switch on Close...

Page 21: ...tup 2 3 3 View GrainGage Info On the Setup H2 GrainGage screen 1 Tap Info Mirus opens the Info screen on which you can view Chamber Module and Sensor information for the H2 GrainGage 2 3 4 Configure W...

Page 22: ...e minimum weight threshold chamber head room Mirus will not record the data because it is not likely to be accurate Evacuation Time 2000 msec The amount of time all the top and bottom gates remain ope...

Page 23: ...b 0 227 kg This is the threshold above which a tare warning is generated after weigh bucket evacuation Note Preconfigured values are default values based on generalized harvest conditions They may not...

Page 24: ...settings see 4 3 1 Calibrate Test Weight on page 48 2 3 6 Configure Moisture Sensors On the Setup H2 GrainGage Sensors screen 1 Tap Moisture Mirus opens the Moisture Sensor Setup screen where you can...

Page 25: ...ntly only H2 Classics mounted on Wintersteiger Quantum or Classic Plus combines are equipped with an overflow sensor that trips when grain is in close proximity The overflow sensor should be enabled i...

Page 26: ...26 Mirus and H2 Classic GrainGage Setup 2 3 8 Configure H2 Classic GrainGage System Settings On the Setup H2 GrainGage screen 1 Tap System Mirus opens the System Setup screen on which you can configu...

Page 27: ...Isolation Gate Mode Normally Open Controls the initial state of the isolation gate In some situations closed is preferred Max Sub Cycle Count 1 The maximum number of sub cycles that can be run during...

Page 28: ...ing actuator timers and weight calibrations This should only be done in consultation with a HarvestMaster Field Service Engineer 2 3 10 Update H2 Classic GrainGage Firmware This option can be found on...

Page 29: ...for H2 Classic GrainGage 29 Mirus and H2 Classic GrainGage Setup 2 3 11 Create and Record Traits This option can be found on the Setup Traits screen To create a new trait 1 Tap the new icon Traits New...

Page 30: ...acter limit Length and or a Default Value for quick selection Number A number trait allows the user to record a number e g a score relative to an individual plot You can set a character limit Length a...

Page 31: ...fault Value This is the most common or most expected value for this trait Mirus will automatically populate the record field with this value to save the operator time The operator needs only to press...

Page 32: ...H2 Clas sic GrainGage Diagnos tic s and Aler t s CHAP TER THREE...

Page 33: ...to tare all load cells and the moisture sensor in the GrainGage 2 Allows the operator to enter and exit Glean Mode which opens all gates in the GrainGage and allows the grain to flow straight through...

Page 34: ...he zero weight readings for the empty weigh bucket and test chamber Mirus also resets the moisture to zero Enter Glean button Use the Enter Glean button to put the GrainGage in Glean Mode This mode op...

Page 35: ...Glean off border plots All gates are in the open position 3 Tap Exit Glean to begin measuring grain again 4 Tap the check icon to exit Diagnostics All gates are in the correct position for Harvest Mod...

Page 36: ...ivolt readings vary linearly with weight added The empty weigh bucket causes the load cells to read between 3 and 4 mV Q This multiplier corrects the weight measurement based on the slope and motion o...

Page 37: ...moisture curve Absolute Moisture Voltage This is the raw moisture sensor reading without any offset applied from a moisture curve This is primarily used for troubleshooting EM Frequency This is a basi...

Page 38: ...load cell Test Weight Q This multiplier corrects the test weight measurement based on the slope and motion of the weighing platform Test Weight Tare Check Test weight value lb bu or kg hL at the time...

Page 39: ...The Health Diagnostics screen is used by HarvestMaster Field Service Engineers 3 1 8 Actuators Diagnostics Use the Actuators Diagnostics screen to manually test the actuators controlling all gates co...

Page 40: ...ask The problem could cause erroneous measurements data corruption data loss or some other system malfunction Warning A warning message provides cautionary information Confirmation A confirmation mess...

Page 41: ...ide the message Or Tap the X or Clear to clear it Or Do nothing and Mirus will automatically hide the message Messages that have been hidden can be viewed again by clicking on the notifications tab on...

Page 42: ...GrainGage Calibration CHAP TER FOUR...

Page 43: ...1G voltage for the accelerometer inside the GrainGage This calibration is critical for good weight measurements on the moving combine It only needs to be done once a year 1 Park the combine on a leve...

Page 44: ...e check icon to apply the new slope and motion settings 9 Tap the gear icon below the calibration wizard to open Diagnostics 10 Tap the padlock icon to extend the dialog box 11 Verify that slope and m...

Page 45: ...ibrate Weigh Bucket Use the weight calibration wizard and the larger weight 11 lb 5 kg included with the GrainGage to calibrate the weigh bucket load cells 1 Park the combine on a level surface 2 Shut...

Page 46: ...lue stamped on the side of the weight 10 Enter that value in the prompt 11 Tap the next arrow to initiate the calibration 12 Follow the on screen video instructions 13 Check for and remove any extra w...

Page 47: ...he weight on the other side as directed 17 Tap the next arrow 18 Mirus displays the old and new load cell coefficients 19 Tap the next arrow 20 Remove the calibration weight 21 Tap the next arrow The...

Page 48: ...hangers 3 The Diagnostics screen should report Weight readings that are very close to the value stamped on the calibration weight If it s not within 05 lb 23 g with the combine off HarvestMaster reco...

Page 49: ...Select Open Calibration Wizard 8 Follow the on screen video instructions 9 Find the value stamped on the side of the weight 10 Enter that value in the prompt 11 Tap the next arrow to initiate the cal...

Page 50: ...ight as directed 15 Tap the next arrow 16 Mirus displays the old and new load cell coefficients 17 Tap the next arrow 18 Remove the calibration weight 19 Tap the next arrow The system will tare and sh...

Page 51: ...n 4 Tap the check icon to close Diagnostics 4 4 Moisture Curve Calibration CAUTION Do not re wet grain samples If you need to adjust the moisture content take a natural sample and dry it down Before h...

Page 52: ...ollect and prepare samples Your challenge is to create a moisture curve that is representative of the moisture range that will be encountered during harvest The more samples available during calibrati...

Page 53: ...ample B Wet Grain Test weight output should reflect the benchtop test weight 4 Cycle Sample B two more times 5 Sample C Dry Grain Test weight output should reflect the benchtop test weight 6 Cycle Sam...

Page 54: ...rm up 2 Test the ambient samples in a benchtop sensor by cycling sub samples from each larger sample 3 5 times and then averaging the moisture and test weight readings This is the Known Moisture and T...

Page 55: ...e test chamber which is important to the accuracy of the system For more information on insert counts see 7 Appendix A Standard Grain Information on page 121 11 Enable M2 0 calibration if you are harv...

Page 56: ...t change The GrainGage cycles the grain and Mirus displays the voltage moisture percentage and test weight 18 Collect the same sample and pour it into the GrainGage again 19 Repeat the calibration cyc...

Page 57: ...it into the GrainGage again 24 Tap Last Value to automatically populate the Known Moisture with the same value as the previous sample 25 Repeat steps 20 24 until all grain samples have been cycled thr...

Page 58: ...rve HarvestMaster recommends testing the new moisture curve against other grain samples to confirm the moisture and test weight values 1 Test the grain sample in a benchtop sensor by cycling sub sampl...

Page 59: ...average the moisture readings for the sample 10 If the moisture curve needs to be tuned to match the sample tap Recalibrate The Recalibrate feature is designed to adjust previously created moisture c...

Page 60: ...Moisture percentage 14 Tap Click to run a sample 15 Repeat steps 12 14 with the same sample at least two more times Note The Last Value button can be used to fill the Known Moisture field with the pre...

Page 61: ...c GrainGage 61 H2 Classic GrainGage Calibration 4 4 6 Test Weight Recalibration 1 Open Mirus 2 Go to Setup H2 GrainGage Moisture Curves 3 Select the moisture curve you want to test 4 Tap the edit icon...

Page 62: ...7 Pour the grain sample into the hopper to simulate harvest Ensure the isolation gate is open so the grain drops into the GrainGage 8 Enter the Known Test Weight 9 Tap Click to run a sample 10 After...

Page 63: ...en Mirus 2 Go to Setup H2 GrainGage Moisture Curves 3 Select the moisture curve you want to adjust 4 Tap the edit icon 5 Tap Recalibrate Adjusting the M2 0 calibration does not factor in the samples o...

Page 64: ...e is open so the grain drops into the GrainGage 8 Enter the Known Moisture percentage 9 Tap Click to run a sample 10 Repeat steps 7 9 with the same sample at least two more times Note The Last Value b...

Page 65: ...ves call a HarvestMaster Field Service Engineer to walk you through the adjustment See 8 4 2 Contact a HarvestMaster Field Service Engineer on page 128 1 Test the grain samples in a benchtop sensor by...

Page 66: ...ght for more information about the moisture curve Note Only adjust these settings if a HarvestMaster Field Service Engineer tells you to 9 Cycle the same sample through the GrainGage repeat steps 7 an...

Page 67: ...nts never adjust 0 or 1 Subtract for a negative average offset Do not adjust voltages In the example above readings from the benchtop sensor indicate that the samples have on average 1 higher moisture...

Page 68: ...base curve as described in 4 4 3 Chamber Calibration Overview on page 52 Once you have a base curve use 3 5 samples multiple samples required that are 26 and above to manually adjust the top half of t...

Page 69: ...heck samples starting with the lower half of the moisture curve 10 After adjusting the lower half of the curve cycle samples above 26 and repeat the adjustment procedure steps 1 8 above Only adjust th...

Page 70: ...urve Adjusted Curve Moisture Voltage Moisture Voltage 0 0 0 000 0 0 0 000 1 0 0 400 1 0 0 400 8 0 0 793 8 0 0 793 11 0 0 892 11 0 0 892 14 0 0 990 14 0 0 990 17 0 1 089 17 0 1 089 20 0 1 187 20 0 1 18...

Page 71: ...Field Maps CHAP TER FIVE...

Page 72: ...Range increment is the numeric interval between ranges This will usually be 1 Range numbering begins with the bottom left corner of a field and proceeds upward In the example to the left Starting Ran...

Page 73: ...Mirus for H2 Classic GrainGage 73 Field Maps The following instructions walk you through creation of a Range Row map On the Mirus Home screen 1 Tap Maps 2 Tap New 3 Select New Empty Map Maps New...

Page 74: ...or the following special characters 7 Set the following Ranges deep Plots wide Range increment Plot increment Starting range Starting plot 8 Tap the check icon to save the map Mirus displays a descri...

Page 75: ...oup of plots Rows wide indicates the number of rows within a given field Plot increment is the numeric interval between plots This will usually be 1 In the example to the left Plot increment is 1 Fiel...

Page 76: ...plots in parallel columns The columns can be ranges horizontal or rows vertical Direction indicates the direction in which plot increments increase Note In order to collect the correct data the map p...

Page 77: ...irus for H2 Classic GrainGage 77 Field Maps The following instructions walk you through creation of a Standard Plot ID map On the Mirus Home screen 1 Tap Maps 2 Tap New 3 Select New Empty Map Maps New...

Page 78: ...wing special characters 7 Set the following Ranges deep Rows wide Starting plot ID Plots per replication Replication increment Plot increment Pattern Direction 8 Tap the check icon to save the map Mir...

Page 79: ...initially displays Standard Plot ID maps as Range Row maps To display the plot IDs select Plot ID under Attribute 5 1 3 Create a Sub Map Mirus allows the creation of sub maps smaller divisions of the...

Page 80: ...will be a sub map of 6 Tap the next arrow Note The Name box will only accept basic letters and numbers Do not use emojis or the following special characters 7 The plot and range increments are the sa...

Page 81: ...Mirus for H2 Classic GrainGage 81 Field Maps On the Manage Maps screen Mirus displays the sub map under the main field map it is a part of Sub map...

Page 82: ...following is an importable range row map file Note The range row map is in list format and the range and row columns are entirely numeric The column names are unimportant During the import process Mi...

Page 83: ...GrainGage 83 Field Maps The following instructions walk you through importing a Range Row map On the Mirus Home screen 1 Tap Maps 2 Tap New 3 Select Import Map from File 4 Navigate to and select the d...

Page 84: ...ge the columns designated as Range and Row by clicking on their respective drop down menus 6 Tap the next arrow On the Manage Maps screen Mirus displays a notification that the map has been imported s...

Page 85: ...r text editor and saved as a tab delimited file or TXT file Do not use any headings or spaces when creating a 2D map Plot IDs may not contain any symbols Two dimensional maps need to be in TXT format...

Page 86: ...or H2 Classic GrainGage 86 Field Maps 2 Tap New 3 Select Import Map from File 4 Navigate to and select the desired file 5 If desired change the default description displayed by Mirus 6 Tap the next ar...

Page 87: ...us for H2 Classic GrainGage 87 Field Maps On the Manage Maps screen Mirus displays a notification that the map has been imported successfully Mirus imports the additional attributes Select to change v...

Page 88: ...Mirus for H2 Classic GrainGage 88 Field Maps 5 2 3 Import Multiple Maps It is possible to import multiple maps at the same time On the Mirus Home screen 1 Tap Maps 2 Tap New Maps New...

Page 89: ...s and click Open 6 Tap Yes to enable Smart Import Smart Import will import each file automatically without any additional input from the user If the map name already exists the import will stop to all...

Page 90: ...assic GrainGage 90 Field Maps 5 3 View a Map On the Manage Maps screen 1 Select the map you want to view 2 Tap View Mirus opens the Map View screen The image below displays a map that has not yet been...

Page 91: ...s of the grain as shown in the image below 5 4 Delete a Map On the Manage Maps screen 1 Select the map you want to delete 2 Tap Delete Mirus asks if you are sure CAUTION This cannot be undone You cann...

Page 92: ...from year to year To do so simply copy the map in Mirus On the Manage Maps screen 1 Select the map you want to copy 2 Tap Copy 3 Enter the name and description for the map 4 Tap the check icon to save...

Page 93: ...The heat map option creates a color coded visual map in a spreadsheet of the parameters you set for each color 5 6 1 Export Data On the Manage Maps screen 1 Select the map you want to export data from...

Page 94: ...ur preferred Traits Note If you check Include Cycle Data the export will include sub cycle and weight trip data 7 Select EM Moisture if you would like to export the EM moisture data 8 Tap the check ic...

Page 95: ...preadsheet for each desired attribute The colors in the heat map are determined by the Legend It can be altered by changing the minimum and maximum for each attribute For instructions see the followin...

Page 96: ...he exported map 5 Select whether or not you want to increase color resolution 6 Select the attributes you want included in the export Multiple attributes are OK 7 Tap the check icon to finish exportin...

Page 97: ...Mirus for H2 Classic GrainGage 97 Field Maps If Microsoft Excel is installed a spreadsheet opens automatically showing the exported heat map...

Page 98: ...Har ves t Mode CHAP TER SIX...

Page 99: ...arvest Note If the Harvest icon is not visible see page 12 for instructions on loading the H2 GrainGage plugin Or Tap Maps Mirus opens the Manage Maps screen From there select a map and tap Harvest Or...

Page 100: ...the starting location 5 Select the direction of harvest 6 Choose a navigation type 7 Tap the next arrow Note If you check Enable Random Navigation you will be able to change your location on the main...

Page 101: ...mation about configuring Traits from the Setup screen see 2 3 11 Create and Record Traits on page 29 9 Select one or all of the traits to include 10 Tap the next arrow If you selected Moisture Test We...

Page 102: ...Mirus for H2 Classic GrainGage 102 Harvest Mode Mirus opens the Harvest screen and is ready to be configured or to collect data...

Page 103: ...the operator to make changes to location direction and navigation type 5 Observations Opens a dialog box in which the operator can record notes for each plot during harvest This is also where you can...

Page 104: ...e Countdown Mode 1 Tap the cycle settings icon in the toolbar 2 Select Countdown or Cycle 3 If you choose Countdown adjust the countdown time If you choose Cycle there is no countdown timer 4 Tap the...

Page 105: ...e as follows Cycle Data Displays the plot weight moisture and test weight for each cycle Diagnostics Displays the Diagnostics dialog box for monitoring during harvest Graph Shows the plot progression...

Page 106: ...icon If desired enlarge and shrink specific screens by dragging the borders of the Quad View screens 2 Tap the Quad View icon a second time Mirus displays options for each of the four screens 3 Tap t...

Page 107: ...st Mode 6 3 3 Diagnostics Screen To access the Diagnostics screen in Harvest Mode 1 Tap the gear icon on the toolbar Note The Diagnostics screen will not open while the GrainGage is cycling Info Diagn...

Page 108: ...2 Select the location on the map where you wish to resume data collection in one of two ways Tap on the plot in the map Or Enter the range and row in the fields at the top of the dialog box 3 Select a...

Page 109: ...position and provides character fields for notes on each trait and a Quick Notes text box to record any other observations for each plot Mirus stores the quick notes and trait notes alongside harvest...

Page 110: ...ts the map for three different traits green for weight blue for moisture and orange for test weight The values shown at the end of the graphs show the averages The green average shows the yield based...

Page 111: ...Mirus for H2 Classic GrainGage 111 Harvest Mode 6 3 7 List View In List View you can see the data in the form of a chart...

Page 112: ...and maximum values helps to create a more detailed legend and define the scope of the graphs and maps The narrower the minimum and maximum range the more detailed the information displayed becomes Thi...

Page 113: ...ure attribute 3 Tap the gear icon in the Attribute bar 4 Set the Minimum and Maximum moisture 5 Tap the check icon Adjusting the minimum and maximum values helps to create a more detailed legend and d...

Page 114: ...attribute 3 Tap the gear icon in the Attribute bar 4 Set the Minimum and Maximum Test Weight Settings 5 Tap the check icon Adjusting the minimum and maximum values helps to create a more detailed lege...

Page 115: ...e yield per acre bu ac kg ha using the weight measurements divided by the plot area For each minimum and maximum changed the Legend will change to match the correct values Adjusting the minimum and ma...

Page 116: ...p choose traits and a moisture curve See 6 2 Open Harvest Mode on page 99 for specifics 3 Start the thresher and throttle up 4 Tare the GrainGage if necessary 5 Tap the Start button in Mirus 6 Harvest...

Page 117: ...times through the plot until the weight trip no longer occurs Note The amount of grain in the weigh bucket can be seen on the Real Time Weight display Make sure the weight peaks and stabilizes before...

Page 118: ...curve See 6 2 Open Harvest Mode on page 99 for specifics 3 Start the thresher and throttle up 4 Tare the GrainGage if necessary 5 Tap the Start button in Mirus 6 Harvest the first plot 7 When the hea...

Page 119: ...wn Note If the weight trip is triggered during the countdown the timer will continue as the GrainGage cycles If the timer has reached zero by the time the weigh cycle finishes the flush cycle will beg...

Page 120: ...Standard Grain Information APPENDIX A...

Page 121: ...t 63 74 oz 1885 ml 2 inserts 44 97 oz 1 330 ml Typical Weights for Test Chamber Volumes Insert Counts Grain Legume Insert Count Volume Typical Weight Wheat 60 lb bu 77 kg hL 0 82 51 oz 2 440 ml 4 05 l...

Page 122: ...Canola 8 5 47 lb bu 60 kg hL Soybean 13 55 lb bu 71 kg hL Barley 14 5 48 lb bu 62 kg hL Corn 15 5 56 lb bu 72 kg hL Rye 14 56 lb bu 72 kg hL Sorghum 13 56 lb bu 72 kg hL Oats 13 5 32 lb bu 41 kg hL Su...

Page 123: ...Troubleshooting APPENDIX B...

Page 124: ...n an error has been flagged the engineers can find it easily within the error logs Use F5 to flag the error in the error log Use F6 to flag and leave a message in the error log 8 1 2 Find and Send Err...

Page 125: ...inaccurate open Diagnostics and follow the steps listed below 1 Ensure the weigh bucket of the GrainGage is in the tracks 2 Clean inside the bucket around the bucket and around the load cells of the...

Page 126: ...eight threshold value is outside 2 6 lb recalibrate the test weight for the chamber calibration If you are not harvesting enough grain to meet the minimum weight threshold install low yield inserts an...

Page 127: ...30 seconds then plug them back in and attempt to connect 7 If the problem persists contact the HarvestMaster Field Service Engineers 8 3 4 Tare Warnings A tare warning can be prompted for the reasons...

Page 128: ...on Mirus and the H2 GrainGage This instructional content includes but is not limited to M2 0 Calibration Recalibrate Traditional Moisture Curve to the New M2 0 Model in Mirus 4 3 0 Mirus Overview Weig...

Page 129: ...Limited Warrant y APPENDIX C...

Page 130: ...hardware or software including without limitation warranties as to merchantability fitness for a particular purpose any warranty arising from course of performance course of dealing or usage of trade...

Reviews: