


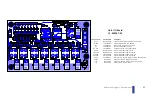


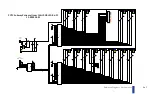
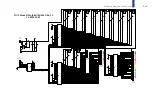


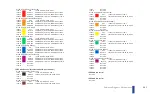
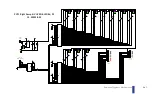


Reference Diagrams & Schematics
D-18
GI LED 62 [Right Flipper Guide Low]
J203-21
GRY
+5VDC to GI LED Bd 62, J100-1
J203-22
GRY-GRN LED100 return from GI LED Bd 62, J100-2
J203-23
Not Used
J203-24
Not Used
GI LED 63 [Right Sling Bottom]
J203-25
GRY
+5VDC to GI LED Bd 63, J100-1
J203-26
GRY-BLU
LED100 return from GI LED Bd 63, J100-2
J203-27
Not Used
J203-28
Not Used
GI LED 64 [Right Sling Top]
J203-29
GRY
+5VDC to GI LED Bd 64, J100-1
J203-30
GRY-VIO
LED100 return from GI LED Bd 64, J100-2
J203-31
Not Used
J203-32
Not Used
J203-33
Not Used
J203-34
Not Used
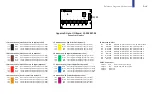
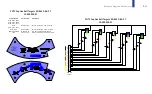
J204
RGB LED Control (RGB Cables 19-009038-05 & 19-009038-06)
RGB LED 53 [Shoot Again]
J204-1
BLK
+5VDC to RGB GI Bd 53, J100-1
J204-2
BLK-BLU
RGB100 BLU return from RGB GI Bd 53, J100-2
J204-3
BLK-RED
RGB100 RED return from RGB GI Bd 53, J100-3
J204-4
BLK-GRN
RGB100 GRN return from RGB GI Bd 53, J100-4
RGB LED 54 [Action Button]
J204-5
BRN
+5VDC to RGB GI Bd 54, J100-1
J204-6
BRN-BLU
RGB100 BLU return from RGB GI Bd 54, J100-2
J204-7
BRN-RED RGB100 RED return from RGB GI Bd 54, J100-3
J204-8
BRN-GRN RGB100 GRN return from RGB GI Bd 54, J100-4
RGB LED 55 [Tilt Warning 1]
J204-9
RED
+5VDC to RGB GI Bd 55, J100-1
J204-10
RED-BLU
RGB100 BLU return from RGB GI Bd 55, J100-2
J204-11
RED-GRY
RGB100 RED return from RGB GI Bd 55, J100-3
J204-12
RED-GRN RGB100 GRN return from RGB GI Bd 55, J100-4
RGB LED 56 [Tilt Warning 2]
J204-13
ORN
+5VDC to RGB GI Bd 56, J100-1
J204-14
ORN-BLU RGB100 BLU return from RGB GI Bd 56, J100-2
J204-15
ORN-RED RGB100 RED return from RGB GI Bd 56, J100-3
J204-16
ORN-GRN RGB100 GRN return from RGB GI Bd 56, J100-4
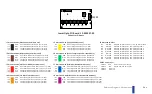
GI LED 63 [Right Sling Bottom]
J203-25
BLU
+5VDC to RGB GI Bd 63, J100-1
J203-26
BLU-GRY
RGB100 BLU return from RGB GI Bd 63, J100-2
J203-27
BLU-RED
RGB100 RED return from RGB GI Bd 63, J100-3
J203-28
BLU-GRN RGB100 GRN return from RGB GI Bd 63, J100-4
GI LED 64 [Right Sling Top]
J203-29
VIO
+5VDC to RGB GI Bd 64, J100-1
J203-30
VIO-BLU
RGB100 BLU return from RGB GI Bd 64, J100-2
J203-31
VIO-RED
RGB100 RED return from RGB GI Bd 64, J100-3
J203-32
VIO-GRN RGB100 GRN return from RGB GI Bd 64, J100-4
J203-33
Not Used
J203-34
Not Used
J203
GI LED Control (GI Cable 19-003125-00, Std Games)
GI LED 57 [Shooter Lane High]
J203-1
GRY
+5VDC to GI LED Bd 57, J100-1
J203-2
GRY-BLK
LED100 return from GI LED Bd 57, J100-2
J203-3
Not Used
J203-4
Not Used
GI LED 58 [Shooter Lane Low]
J203-5
GRY
+5VDC to GI LED Bd 58, J100-1
J203-6
GRY-BRN LED100 return from GI LED Bd 58, J100-2
J203-7
Not Used
J203-8
Not Used
GI LED 59 [Right Outlane Guide High]
J203-9
GRY
+5VDC to GI LED Bd 59, J100-1
J203-10
GRY-RED
LED100 return from GI LED Bd 59, J100-2
J203-11
Not Used
J203-12
Not Used
GI LED 60 [Right Outlane Guide Low]
J203-13
GRY
+5VDC to GI LED Bd 60, J100-1
J203-14
GRY-ORN LED100 return from GI LED Bd 60, J100-2
J203-15
Not Used
J203-16
Not Used
GI LED 61 [Right Flipper Guide High]
J203-17
GRY
+5VDC to GI LED Bd 61, J100-1
J203-18
GRY-YEL
LED100 return from GI LED Bd 61, J100-2
J203-19
Not Used
J203-20
Not Used
Summary of Contents for Pirates of the Caribbean
Page 2: ......
Page 13: ...Game Assembly Setup A 1 Game Assembly Setup Section A...
Page 37: ...The POTC Menu System B 1 The POTC Menu System Section B...
Page 93: ...Game Parts Information C 1 Game Parts Information Section C...
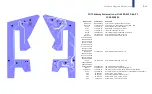
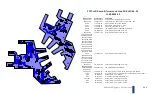
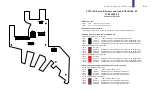
Page 98: ...Game Parts Information C 6 1 2 3 4 5 6 7 8 9 14 12 16 11 10 13 15...
Page 112: ...Game Parts Information C 20 1 2 5 9 3 13 6 10 4 15 16 11 8 7 12 18 17 14 12 18 17 14...
Page 114: ...Game Parts Information C 22 2 4 12 3 16 17 10 11 5 7 6 18 8 14 9 13 1 15 8...
Page 146: ...Game Parts Information C 54 7 14 1 4 9 11 3 2 5 8 8 10 10 12 13 15 16 16 17 6...
Page 166: ...Game Parts Information C 74 15 1 25 2 3 4 5 6 9 10 11 12 13 14 19 17 18 20 21 26 27 28...
Page 168: ...Game Parts Information C 76 1 2 3 4 5 6 9 10 11 12 13 14 15 25 17 18 20 19 26 21 27 28...
Page 170: ...Game Parts Information C 78 49 51 50 55 56 41 42 43 44 45 46 46 46 47 48 76 77 46...
Page 172: ...Game Parts Information C 80 49 51 50 55 56 41 42 43 44 45 46 46 46 47 48 76 77...
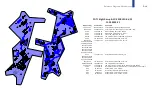
Page 200: ...Game Parts Information C 108 79 65 69 70 71 72 73 74 75 76 77 78 81 80 82 83 84 85 86 87 88...
Page 202: ...Game Parts Information C 110 9 10 12 13 14 15 66 67 68 9 10 12 15 13 14 66 67 68...
Page 208: ...Game Parts Information C 116 32 79 65 69 70 71 72 75 74 73 76 77 78 80 81 82 83 84 85 86 87 88...
Page 212: ...Game Parts Information C 120 23 16 4 6 15 12 10 9 5 2 3 17 13 18 7 22 8 21 20 19 27...
Page 214: ...Game Parts Information C 122 1 14 25 24 11 26 26 26 26 34 32 32 32 30 31 31...
Page 216: ...Game Parts Information C 124 8 3 4 5 1 2 6 7...
Page 220: ...Game Parts Information C 128 0 1 14 2 3 5 4 11 7 6 9 10 12 15...
Page 222: ...Game Parts Information C 130 13 4 5 5 4 4 3 1 2 2 1 7 6 6 6 6 6 6 6 6 6 6 6 6 8 8 8 13 13...
Page 230: ...Game Parts Information C 138 1 2 3 4 5 10 9 8...
Page 232: ...Game Parts Information C 140 1 1 1 2 2 3 3 4 5 8 7 7 7 7 7 7...
Page 234: ...Game Parts Information C 142 1 1 1 1 1 1 1 1 1 1...
Page 248: ...Game Parts Information C 156...
Page 249: ...Reference Diagrams Schematics D 1 Reference Diagrams Schematics Section D...
Page 302: ...Reference Diagrams Schematics D 54...
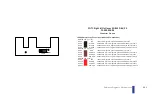
Page 308: ...Reference Diagrams Schematics D 60...
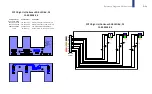
Page 337: ...Reference Diagrams Schematics D 89 1 Fuse Locations Bottom of Cabinet 4 2 3 In Backbox...
Page 343: ...Game Service Troubleshooting E 1 Game Service Troubleshooting Section E...
Page 353: ...Appendices...
Page 358: ......