Game Assembly & Setup
A-6
8)
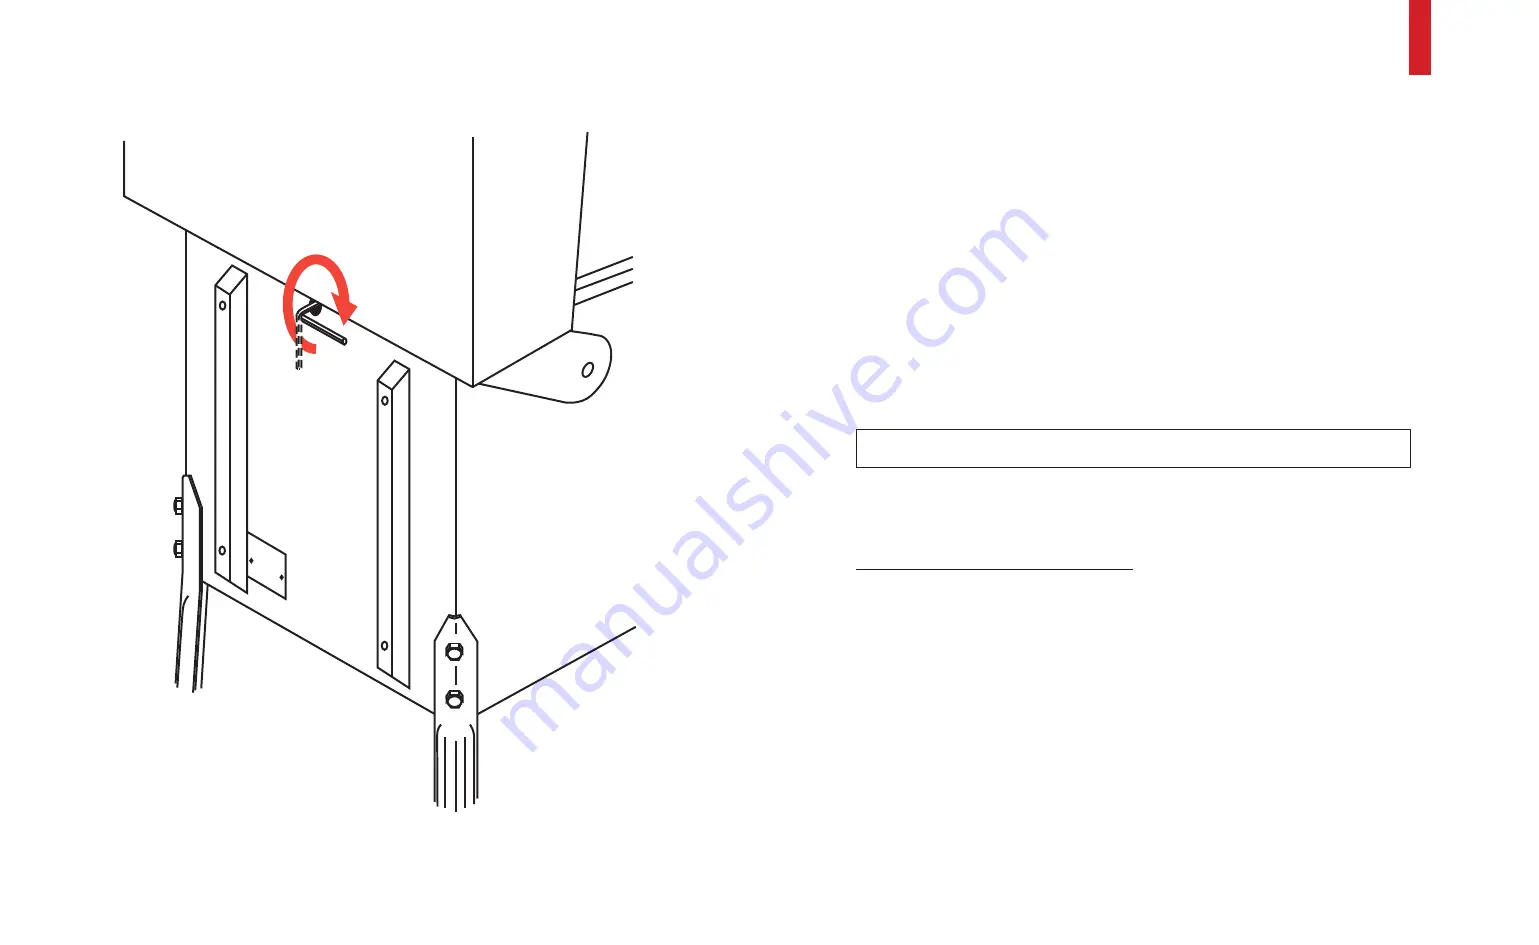
Locate the “L”-shaped, 5/16” hex key for the backbox Roto-Lock in the loose parts.
Insert it into the hole at the base of the backbox and turn it a full 270 degrees, CW
(see figure A8).
Figure A8. Locking the backbox in the upright position.
9)
Using at least two people, lift the game and move it to the intended play area.
DO NOT SLIDE LEGS ACROSS THE FLOOR.
Note:
When the Roto-Lock is in the fully locked position, the key will not turn any
further in the CW direction.
Summary of Contents for Pirates of the Caribbean
Page 2: ......
Page 13: ...Game Assembly Setup A 1 Game Assembly Setup Section A...
Page 37: ...The POTC Menu System B 1 The POTC Menu System Section B...
Page 93: ...Game Parts Information C 1 Game Parts Information Section C...
Page 98: ...Game Parts Information C 6 1 2 3 4 5 6 7 8 9 14 12 16 11 10 13 15...
Page 112: ...Game Parts Information C 20 1 2 5 9 3 13 6 10 4 15 16 11 8 7 12 18 17 14 12 18 17 14...
Page 114: ...Game Parts Information C 22 2 4 12 3 16 17 10 11 5 7 6 18 8 14 9 13 1 15 8...
Page 146: ...Game Parts Information C 54 7 14 1 4 9 11 3 2 5 8 8 10 10 12 13 15 16 16 17 6...
Page 166: ...Game Parts Information C 74 15 1 25 2 3 4 5 6 9 10 11 12 13 14 19 17 18 20 21 26 27 28...
Page 168: ...Game Parts Information C 76 1 2 3 4 5 6 9 10 11 12 13 14 15 25 17 18 20 19 26 21 27 28...
Page 170: ...Game Parts Information C 78 49 51 50 55 56 41 42 43 44 45 46 46 46 47 48 76 77 46...
Page 172: ...Game Parts Information C 80 49 51 50 55 56 41 42 43 44 45 46 46 46 47 48 76 77...
Page 200: ...Game Parts Information C 108 79 65 69 70 71 72 73 74 75 76 77 78 81 80 82 83 84 85 86 87 88...
Page 202: ...Game Parts Information C 110 9 10 12 13 14 15 66 67 68 9 10 12 15 13 14 66 67 68...
Page 208: ...Game Parts Information C 116 32 79 65 69 70 71 72 75 74 73 76 77 78 80 81 82 83 84 85 86 87 88...
Page 212: ...Game Parts Information C 120 23 16 4 6 15 12 10 9 5 2 3 17 13 18 7 22 8 21 20 19 27...
Page 214: ...Game Parts Information C 122 1 14 25 24 11 26 26 26 26 34 32 32 32 30 31 31...
Page 216: ...Game Parts Information C 124 8 3 4 5 1 2 6 7...
Page 220: ...Game Parts Information C 128 0 1 14 2 3 5 4 11 7 6 9 10 12 15...
Page 222: ...Game Parts Information C 130 13 4 5 5 4 4 3 1 2 2 1 7 6 6 6 6 6 6 6 6 6 6 6 6 8 8 8 13 13...
Page 230: ...Game Parts Information C 138 1 2 3 4 5 10 9 8...
Page 232: ...Game Parts Information C 140 1 1 1 2 2 3 3 4 5 8 7 7 7 7 7 7...
Page 234: ...Game Parts Information C 142 1 1 1 1 1 1 1 1 1 1...
Page 248: ...Game Parts Information C 156...
Page 249: ...Reference Diagrams Schematics D 1 Reference Diagrams Schematics Section D...
Page 302: ...Reference Diagrams Schematics D 54...
Page 308: ...Reference Diagrams Schematics D 60...
Page 337: ...Reference Diagrams Schematics D 89 1 Fuse Locations Bottom of Cabinet 4 2 3 In Backbox...
Page 343: ...Game Service Troubleshooting E 1 Game Service Troubleshooting Section E...
Page 353: ...Appendices...
Page 358: ......


