background image

4-77 

4.15.17 Inputtig/Outputting Waypoint, Route and Track 


4.15.17.1 Outputting Waypoint, Route and Track 

 
A waypoint list and the destination of a route list, a route, and a trip can be outputted to external PC. 
The ports used with an output are DATA IN/OUT2 and 3. 
By outputting in an exclusive format, it can save by a CSV file. In order to use an exclusive format, PC 
tool for exclusive use is needed. 
When you use PC tool for exclusive use, be sure to make the bit rate of DATA IN/OUT2 and 3 the same. 
When outputting by NMEA, general-purpose tools, such as a hyper-terminal, can be used. In this case, 
the output of a track cannot be performed. The sentences to be used are WPL and RTE. 
The outline of the data which can be outputted is as follows. 
    ALL WAYPOINT:  

Output all the waypoint. 

    ALL ROUTE:  

Output all the route. 

        ALL WROUTE:   

Output all the waypoint and route. 

    ALL TRACK:  

Output all the trip. 

 
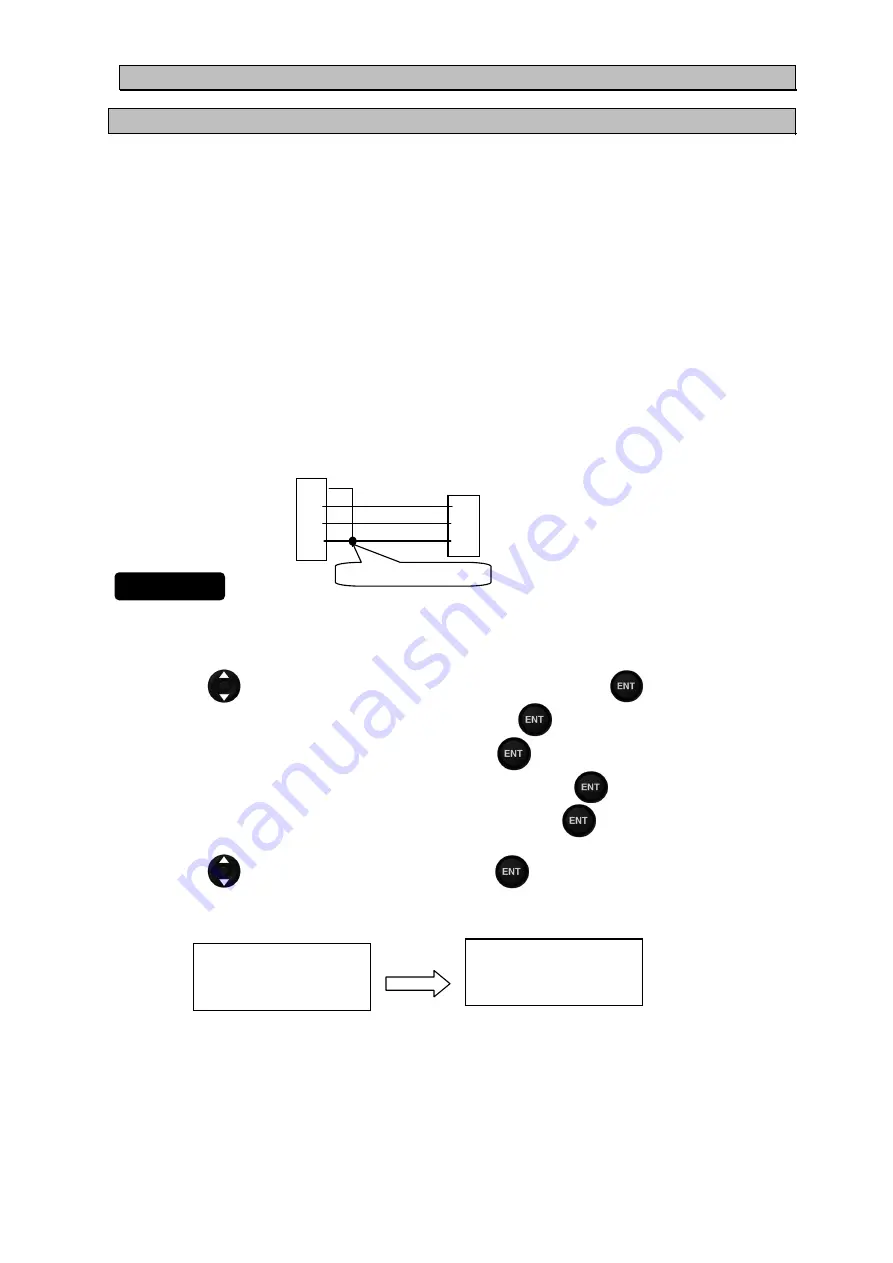
When you output and input, connect with PC as follows. When connected with other equipment, 
change connection into PC temporarily. 
 
 NWZ-4610 

display 

Personal 

computer 


14 pins 

COM port 

 Color 

Pin 


Purple (7) 


Pin 

Operation 

Pink (10) 


(2) 


RX 

Bright green  (12)  

(3)  TX 

Brown (13) 


(5) 


GNG 


1) When outputting in a NMEA format 
 
1.  Refer to "4.15.1 Change to a maintenance mode" and display the maintenance menu. 

2. Press 

the 

  key to select "INTERFACE" "DATA I/O" and press the 

 key. 

3.  Select "ROUT WPT" from DATA IN/OUT2, and press the 

 key. 

4.  Select NMEA vertion from "VERSION", and press the 

 key. 

5.  Select the bit rate linked with PC from "BIT RATE", and press the 

 key. 

6.  Select the data outputted from "OUTPUT DATA", and press the 

 key. 

In the case of NMEA data output, the output of "ALL TRACK" cannot be performed. 

7. Press 

the 

  key to select "SEND", and press the 

 key. 

8.  Since the following is displayed, select "YES". 

It is displayed as "SENDING" and data transmission is carried out. 


                                                                            YES 


ARE YOU SURE


YES   NO 


SENDING 

Short in (7) and (13) 

Procedure 

Summary of Contents for JLR-7900

Page 1: ...NAVIGATOR ISO 9001 ISO 14001 Certified FEB 2017 Edition 3 CODE No 7ZPNA4288 Not use the asbestos For further information contact URL Head office http www jrc co jp eng Marine Service Department 1 7 3...

Page 2: ......

Page 3: ...retrieve the position data using the DGPS GPS sensor to display various navigation information on the display Thoroughly read this instruction manual before operating the equipment Keep this manual n...

Page 4: ...hat may cause injury or property damage if not observed Examples of the Symbols The symbols shown in the mark represent those that require attention including potential dangers and warnings A depictio...

Page 5: ...nt failure Please consult with JRC or an affiliate to perform internal inspections or repair When disposing of the used lithium battery place insulating tape over the battery terminals or otherwise in...

Page 6: ...location where it may come in contact with water oil or chemicals Doing so may result in equipment failure malfunction or injury This equipment is not designed to automatically make judgments on the p...

Page 7: ...rder to ensure that GPS signals can be directly received from satellites without interference or reflection of signals from surrounding objects Whenever possible select a place with the following char...

Page 8: ...vi Appearance of the Equipment NWZ 4610 Display Unit JLR 4341 DGPS Sensor Unit JLR 4340 GPS Sensor Unit...

Page 9: ...atellite error data sent from a reference station whose position is accurately known is received via beacon from a beacon station improving positioning accuracy FRAM Nonvolatile memory using a ferroel...

Page 10: ...ing calculations Ranging Positioning with the use of SBAS satellite in addition to GPS satellite Reception Level GPS signal reception level Route plan Plan registered with multiple waypoints in the na...

Page 11: ...ix...

Page 12: ...3 Adjusting the Backlight by using the kry 4 10 4 2 4 Adjusting contrast 4 10 4 2 5 Turning off the buzzer 4 11 4 2 6 Switching display 4 11 4 2 7 Alert display 4 11 4 2 8 Selecting items from the me...

Page 13: ...4 8 MOB 4 40 4 9 SETTING DISPLAY 4 41 4 9 1 Adjusting contrast 4 41 4 9 2 Adjusting back light 4 41 4 9 3 Setting a click sound 4 42 4 9 4 Setting a display screen 4 42 4 9 4 1 STEP1 Selecting a scree...

Page 14: ...tance 4 76 4 15 17 Inputtig Outputting Waypoint Route and Track 4 77 4 15 17 1 Outputting Waypoint Route and Track 4 77 4 15 17 2 Inputting Waypoint Route and Trip 4 78 4 15 17 3 How to Use Exclusive...

Page 15: ...ON 7 1 SECTION 8 DISPOSAL 8 1 8 1 DISPOSAL OF THE EQUIPMENT 8 1 8 2 DISPOSAL OF USED BATTERIES 8 1 SECTION 9 SPECIFICATION 9 1 9 1 NWZ 4610 DISPLAY UNIT 9 1 9 1 1 Basic Specification 9 1 9 1 2 Environ...

Page 16: ......

Page 17: ...with high accuracy anywhere in the world and in all weather conditions by using the GPS satellites In addition the GPS navigator can increase the accuracy of position fixing by receiving correction d...

Page 18: ...4162 7ZPNA4162 1 English 2 3 Cable Guard Rubber MPPK31468 MPPK31468 1 3 Screw Adapter MTV302007A MTV302007A 1 4 Mounting Band MPBP02520 MPBP02520 1 Include 2 bands JLR 7600 No Name Model Code Q ty Not...

Page 19: ...16 terminals 7 Dimmer Unit NCM 227 NCM 227 7 NCM 227 2 1 External dimmer unit 7 5BG7 2 2 5G7 2 8 L TYPE ADAPTER CFQ 9184 CFQ9184 1 9 Printer NKG 94 NKG 94 1 10 Printer Paper H 7ZPJD0384 7ZPJD0384 1 11...

Page 20: ...1 4 1 4 Construction NWZ 4610 Display Unit Unit mm Mass Approximately 0 8 kg NWZ 4610 Desktop type...

Page 21: ...1 5 JLR 4341 DGPS Sensor Unit JLR 4340 GPS Sensor Unit Unit mm Mass Approximately 1 7 kg including 15m cable Unit mm Mass Approximately 0 7 kg including 10m cable...

Page 22: ...1 6 NBG 320 Power Supply Outline Drawing Unit mm Mass Approximately 3 5 kg Installation Screw M5 Installation Screw M5...

Page 23: ...1 7 NBD 577C Power Supply Outline Drawing Unit mm Mass Approximately 5 4 kg...

Page 24: ...1 8 NQE 7700A Junction Box Outline Drawing Unit mm Mass Approximately 0 6 kg Cable diameter 10 20 Cable diameter 5 11 Gland 15 f Gland 25 f DGPS Cable CFQ 8919...

Page 25: ...Cable Kit outdoor use NQD 4410 Outline Drawing NQD 4414 Coaxial Cable Kit indoor use NQD 4411 Outline Drawing Unit mm Mass Approximately 0 7 kg Unit mm Mass Approximately 1 5 kg Installation Screw M8...

Page 26: ...1 10 NQA 4251A Output Buffer Outline Drawing Unit mm Mass Approximately 0 8 kg NMEA Output 24 VDC Input NMEA Output NEC61162 1 NMEA Input Installation Hole NMEA Output NMEA Output...

Page 27: ...1 11 NQA 4351 Output Buffer Outline Drawing Unit mm Mass Approximately 0 8 kg...

Page 28: ...777 Select Switch Stationary Outline Drawing NCZ 777 Select Switch Flush Mounting Outline Drawing Unit mm Mass Approximately 0 7 kg Unit mm Mass Approximately 0 5 kg Installation Screw M6 Installation...

Page 29: ...1 13 NCZ 1663 Select Switch Unit mm Mass Approximately 0 2 kg...

Page 30: ...1 14 NCZ 1663 Select Switch Flush Mounting Unit mm Mass Approximately 0 2 kg...

Page 31: ...1 15 NCZ 1537B Select Switch Flush Mounting Unit mm Mass Approximately 0 55 kg...

Page 32: ...1 16 CQD 10 Junction Box Outline Drawing Unit mm Mass Approximately 1 1 kg 4 7 5 Installation Screw M6...

Page 33: ...1 17 NKG 94 Printer Outline Drawing Unit mm Mass 2 2 kg or less Printer Rack...

Page 34: ...CK Radar ECDIS GPS Plotter Tide Current Calculator AIS JLR 4340 GPS Sensor NQE 7700A Junction Box 250V MPYCYS 7 Extension Cable Printer NKG 94 Remote Maintenance Junction Box CQD 10 External Buzzer Lo...

Page 35: ...lay the main menu 4 Display key Use this key to switch the display screen 5 Clear key Use this key to cancel the operation Use this key also to stop the alert 6 Cursor key Use this key to move the cur...

Page 36: ...ormation If an alert occurs alert information is displayed Arrival Anchor XTD Ex An ALR sentence is received Position fixing mode G GPS position fixing D Beacon DGPS position fixing Sb SBAS position f...

Page 37: ...de diameter Approximately 6 mm Base Radome 6 pin Connector Outside diameter Approximately 19 mm Mounting Screw 1 inch 14UNS 2B Base Radome Mounting Screw 1 inch 14UNS 2B Data Cable 10 m Outside diamet...

Page 38: ...2 4...

Page 39: ...own ship s position 3 GPS information screen The GPS information screen displays the receiving status of GPS satellites Reception information can be displayed by pressing 4 Beacon information Type 16...

Page 40: ...display the speed 8 Reception information screen The reception screen can display the beacon information HDOP antenna height Beacon frequency Beacon bit rate Beacon error rate Beacon SNR Beacon signa...

Page 41: ...t when it is navigation at a given bearing angle and speed VEAR Speed of the COG component VEAR An acronym of Velocity Along Route This in an index that shows how fast the vessel is approaching along...

Page 42: ...3 4...

Page 43: ...4 3 SOUND SOUND1 SOUND2 OFF 4 9 4 3 TIME 1 10sec 4 9 4 3 SEGMENTATION3 4 9 4 2 DISPLAY1 3 Same as DISPLAY 1 4 9 4 2 DISPLAY2 3 Same as DISPLAY 1 4 9 4 2 DISPLAY3 3 Same as DISPLAY 1 4 9 4 2 AUTO SCRE...

Page 44: ...ACK PERIOD 4 3 8 TIME 1sec 60min 4 3 8 DISTANCE 0 01 99 99NM 4 3 8 ROUTE START END START END 4 3 8 WPT RTOUTE WPT LIST 0 999 LIST DISPLAY 4 4 1 WPT No 4 4 2 MARK 4 4 2 COMMENT 4 4 2 POSITION 4 4 2 ENT...

Page 45: ...NG LANG English Japanese Norwegian French German Italian Spanish Vietnamese Indonesian 4 11 ALARM SYSTEM ON OFF 4 12 1 SOUND ON OFF 4 12 8 LCD ON OFF 4 12 8 SPEED OVER UNDER IN RANG OUT RANG OFF 4 12...

Page 46: ...GPS ALONE BEACON SBAS 4 13 1 FIX MODE AUTO 2D 3D 4 13 2 ELV MASK 5 89deg 4 13 3 HDOP 4 10 20 4 13 4 SMOOTHING 4 13 5 POSITION 0 99sec 4 13 5 SPEED 0 99sec 4 13 5 COURSE 0 99sec 4 13 5 RAIM ACCURACY OF...

Page 47: ...OFF 4s 4 15 5 ROUTE WPT 4 15 5 VERSION 1 5 2 1 2 3 4 0 JRC 4 15 5 BIT RATE 4800 9600 19200 38400 4 15 5 OUTPUT DATA ALL WAYPOINT ALL ROUTE ALL WAYPOINT ROUTE ALL TRACK 4 15 5 SEND 4 15 5 DATA IN OUT3...

Page 48: ...DISPLAY 4 15 10 EXCEPT FOR LIST 4 15 10 RECEIVER RESET 4 15 10 ALL RESET 4 15 10 DEMO MODE DEMO TYPE STATIC STRAIGHT RIGHT LE FT ROUTE AUTO 4 15 11 DATE 4 15 11 TIME 4 15 11 LATITUDE 4 15 11 LONGITUDE...

Page 49: ...een is displayed Select a Model with and press Model When LOG is selected by mistake Refer to Caution in 4 15 2 setting a model When GPS is selected by the first time power up and model setup for the...

Page 50: ...er supply for 12V A receiver will be damaged if DC24V is supplied to a receiver If NO is selected Since the above is displayed turn OFF a power supply Exchange the power supply of a display for 12V If...

Page 51: ...unit and sensor configuration settings do not match such as when equipment has been replaced When this occurs select one of the items and press the key to perform it SENSOR Replaces display configura...

Page 52: ...off dark medium bright 4 2 4 Adjusting contrast Contrast can be adjusted over 13 levels Whenever is pressed the contrast is reduced or increased from the current setting and after the contrast reaches...

Page 53: ...ied with a popup menu and alert sound When is pressed the popup menu is cleared and the buzzer sound stops However display of remains on the status bar unless the alert is cancelled Even after the pop...

Page 54: ...ble selection of details Menu Submenu 3 Move the cursor to a required item by using and press The cursor moves to the setting value selection 4 Select a setting value with and press or The setting val...

Page 55: ...by using Select a numeric value by using Procedure If the numeric value that can be entered is restricted by an input range enter the digits from the highest order To prevent the value from exceeding...

Page 56: ...perated for 5 seconds cursor display is automatically turned off 4 3 1 2 Moving the Cursor The cursor can be moved up down right and left 1 Use the to move the cursor up down right and left 4 3 2 Zoom...

Page 57: ...he key is pressed 4 3 4 Registering the corsor position The cursor position can be registered to the waypoint list 1 Press the key on the plot screen to display the cursor 2 Press the key at the posit...

Page 58: ...period If the period is set to OFF track memory will be deactivated Previously stored data will be retained 4 3 6 2 Deleting Tracks All tracks can be deleted Partial deletion cannot be performed 1 Pre...

Page 59: ...be changed individually from the waypoint list In order to change symbols you must switch the unit to non IMO mode 1 Press the key to display the main menu standard mode 2 Use the key to select PLOT a...

Page 60: ...under the screen 1 Press the key to display the main menu standard mode 2 Press the key to select PLOT TRACK TO ROUT and TRACK PERIOD and press the key 3 Press the key to select TIME or DISTANCE and...

Page 61: ...nd WPT LIST and press the key The position registered as HOME in the waypoint list can be easily set as the waypoint using the GOTO function It is convenient to register a frequently used waypoint suc...

Page 62: ...position is shown in LAT and LON 4 Press the key to select ENTER and press the key 4 4 2 2 Registering Latitude and Longitude Any latitude and longitude can be registered in the waypoint list 1 Refer...

Page 63: ...ss START POINT press the key to select the start point and press the key 1 When LAT LON is selected 4 Enter LATITUDE and LONGITUDE and press the key 2 When OWN SHIP is selected 4 The own ship position...

Page 64: ...WPT No 6 Press the key to enter the waypoint number The same information is entered in the input waypoint number Information about the waypoint number before change also remains Delete the destination...

Page 65: ...nu 2 Press the key to select WPT ROUTE and DELETE WPT and display the waypoint list 3 Press the key to select the waypoint to be deleted and press the key An overview of the delete waypoint submenu is...

Page 66: ...s displayed in the registered route number The required time cannot be calculated for routes for which no planned speed has been set Route List 1 Press the key to display the main menu 2 Press the key...

Page 67: ...cle Sailing GC The shortest distance from the current position to the waypoint can be used but the bearing will be different from that determined on nautical chart and will change during movement Rhum...

Page 68: ...nt list will be displayed 8 Press the key to move the cursor to the waypoint number you wish to select and press the key 9 Select STATUS of the waypoint The following items can be set in STATUS USE Th...

Page 69: ...5 Press the key to select ENTER and press the key 4 5 3 2 Changing route Information 1 Press the key to display the main menu 2 Press the key to select WPT ROUTE and MAKE ROUTE LIST and press the key...

Page 70: ...ion along the created routes 1 Refer to 4 5 1 Displaying the Route List select the route to which you wish to add a waypoint and display the route waypoint list 2 Move the cursor to the waypoint numbe...

Page 71: ...SE or SKIP 5 Press the key to select ENTRE and press the key 6 When you have completed addtion press the key to return to route information screen 7 Press the key to select ENTER and press the key 4 5...

Page 72: ...owing popup is displayed press YES 9 When you have completed deletion press the key to return to route information screen 10 Press the key to select ENTER and press the key 4 5 4 Copying Routes To cop...

Page 73: ...e to be deleted 3 ALL DELEATE Delete all routes between 1 and 20 3 Press the key to select the route deletion method and press the key 1 When ROUTE LIST is selected The route list will be displayed Mo...

Page 74: ...as follows 1 LEG CHANGE You can set whether a waypoint is updated automatically or manually when own ship arrives the waypoint arrival circle AUTO The waypoint is automatically updated to the next way...

Page 75: ...tarts to that waypoint Routes created with GOTO key are stored as temporary route with route number 21 The waypoint can be selected by the following methods 1 Set HOME PORT as the waypoint 2 Enter the...

Page 76: ...ress the key to set LEG CHANGE DIRECTION and SPEED SMOOTHING and press the key Please refer to 4 6 1 Selecting a Route from the Route List for details 5 Press the key to select ROUTE and START and pre...

Page 77: ...e waypoint list 5 Select from the waypoint list A waypoint can be selected from the waypoint list 1 Press the key 2 Press the key to select LIST and WPT LIST and press the key 3 Press the key to set t...

Page 78: ...tion with GOTO Key 1 Press and hold down the key 3 seconds or more 2 When the following popup is displayed press YES 4 6 3 2 Ending Navigation in Menu 1 Press the key to display the menu 2 Press the k...

Page 79: ...ve the cursor to A 4 When the cursor is set to A press the key to enter 5 A will be displayed in the comment entry field The cursor in the comment entry field shifts one to the right to enter the mode...

Page 80: ...cated at the top press the key to move the cursor to the comment entry field 2 Set the cursor to after the character you wish to delete press the key to return to the character selection field and sel...

Page 81: ...move the cursor to the character selection field 4 Refer to 4 7 1 Text Entry and enter characters To add B 4 7 4 Canceling Comment Entry Comment entry is ended without deciding characters 1 Press the...

Page 82: ...ute which made the Man Overboard position the destination will be performed The bearing and distance to the Man Overboard position from a current position are displayed on BRG and DTG 1 Press and hold...

Page 83: ...st The darkest contrast is 1 and the lightest contrast is 13 The default setting is 7 1 Display a main menu by pressing 2 Select DISPLAY LCD and CONTRAST in this order by using 3 Enter a contrast valu...

Page 84: ...ion character can be expanded and displayed Display mode The setting of the auto screen function and the display mode are performed by STEP3 The screen structures of each display screen include custom...

Page 85: ...d graphic screen Users cannot change the screen structure Special contents for the model are displayed on the screen The following screen structures can be selected 1 SEGMENTATION1 Full screen 2 SEGME...

Page 86: ...displayed in the area Set the auto screen function and display mode only segmentation 1 screen in STEP3 The following functions can be set 1 1 AUTO SCREEN ON Enables the auto screen function OFF Disab...

Page 87: ...by using and press 5 Go to procedure 6 when setting an auto screen Fixed screen and graphic screen 2 Select 1 DISPLAY by using and press 3 Select display contents by using and press 4 Go to procedure...

Page 88: ...range Auto range The contents of a display Integer part expanded display Usual display Decimal part expanded display SOG VTD VEAR 10kn or more 1 0 9 9kn 0 9kn or less DTG XTD 10NM or more 1 00 9 99NM...

Page 89: ...d and Anntena height Unit You can select NM kn km km h mi mi h m and m s for speed and m ft and fm for anntena height unit 1 Refer to 4 15 1 Change to a maintenance mode and display the maintenance me...

Page 90: ...manually entered value If you turn magnetic correction off no correction is performed Magnetic compensation can be applied only to a display or an output usually carry out the same setup for a display...

Page 91: ...system You can select between 47 types of geodetic systems For details refer to Appendix 1 Geodetic Systems 1 Refer to 4 15 1 Change to a maintenance mode and display the maintenance menu 2 Press the...

Page 92: ...French Italian Norwegian Spanish Vietnamese Indonesian To change the language place the unit in the maintenance mode 1 Refer to 4 15 1 Change to a maintenance mode and display the maintenance menu 2 P...

Page 93: ...n alert occurs when own ship exits the route width 6 DGPS An alert occurs when switching is done from GPS positioning to DGPS positioning or vice versa 7 HDOP An alert occurs when the GPS positioning...

Page 94: ...Enter a vessel speed by using and press 6 Set an buzzer sound and screen back light by referencing 4 12 8 Setting a buzzer sound and screen back light 4 12 3 Setting a TRIP alert An alert is issued w...

Page 95: ...versa Even if generated by DGPS alert icon and pop up are not indicated It is reported that the audible tone changed the positioning state in one time of Pi and Moreover screen lighting is unchangeab...

Page 96: ...an alert can be set When the back light color under the normal condition is set to white the color is changed to orange and when the back light color is set to orange the color is changed to white Cha...

Page 97: ...Receiver Autonomous Integrity Monitoring This function allows the sensor to determine whether the position accuracy measured by the GPS is within required accuracy 4 13 1 Setting GPS Mode You can sele...

Page 98: ...tion mask is set satellites at an elevation lower than the set value will not be used in positioning The elevation mask can be set between 5 and 89 degrees 1 Refer to 4 15 1 Change to a maintenance mo...

Page 99: ...ndication The integrity indications with a confidence level above 95 for different position accuracy levels are expressed in two states safe and unsafe In the case of the confidence level under 95 the...

Page 100: ...the sensor This height is used in 2D positioning It is not used in 3D positioning 4 DATE Enter the current date in UTC 5 TIME Enter the current time in UTC When you perform initial setting be sure to...

Page 101: ...bit rate when station selection is set to manual 1 Refer to 4 15 1 Change to a maintenance mode and display the maintenance menu 2 Press the key to select SENSOR and BEACON 1 Setting beacon station 3...

Page 102: ...in the same way as the GPS satellite ON Used OFF Not used default 1 Refer to 4 15 1 Change to a maintenance mode and display the maintenance menu 2 Press the key to select SENSOR and SBAS 1 Setting SB...

Page 103: ...13 8 Setting beacon the beacon information Type16 massage from the beacon broadcast stations can be displayed 1 Refer to 4 15 1 Change to a maintenance mode and display the maintenance menu 2 Press t...

Page 104: ...5 1 Changing to a maintenance mode Before starting installation the mode must be changed to a maintenance mode to prevent an operation error Change the mode to a maintenance mode by the initial operat...

Page 105: ...y unit When an external dimmer unit is used the contact point input must be set to DIMMER For the setting method see 4 15 6 Setting Contact Input When sharing a dimmer unit set the same dimmer unit fo...

Page 106: ...r control and data sharing with RS 485 is shown below Refer to the setting reference section for the setting method The connection conditions of the connection example are as follows Display unit 1 Di...

Page 107: ...S 485ID 2 Select the same dimmer unit by referencing 4 15 3 Selecting a dimmer unit 3 Set the display units in the same dimmer group by referencing 4 15 4 3 Setting a dimmer group To disable linkage o...

Page 108: ...t sentence by using and set an output cycle A cycle can be selected within the range from 1 second to 9 seconds and if OFF is selected the sentence is not output 6 Return control to the BIT RATE selec...

Page 109: ...nput Output Output Input 1 port for output 2 ports for input Input Input Output Although an output sentence a cycle and a bit rate can be set for each port some bit rates and the number of sentences m...

Page 110: ...e can be selected within the range from 1 second to 9 seconds and if OFF is selected the sentence is not output 7 Return control to the BIT RATE selection screen and select BIT RATE by using Available...

Page 111: ...mat that are to be set by using 4 Select RECEIVE from DATA IN OUT by using 5 Return control to the BIT RATE selection screen and select BIT RATE by using Available bit rates are 4800 9600 19200 and 38...

Page 112: ...st be set to transmission Connect PC to a serial port before output operation 1 Refer to 4 15 1 Change to a maintenance mode and display the maintenance menu 2 Refer to 4 15 5 1 Setting transmissin to...

Page 113: ...n screen press When no data is displayed check the connection and the setting of the serial port 4 15 9 2 Self diagnosis Self diagnosis of the display unit can be performed and the result can be displ...

Page 114: ...playing the current alert 3 Select ALARM by using and press The current alert is displayed When no alert has occurred no information is displayed Displaying past alert history 4 Press ERROR LOG by usi...

Page 115: ...setting values before performing master reset However the following items are not reset Model RS 485ID dimmer control unit setting dimmer group To reset the display select DISPALY or EXCEPT FOR LIST...

Page 116: ...O TYPE and press the key 4 Press the key to enter the init 5 Enter DATE TIME LATITUDE and LONGITUDE 6 Press the key to select DEMO MODE Set START 4 15 12 Setting the Sub Display The dispaly unit can b...

Page 117: ...r and press the key 4 15 14 Outputting setting value Setting value can be output to an external unit Data is output from a data IN OUT1 port If data IN OUT1 is set to reception the port must be set to...

Page 118: ...ress the key 3 Press the key to select the ship size BEAM LENGTH and enter the shi size 3 Press the key to select the sensor position SENSOR X Y Z and enter the sensor position 3 Press the key to sele...

Page 119: ...ll the waypoint and route ALL TRACK Output all the trip When you output and input connect with PC as follows When connected with other equipment change connection into PC temporarily NWZ 4610 display...

Page 120: ...utted in an exclusive format In order to use an exclusive format PC tool for exclusive use is needed When you use PC tool for exclusive use be sure to make the bit rate of DATA IN OUT2 and 3 the same...

Page 121: ...nd press the key 6 Select the bit rate linked with PC from BIT RATE in DATA IN OUT2 and DATA IN OUT3 and press the key 7 Select RECEIVE from DATA IN OUT3 and press the key 8 Since the following is dis...

Page 122: ...s saved at JRC_Date_Time_waypoint or route track csv Refer to 4 CSV file about a CSV file 3 Press Start It is displayed with Wait to RX ROUTE that it is displayed as START Also in the waypoint and tra...

Page 123: ...Complete 6 Press finish and terminate a tool 4 CSV file The example of a file created with PC is shown When you transmit the waypoint route track from PC create a CSV file according to the example of...

Page 124: ...Within the same route it is the same radius altogether Unit NM fixation Plan ship speed It is the same ship speed altogether within the same route Unit knot fixation 0 fixation Distance calculation m...

Page 125: ...the specified fuse Failure to do so may result in fire or equipment failure Use only the specified batteries Failure to do so may result in equipment failure or malfunction 5 1 General Maintenance and...

Page 126: ...ROM Error Memory Error Processing Unit of Sensor 42 Controller RAM Error Memory Error Processing Unit of Sensor 43 Controller FPGA Error FPGA Error Processing Unit of Sensor 44 Controller BACKUP Error...

Page 127: ...ts The alert sound is turned off Refer to 4 12 8 The click does not sound The key press sound is turned off Refer to 4 9 3 There is no reception from sensor The sensor connection cable is disconnected...

Page 128: ...PANEL PRODUCT NAMEPLATE 5 3 3 Regular Replacement Parts Parts that should be regularly replaced are shown below Contact JRC or one of our agents to order Replace the radome and packing when replacing...

Page 129: ...degrees centigrade or higher Doing so sometimes causes fire or failure Do not put the equipment on an unstable place such as wobbly base or tilted area Doing so sometimes causes the equipment to drop...

Page 130: ...or reflection of signals from surrounding objects Whenever possible select a place with the following characteristics If it is difficult to find an ideal site select a place temporarily and install t...

Page 131: ...to the radome resulting in cracks The diagram shows the JLR 4341 but these instructions apply equally to the JLR 4340 as well Do not apply force to the joint Hold and turn the base 2 Secure the sensor...

Page 132: ...s apply equally to the JLR 4340 as well 1 Loosen the fitting belt screw with a screwdriver to remove the clamp 2 Coil the fitting belt around the mast as shown below 3 Tighten the clamp screw with the...

Page 133: ...ews 1 inch 14 UNS 2A In this case cable guard rubber accessory is used 1 The cable is installed as following figure Do not bend the cable acutely Doing so may result in damage to the cable Cable insta...

Page 134: ...may result in a large amount of force applied at the junction of the base and the radome resulting in damage to the sensor When performing attachment do not use adhesive for screw or other adhesive f...

Page 135: ...del Identification Plate Peel the label of the equipment to be used from the accessory model identification plate and affix it over the upper left blank part of the unit nameplate at the center of the...

Page 136: ...e and earth cable to the earth terminal Failure to do so may cause electric shock in case of failure and electric leak Do not use or leave the equipment at places where it is exposed to direct sunligh...

Page 137: ...to the main unit 3 Attach the rotational washer on the side of the main unit 4 Attach the rotational washer on the side of the desktop rack 5 Assemble the main unit on the desktop rack insert the knob...

Page 138: ...6 10 Required installation space Unit mm Mount bottom 285 or more 190 or more 190 or more...

Page 139: ...n 2 Fix the main unit using screws 4 screw or wood screw L 10mm provided by the shipyard The sizes of the heads of the screws that are used are restricted as follows including the washers Diameter Up...

Page 140: ...6 12 Provide maintenance space Unit mm 180 or more About the corner C11 may want to cut 25 Mounting hole Square hole Screw pitch Square hole Screw pitch...

Page 141: ...e the display unit 1 Insert a hexagonal wrench into the holes 2 at the bottom of the front panel 2 Remove the front panel by pressing down the hexagonal wrench Mounting wall Front panel Prepare a boar...

Page 142: ...ble External Equipment Connection Terminal Contact Output Signal Connect to the optional equipment such as external buzzer External Equipment Connection Terminal Contact Input Signal Connect to the co...

Page 143: ...t to the specifications set by DATA IN OUT1 9 White SD0 B 10 Pink Serial Transmission DATA I O2 SD3 A Input and output to the specifications set by DATA IN OUT2 11 Sky blue SD3 B 12 Bright green Seria...

Page 144: ...els see 4 15 5 Setting a serial port Terminal Number CFQ 5766 Name Input Output Condition 3ch Input 2ch Input 1ch Output 1ch Input 2ch Output 3ch Output 8 Gray Serial Transmission DATA I O1 SD0 A Inpu...

Page 145: ...162 1 NMEA SD B SD A SD B SD A Input Setting Output Setting Relay Contact maximum 30 VDC 1 0 A COM NO NC IEC61162 1 NMEA Input Output Serial Transmission Contact Output Contact Input Analog Input IN I...

Page 146: ...SD1 B 3 Green SD1 C 4 Shield Chassis Earth E Chassis earth TERM Switch When this terminal is connected move the TERM switch terminator to ON To connect multiple units move the TERM switches on both en...

Page 147: ...ple units up to 10 units To Extend the Cable T SHAPED CONNECTOR option Type name AA 040404 MMM TL Code 5JCDX00071 CFQ 5769 CFQ 5769 CFQ 5769 CFQ5768 CFQ5768 CFQ 5769 3 m CFQ 5769 3 m Term ON up Term O...

Page 148: ...nits can be connected 3 4 5 6 7 8 9 CFQ5768 CFQ 5769 3 m CFQ5769 CFQ5768 Term ON up Term ON up Term OFF down CFQ 5769 3 m CFQ 5769 3 m The number of cables and the number of cable adapters vary depend...

Page 149: ...er group 02 Dimmer External dimmer Dimmer group 03 Dimmer Key RS485ID 06 RS485ID 05 RS485ID 02 SOG 12 3 kn SOG 12 3 kn SOG 12 3 kn RS485ID 01 RS485ID 03 RS485ID 04 RS485ID 09 RS485ID 08 RS485ID 07 SOG...

Page 150: ...transmission TXD2 A Sends configuration data to the DGPS GPS sensor 6 Brown Not Use Display Unit Rear Connector Pin Number DGPS Sensor JLR 4341 GSP Sensor JLR 4340 In this display the voltage supplied...

Page 151: ...he wrapped tape may form three layers However portions between the connector and cable have different diameters This portion apply tape more than the other portions When the tape has been wrapped pres...

Page 152: ...e of a setting in the case of outputting from the data in out 1 of a main display and receiving with the data in out 1 of a sub display Main display Sub display Display type Main Sub Connection port D...

Page 153: ...ay from the display unit by connecting the dimmer unit NCM 227 Connection example NCM 227 Dimmer Unit NWZ 4610 Display Unit DC12 24V CFQ 5766A Data Power Cable 2 m DC12 24V DATA DATA1 SENSOR DATA2 CQD...

Page 154: ...x on a given flat surface using self tapping screws and flat washers as shown below The self tapping screws and flat washers in the figure above are not included with this equipment How to Mount the J...

Page 155: ...er M6 SUS Spring Washer M6 SUS Nut M6 SUS Lock Nut M6 SUS Note SUS Stainless Steel Pole Mounting Kit MPBP30608 Perform waterproofing 1 or 2 below for the glands 1 Exterior Waterproof with self adhesiv...

Page 156: ...eld Line 1 2 3 4 5 6 3 JLR 4340 GPS Sensor Cable Junction Box Terminal Red Black White Green Yellow Brown Blue Shield Line Orange not used 1 2 3 4 5 6 3 3 6 5 5 Coaxial Cable Kit Connection Please ref...

Page 157: ...t and switched GPS units manually 6 5 8 GPS Select Switch Automatic NCZ 1537B A GPS select switch NCZ 1537B can be switched GPS units by control signal GPS select Switch NCZ 1537B Control Signal No1 G...

Page 158: ...6 30...

Page 159: ...re or other Acts of God is charged Repairs after the warranty period Repairs to restore the proper equipment operation can be made at a specified rate with the user s consent In this case the equipmen...

Page 160: ...7 2...

Page 161: ...rve all rules and regulations of the local authorities when disposing of this equipment 8 2 Disposal of Used Batteries This equipment contains a lithium battery When disposing of the used lithium batt...

Page 162: ...8 2...

Page 163: ...1 99 99NM 0 01NM selectable Interface Data 1 connector Input or output 1 port RS 485 DC12 24V data connector Power input Serial input or output 3 ports RS 422 Contact input output 1 port Sensor data...

Page 164: ...arity None Start Bit 1 bit Stop Bit 1 bit Output Sentence GGA RMC GLL VTG GSA GSV DTM GBS GRS GST ZDA GNS MSS ALR APB BOD BWC BWR RMB XTE ZDG AAM RTE WPL ACK Output Interval 1s 2s 3s 4s 5s 6s 7s 8s 9s...

Page 165: ...SBAS WAAS MSAS EGNOS Geodetic datum Selection among 46 geodetic datum 2 Beacon Unit Reception Frequency 283 5 325kHz Selection of Beacon Station Automatic or manual 3 Power Supply Power Supply Voltage...

Page 166: ...OP 4 SA off 7m 2DRMS SBAS selected SBAS WAAS MSAS EGNOS Geodetic datum Selection among 46 geodetic datum 2 Power Supply Power Supply Voltage DC12 24V 30 10 Power Consumption less than 1 5W 3 Dimension...

Page 167: ...c Datum 1949 New Zealand GUA GUA 23 Guam 1963 Guam 024 024 24 Hayford 1910 Finland HJO HJO 25 Hjorsey 1955 Iceland IND IND 26 Indian India Napal IRL IRL 27 Ireland 1965 Ireland KEA KEA 28 Kertau 1948...

Page 168: ...nce BRILL Built in Test Equipment BITE Calibrate CAL Cancel CNCL Carried for example carried EBL origin C Central Processing Unit CPU Centre CENT Term Abbreviation Change CHG Circularly Polarised CP C...

Page 169: ...hing Vessel FISH Fix FIX Forward FWD Frequency FREQ Frequency Modulation FM Full FULL Gain GAIN Geographics GEOG Term Abbreviation Geometric Dilution Of Precision GDOP Global Maritime Distress and Saf...

Page 170: ...ssing MISSING Mute MUTE Navigation NAV Term Abbreviation Night NT Normal NORM North N North Up N UP Not Less Than NLT Not More Than NMT Not Under Command NUC November NOV October OCT Off OFF Officer O...

Page 171: ...ET Ship s Time TIME Short Pulse SP Signal to Noise Ratio SNR Simulation SIM Slave SLAVE South S Term Abbreviation Speed SPD Speed and Distance Measuring Equipment SDME Speed Over the Ground SOG Speed...

Page 172: ...ing Operations DIVE Vessel Engaged in Dredging or Underwater Operations DRG Vessel Engaged in Towing Operations TOW Vessel Not Under Command NUC Vessel Restricted in Manoeuvrability RIM Vessel Traffic...

Page 173: ...HIC GPS OFF OFF 1sec DISPLAY4 DISPLAY AUTO SCREEN SOUND TIME SPECIAL BEACON INFO OFF OFF 1sec DISPLAY5 OFF DISPLAY6 OFF BACK LIGHT WHITE PLOT WAYPOINT MARK EVENT MARK TRACK PREIOD OFF TRACK TO ROUTE T...

Page 174: ...VER 4 SOUND OFF LCD COLOR OFF SENSOR GPS MODE AUTO FIX MODE AUTO ELV MASK 5 HDOP 10 SMOOTHING POSITION 10sec SPEED 10sec COURSE 10sec RAIM ACCURACY 100 INITIALIZATION LATITUDE 35 00 0000 N LONGITUDE 1...

Page 175: ...B DTM GGA RMB RMC VTG ZDA BIT RATE 4800 DATA IN OUT3 NMEA NMEA DATA IN OUT SEND VERSION 2 3 SENTENCE ACK APB DTM GGA RMB RMC VTG ZDA BIT RATE 4800 RS 485 NMEA VERSION 2 3 SENTENCE None BIT RATE 115200...

Page 176: ...1 SPECIAL2 AUTO RANGE AUTO SCREEN ON OFF SOUND ON OFF TIME sec DISPLAY MODE NORMAL SPECIAL1 SPECIAL2 AUTO RANGE AUTO SCREEN ON OFF SOUND ON OFF TIME sec DISPLAY MODE NORMAL SPECIAL1 SPECIAL2 AUTO RANG...

Page 177: ...FF ARRIVAL ANCHOR ARRIVAL ANCHOR OFF SOUND ON OFF LCD COLOR ON OFF XTD XTD OFF SOUND ON OFF LCD COLOR ON OFF DGPS ON OFF OFF ON OFF ON OFF SOUND ON OFF HDOP OVER OFF OVER SOUND ON OFF LCD COLOR ON OFF...

Page 178: ...600 19200 38400 JRC INTERVAL OFF 4s ROUTE WPT VERSION 1 5 2 1 2 3 4 0 JRC BIT RATE 4800 9600 19200 38400 OUTPUT DATA ALL WAYPOINT ALL ROUTE ALL WAYPOINT ROUTE ALL TRACK DATA IN OUT3 NMEA DATA IN OUT S...

Page 179: ...R ACK CONTACT OUTPUT 200PULSE NM 400PULSE NM ALARM OFF DIAGNOSIS MAINTENANCE INPUT DATA DIAGNOSIS ERROR LOG SOFT VERSION DISPLAY VER APP VER SERIAL NUMBER BARCORD SENSOR VERSION APP VER SERIAL NUMBER...

Page 180: ...endix5 List of Symbols Symbol name Symbol graphic Own ship simplified symbol Double circle Past track Small filled circle Waypoint Circle Route Long dashed line Event Square with diagonal line User cu...

Page 181: ......

Page 182: ......

Page 183: ......

Page 184: ...NAVIGATOR ISO 9001 ISO 14001 Certified FEB 2017 Edition 3 CODE No 7ZPNA4288 Not use the asbestos For further information contact URL Head office http www jrc co jp eng Marine Service Department 1 7 32...

Reviews: