background image

5-93

5

M

A

INTE

NAN

CE

ADVANCE 2000

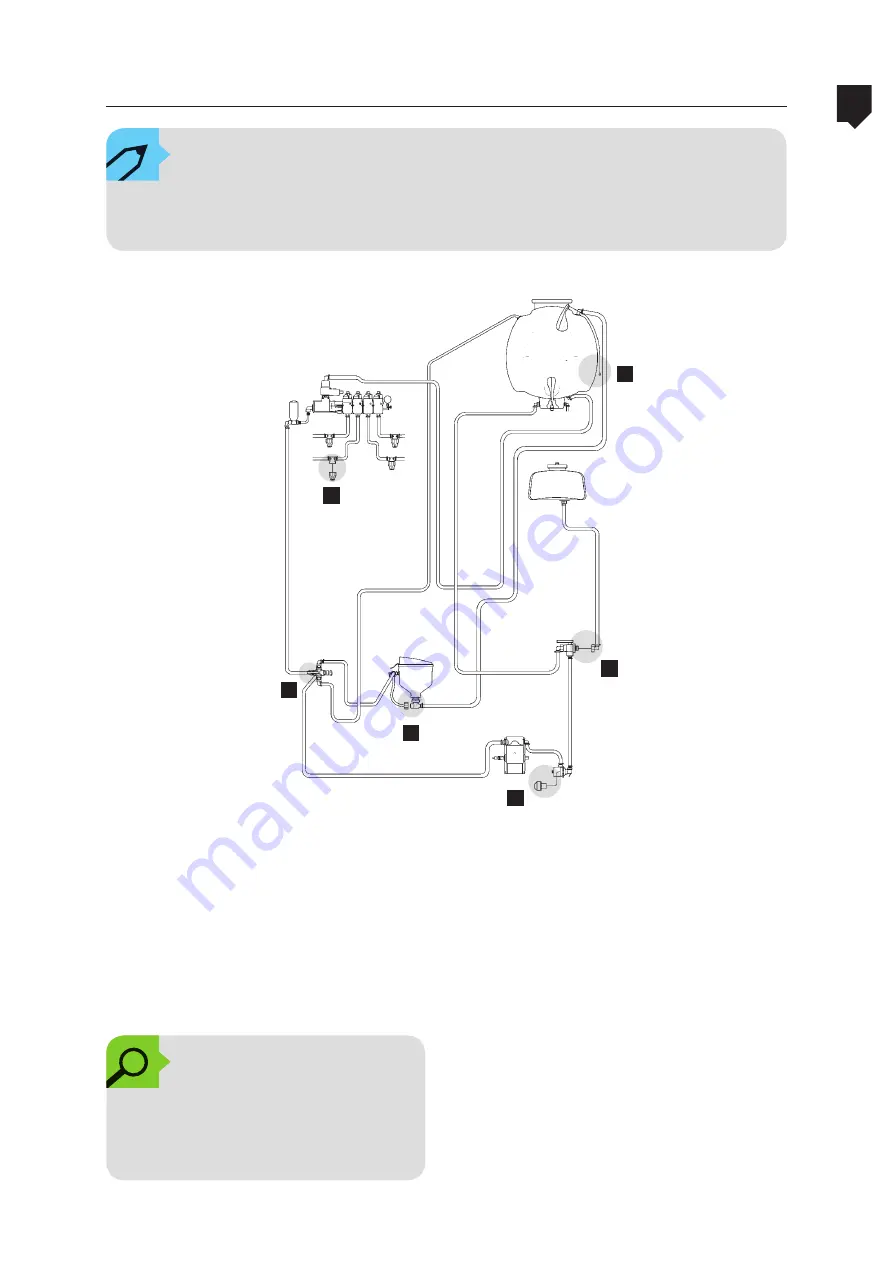
Winter storage

NOTE:

In areas where temperatures drop to 0° or less, the water accumulated in the spray 
pump can freeze and cause serious damage.

Procedures:

1.  Drain the spray tank through the dis-

charge valve (A).

2.  Remove the suction filter cap (B).

3.  Run the sprayer for about 30 seconds at 

between half and low speed.

4.  Disconnect the inlet hose of the auxiliary 

tank bypass valve (C).

5.  Remove the in-line filter cap (D).

6.  Operate the flow bypass valve lever (E) to 

drain the circuit.

7.  Reinstall the components in their place.

8.  Repeat this operation at the end of each 

working day during winter time to avoid 
problems in future spray applications.

OBSERVATION:

To avoid damage to compo-
nents, do not run the sprayer 
over the recommended time.

E

F

D

B

C

A

Summary of Contents for Advance 2000 AM-18

Page 1: ...randa 1650 17580 000 Pomp ia SP Brasil Tel 55 14 3405 2100 CNPJ 55 064 562 0001 90 e mail jacto jacto com br www jacto com br ADVANCE 2000 AM 18 ADVANCE 2000 VORTEX English version MI_USA 0250 Operato...

Page 2: ......

Page 3: ...ADVANCE 2000 3 Table of contents Introduction 5 Precautions 1 7 Assembly 2 27 Technical Specifications 3 47 Operations and Adjustments 4 53 Maintenance 5 83 Warranty 6 111 General Index of tables 119...

Page 4: ......

Page 5: ...JACTO s aim is to prepare and guide the farm er on the proper use of the farm equipment manufactured by JACTO Therefore read carefully and understand thor oughly this manual before operat ing this spr...

Page 6: ......

Page 7: ...nvironmental responsibilities 1 1 1 Safety decals 1 1 2 General safety recommendations 1 1 5 Safety for unloading the equipment 1 1 7 Cautions during component assembly 1 1 8 Warning when using and fi...

Page 8: ......

Page 9: ...ent It is important to remind that this equipment has been carefully developed to provide op timum performance with cost savings and ease of operation and safety For that purpose be always mindful of...

Page 10: ...ations have been understood before putting this equi pment in operation Owner s responsabilities The equipment owner shall keep the ins tructions manual at a place where the operator can have free acc...

Page 11: ...ect municipal state and federal as well as guidelines to dispose of parts components or any other item of the equipment Batteries must be properly disposed of in places which have been approved to col...

Page 12: ...nual before operating the sprayer P N 998328 ATTENTION Keep at a distance risk of collision P N 379164 ATTENTION Nut torque table Safety decals Safety and maintenance related decals have beenaffixedal...

Page 13: ...379073 ATTENTION Clean water tank to wash the hands P N 380014 ATTENTION Do not get into the main tank of the sprayer RG 379057 ATTENTION Risk of seri ous injuries Keep away and do not make any kind...

Page 14: ...onal valve It directs the flow of the 200 or 3000 liter tank to the chemical pump P N 997965 ATTENTION Actuation of the Vortex system fan P N 379107 ATTENTION Hydraulic oil level indicator P N 378976...

Page 15: ...masks provided with fil ters suitable for each kind of product In case of doubts read the chemical label or contact the manufacturer of the same When checking the machine components that are in direc...

Page 16: ...e equipment if some critical component needs to be repaired Provide for the repair before This equipment can cause accidents if used improperly or irresponsibly Do not step on the machine while it is...

Page 17: ...he equipment on the tractor Refer to the tractor instructions manual before carrying out this operation The precautions listed below apply only for coupling the Advance Advance Vortex to the tractor P...

Page 18: ...he tractor make sure that the safety pin is securely locked Directions on how to properly adjust the PTO shaft length will be described in chapter 2 ASSEMBLY of this manual After length adjustment cle...

Page 19: ...elts fans or any other moving parts of the equipment with the PTO coupled of the tractor diesel engine running When uncoupling the machine hold it on firm and level ground if the equip ment is provide...

Page 20: ...ervoir drain valve is shut The setup residue remaining inside the supply hose shall be collected with a bu cket and returned to the reservoir which the mixture was prepared in Do not let this residue...

Page 21: ...se all protection equipment recommended by the chemical manufacturer AFTER the spraying operation take a shower and change clothing The used clothing shall be immediately washed and segregated from th...

Page 22: ...from one chemical to another one The chemical manufacturer should be consulted for the optimum nozzle option DO NOT clear nozzles vales or tubing with your mouth Use protection gloves for this operat...

Page 23: ...hing its target causing a poor distribution of chemical over the cultiva tion it can also carry the sprayed mixture to water springs wild animals and the entire environment Do not spray if the wind ve...

Page 24: ...the authorities and the chemical manufacturer STORING THE CHEMICAL Build a brick work storehouse for chemicals LINE THE FLOOR with waterproof mate rial Do not rest the product piles on the floor or a...

Page 25: ...call the authorized technical assistance In case that no possibility exists of provid ing maintenance service to the equipment with the diesel engine shut down and out side sheds keep the shed doors...

Page 26: ...s employed for fastening the equip ment shall not be used again for binding foodstuff they may be contaminated and accordingly contaminate such foodstuff Make use of the PPEs when tying the equi pment...

Page 27: ...ntents Hitching 2 30 Coupling 2 32 Assembly of the conventional power takeoff shaft 2 32 Assembling the controllers 2 34 Assembling the booms 2 36 Assembling the nozzles tubes and boom skid 2 41 Mount...

Page 28: ......

Page 29: ...For the sprayers with Vortex system air as sisted boom also follow the table below that indicate the ideal tractor to work with these sprayers which are provided with a fan and therefore consume more...

Page 30: ...o the distance between the power takeoff point and the attach ment hole on the traction bar were obtained from a tractor with the power of 63 HP For further clarification please consult your tractor m...

Page 31: ...ate Posicione o garfo do engate na hori zontal e coloque o pino de engate no furo lateral Position the eye type hitch between the traction bar of the tractor as is shown in the figure Insert the hitch...

Page 32: ...nks are stretched This procedure must be carried out with the machine stopped and the engine off Employees performing any kind of mainte nance service in the PTO shaft must wear adequate PPE such as p...

Page 33: ...ATTENTION After installed the hydraulic and spray circuit controls levers will be positioned close to the operator for easy operation As the operator may be in front of or even beside the control leve...

Page 34: ...red to be installed in the lo cations as described in the ins tructions below A D E B C The red colored cable must be connected to the battery s positive pole and the black cable must be connected to...

Page 35: ...ATTENTION Before unhitching the equip ment power off the controller by means of the ON OFF swi tch and disconnect the male female socket If the controller remains powered on then there will be consump...

Page 36: ...SE M B LY ADVANCE 2000 Assembling the booms Install the booms supporting crossbeam Install the booms supporting springs Install the booms A on the frame OBSERVATION Install the washers as shown in the...

Page 37: ...2 37 2 A S SE M B LY ADVANCE 2000 OBSERVATION Keep the clamps joining the boom sections I and II Assembling the booms Install the cylinder on the boom Install the stabilization cables B on the boom B...

Page 38: ...embling the booms Install the safety cable Install the central boom Install the hoses 1 2 1 2 OBSERVATION The hoses have different sizes The shorter one must be installed on the 1st in line filter and...

Page 39: ...LY ADVANCE 2000 cylinder fork Assembling the booms Unfold and fold carefully the booms to make sure that the hoses are not entan gled on the structure In case of problem when folding the booms adjust...

Page 40: ...TTENTION Remove the boom when trans porting the sprayer on trailers trucks or tows The boom lock system is desig ned for operations at low speeds Lock the boom when moving the sprayer within the farm...

Page 41: ...demais segmentos The position of the ot 19 68 ou 13 77 in between nozzles chosen at the time of purchase Mount the skids on the boom A between the last two nozzle holders as shown other wise the boom...

Page 42: ...this proceed in the follow ing manner 1 Install the fan type nozzle unit into the nozzle holder and tighten it by hand onto the threaded sleeve 2 Place the nozzle alignment spanner onto the fan type...

Page 43: ...from that of the Bi jet nozzle holder These nozzle holders guarantee greater ver satility during use since the operator may choose from the four nozzles what best serves their purposes at the time of...

Page 44: ......

Page 45: ...C AT ION ADVANCE 2000 Table of contents Presentation Advance 2000 AM 18 3 47 Technical specifications Advance 2000 AM 18 3 48 Presentation Advance 2000 Vortex 3 49 Technical specifications Advance 200...

Page 46: ......

Page 47: ...ION ADVANCE 2000 Presentation Advance 2000 AM 18 1 Main reservoir 2 Booms 3 Frame 4 Chemical container rinse 5 Masterflow control 6 Power Takeoff Shaft 7 Jack 8 Clean water reservoir 9 Hand washing re...

Page 48: ...hylene Material 52 83 gallons Hand washing clean water tank Material Polyethylene Capacity 3 69 gallons Hydraulic fluid tank 1 16 gallons Pump Model JP 100 Filling rate 26 41 gallons min at 540 rpm at...

Page 49: ...ON ADVANCE 2000 Presentation Advance 2000 Vortex 1 Main reservoir 2 Booms 3 Frame 4 Chemical container rinse 5 Masterflow control 6 Power Takeoff Shaft 7 Jack 8 Clean water reservoir 9 Hand washing re...

Page 50: ...9 gallons Hydraulic fluid tank 1 16 gallons Pump Model JP 100 Filling rate 26 41 gallons min at 540 rpm at the PTO Power consumption 5 6 hp Boom activation hydraulic pump Flow rate 2 10 gallons min Ro...

Page 51: ...rical with computer Hidraulic controls Lever Cable Electrical Pump JP 100 JP 150 Tire 12 4 x36 16 9 x 30 Nozzle holder Bijet Quadrijet Distance 13 77 in 52 nozzles 19 68 in 37 nozzles Power takeoff sh...

Page 52: ......

Page 53: ...ck 4 5 5 Filling the reservoirs 4 5 7 Instructions for triple washing 4 6 2 Drainage of the main tank 4 6 4 Folding and unfolding the booms 4 6 5 Calibrating the sprayer 4 6 7 Calibrating the Masterfl...

Page 54: ......

Page 55: ...de suffi ciently to raise the tire just off the ground 3 Loosen the bolts C on the half shaft mounting plate 4 Set the half shaft to the desired track E 5 Tighten the bolts on the half shaft s faste n...

Page 56: ...nd other obstacles at high speed must be avoided We recommend slowing the speed while going over them It is important to also remember that the machi ne speed when the tank is full must be slow to avo...

Page 57: ...s mixer valve 2 Connect the filler unit 3 hose to the bypass valve 1 hose cover of the main reservoir ATTENTION When filling the reservoir it is recommended the use of IPE 2 3 1 Put the filler unit 3...

Page 58: ...Open the quick fitting valve 3 Open the filling hose valve 1 Watch the water volume being transported to the spray tank in order to prevent leaking Detail of the quick fittiing valve 3 ATTENTION When...

Page 59: ...romthistank setthebypass valve D turned to the clean water tank Engage the tractor s PTO and keep the chemicals control setting to turn on the flow to the nozzles Attention to this operation because t...

Page 60: ...he chemical container over the rinse nozzle and operate the chemicals mixer 3 red lever for a few seconds de tail A Then operate the black lever to wash inside the chemicals mixer Set the bypass valve...

Page 61: ...4 61 4 O P E R AT ION A ND A D JUS T ME N T S ADVANCE 2000 Chemicals mixer Detail Chemicals mixer valve Black lever Chemicals mixer inside cleaning Red lever Chemical container rinsing 2 3 1 4 5...

Page 62: ...ly 1 4 of clean water replace the cap on the container and tighten it sufficiently to prevent any leakage whilst being shaken Shake the container vigorously in all di rections for approximately 30 sec...

Page 63: ...on by alternate ly raising the ends of the container and supporting one end on the ground This operation must last for approximately 30 seconds 3 Drain out the washing up water in the same manner in w...

Page 64: ...p the rope around the support grooves so that the valve re mains open until the complete emptying of the main tank After the total drain of water unroll the rope to close the valve again ATTENTION Do...

Page 65: ...through cable showing the sequence to unfold and fold the booms Folding and unfolding the booms There are two ways to actuate the booms un folding and folding Through electric switches Booms folding...

Page 66: ...te the booms angular adjustment cylinder in order to set the booms in a position so as to provide a good drift free coverage This part directs the air flow and spray in a way so as to provide a good c...

Page 67: ...the sprayer 3 Choose the working gear 4 Engage the PTO 5 Accelerate until reaching 540 rpm at the PTO 6 Start moving at least 5 meters before the initial mark 7 Note the time it takes the tractor to m...

Page 68: ...ozzle spray volume during the same time taken to move the 50 meters and read on the column corresponding to the nozzle spacing 11 Repeat this operation with several nozz les to obtain an average volum...

Page 69: ...osition P pressure Set the levers no 2 3 4 and 5 downward Check the pressure registered on the pres sure gauge Choose one of the boom sections and set to the side the corresponding lever to turn off t...

Page 70: ...the lever downward open Repeat the same operation on the other boom sections in order to keep constant pressure along the entire boom regard less of the number of boom sections on NOTE Do not change t...

Page 71: ...make sure there will be no risk to people animals and environment Avoid spraying at hotter times with humidity below 55 or under windy conditions Do not allow the operator to handle chemi cals and spr...

Page 72: ......

Page 73: ...ication grease nipples 5 8 1 Lubricating and Oil changing procedures 5 8 2 Table of operations 5 8 3 Lubricants and recommended filters 5 8 4 Power takeoff shaft 5 8 5 Belts tension 5 9 0 Mechanical a...

Page 74: ......

Page 75: ...ilter and the line filters Wash the machine internally and externally These procedures will prevent problems dur ing future applications such as blockage of the nozzles filters etc as well as protecti...

Page 76: ...quality of the water used as well as the type of chemical product Clean the filters at every replenishment or when necessary The main filter and line filters are mounted according to the illustrations...

Page 77: ...ut 1 Do not use tools only hand tight will do b Remove and clean the dia phragm c Replace the diaphragm d Replace the diaphragm and clean the plunger set Leakage between the core and nozzle holder a L...

Page 78: ...akage between the nozzle holder and the body a Seal 2 missing b Seal 2 damaged c Nut 1 not tightened properly a Fit the seal 2 b Replace the seal 2 c Tighten the nut 1 Leakage at the con nection with...

Page 79: ...e manufacturer Do not mix fluids from different brands Never pour lubricating oil for internal com bustion engines into the hydraulic system Do not operate the system if there s a shortage of the hydr...

Page 80: ...bricating points Power Takeoff Shaft Grease nipples for the booms and mov able frame Booms articulation Traction bar Wheel hub etc OBSERVATION The lubrication interval for each of the items below is d...

Page 81: ...e in the system and are marked with a lubrication point sticker A Look at the components below for the lubri cating points Transmission unit hitch jack and wheels Boom frame and support Booms To lubri...

Page 82: ...Replace the drainage plug A and tighten it For the JP 100 JP 150 pumps proceed Remove the bolt for the oil level as well as the filler cap Pour lubricating oil in until it starts to flow out of the l...

Page 83: ...hemical circuit Wash the equipment externally Wash the spraying circuit components main filter and in line filters Lubricate the lubrication spots Lubricate the articulation pins for the booms and mov...

Page 84: ...e nipples PTO shafts and wheel hubs Grease Lithium based NLGI 2 Texaco Multifak EP 2 As required Hydraulic system tank Hydraulic fluid ISO VG 68 Texaco Rando HDZ 68 1 16 gallons 20 60 gallons Vortex P...

Page 85: ...guard cone until the indicated position 3 Pull the guard cone 4 Remove the sliding ring ATTENTION These operations must be carried out with the machine stopped and the tractor s motor switched off Any...

Page 86: ...and lubricate the male and fema le tubes 2 Install the sliding ring into the fitting with the grooves pointing toward the tube 3 Install the protection guards 4 Turn the guard cone until the indicate...

Page 87: ...g ure to the side every 8 hours OBSERVATION All of the points as indicated on the figure on the side must be lubricated Under no hypoth eses must these lubrication points remain without lubrica tion E...

Page 88: ...cover 3 which may then be removed Remove the circular lock 4 and separate cov er 3 from the pipe Repeat the operations as indicated in figures C and D on the side of the constant speed universal joint...

Page 89: ...r with the existing nozzle on the c clip 4 Figure J Force cover 3 downwards in such a manner that it remains locked by means of the clips 2 Ensure yourself of the full locking of the 3 clips 2 If nece...

Page 90: ...should slack 0 39 to 0 59 in Do not use sharp ended or cutting tool At any sign of the drain leak A replace the mechanical seal Contact your nearest Jacto dealer ATTENTION Always stop the machine and...

Page 91: ...lockwise or counterclockwise depending on the need of adjustment Once the adjustment is made retighten the nut 1 and the bolts 2 Hydraulic control Cable adjustment NOTE This adjustment should be made...

Page 92: ...first install the steel cable of the first boom section Next install the silver steel cable on the second boom section pulley 1 Then install the orange steel cable on the external pulley also on the...

Page 93: ...he sprayer for about 30 seconds at between half and low speed 4 Disconnect the inlet hose of the auxiliary tank bypass valve C 5 Remove the in line filter cap D 6 Operate the flow bypass valve lever E...

Page 94: ...e shooting Components 1 Spray tank 2 Suction filter 3 Spray control 4 Spray pump 5 Pressure hose 6 Return hose 7 In line filter 8 Auxiliary tank 9 Flow bypass valve 10 Chemicals mixer 11 Auxiliary tan...

Page 95: ...es not indicate pressure b Pressure deficiency partial lack of pressure Desired pressure is not attained A Specified nozzle spraying angle is not attained B Pressure gauge shows lower pressure C c Pre...

Page 96: ...position there will still be liquid flow ing when the pump operates therefore there will be insufficient flow 4 Dirt filter The dirt filter will prevent the free flow of the liquid Clean the filter a...

Page 97: ...if the hose that connects the filter to the pump is not folded Check if there are no obstructions in the hoses from the tank to the filter Fill the tank open the tap and check if the water flows abun...

Page 98: ...t to ensure yourself that these components are correctly adjusted Probable causes Indications and corrections 1 Tap closed Due to the design of the 3 way valve even when it is in the closed position t...

Page 99: ...ulic circuit characteristics 1 2 4 5 3 6 7 8 1 Chemical pump 2 Hydraulic pump 3 Boom angular adjustment cylinder 4 Left boom actuation hydraulic cylinder 5 Right boom actuation hydraulic cylinder 6 Fr...

Page 100: ...c oil with speci fication ISO VG 68 as shown in the lubrication table Advance 2000 VORTEX Circuit hydraulic Working pressure 2489 PSI Pump average rotation 1570 rpm Pump flow rate 2 11 gpm FAN Working...

Page 101: ...s in their closed position In relation to the changing of the tires Do not remove the object that caused the puncture whilst the tire is full of air Deflate it first If whilst removing the tire it get...

Page 102: ...Externally wash the machine with clean water and carry out this cleaning in a lo cation where there is no risk of environ mental contamination Damages to the paint work must be re paired so as to pre...

Page 103: ...ADVANCE 2000 6 103 6 WA R R A N T Y Warranty 6 105 Technical delivery certificate 6 111 400 Hour inspection certificate 6 113 Tabel of contents...

Page 104: ......

Page 105: ...he instruction manuals Request the free inspection at 400 hours mandatories at 15 days before the deadline Keep the equipment as well as all of the instruction manuals in good condition Just as we do...

Page 106: ...pment Use of parts and spares that are not sup plied by Jacto Changes to the equipment or any charac teristic of the original design Change or destruction of the identification plate of the equipment...

Page 107: ...en without incurring any responsibility or obligations to the buyer or third parties Jacto s responsibility is restricted to the terms in this guarantee which is not transferable and automatically cea...

Page 108: ......

Page 109: ...__________ Address _____________________________________________________________________ Municipality______________________________________________ State _______________ ADVANCE Sprayer ADVANCE 2000 T...

Page 110: ......

Page 111: ...ls and operation of the components Check the accessories box Operational test of the electronic control ler Notes Retailer _____________________________ Town _________________________FU ___ Equipment...

Page 112: ...hin the established deadlines It is necessary to send this duly filled out document to M QUINAS AGR COLAS JACTO S A DEPARTAMENTO DE ASSIST NCIA T CNICA Rua Dr Luiz Miranda 1650 17580 000 Pomp ia SP Br...

Page 113: ...details Operational test of the eletronic control ler and plant sensors Notes Retailer _____________________________ Town _________________________FU ___ Equipment __________________________ Model ___...

Page 114: ...in the established deadlines It is necessary to send this duly filled out document to M QUINAS AGR COLAS JACTO S A DEPARTAMENTO DE ASSIST NCIA T CNICA Rua Dr Luiz Miranda 1650 17580 000 Pomp ia SP Bra...

Page 115: ...ADVANCE 6 115 Technician visits record Date No of Hours Problems Technician Retailer...

Page 116: ......

Page 117: ...the chassis 4 5 5 Table 8 Bitola em fun o da declividade do terreno 4 5 6 Table 11 Problem cause and correction nondrip double nozzle holder 5 7 7 Table 12 Problem cause and correction Quadrijet nondr...

Page 118: ......

Reviews: