background image

Installation

15

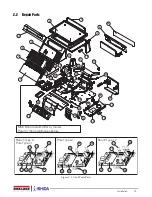
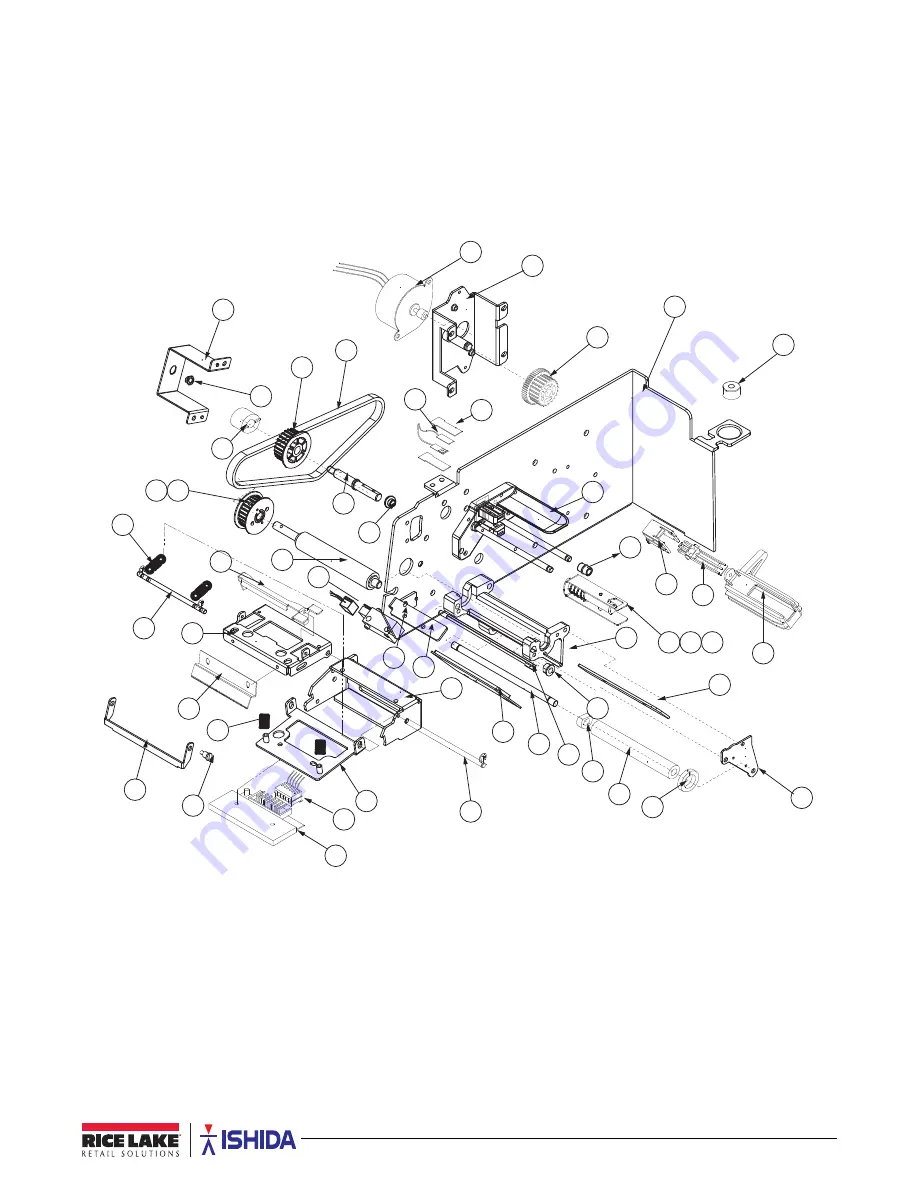
Figure 2-2. Uni-3 Printer Parts

35

37

36

43

47

48

40

42

73

70

55

45 44

38

71

66

68

67

46

56

49

50

51

54

53

52

57

59

60

61

63

64

72

84

85

88

58

86

78

79

69

65

89

77

83

62

81

82

87

39

41

Summary of Contents for Uni-3

Page 1: ...Ishida Uni 3 Price Computing Scale With Printer Technical Manual PN 166736 Rev B ...

Page 2: ......

Page 3: ...up Before Delivery 11 2 1 3 At the Customer s Location Wireless 12 2 1 4 At the Customer s Location Wired 12 2 1 5 At the Customer s Location Wrap Up 12 2 2 Repair Parts 13 2 3 Block Diagrams 19 2 3 1 Harness List 21 2 4 Electric Signals 22 2 4 1 Main Board 22 2 4 2 Key Board PS 068 Bench Pole PS 037 Hanging 23 2 4 3 L1 Type LCD Display Board 23 2 4 4 L2 Type LCD Display Board 23 2 4 5 Wireless LA...

Page 4: ...ion 68 4 8 1 Calibrate the Scale 68 4 9 C10 Download 69 4 10 C11 Option Check 70 4 11 C13 Model 70 5 0 Program Mode 71 5 1 P01 PLU Data 72 5 2 P02 Campaign 75 5 3 P03 Operators 75 5 4 P04 Preset Key Registration 76 5 5 P05 Ad Message 78 5 6 P06 Store Data 78 5 7 P07 Department 78 5 8 P08 Group 79 5 9 P09 Cooking Time 79 5 10 P10 Nutrition 79 5 11 P11 P13 Extra Message Data 1 3 80 5 12 P14 Coupon M...

Page 5: ...g Systems is not liable for any damage loss or injury that results from incorrect operation insufficient caution unauthorized modifications to the scale or failure to follow the instructions contained in this manual Contact any Rice Lake Weighing Systems dealer for replacement manuals Proper care is your responsibility Some procedures described in this manual require work inside the indicator encl...

Page 6: ...ion Figure 1 1 Uni 3 Outer Dimensions for Bench Type Figure 1 2 Outer Dimensions for Hanging Type 410 mm 16 1 in 370 mm 14 6 in 266 mm 10 5 in 159 mm 6 5 in 437 mm 17 2 in 420 mm 16 5 in 800 mm 31 5 in 678 mm 26 7 in 360 mm 14 2 in 146 mm 5 7 in ...

Page 7: ...Introduction 3 Figure 1 3 Outer Dimensions for Pole Type 370 mm 14 6 in 266 mm 10 5 in 437 mm 17 2 in 159 mm 6 3 in 524 mm 20 6 in 500 mm 19 7 in ...

Page 8: ...June 21 2015 enter 06212015 6 Press Enter twice C01 2 TIME will display 7 Enter the time in a HHMMSS format Example For 1 10 00 pm enter 131000 time is entered in 24 hour format Setup 6000 Adjustment 4000 Operation 2000 Total 8000 Program 9000 B01 Machine No comms C01 Date Time S01 Sales F01 Sales Daily Total P01 PLU B02 Sales Mode C03 Display Check S06 Total Adjust F02 Sales Weekly Total P02 Camp...

Page 9: ...ill display 10 Press Edit InP 0001 0000 07 0001 will display 11 Type the store address then press Enter InP 19001 0000 IS IT OK TO SAVE will display 12 Press Enter P06 00 no XXXX will display 13 Press 4 then press the Down Arrow P06 04 PRINTER 1 will display 14 Enter Store Number entered in step 5 Press Enter twice to assign programmed store P06 00 no XXXX will display 15 Press Mode three times to...

Page 10: ... Key insert page 2 Enter 6000 then press Mode B00 SETUP will display 3 Enter the password 495344 then press PLU to enter service level B00 SETUP will display 4 Press 1 then press Enter twice B01 01 BASIC will display 5 Press the Right Arrow then press Enter B01 02 01 will display 6 Enter the IP address then press Enter B01 02 01 will display Use leading zeros instead of decimals Example enter 1921...

Page 11: ...COM CHK and entered number will display A value of 600 is recommended 10 Press 8 then press Down Arrow B01 03 08 PING TO PC displays 11 Press Zero to execute PING to test connection to PC If ping is successful there will be one long beep If ping is unsuccessful there will be five short beeps 12 Press Mode three times to exit Setup Mode KEY IN ITEM No will display Scale is ready to resume weighing ...

Page 12: ...selected in step 7 15 Press Edit Enter the encryption key case sensitive 16 Press Enter twice B01 04 WI FI is displayed 17 Press Mode 14038 0009 WI FI SET UP is displayed Wait 5 seconds before proceeding 18 Press Enter 14038 0010 WI FI SET UP is displayed Wait 5 seconds before proceeding 19 Press Enter B01 04 WI FI is displayed Wait 5 seconds before proceeding 20 Press Mode 14034 0000 REBOOTING CH...

Page 13: ...hould be set to 1 for Variable 15 Press Mode three times Setup Mode KEY IN ITEM No will display The scale is ready to resume weighing and labeling 1 3 9 Load File from Flash Drive USB specfications 8 GB or smaller FAT32 format USB 3 0 Use the following steps to load files from a flash drive 1 Remove Speed Key insert page 2 Insert a flash drive containing a DATA0x Folder 3 Enter 6000 then press Mod...

Page 14: ...27 02 04 EXECUTE will display 14 Press Zero 14012 0000 OUTPUT CHECK will display 15 Press Enter to begin sending file to USB 14014 0000 COMPLETE will display when complete 16 Press Enter then press Mode three times to exit Setup Mode KEY IN ITEM No will display 17 Remove the flash drive Scale is ready to resume weighing and labeling 1 3 11 Set Product Name Display Timer Use the following steps to ...

Page 15: ...ration or unstable foundations Exposed to direct cold air from air conditioners or refrigerators Where the floor or foundation is unstable Subject to a lot of dust or dirt With large voltage fluctuations 2 1 Installation The following is an overview of the installation procedure of the Ishida Uni 3 scale 2 1 1 Preliminary Information 1 Determine the IP address es to be assigned to the scale s 2 De...

Page 16: ...1 3 At the Customer s Location Wireless 1 Confirm all access points have been positioned and configured 2 Position all scales 3 If necessary program the wireless settings see Section 3 2 on page 33 2 1 4 At the Customer s Location Wired 1 Confirm all Ethernet cables have been run 2 Position all scales and connect them to the Ethernet cables disconnect cable to internal bridge 2 1 5 At the Customer...

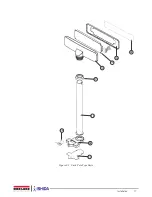
Page 17: ... 6 34 5 3 2 1 10 78 80 25 23 24 22 17 72 18 19 15 16 95 27 26 31 74 29 30 75 11 32 28 Main Board details differ by model Refer to the detail images below Bench Type L1 Pole Type L1 Pole Type L2 Bench Type L2 90 91 20 21 93 20 21 91 90 92 80 91 90 93 20 21 92 92 93 4 14 76 13 ...

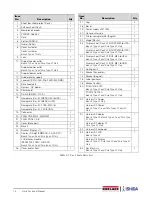
Page 18: ...e type L1 Only 26 Cover printer front 1 27 Leg 4 28 Base 1 1 29 Power supply LSF10024 1 30 Cover printer side 1 31 Printer nameplate NL English 1 32 Hinge Plastic 2 33 Display sheet Uni 3 L2B CUST M30 lb USA Bench Type L2 and Pole Type L2 Only 1 Display sheet Uni 3 L1B CUST M30 lb USA Bench Type L1 and Pole Type L1 Only 34 Display sheet Uni 3 L2B OP M30 lb USA Bench Type L2 and Pole Type L2 Only 1...

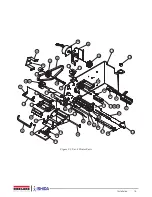
Page 19: ...Installation 15 Figure 2 2 Uni 3 Printer Parts 35 37 36 43 47 48 40 42 73 70 55 45 44 38 71 66 68 67 46 56 49 50 51 54 53 52 57 59 60 61 63 64 72 84 85 88 58 86 78 79 69 65 89 77 83 62 81 82 87 39 41 ...

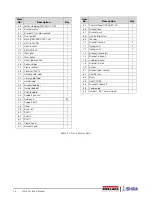
Page 20: ...Spring bobbin 1 54 Shaft bobbin 1 55 Support sensor 1 56 Axle bush 32 57 Support roll 1 58 Cover 1 59 Bush left 2 60 Axis01 1 61 Axis02 1 62 Shaft 1 1 63 Frame head 1 64 Bracket head 1 65 Thermal head CHX56 9719A 1 66 Bracket lock 1 67 Bracket push 1 68 Axis hold printer 1 69 Tear bar 1 70 Bracket sensor 2 71 Spring coil 1 2 72 Spring coil 2 2 74 Bracket for printer 1 75 Bracket magnet 1 76 Label ...

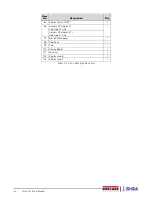
Page 21: ...Installation 17 Figure 2 3 Uni 3 Pole Type Parts 95 100 99 98 97 103 95 8 102 101 96 ...

Page 22: ...y Panel CUST 1 96 Harness C2 Display L2 Pole type L2 Only 1 Harness C3 display L1 Pole Type L1 Only 97 Bracket Pole base 1 98 Pole base 1 99 Pole 1 100 Display Board 1 101 Lock nut 1 102 Display case B 1 103 Display case F 1 Table 2 3 Uni 3 Pole Type Parts List ...

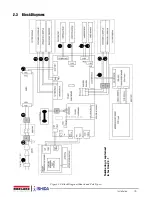
Page 23: ...Installation 19 2 3 Block Diagrams Figure 2 4 Block Diagram Bench and Pole Types 2 3 4 10 9 8 7 5 6 11 12 13 14 1 POWER CORD Numbering is explained in Section 2 3 1 ...

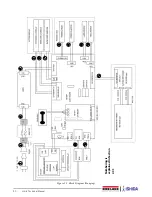
Page 24: ...20 Uni 3 Technical Manual Figure 2 5 Block Diagram Hanging 2 3 4 10 9 8 7 5 6 11 14 1 POWER CORD 16 15 Numbering is explained in Section 2 3 1 ...

Page 25: ...side L2 Hanging type customer side display 6 L2 Bench Pole type operator side display L2 Hanging type operator side display 7 L2 Type backlight resistor assembly 8 Thermal head 9 Stepping motor assy 10 Label sensor assy 11 Bench Pole type peel sensor Hanging type peel sensor 12 L1 Bench type customer side display L1 Pole type customer side display main board side L1 Pole type customer side display...

Page 26: ...Back light register L2 2 DC 24V for LCD L2 Table 2 9 XJ9 No Signal Name Direction Opposite Side 1 DC 24V main power supply Switching power supply 2 GND Table 2 10 XJ10 No Signal Name Direction Opposite Side 1 DC 5V Thermal head 2 GND 3 4 6 10 27 Thermal head control signal 5 7 9 28 Not connected 11 12 Thermistor input signal 13 19 GND 20 26 DC 24V for thermal head Table 2 11 XJ11 No Signal Name Di...

Page 27: ... Side 1 14 Key data KD0 KD13 Membrane key sheet 15 16 Not connected Table 2 19 CN2 No Signal Name Direction Opposite Side 1 8 Key scanning KS0 KS7 Membrane key sheet Table 2 20 CN3 No Signal Name Direction Opposite Side 1 DC 5V Main board PS 990 XJ19 20 2 GND 3 4 LCD control signal 5 DC 5V for LED Table 2 21 L1 Display No Signal Name Direction Opposite Side 1 3 Not connected Main board PS 990 XJ7 ...

Page 28: ...e 2 6 Turn the Scale Upside Down 3 Remove the following fasteners that secure the top cover see Figure 2 6 four machine screws one Allen head hex bolt 8 mm 4 Remove the two machine screws securing the front printer cover See Figure 2 6 5 Carefully turn the scale right side up 6 Open the right side cover See Figure 2 7 Figure 2 7 Right Side Cover CAUTION Machine Screws Securing Printer Cover Machin...

Page 29: ...t Printer Cover 8 Carefully pull the top cover up just enough to unplug the keyboard connector cable and the customer side display cable bench models only See Figure 2 9 Figure 2 9 Unplug Cables from Top Cover 9 Once unplugged remove the top cover Reverse this procedure for assembly Note ...

Page 30: ...r and print head ribbon cables 5 Move the printer to the side 6 Remove the five Allen head hex bolts 4 mm securing the load cell bracket See Figure 2 11 Figure 2 11 Load Cell Bracket Disassembly 7 Unsolder the five wires from the A D board PS 067 8 Remove the two Allen head hex bolts 5 mm and remove the load cell and load cell bracket 9 Carefully turn over the load cell bracket and remove the two ...

Page 31: ...2 Remove the two screws securing the thermal head See Figure 2 12 Figure 2 12 Remove Two Screws from Thermal Head 3 Unlatch and raise the thermal head bracket Figure 2 13 Unlatch Thermal Head Bracket 4 Pull the thermal head forward and unplug the connector See Figure 2 13 Reverse this procedure for assembly Note ...

Page 32: ...mbly 2 Remove the six screws three on each long side of the main CPU board 3 Remove the main CPU board Reverse this procedure for assembly Operator Display Board Disassembly Procedure 1 Remove the top cover 2 Unplug the customer display from the main CPU board bench models only Figure 2 15 Operator Display Board Disassembly 3 Remove the four machine screws Note ...

Page 33: ... Procedure 1 Unplug the two flexible cables from the keypad board See Figure 2 18 Figure 2 18 Keypad Disassembly 2 Remove the four screws 3 Remove the keypad board 4 Peel off membrane keypad The membrane keypad will be damaged during removal and cannot be reattached Before removal connect the replacement and verify operation Remove all adhesive from the plastic case before applying the new membran...

Page 34: ...wer supply will be damaged or not operate if the jumper is set incorrectly Reverse this procedure for assembly 2 5 2 Pole Type Make sure to unplug the power cord from the wall outlet before starting the disassembly work Pole Unit 1 Remove the platter 2 Carefully tip the scale on its side to access the base of the pole at the bottom of the scale See Figure 2 20 Figure 2 20 Pole Disassembly 3 Remove...

Page 35: ...gure 2 21 7 Insert a flathead screwdriver into the slit at the base of the display enclosure Figure 2 22 Detach the Front Cover of the Customer Display 8 Detach the front cover of the customer display 9 Remove the four screws and unplug the connector in order to detach the display board See Figure 2 23 Figure 2 23 Detach the Display Board Reverse this procedure for assembly Note ...

Page 36: ...number to select the appropriate choice Example 1 From the Setup mode main menu screen press the Down arrow once to scroll to B01 MACHINE NO COMMS 2 Press Enter to enter B01 MACHINE NO COMMS 3 Press Enter to enter the parameter B01 01 BASIC 4 Press the right arrow to view the available options from 1 ALONE to 3 SAT To change the current setting press the numeric key example 3 then press Enter to s...

Page 37: ...atically send to the satellite when the product master is updated by the master machine 1 Yes 2 No B01 02 IP Addr B01 02 01 IP Address Enter the IP address of the scale Enter the full 12 digit number including leading zeros Do not enter decimal points B01 02 02 Subnet Mask Enter the subnet mask of the scale Enter the full 12 digit number including leading zeros Do not enter decimal points B01 02 0...

Page 38: ...nter user name for FTP transmission Press Edit and enter character string edit B01 03 06 FTP Pass Enter password more than 8 characters for FTP transmission Press Edit and enter character string edit B01 03 07 Preset Function B01 03 08 PING to PC Press the Zero key to execute the PING in order to test the connection to the PC A long beep success Five short beeps failure B01 04 WiFi B01 04 01 Secur...

Page 39: ...s 1 NO OPERATOR Issue labels using the Print key 2 WITH OPERATOR Issue labels using Operator keys 3 CR EACH SUBTOTAL When executing CR with labels issue label for each individual item and issue statement label when settling accounts 4 CR SUBTOTAL ONLY Issue label only when settling accounts or issue receipt 5 CR FIXED OPERATOR Sales mode for fixed operator Table 3 2 B02 Sales Mode Parameters BO2 S...

Page 40: ...leading zeros Example 001234 Table 3 3 B03 Password Parameters BO3 PASSWORD 3 66 25 2O1O TTL CLR 2 NO USE 77 5 Note 1002 TTL ADJ 1008 POS FUNC 2001 SLS D TTL 2002 SLS W TTL 2003 SLS C TTL 2005 P D TTL 2006 P W TTL 2007 P C TTL 2009 PRST REP 2010 TTL CLR 2015 POS REP 3001 PLU 3002 CAMPAIGN 3003 STORE 3004 PRST KEY 3005 AD MSG 3006 OPERATORS 3008 XTRA MSG1 3009 XTRA MSG2 3010 XTRA MSG3 3011 COUPON M...

Page 41: ...eight value or the actual weight 1 Fix Weight 2 Real Weight B05 02 02 Item Count Select Select whether to add the number of items as one item per label or add the quantity as the number of items 1 Multiply 2 Details B05 02 05 Summary Receipt Reduce the length of the CR receipt by listing the duplicate items on one line 1 No 2 Yes B05 03 Transaction B05 03 01 Product Transaction Select if Productio...

Page 42: ...e ABC DEPARTMENT B06 01 15 DEPT ABC 3 Product Daily Total Weight ABC DEPARTMENT B06 01 16 DEPT ABC 4 Product Daily Total Pieces ABC DEPARTMENT B06 01 17 DEPT Z 2 Product Daily Total Price Z DEPARTMENT B06 01 18 DEPT Z 3 Product Daily Total Weight Z DEPARTMENT B06 01 19 DEPT Z 4 Product Daily Total Pieces Z DEPARTMENT B06 01 20 GROUP ABC 1 Product Daily Total PLU ABC GROUP B06 01 21 GROUP ABC 2 Pro...

Page 43: ...oduct Cumulative Total Pieces Z B06 03 13 DEPT ABC 1 Product Cumulative Total PLU ABC DEPT B06 03 14 DEPT ABC 2 Product Cumulative Total Price ABC DEPT B06 03 15 DEPT ABC 3 Product Cumulative Total Weight ABC DEPT B06 03 16 DEPT ABC 4 Product Cumulative Total Pieces ABC DEPT B06 03 17 DEPT Z 2 Product Cumulative Total Price Z DEPT B06 03 18 DEPT Z 3 Product Cumulative Total Weight Z DEPT B06 03 19...

Page 44: ...by date or sell by time change is saved B07 08 Tare Select if a tare weight change is saved B07 09 B07 11 Extra Message 1 3 Select if a different extra message is linked to the PLU B07 13 Coupon Message Select if a different coupon message is linked to the PLU B07 14 POP Message Select if a different POP message is linked to the PLU B07 15 B07 29 Free Message 1 15 Select if a different free messag...

Page 45: ... 0 NORMAL 0 0 99 9 0 00 999 99 B08 01 06 Quantity Only available when B08 01 01 Sales Mode is set to 1 Fix Price or 2 WGT F PRI 0 999 B08 01 07 Unit Type Only available when B08 01 01 Sales Mode is set to 1 Fix Price or 2 WGT F PRI 0 16 B08 01 08 Tax Enter a numeric value Press Enter 0 9 B08 01 09 Fixed Weight Only available when B08 01 01 Sales Mode is set to 1 Fix Price 0 999 B08 01 10 Tare Weig...

Page 46: ...rst Label Print Enter the mode number Press Enter to select whether or not to print the first label 1 YES 2 NO B08 05 05 Second Label Print Enter the mode number Press Enter to select whether or not to print the second label 1 YES 2 NO B08 06 Date B08 06 01 Pack Date Print Enter the mode number Press Enter to select whether or not to print the pack date 1 YES 2 NO B08 06 02 Pack Time Print Enter t...

Page 47: ...IMITED 9 GS1 EXPANDED 10 ITF 11 CODE 128 12 EAN 128 B08 07 07 POS Format Enter desired barcode format number Press Enter 0 REFER 1 F2C5pP4d 2 F2C6P4d 3 F1C6pP4d 4 F2C5P5d 5 F1C6P5d 6 F2C4pP5d 7 F2C6W4d 8 F1C6W5d 9 F1C5I6d 10 F2C6P4d 11 F2C6W4d 12 F2C4wW5d 15 F2C50P4d 16 F2C5W5d 17 F2C5P5 10d 18 F2C5pP4 10d 19 F2C5wW4d 20 F1C5P6d 21 F2C4P6d 22 F1C3W4P4d 23 F2C4Q2P4d 24 F1I6P5d 25 F2I6P4d 26 F1C4P7d...

Page 48: ...et the flag value printed at the beginning of the receipt barcode when the total price is negative 00 99 03 B10 02 04 POS Code Set the receipt barcode format 1 EAN UPC 13 2 EAN UPC 8 3 10 DIGITS 13 4 5 DIGITS 8 5 GS1 6 GS1 ST 7 GS1 STO 8 GS1 LIMITED 9 GS1 EXPANDED 10 ITF 11 CODE 128 12 EAN 128 B10 02 05 Format AI EAN 128 Specify the barcode format when using GS1 Expanded GTN GS1 P Price W Weight S...

Page 49: ...than 99999 21 Price more than 9999 20 All other prices 11 F2C6W4d FFCCCCCCWWWW c d FF value changes depending on the weight value 25 Price more than 99999 24 Price more than 9999 23 All other weights 1 F2C5pP4d 2 F2C6P4d 3 F1C6pP4d 4 F2C5P5d 5 F1C6P5d 6 F2C4pP5d 7 F2C6W4d 8 F1C6W5d 9 F1C5I6d 10 F2C6P4d 11 F2C6W4d 12 F2C4wW5d 15 F2C50P4d 16 F2C5W5d 17 F2C5P5 10d 18 F2C5pP4 10d 19 F2C5wW4d 20 F1C5P6...

Page 50: ...the printing method 0 Press the Print key to issue labels 1 Labels print automatically when the weight stabilizes 0 MANUAL 1 AUTO B11 09 Label Type Select the type of label 0 Die cut labels 1 Continuous strip label 0 DIE CUT 1 CONTI B11 10 Store Part Select store name and address printing 0 Do not print 1 Print 0 DISABLE 1 ENABLE B11 11 Title Part Select if the titles that identify the numeric val...

Page 51: ...el specification number 01 99 B12 02 Label Type Select the Label Paper type 130LA is the USA standard there should be no reason to change the default 0 RECEIPT 1 130LA 1 3 150LA 1 B12 03 Back Feed Select if backfeed is enabled This allows variable data other than the store name to print at the bottom of the label 0 NO 1 YES B12 04 Sensor Type Select label sensor control 0 NO USE 1 LABEL B12 05 Pri...

Page 52: ... the PLU key 001 999 B13 01 02 Width Set the width of the label format in tenths of a milimeter Example 56 0 mm is 560 300 560 B13 01 03 Height Set the length of the label format in tenths of a milimeter Example 44 0 is 440 300 2000 B13 01 04 Default PLU Select a PLU number for test printing 0 999999 1 B13 02 Unit B13 02 01 Unit Number Select a unit print field for editing Press the PLU key B13 02...

Page 53: ...rmat 1 EAN UPC 13 2 EAN UPC 8 3 10 DIGITS 13 4 5 DIGITS 8 5 GS1 6 GS1 ST 7 GS1 STO 8 GS1 LIMITED 9 GS1 EXPANDED 10 ITF 11 CODE 128 12 EAN 128 B14 02 02OCR Specify the format of the human readable OCR numbers printed under the barcode The bars and spaces in the barcode are not affected 1 EAN13 print all 13 digits in the standard UPC barcode 2 UPC12 print 12 digits in the standard UPC barcode exclud...

Page 54: ... F1C5I6d 10 F2C6P4d 11 F2C6W4d 12 F2C4wW5d 15 F2C50P4d 16 F2C5W5d 17 F2C5P5 10d 18 F2C5pP4 10d 19 F2C5wW4d 20 F1C5P6d 21 F2C4P6d 22 F1C3W4P4d 23 F2C4Q2P4d 24 F1I6P5d 25 F2I6P4d 26 F1C4P7d 27 F1I6P5 10d 28 F2I6P4 10d 29 F1C6P5 10d 30 F2C6P4 10d 31 F2C5Q5d 34 F2S1R3pP5d 35 F2S1C3pP5d B14 02 06 POS Fixed Price Specify the default barcode format for fixed price items when 1 EAN UPC 13 is set in step B...

Page 55: ...e represent the department for totals accumulation D1 Starting digit from the left D2 Number of digits Example 31 12345678 31 B14 03 02 GROUP No 42 Specify which digits in a PLU s 8 digit item code represent the group for totals accumulation D1 Starting digit from the left D2 Number of digits Example 42 12345678 42 B14 03 03 EAN UPC 13 45 Specify which digits in a PLU s 8 digit item code are used ...

Page 56: ...ght 1 NO 2 YES B17 02 04 Fix Range Check weight of fixed amount product 1 NO 2 YES B17 03 Timer B17 03 01 Registration Timer Product call maintenance timer seconds 0 9999 B17 03 02 Subtotal Timer Subtotal mode maintenance timer seconds 0 9999 B17 03 03 Print Term Timer Fixed amount auto print interval seconds 0 9999 B17 03 07 Segment PLU Timer Timer setting to display the product name on the segme...

Page 57: ...nd press the Enter key 2 Direct use the left and right arrow keys 1 NORMAL 2 DIRECT B17 08 Log B17 08 01 Operator Log In Out Select if operator log in out is required 1 NO 2 YES B17 08 02 Auto Login In CR fixed operator mode set the operator number to automatically login when entering the normal operation mode With auto login a selection is not required during floral operation 0 9999 B17 09 Talon ...

Page 58: ...rror Zero Price Select if an error message is displayed when the total price is zero 1 NO 2 YES B18 02 Call B18 02 01 No POS Error Select the response when the barcode identifying the product is zero 1 No error 2 Display an error and do not print the label 0342 0000 3 Display an error and do not print the barcode 0343 0000 1 NO DISP 2 NO PRINT 3 NO BAR B18 02 02 Tare Cancel Error Not applicable fo...

Page 59: ...ceability Print Turn traceability print on or off 1 NO PRINT 2 PRINT B20 05 Lookup Table Choose to display not to display the lookup table edit button on the traceability screen in weigh mode 1 YES 2 NO Table 3 16 B20 Traceability Parameters Display Description Choices B21 01 Exchange Rate Currency exchange rate 4293 B21 02 Decimal Position Exchange rate decimal position 4 B21 03 Period Select Sel...

Page 60: ... for USA 1 01 2 05 3 10 4 50 5 100 6 500 7 1000 8 25 9 25CUT B22 03 Discount Rounding Set rounding for markdown items to best match front end POS systems 1 DOWN 2 4 5 3 UP B22 04 Subtotal Price Rounding Set rounding for CR mode subtotal calculations 1 NON 2 05 3 10 4 50 5 100 6 500 7 1000 8 25 9 25CUT Table 3 18 B22 Price Rounding Parameters Display Description Choices B23 01 Barcode Price Type Se...

Page 61: ...ccess B26 03 02 Decimal Point Position B26 03 03 Decimal Point Type B26 03 05 Minimal Print Weight B26 03 06 Zero Width B26 03 08 Price Cal Rate and B26 03 09 Minimum Print Weight Auto From B26 03 Weight enter the service password 1478963 press PLU and then press Enter to access B26 03 01 Weight Unit and B26 03 04 Maximum Tare Figure 3 1 B26 Country Menu Navigation B26 COUNTRY 28175 B26 COUNTRY EN...

Page 62: ...NISH 8 ENG S AFR 9 SWEDISH 10 TURKISH 11 SLOVENE 12 THAI B26 01 03 Detail Edit country detail data This step only available with service password 495344 B26 02 Currency Gain access by pressing PLU from step B26 01 03 B26 02 01 Currency Symbol Select currency symbol B26 02 02 Dec Point Position Select decimal point position 2 B26 02 03 Dec Point Type Select decimal point type 1 2 B26 02 04 Seg Form...

Page 63: ...use 0 x1 This step is only available with service password 951753 0 x1 1 x10 2 x100 B26 03 09 Min WGT Auto Minimum print weight in auto print mode e represents one weight division which is 0 005 lb for standard dual range weighing 20e 0 100 lb 5e 0 025 lb 3e 0 015lb This step is only available with service password 951753 1 20e 2 5e 3 3e B26 04 Date Gain access by pressing PLU from step B26 01 03 ...

Page 64: ...27 201 USB Data 01 B27 207 USB Data 07 Press the Edit key to name the folder Press the Enter key when complete B27 02 04 Execute Press the Down Arrow to scroll to the Execute option Press the Zero key to begin sending files to the USB 14012 0000 Enter or Clear Execute confirmation screen Press the Enter key to begin sending to the USB Press Clear to quit When COMPLETE INPUT is displayed backup is ...

Page 65: ...f the campaign file will be downloaded to the specified satellite scales B28 02 03 Operator Select if the operator file will be downloaded to the specified satellite scales B28 02 04 Preset Key LCD N A B28 02 05 Preset Key Membrane B28 02 06 Ad Message B28 02 07 Store B28 02 08 Department B28 02 09 Group B28 02 10 Cook Time B28 02 11 Nutrition B28 02 12 B28 02 14 Extra Message 1 3 B28 02 15 Coupon...

Page 66: ...ED 3 EXEMPT B29 02 TAX2 Rate Tax Rate 0 99 9 B29 03 TAX3 Type Tax Type 1 EXCLUDED 2 INCLUDED 3 EXEMPT B29 03 TAX3 Rate Tax Rate 0 99 9 B29 04 TAX4 Type Tax Type 1 EXCLUDED 2 INCLUDED 3 EXEMPT B29 04 TAX4 Rate Tax Rate 0 99 9 B29 05 TAX5 Type Tax Type 1 EXCLUDED 2 INCLUDED 3 EXEMPT B29 05 TAX5 Rate Tax Rate 0 99 9 B29 06 TAX6 Type Tax Type 1 EXCLUDED 2 INCLUDED 3 EXEMPT B29 06 TAX6 Rate Tax Rate 0 ...

Page 67: ...Choices B31 01 Adjust Adjust mode startup code Default is 4000 B31 02 Setup Setting mode startup code Default is 6000 B31 03 Program Registration mode startup code Default is 9000 B31 04 Total Total mode startup code Default is 8000 B31 05 Operate Operate mode startup code Default is 5000 B31 06 Mode Code Type Do not select 1 Date it is not valid for the USA 0 None 1 Date Table 3 24 B31 Mode Code ...

Page 68: ...hrough the menu options Use the Left and Right arrow keys or key in the corresponding number to select the appropriate choice Example 1 From the Adjustment mode main menu screen press the Down arrow several times to scroll to C11 OPTION CHECK 2 Press Enter to enter C11 OPTION CHECK 3 Press Enter to enter the parameter C11 01 SCANNER CHECK 4 Use the Down arrow key to scroll to C11 01 02 SCANNER SEL...

Page 69: ...the data HHMMSS C01 03 Local Year Set the year in four digits C01 04 Julian Date The Julian date is the number of days since January 1st This step displays the Julian date it is not possible to change it Display format DDD YYYY C01 05 Year Mode Selects the name of the era to print Select 0 A D for USA 0 A D 1 LOCAL Table 4 1 C01 Date Time Parameters Display Description Choices C04 01 Key Data Pres...

Page 70: ...ater Displays the program number and version of the Updater ROM Table 4 3 C05 Firmware Details Parameters Display Description Choices C06 01 Master Data Clear Deletes all data in the program menu and custom label formats Press Zero twice to clear the RAM After clearing the memory the result is displayed Success OK Failure NG C06 02 System Data Initial Used to restore the default settings of the sy...

Page 71: ...80mm Press Feed to store Default 1 0 C07 01 08 Thermal Head Temperature Selects whether to monitor and provide an error if the thermal head over heats 0 NO 1 YES C07 01 09 Printer Initial Initializes the printer Resets all printer settings to default values Press Zero followed by Enter to execute C07 01 10 Head Initial Initializes the thermal head Press Zero followed by Enter to execute C07 01 11 ...

Page 72: ...ward feeding on or off 1 NO 2 YES C07 04 08 Peel Sensor Specifies if the peel sensor is active 0 USE 1 NO USE Display Description Choices C08 01 Capacity Specifies the scale s maximum capacity and units Changes to the capacity selection will not be saved until calibration is performed Do not select 60 lb or 30 kg unless the scale is equipped with a high capacity load cell 0 15 kg 1 30 kg 2 30 lb 3...

Page 73: ... 0 high speed format The USB flash drive must be empty except for the soft folder Display Description Choices C10 01 Copy Method Selects the downloading procedure Enter the number and press Enter Select step 0 or 1 to download firmware to the scale 0 Firmware and default images 1 Firmware only After pressing the Enter key press the Down arrow key to display the firmware version 0 USB MAIN PRG IMG ...

Page 74: ... BIT C11 02 Drawer Check C11 02 01 Drawer Test PORT 1 Test port output ON by pressing Print C11 03 RS232C Check C11 03 01 RS232C Select Result data output 1 NONE 2 RS232C C11 03 02 RS232C Baud Rate Selection Selects baud rate of RS 232C communication 1 2400 2 4800 3 9600 4 19200 5 38400 6 57600 7 115200 C11 03 03 Parity Bit Sets the vertical parity of RS 232C 1 NONE 2 EVEN 3 ODD C11 03 04 Data Bit...

Page 75: ...ress the desired preset key again to register the function 7 Press Mode to exit POO PROGRAM 322 352 5 0 1 P01 PLU 2 P02 Campaign 3 P03 Operator Data 4 P04 Preset Key 5 P05 AD MSG 6 P06 Store Data 7 P07 Department Name 8 P08 Group Name 9 P09 Cooking Time 10 P10 Nutrition 11 P11 Extra Message 1 12 P12 Extra Message 2 13 P13 Extra Message 3 14 P14 Coupon Message 15 P15 POP Message 19 P19 Lookup Table...

Page 76: ... to select whether or not to allow an open price system 0 YES 1 NO P01 01 04 Unit Price Enter the unit or fixed price Press Enter P01 01 08 Tax Enter a numeric value Press Enter P01 01 10 Tare Weight Enter tare weight Press Enter P01 01 12 Tare Enter the tare percentage Press Enter P01 01 13 Forced Tare Enter the mode number Press Enter to select whether or not to use the forced tare function 1 YE...

Page 77: ...elect whether or not to print the first label 1 YES 2 NO P01 05 05 2nd Label Print Enter the mode number Press Enter to select whether or not to print the second label 1 YES 2 NO P01 06 Date P01 06 01 Pack Date Print Enter the mode number Press Enter to select whether or not to print the packed date 1 YES 2 NO P01 06 02 P T PRN Enter the mode number Press Enter to select the desired pack time prin...

Page 78: ...EFER 1 EAN UPC 13 2 EAN UPC 8 3 10 DIGITS 13 4 5 DIGITS 8 5 GS1 6 GS1 ST 7 GS1 STO 9 GS1 EXP 10 ITF P01 07 07 POS Format WGT This field is only available when one PLU file is selected in POS Reference P01 07 05 Enter desired barcode format number Press Enter 0 REFER 1 F2C5pP4d 2 F2C6P4d 3 F1C6pP4d 4 F2C5P5d 5 F1C6P5d 6 F2C4pP5d 7 F2C6W4d 8 F1C6W5d 9 F1C5i6d 10 F2C6P4d 11 F2C6W4d 12 F2C4wW5d 13 14 ...

Page 79: ...hour format Press Enter P02 02 Data P02 02 01 Call PLU Enter desired PLU number and press PLU P02 02 02 PLU Name and Number Displays the PLU name and number for confirmation P02 02 03 MD Mode Enter the desired PLU Markdown mode and press Enter 16 and 17 are used to change the price without printing the pre markdown price on the label 1 SPECIAL 2 3 4 SPEC U P 5 U P 6 U P 16 Unit Price 17 Fixed Pric...

Page 80: ...Coupon Message 15 Subtotal Display Subtotal Display 16 Extra1 Extra Message 1 17 Extra2 Extra Message 2 18 Extra3 Extra Message 3 20 SP U P Special unit price 22 Format Change of label format 23 Image 1 Image 1 24 Image 2 Image 2 25 Price U P Unit Price 26 Peel MD Label Peel Die Cut 28 Operator Operator 32 U P Unit price change 33 P Date Pack date 34 S Date Sell by date 36 Open Drawer Money exchan...

Page 81: ...n 101 Charge Add cost to subtotal in 102 Data distribution Distribution of master data 103 Price subtot Price subtotal 104 Subtot subtotal 105 Preset Price Subtot Price subtotal by preset 106 Preset Subtot subtotal by preset key 107 Mince Mince grind 109 Return Item Returning item 113 Stamp Stamp on coupon 114 Customer Customer 115 Payment Payment by coupon 116 Minus Minus PLU 117 Auto PLU Automat...

Page 82: ...age Table 5 6 P05 Ad Message Display Description Choices P06 00 Store No Enter the store number and press PLU to display the desired store data 13001 0000 Set Up New Data If a non registered item has been requested the confirmation screen is displayed Press Enter to set up new data or Clear to go back If a pre registered item has been requested P06 01 will display with registered store name Press ...

Page 83: ...new data or Clear to go back P09 00 Method Press Edit to edit the cooking method Press Enter when editing is complete InP 0001 0000 The Text Edit screen is displayed for the selected store number Edit text according to the procedure described in Section 6 2 on page 85 Press Enter when editing is complete P09 00 Time Enter the desired base time and press Enter P09 00 Weight Enter the desired weight...

Page 84: ...n Percent Enter the protein percent P10 22 Sugars Enter the sugar value g P10 23 Sugars Pecent Enter the sugar percent P10 24 Vitamin A Percent Enter the vitamin A percent P10 25 Vitamin C Percent Enter the vitamin C percent P10 26 Calcium Percent Enter the calcium percent P10 27 Iron Percent Enter the iron percent Display Description Choices P11 00 XTRA MSG1 P12 00 XTRA MSG2 P13 00 XTRA MSG3 Ente...

Page 85: ... Data If a non registered item has been requested the confirmation screen is displayed Press Enter to set up new data or Clear to go back InP 0001 0000 The Text Edit screen is displayed for the selected store number Edit text according to the procedure described in Section 6 2 on page 85 Press Enter when editing is complete Table 5 14 P15 POP Message Display Description Choices P19 00 Lookup Table...

Page 86: ...mber and press PLU to display desired free message data 13001 0000 Set Up New Data If a non registered item has been requested the confirmation screen is displayed Press Enter to set up new data or Clear to go back InP 0001 0000 The Text Edit screen is displayed for the selected store number Edit text according to the procedure described in Section 6 2 on page 85 Press Enter when editing is comple...

Page 87: ... 222 Tare Weight is 0 g Set tare weight 223 Label Setting Master Is Not Programmed Check label number program if necessary 266 000 File Input Error There is a file that failed during input check USB 266 001 File Input Error Failed in reconstruction of SRAM data 267 000 File Output Error There is a file that failed during output check USB 267 001 File Output Error Failed in SRAM data backup 268 000...

Page 88: ...s no effect on printing 715 002 Thermal Head Is Worn Out For Printer 1 Change thermal head 1010 No Label for Printer 1 The label gap sensor did not detect the labels Open the printer door and confirm the labels are threaded correctly and are in the label gap sensor 1011 Label size error The length of the label does not match the label format Confirm the label are the correct length Confirm the lab...

Page 89: ...or select characters by pressing the left or right arrow keys Move cursor left Delete a character Move cursor right Delete a line of text Move cursor up Delete a character by moving the cursor back by one character Move cursor down Copy original data to current data Font Size Choice Description 0 30 x 15 25 character line default 1 32 x 15 25 character line 2 34 x 16 24 character line 3 40 x 20 19...

Page 90: ...ccuracy 1 3000 Operator customer display L1 One line 16 segments x 23 digits liquid crystal with backlight L2 Two lines upper 192 x 16 dots lower 7 segments x 23 digits liquid crystal with backlight Printing method Direct thermal method Thermal head 2 2 inch 56 mm and 8 dots mm Printing speed 3 9 inch 100 mm second Label size Label width 38 mm to 64 mm Label length 30 mm to 175 mm Number of label ...

Page 91: ... nonconformity actually exists and was not caused by accident misuse neglect alteration improper installation improper repair or improper testing RLWS shall be the sole judge of all alleged non conformities Such equipment has not been modified altered or changed by any person other than RLWS or its duly authorized repair agents RLWS will have a reasonable time to repair or replace the defective eq...

Page 92: ......

Page 93: ...nada Mexico 800 321 6703 International 715 234 9171 Europe 31 0 26 472 1319 www ricelake com retail www ricelake mx www ricelake eu www ricelake co in Rice Lake Weighing Systems is an ISO 9001 registered company Rice Lake Weighing Systems Specifications subject to change without notice ...

Reviews: