Inf
o
rm
at
io
n
an
d
Non
-c
o
nt
rac
tua
l v
isu
al
s.
Sub
je
ct
t
o
t
ec
hn
ic
al
c
ha
ng
e wi
tho
ut
no
ti
ce
.
This document is the property of IRFTS. It shall not be reproduced or shared with third party without agreement IRFTS
Flooring installation for all PV field installation
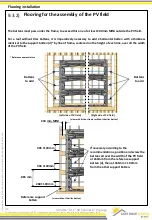
Set up the horizontal flooring for the frames support with a number of support batten (d)* equal to
(1 X no. vertical PV modules) + 1 , at the top add a tile batten.
To screw the support batten follow the recommendations page 17 to 19 to know the type and the
number of screws to be set up.
9.3)
* Reference nomenclature
(view without the rafters and tiles batten
(view without the rafters and tiles batten)
Step 1:
Position and screw the first support batten 885 mm above the reference support batten
(installed at the preceding Step).
Step 2:
Position and screw another support batten 1020 mm above the preceding one.
Etape 3 : Repeat Step 2 as many times as necessary up to the highest line of modules.
Etape 4 : Position and screw the last support batten 990 mm above the preceding one
Etape 5 : Position and screw the tile batten 225 mm above the preceding support batten
Reference support batten
1
2
5
Step 1
Step 2
Step 5
Bottom
frame
885
mm
255
mm
Middle
frame
1020
mm
Top
frame
900
mm
4
Step 4
30
Flooring for an assembly with 4/6 brackets per module
9.3.1)
Flooring
i
nstallation
Modèle “M-1” 60 Cellules 6" Paysage


