InfoPrint Color 1826 User Manual Download Page 133

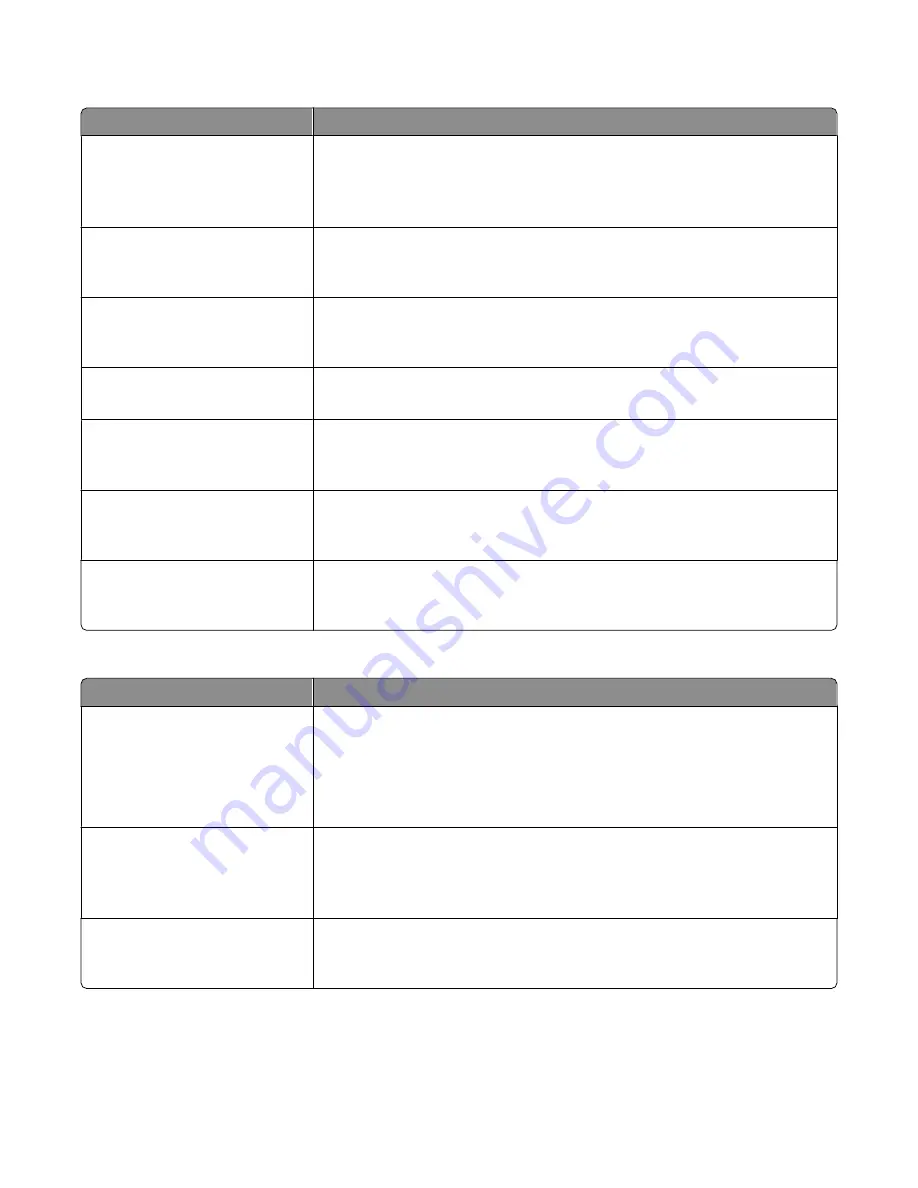
Fax Log Settings

Menu item

Description

Transmission Log

Print log
Do not print log
Print only for error

Enables printing of a transmission log after each fax job
Note: Print log is the factory default setting.

Receive Error Log

Print Never
Print on Error

Enables printing of a receive error log following a receive error
Note: Print Never is the factory default setting.

Auto Print Logs

On
Off

Enables automatic printing of fax logs
Note: On is the factory default setting.

Log Paper Source

Tray <x>

Selects the source of the paper used for printing logs
Note: Tray 1 is the factory default setting.

Logs Display

Remote Station Name
Dialed Number

Specifies whether printed logs display the dialed number or the station name
Note: “Remote Station Name” is the factory default setting.

Enable Job Log

On
Off

Enables access to the Fax Job log
Note: On is the factory default setting.

Enable Call Log

On
Off

Enables access to the Fax Call log
Note: On is the factory default setting.

Speaker Settings

Menu item

Description

Speaker Mode

Always Off
On until Connected
Always On

Notes:

Always Off turns the speaker off.

“On until Connected” is the factory default setting. The speaker is on and issues

a noise until the fax connection is made.

Always On turns the speaker on.

Speaker Volume

High
Medium
Low

Controls the volume setting
Note: High is the factory default setting.

Ringer Volume

On
Off

Controls the ringer volume for the fax speaker
Note: On is the factory default setting.

Understanding printer menus

131

Summary of Contents for Color 1826

Page 1: ...InfoPrint Color 1826 MFP MT 4989 User s Guide G510 7212 00...

Page 2: ......

Page 3: ...InfoPrint Color 1826 MFP MT 4989 User s Guide G510 7212 00...

Page 4: ...ling a 650 sheet duo drawer 29 Attaching cables 31 Verifying printer setup 32 Printing menu settings pages 32 Printing a network setup page 32 Setting up the printer software 33 Installing printer sof...

Page 5: ...ng letterhead 52 Tips on using transparencies 53 Tips on using envelopes 53 Tips on using paper labels 54 Tips on using card stock 55 Printing from a flash drive 55 Printing photos from a PictBridge e...

Page 6: ...an e mail using the keypad 69 Sending an e mail using a shortcut number 70 Sending an e mail using the address book 71 Canceling an e mail 71 Faxing 72 Getting the printer ready to fax 72 Initial fax...

Page 7: ...ions 92 Original Size 92 Content 92 Sides Duplex 92 Resolution 93 Darkness 93 Improving fax quality 93 Holding and forwarding faxes 93 Holding faxes 93 Forwarding a fax 94 Scanning to a computer or US...

Page 8: ...117 Active NIC menu 117 Network menu 117 Wireless menu 118 USB menu 119 Settings menu 121 General Settings menu 121 Copy Settings menu 124 Fax Settings menu 126 Flash Drive menu 132 Print Settings 13...

Page 9: ...Saver 186 Using the Embedded Web Server 187 Setting up e mail alerts 187 Viewing reports 187 Troubleshooting 189 Solving basic printer problems 189 Solving printing problems 189 Multiple language PDFs...

Page 10: ...202 Solving paper feed problems 202 Paper frequently jams 202 Paper jam message remains after jam is cleared 202 Page that jammed does not reprint after you clear the jam 202 Solving print quality pro...

Page 11: ...bedded Web Server does not open 216 Check the network connections 216 Check the network settings 216 Contacting Customer Support 216 Notices 217 Product information 217 Edition notice 217 Power consum...

Page 12: ...10...

Page 13: ...cturer s authorized replacement Use only the telecommunications RJ 11 cord provided with this product or a 26 AWG or larger replacement when connecting this product to the public switched telephone ne...

Page 14: ...exterioroftheprinter unplug the power cord from the wall outlet and disconnect all cables from the printer before proceeding CAUTION SHOCK HAZARD Do not use the fax feature during a lightning storm Do...

Page 15: ...RAE 62 standard Provide a flat sturdy and stable surface Keep the printer Away from the direct airflow of air conditioners heaters or ventilators Free from direct sunlight humidity extremes or tempera...

Page 16: ...asic functions of the scanner The scanner provides copy fax and scan to network capability for workgroups You can Make quick copies or change the settings on the printer control panel to perform speci...

Page 17: ...sheets of plain paper into the ADF Scan sizes from 125 x 216 mm 4 9 x 8 5 in wide to 127 x 356 mm 5 x 14 in long Scan media weights from 52 to 120 g m2 14 to 32 lb Do not load postcards photos small i...

Page 18: ...rormessages Access the administration menus start stop or cancel a print job 3 Keypad area Enter numbers letters or symbols on the display print using the USB flash memory device or change the default...

Page 19: ...book 7 Darkness Press the Darkness button to adjust the current darkness settings 8 Duplex 2 Sided Press the Duplex 2 Sided button to scan or print on both sides of the paper Note The duplex feature...

Page 20: ...rror messages Note The fax feature is not available on selected printer models 3 Stop Cancel Press to stop all printer activity 4 Color start Press to copy or scan in color 5 Black start Press to copy...

Page 21: ...e is connected and the USB menu is displayed Note The fax buttons keypad and USB port are not available on selected printer models Item Description 1 Redial Pause Press the Redial Pause button to caus...

Page 22: ...vice All other printer functions are unavailable 4 Shortcuts Press to enter the shortcut screen 5 Hook Press to take the line off hook like picking up a phone receiver Press a second time to hang up t...

Page 23: ...able options Note Certain machine models options or supplies may not be available Contact your place of purchase for more information Memory cards Printer memory Flash memory Font cards Installing a m...

Page 24: ...Damage System board electronic components are easily damaged by static electricity Touch something metal on the printer before touching any system board electronic components or connectors Additional...

Page 25: ...ge System board electronic components are easily damaged by static electricity Touch something metal on the printer before touching any system board electronic components or connectors 1 Flash memory...

Page 26: ...Note Avoid touching the connection points along the edge of the card 5 Align the notches on the memory card with the ridges on the connector 1 Notches 2 Ridges 6 Push the memory card straight into th...

Page 27: ...turn the printer off and unplug the power cord from the wall outlet before continuing If you have any other devices attached to the printer then turn them off as well and unplug any cables going into...

Page 28: ...Damage System board electronic components are easily damaged by static electricity Touch something metal on the printer before touching any system board electronic components or connectors Additional...

Page 29: ...ed by static electricity Touch something metal on the printer before touching any system board electronic components or connectors 1 Flash memory or font card connector 2 Memory card connector 3 Unpac...

Page 30: ...m board This ensures the metal pins line up correctly as well 1 Plastic pins 2 Metal pins 5 Push the card firmly into place Notes The entire length of the connector on the card must touch and be flush...

Page 31: ...ystem board or installing optional hardware or memory devices sometime after setting up the printer then turn the printer off and unplug the power cord from the wall outlet before continuing If you ha...

Page 32: ...rawer 4 Align the printer with the 650 sheet duo drawer and then lower the printer into place CAUTION POTENTIAL INJURY The printer weight is great than 18 kg 40 lb and requires two or more trained per...

Page 33: ...fax connections see Initial fax setup on page 73 Make sure the software is installed before turning the printer on For more information see the Setup Guide 2 Connect the power cord to the printer firs...

Page 34: ...ttings A user default setting remains in effect until you access the menu again choose another value and save it To restore the factory default settings see Restoring the factory default settings on p...

Page 35: ...se all open software applications 2 Insert the Software and Documentation CD 3 From the Finder desktop double click the printer CD icon that automatically appears 4 Double click the Install icon 5 Fol...

Page 36: ...elect the printer and then click Options Supplies 4 Click Driver and then add any installed hardware options 5 Click OK In Mac OS X version 10 4 and earlier 1 From the Go menu choose Applications 2 Do...

Page 37: ...eristics If the name that best describes your paper is used by linked trays assign a different Paper Type name to the tray such as Custom Type x or define your own custom name Paper Size for example l...

Page 38: ...ize 8 Press the arrow buttons until Type appears and then press 9 Press the arrow buttons until the correct type appears and then press Submitting changes appears followed by Type 10 Press and then pr...

Page 39: ...p menu press the arrow buttons until Portrait Width or Portrait Height appears and then press Note Select Portrait Height to adjust the paper height setting or Paper Width to adjust the paper width se...

Page 40: ...dicators on the bottom of the tray to help position the guide 3 If the paper is longer than letter size paper push the green tab at the back of the tray to elongate it 4 Flex the sheets back and forth...

Page 41: ...reviously loaded in the tray change the Paper Type or Paper Size setting for the tray from the printer control panel Note Mixing paper sizes or types in a paper tray may lead to jams Loading the optio...

Page 42: ...Length guide tabs 2 Size indicators 3 Width guide tabs Using the multipurpose feeder 1 Push the multipurpose feeder latch to the left 2 Open the multipurpose feeder Loading paper and specialty media 4...

Page 43: ...s by the edges and fan them Straighten the edges on a level surface Note Avoid touching the print side of transparencies Be careful not to scratch them Flex a stack of envelopes back and forth to loos...

Page 44: ...size and type of paper at a time 7 Make sure the paper is as far into the multipurpose feeder as it will go with very gentle pushing Paper should lie flat in the multipurpose feeder Make sure the pap...

Page 45: ...nual feeder To achieve the best possible print quality use only high quality paper designed for laser printers 3 Move the width guide until it lightly touches the sheet Do not force the width guide ag...

Page 46: ...If paper is too rough toner cannot fuse to it properly If paper is too smooth it can cause paper feeding or print quality issues Always use paper between 100 and 300 Sheffield points however smoothne...

Page 47: ...Multiple part forms or documents Selecting paper Using appropriate paper prevents jams and helps ensure trouble free printing To help avoid jams and poor print quality Always use new undamaged paper...

Page 48: ...dandoptionalpapersourcesandthetypesofpapertheysupport Note For an unlisted paper size select the closest larger listed size Paper sizes supported by the printer Paper size Dimensions 250 sheet tray st...

Page 49: ...241 mm 4 1 x 9 5 in X X X DL Envelope 110 x 220 mm 4 3 x 8 7 in X X X B5 Envelope 176 x 250 mm 6 9 x 9 8 in X X X C5 Envelope 162 x 229 mm 6 4 x 9 in X X X Monarch 105 x 241 mm 4 1 x 9 5 in X X X Oth...

Page 50: ...lb book Cover 162 to 176 g m2 grain long 60 to 65 lb cover Book 88 to 176 g m2 grain long 60 to 120 lb book Cover 162 to 176 g m2 grain long 60 to 65 lb cover Book 88 to 176 g m2 grain long 60 to 120...

Page 51: ...ween 60 105 g m2 16 28 lb grain long bond The duplex does not support card stock transparencies envelopes and labels 3 For 60 to 176 g m2 16 to 47 lb bond paper we recommend grain long fibers 5 The pr...

Page 52: ...premium cotton papers 200 300 Sheffield units have been engineered to work very well in laser printers despite surface texture Before using these types of paper consult your paper supplier Suitable s...

Page 53: ...ings to match the loaded paper or select the appropriate tray or feeder c Click OK and then click Print For Macintosh users a Customize the settings as needed in the Page Setup dialog 1 With a documen...

Page 54: ...550 sheet tray Simplex one sided printing from trays Printed letterhead design is placed faceup The top edge of the sheet with the logo is placed at the front of the tray Duplex two sided printing fr...

Page 55: ...es Print samples on the transparencies being considered for use before buying large quantities When printing on transparencies Feed transparencies from the 250 sheet tray manual feeder or optional mul...

Page 56: ...the labels being considered for use before buying large quantities Note Single sided paper labels designed for laser printers are supported for occasional use no more than 20 pages of paper labels a...

Page 57: ...ted card stock manufactured with chemicals that may contaminate the printer Preprinting introduces semi liquid and volatile components into the printer Use grain short card stock when possible Printin...

Page 58: ...jobs are processed you may need to view the held jobs list to print documents from the flash drive 3 Press the arrow button until the document you want to print appears and then press Note Folders fo...

Page 59: ...on If the PictBridge connection is successful then a confirmation message appears on the printer display 3 Follow the instructions on the camera to select and print photos Note If the printer is turne...

Page 60: ...t pages to isolate print quality problems 1 Turn the printer off 2 Hold down and the right arrow button while turning the printer on 3 Release the buttons when the dots appear and wait for CONFIG MENU...

Page 61: ...printer window 2 Select a job to cancel 3 From the keyboard press Delete For Macintosh users In Mac OS X version 10 5 1 From the Apple menu choose System Preferences 2 Click Print Fax and then double...

Page 62: ...a document into the ADF adjust the paper guides 3 From the printer control panel press for a black only copy or for a color copy 4 If you placed the document on the scanner glass and have additional...

Page 63: ...copy 6 Place the next document on the scanner glass and then press 1 on the numeric keypad Otherwise press 2 on the numeric keypad Copying on specialty media Copying to transparencies 1 Load an origin...

Page 64: ...ic keypad Otherwise press 2 on the numeric keypad Customizing copy settings Copying from one size to another 1 Load an original document faceup short edge first into the ADF or facedown on the scanner...

Page 65: ...black only copy or for a color copy 9 If you placed the document on the scanner glass and have additional pages to copy then place the next page on the scanner glass and then press 1 on the numeric ke...

Page 66: ...aseorincreasethesize orenteranumberbetween25and400onthenumeric keypad b Press 6 Press for a black only copy or for a color copy 7 If you placed the document on the scanner glass and have additional pa...

Page 67: ...umeric keypad 7 Press to return to the Ready state Collating copies If you print multiple copies of a document then you can choose to print each copy as a set collated or to print the copies as groups...

Page 68: ...The Copy Size must be set to 100 1 Load an original document faceup short edge first into the ADF or facedown on the scanner glass Note Do not load postcards photos small items transparencies photo pa...

Page 69: ...reen appears Improving copy quality Question Tip When should I use Text mode Use text mode when text preservation is the main goal of the copy and preserving images copied from the original document i...

Page 70: ...a shortcut number or use the address book Getting ready to e mail Setting up the e mail function For e mail to operate it must be turned on in the printer settings and have a valid IP address or gate...

Page 71: ...ked to enter a password If you do not have an ID and password get one from your system support person 4 Click E mail Destination Setup 5 Type a unique name for the recipient and then enter the e mail...

Page 72: ...the number or letter you want The first time youpressthebutton thenumberforthatbuttonappears Whenyoupressthebuttonagain oneoftheletters assigned to that button appears b Press the right arrow button t...

Page 73: ...button Scan to E mail appears 4 Press Search appears Note If there are no entries in the address book Manual Entry appears 5 Press to search the address book 6 Press the arrow buttons until the addres...

Page 74: ...ready to fax The following connection methods may not be applicable in all countries or regions CAUTION SHOCK HAZARD Do not use the fax feature during a lightning storm Do not set up this product orm...

Page 75: ...your fax setup information Using the printer control panel for fax setup When the printer is turned on for the first time or if the printer has been off for an extended time a series of start up scre...

Page 76: ...works best when directly connected to the wall outlet Other devices such as a telephone or answering machine can be successfully attached to pass through the printer as described in the setup steps If...

Page 77: ...ur home such as telephones or answering machines may not work If your telecommunications equipment uses a US style RJ11 telephone line then follow these steps to connect the equipment 1 Connect one en...

Page 78: ...of the telephone cable to the DSL filter Note Your DSL filter may look different than the one in the illustration 3 Connect the DSL filter cable to an active telephone wall jack Connecting to a PBX or...

Page 79: ...th your PBX system Connecting to a Distinctive Ring Service There is a plug installed in the EXT port of the printer This plug is necessary for the proper functioning of the printer Note Do not remove...

Page 80: ...Rings appears and then press e Press the arrow buttons until the desired ring tone appears and then press Connecting a telephone or answering machine to the same telephone line 1 Remove the plug from...

Page 81: ...Warning Potential Damage Do not touch cables or the printer in the area shown while actively sending or receiving a fax Faxing 79...

Page 82: ...machine telephone or other telecommunications equipment to the printer There is a plug installed in the EXT port of the printer This plug is necessary for the proper functioning of the printer Note Do...

Page 83: ...Faxing 81...

Page 84: ...3 Connect the answering machine or telephone to the adapter Faxing 82...

Page 85: ...home such as telephones or answering machines may not work 1 Connect one end of the telephone cable that came with the printer to the LINE port on the back of the printer 2 Connect the other end of th...

Page 86: ...ur answering machine then connect a second telephoneline notprovided betweentheansweringmachineandtheotherNslotoftheactiveanalogtelephone wall jack Connecting to a computer with a modem Connect the pr...

Page 87: ...o the LINE port of the printer and then plug it into an active telephone wall jack 3 Remove the protective plug from the EXT port of the printer 4 Connect a second telephone cord from the telephone to...

Page 88: ...box and then enter the name to be printed on all outgoing faxes 6 Click inside the Station Number box and then enter the printer fax number 7 Click Submit Setting the date and time You can set the dat...

Page 89: ...tcards photos small items transparencies photo paper or thin media such as magazine clippings into the ADF Place these items on the scanner glass 2 If you are loading a document into the ADF then adju...

Page 90: ...With a document open choose File Print 2 From the Printer pop up menu choose your printer Note In order to see the fax options on the Print dialog you must use the fax driver for your printer To insta...

Page 91: ...he scanner glass 2 If you are loading a document into the ADF then adjust the paper guides 3 From the printer control panel press the Fax button To appears on the first line and the time and date appe...

Page 92: ...Note If the address book feature is not enabled contact your system support person 1 Load an original document faceup short edge first into the ADF or facedown on the scanner glass Note Do not load po...

Page 93: ...e clippings into the ADF Place these items on the scanner glass 2 If you are loading a document into the ADF then adjust the paper guides 3 From the printer control panel press the Fax button To appea...

Page 94: ...ze of the original document appears and then press Content This option tells the printer the original document type Choose from Text Text Photo or Photo Content affects the quality and size of your sc...

Page 95: ...ent is not a concern Text mode is recommended for faxing receipts carbon copy forms and documents that contain only text or fine line art When should I use Text Photo mode Use Text Photo mode when fax...

Page 96: ...Type the printer IP address into the address field of your Web browser Note If you do not know the IP address of the printer then print a network setup page and locate the address in the TCP IP secti...

Page 97: ...then downloading the profile to the printer Note Scanning to a computer or USB device is not available on selected printer models Scanning to a computer 1 Type the printer IP address into the address...

Page 98: ...specified or launched in the program you specified Scanning to a USB flash memory device Note The USB port is not available on selected printer models 1 Insert a USB flash memory device into the fron...

Page 99: ...ain text or fine line art When should I use Text Photo mode Use Text Photo mode when scanning an original document that contains a mixture of text and graphics Text Photo mode is recommended for magaz...

Page 100: ...For more information see Paper types and weights supported by the printer on page 48 Do not load wrinkled creased damp bent or curled paper Flex fan and straighten paper before loading it Do not use...

Page 101: ...cover Inspect the area under the cover and then remove any jams 3 Close the front door 4 Pull Tray 1 out Inspect the tray area and then remove any jams 5 Verify that the paper is loaded correctly 6 Re...

Page 102: ...re all paper fragments are removed 3 Insert the tray 4 Press 201 paper jam 1 Grasp the front door at the side handholds and then pull it toward you to open it CAUTION HOT SURFACE The inside of the pri...

Page 103: ...m and 202 xx Paper Jam appear 3 Close the front door 4 Press 202 paper jam 1 Grasp the front door at the side handholds and then pull it toward you to open it CAUTION HOT SURFACE The inside of the pri...

Page 104: ...hen pull the fuser cover toward you 3 Hold the fuser cover down and then remove the jammed paper The fuser cover closes when released Note Make sure all paper fragments are removed 4 Close the front d...

Page 105: ...de handholds and then pull it toward you to open it 2 Remove the jam 3 Load the tray with the correct paper size A4 letter legal folio 4 Insert the tray 5 Close the front door 6 Press 242 paper jam 1...

Page 106: ...ess the paper jammed 2 Remove the jam Note Make sure all paper fragments are removed 3 Insert the tray 4 Press 290 paper jam 1 Remove all original documents from the ADF 2 Open the ADF cover and then...

Page 107: ...4 Open the scanner cover and then remove any jammed pages 5 Close the scanner cover 6 Press Clearing jams 105...

Page 108: ...yan Cartridge Magenta Cartridge Yellow Cartridge Black Cartridge Imaging Kit Waste Toner Bottle Default Source Size Type Paper Texture Paper Weight Paper Loading Custom Type Custom Scan Sizes Universa...

Page 109: ...t Source menu Menu item Description Default Source Tray x MP Feeder Manual Paper Manual Env Sets a default paper source for all print jobs Notes The 650 sheet duo drawer must be installed in order for...

Page 110: ...sy Bond Letterhead Preprinted Colored Paper Light Paper Heavy Paper Rough Cotton Custom Type x Specifies the type of paper loaded in each tray Notes Plain Paper is the factory default setting for Tray...

Page 111: ...ear as a menu setting Letter is the U S factory default setting A4 is the international factory default setting The multipurpose feeder does not automatically sense paper size The paper size value mus...

Page 112: ...ault setting Card Stock Texture Smooth Normal Rough Specifies the relative texture of the card stock loaded in a specific tray Notes Normal is the factory default setting Settings appear only if card...

Page 113: ...d in a specific tray Note Normal is the factory default setting Light Paper Smooth Normal Rough Specifies the relative texture of the light paper loaded in a specific tray Notes Normal is the factory...

Page 114: ...labels loaded in a specific tray Note Normal is the factory default setting Envelope Weight Light Normal Heavy Identifies the relative weight of the envelopes loaded in a specific tray or feeder Note...

Page 115: ...ry default setting Bond Loading Duplex Off Determines whether 2 sided printing occurs for all jobs that specify Bond as the paper type Note Off is the factory default setting Letterhead Loading Duplex...

Page 116: ...ected from Print Properties in Windows or the Print dialog in Macintosh Custom Types menu Menu item Description Custom Type x Paper Card Stock Transparency Glossy Envelope Rough Cotton Associates a pa...

Page 117: ...ame replaces a Custom Scan Size x name in the printer menus Notes 8 5 inches is the US factory default setting for Width 216 millimeters is the international factory default setting for Width 14 inche...

Page 118: ...paper loaded into trays installed memory the total page count alarms timeouts the printer control panel language the TCP IP address the status of supplies the status of the network connection and oth...

Page 119: ...rint servers Network menu Menu item Description PCL SmartSwitch On Off Sets the printer to automatically switch to PCL emulation when a print job requires it regardless of the default printer language...

Page 120: ...of the USB buffer Changing this setting from the printer control panel and then exiting the menus causes the printer to restart The menu selection is updated Mac Binary PS On Off Auto Sets the printer...

Page 121: ...the printer does not examine incoming data When the Off setting is used the printer uses PostScript emulation if PS SmartSwitch is set to On It uses the default printer language specified in the Setup...

Page 122: ...Address Sets the network address information for an external print server that is attached to the printer using a USB cable Note Thismenuitemisavailableonlyiftheprinterisattachedtoanexternalprinter s...

Page 123: ...ergy paper or specialty media Notes Off is the factory default setting Off resets the printer to its factory default settings The Energy setting minimizes the power used by the printer Performance may...

Page 124: ...MM DD YYYY DD MM YYYY YYYY MM DD Formats the printer date Note MM DD YYYY is the US factory default setting and DD MM YYYY is the international factory default setting Time Format 12 hour A M P M 24...

Page 125: ...setting has no effect on PCL or PPDS emulation print jobs Print Recovery Auto Continue Disabled 5 255 Lets the printer automatically continue printing from certain offline situations when not resolve...

Page 126: ...1 sided to 1 sided 1 sided to 2 sided 2 sided to 1 sided 2 sided to 2 sided Specifies whether an original document is duplex two sided or simplex one sided and then specifies whether the copy should b...

Page 127: ...tes it is the current default setting Paper Source Tray x Single Sheet Feeder Multi Sheet Feeder Specifies the paper source for copy jobs Note Tray 1 is the factory default setting Transparency Separa...

Page 128: ...ast 0 5 Best for content Specifies the contrast used for the copy job Note Best for content is the factory default setting Shadow Detail 4 to 4 Adjusts the amount of shadow detail visible on a copy No...

Page 129: ...al is the factory default setting Equal splits the memory for sending and receiving fax jobs into equal amounts Mostly sent specifies that most of the memory is set to send fax jobs All send specifies...

Page 130: ...page top edge for portrait orientation and left edge for landscape orientation Content Text Text Photo Photograph Specifies the type of content that will be scanned to fax Notes Text is used when the...

Page 131: ...sent Note 33600 baud is the factory default setting Background Removal 4 to 4 Adjusts the amount of background visible on a copy Note 0 is the factory default setting Contrast Best for content 0 5 Spe...

Page 132: ...e paper loaded in the designated fax source Note On is the factory default setting Paper Source Auto Size Match Tray x Single Sheet Feeder Multi Page Feeder Specifies the paper source selected to supp...

Page 133: ...ifies whether printed logs display the dialed number or the station name Note Remote Station Name is the factory default setting Enable Job Log On Off Enables access to the Fax Job log Note On is the...

Page 134: ...g Update Code Enable Disable Enables or disables the ability of the printer to update its firmware code from a USB device Note Enable is the factory default setting Scan Settings Menu item Description...

Page 135: ...Folio Statement Universal 4 x 6 in 3 x 5 in Business Card Custom Scan Size x A4 A5 Oficio Mexico A6 JIS B5 Specifies the paper size of the document that is being scanned Note Letter is the US factory...

Page 136: ...files are created with one file for each page of the job Notes On is the factory default setting This menu item applies to all scan functions Scan bit Depth 8 bit 1 bit Enables the Text Photo mode to...

Page 137: ...loaded resources Note Off is the factory default setting Finishing menu Note Certain options are not available on selected printer models Menu item Description Sides 2 Sided 1 Sided Specifies whether...

Page 138: ...on Between Jobs inserts a blank sheet between print jobs Between Pages inserts a blank sheet between each page of the print job This setting is useful when printing transparencies or inserting blank...

Page 139: ...4800 CQ 1200 dpi Specifies the printed output resolution Note 4800 CQ is the factory default setting Toner Darkness 1 5 Lightens or darkens the printed output Notes 4 is the factory default setting Se...

Page 140: ...of a series of colored boxes along with the RGB or CMYK combination that creates the color observed These pages can be used to help decide which combinations to use to get the desired printed output...

Page 141: ...ob problem Notes When Hex Trace is activated all data sent to the printer is printed in hexadecimalandcharacterrepresentation andcontrolcodesarenotexecuted To exit Hex Trace turn the printer off Cover...

Page 142: ...ion where it is stored Notes RO Courier is the factory default setting RO Courier shows the font name font ID and storage location in the printer The font source abbreviation is R for Resident F for F...

Page 143: ...ault setting 64 is the international factory default setting TheprintersetstheamountofspacebetweeneachlinebasedontheLines per Page Paper Size and Orientation settings Select the desired Paper Size and...

Page 144: ...tom setting to be assigned Tray Renumber View Factory Def None Displays the factory default setting assigned to each tray drawer or feeder Tray Renumber Restore Defaults Yes No Returns all tray drawer...

Page 145: ...Letter A4 A5 JIS B5 Controls the printed size of each photo printed from a PictBridge enabled device Notes Auto is the factory default setting If both the printer and the PictBridge enabled camera ha...

Page 146: ...han the size of the media installed in the printer input source cannot be selected Set Date and Time Menu item Description View Date Time Displays the time in YYYY MM DD HH MM format Note This is a vi...

Page 147: ...fies the time zone for the fax Note indicates that this value does not have pre programmed Daylight Savings Time Start and End times Time Zone Australia and the Pacific region Australia WST Australia...

Page 148: ...nd access the USB drive directly or press 2 to ignore the USB drive and return to the job being set up Busy Wait for the message to clear Calibrating Wait for the message to clear Call complete A fax...

Page 149: ...message to clear File corrupt A file with a valid extension is detected but the actual file type does not match the extension or the file is corrupt Hex Trace The printer is in Hex Trace mode With He...

Page 150: ...ith x Try one or more of the following Load the manual feeder with the correct paper type and size If no paper is in the manual feeder load a sheet and then press to clear the message and continue pri...

Page 151: ...it is near exhaustion The printer continues printing unless the value for the Cartridge Alarm is changed from the printer control panel or set to On from the Supply Notifications Web page located on t...

Page 152: ...B drive and encountered an error The USB drive must be removed from the printer to clear the message Ready The printer is ready to receive print jobs Receiving pXX The printer is receiving a fax pXX r...

Page 153: ...age Scan to USB failed An attempt to create a file on the USB drive failed Try one or more of the following Re send the job Reduce the scan resolution and then try sending the job again Remove the USB...

Page 154: ...camera is attached to the printer Waiting Theprinterhasreceiveddatatoprint butiswaitingforanEnd of Jobcommand aFormFeedcommand oradditional data Try one or more of the following Press to print the co...

Page 155: ...led prior to the collation message and collates the remainder of the print job Try one or more of the following Press to clear the message and continue printing Press and then press to cancel printing...

Page 156: ...sage and continue printing Format the flash memory If the message remains the flash memory may be defective and require replacing 54 Network x Software Error The printer detects that a network port is...

Page 157: ...x Only options designed specifically for this printer are supported Try one or more of the following Remove the specified tray Press to clear the message and continue printing without using the specif...

Page 158: ...oor and then remove the jammed paper 3 Close the front door 4 Press to clear the message and continue printing Note When there is more than one jam the message displays the number of pages jammed 235...

Page 159: ...panel press to start a black only job or to start a color job 293 Paper Missing The scanner was instructed to scan using the ADF but there is no paper in the ADF Note The message clears when the pages...

Page 160: ...t your system support person 940 01 Pressdownonthecyantonercartridgetomakesureitisinstalledproperly Turntheprinteroff waitabout10seconds and then turn the printer back on 941 01 Press down on the mage...

Page 161: ...ervice 900 999 Service message 1 Turn the printer off 2 Unplug the power cord from the wall outlet 3 Check all cable connections 4 Connect the power cord to a properly grounded outlet 5 Turn the print...

Page 162: ...ake sure the printer is on and Ready appears 2 From the printer control panel press 3 Press the arrow buttons until Reports appears and then press 4 Press the arrow buttons until Menu Settings Page ap...

Page 163: ...e appears you must replace the specified toner cartridge To order toner cartridges contact the place where you purchased the printer Ordering imaging kits When Replace black and color imaging kit or R...

Page 164: ...3 Open the top door 4 Remove the right side cover Maintaining the printer 162...

Page 165: ...levers on each side of the waste toner bottle and then remove it 6 Place the waste toner bottle in the enclosed packaging 7 Insert the new waste toner bottle 8 Replace the right side cover Maintainin...

Page 166: ...k imaging kit when Imaging Kit appears 1 Grasp the front door at the side handholds and then pull it toward you CAUTION HOT SURFACE The inside of the printer might be hot To reduce the risk of injury...

Page 167: ...2 Open the top door 3 Remove the toner cartridges by lifting the handles and then gently pulling away from the imaging kit 4 Remove the right side cover Maintaining the printer 165...

Page 168: ...blue levers on the imaging kit and then pull it toward you 7 Press down on the blue levers grasp the green handles on the sides and then pull the imaging kit out Warning Potential Damage Do not touch...

Page 169: ...pack the replacement black imaging kit Leave the packaging on the black developer unit 10 Gently shake the black developer unit side to side 11 Remove the packaging from the black developer unit 12 In...

Page 170: ...ake sure each developer unit is inserted into a matching color slot 14 Place the used black imaging kit in the enclosed package 15 Align and insert the imaging kit 16 Rotate the blue levers down until...

Page 171: ...17 Replace the waste toner bottle 18 Replace the right side cover 19 Replace the toner cartridges Maintaining the printer 169...

Page 172: ...color imaging kit when Imaging Kit appears 1 Grasp the front door at the side handholds and then pull it toward you to open it CAUTION HOT SURFACE The inside of the printer might be hot To reduce the...

Page 173: ...2 Open the top door 3 Remove the toner cartridges by lifting the handles and then gently pulling away from the imaging kit 4 Remove the right side cover Maintaining the printer 171...

Page 174: ...ard you 7 Press down on the blue levers grasp the green handles on the sides and then pull the imaging kit out Warning Potential Damage Do not touch the underside of the imaging kit This could damage...

Page 175: ...de 10 Remove the packaging from the yellow cyan magenta and black developer units 11 Insert the yellow cyan magenta and black developer units 12 Place the used black and color imaging kit in the enclo...

Page 176: ...14 Replace the waste toner bottle 15 Replace the right side cover 16 Replace the toner cartridges Maintaining the printer 174...

Page 177: ...yellow cyan magenta or black when 88 Replace color Cartridge appears The printer will not continue printing until the specified cartridge is replaced 1 Make sure the printer is on and Ready or 88 Rep...

Page 178: ...3 Open the top door 4 Remove the toner cartridge by lifting the handle and then gently pulling away from the imaging kit Maintaining the printer 176...

Page 179: ...eveloper unit when a print quality defect occurs or when damage occurs to the printer 1 Grasp the front door at the side handholds and then pull it toward you to open it CAUTION HOT SURFACE The inside...

Page 180: ...2 Open the top door 3 Remove the toner cartridges by lifting the handles and then gently pulling away from the imaging kit Maintaining the printer 178...

Page 181: ...ove the right side cover 5 Press the green levers on each side of the waste toner bottle and then remove it 6 Lift the blue levers on the imaging kit and then pull it toward you Maintaining the printe...

Page 182: ...the imaging kit This could damage the imaging kit 8 Remove the used developer unit 9 Place the used developer in the enclosed package 10 Unpack the replacement developer unit Leave the packaging on t...

Page 183: ...13 Insert the developer unit 14 Align and insert the imaging kit Maintaining the printer 181...

Page 184: ...15 Replace the waste toner bottle 16 Replace the right side cover 17 Replace the toner cartridges Maintaining the printer 182...

Page 185: ...es from the printer before proceeding 2 Remove paper from the standard exit tray 3 Dampen a clean lint free cloth with water Warning Potential Damage Do not use household cleaners or detergents as the...

Page 186: ...ass until it is clean and dry 4 Wipe the white underside of the scanner cover until it is clean and dry 5 Close the scanner cover Moving the printer Before moving the printer CAUTION POTENTIAL INJURY...

Page 187: ...inter to another location The printer and options can be safely moved to another location by following these precautions Any cart used to move the printer must have a surface able to support the full...

Page 188: ...s are restored All downloaded resources in the printer memory are deleted This includes fonts macros and symbol sets All settings return to the factory default settings except Printer Language in the...

Page 189: ...computer by a USB or parallel cable then open the Local Printer Settings Utility for Windows or Printer Settings for Macintosh to access printer menus Setting up e mail alerts You can have the printer...

Page 190: ...nto the address field of your Web browser Note If you do not know the IP address of the printer then print a network setup page and locate the IP address in the TCP IP section 2 Click Reports and then...

Page 191: ...you have checked each of these possibilities turn the printer off wait for about 10 seconds and then turn the printer back on This often fixes the problem Solving printing problems Multiple language...

Page 192: ...functioning correctly MAKE SURE YOU ARE USING A RECOMMENDED USB OR ETHERNET CABLE For more information contact the place where you purchased the printer MAKE SURE PRINTER CABLES ARE SECURELY CONNECTE...

Page 193: ...u LOAD THE SAME SIZE AND TYPE OF PAPER Load the same size and type of paper in each tray to be linked Move the paper guides to the correct positions for the paper size loaded in each tray USE THE SAME...

Page 194: ...ut appears and then press 6 Press the arrow buttons until the desired value appears and then press Solving copy problems Copier does not respond These are possible solutions Try one or more of the fol...

Page 195: ...hen the print becomes faded replace the toner cartridge THE SCANNER GLASS MAY BE DIRTY Clean the scanner glass with a clean lint free cloth dampened with water THE COPY IS TOO LIGHT OR TOO DARK Adjust...

Page 196: ...CHECK THE DOCUMENT PLACEMENT Make sure the document or photo is loaded facedown on the scanner glass in the upper left corner CHECK THE PAPER SIZE SETTING Make sure the Paper Size setting matches the...

Page 197: ...BE SET TOO HIGH Select a lower scan resolution Poor scanned image quality These are possible solutions Try one or more of the following CHECK THE DISPLAY FOR ERROR MESSAGES Clear any error messages TH...

Page 198: ...more of the following CHECK THE DISPLAY FOR ERROR MESSAGES Clear any error messages CHECK THE POWER Make sure the printer is plugged in the power is on and Ready appears CHECK THE CABLE CONNECTIONS M...

Page 199: ...e Certain devices can be connected to the printer so that digital telephone services can be used IfyouareusinganISDNtelephoneservice thenconnecttheprintertoananalogtelephoneport anR interface port on...

Page 200: ...for the printer THE PRINTER MEMORY MAY BE FULL 1 Dial the fax number 2 Scan the original document one page at a time Can send but not receive faxes These are possible solutions Try one or more of the...

Page 201: ...number that you want to dial As an alternative dial the telephone number manually Received fax has poor print quality These are possible solutions Try one or more of the following RE SEND THE DOCUMEN...

Page 202: ...r the phone numbers or fax station names of specific fax callers you want to block Solving option problems Option does not operate correctly or quits after it is installed These are possible solutions...

Page 203: ...off Wait 10 seconds Turn the printer back on Multipurpose feeder CHECK THE MULTIPURPOSE FEEDER Make sure the 650 sheet duo drawer multipurpose feeder is installed properly CLEAR ANY JAMS Clear any ja...

Page 204: ...maximum stack height indicated in the tray or on the multipurpose feeder CHECK THE PAPER GUIDES Move the guides in the tray to the correct positions for the paper size loaded THE PAPER MAY HAVE ABSORB...

Page 205: ...hese are possible solutions Try one or more of the following PACKING MATERIAL MAY BE ON THE PRINT CARTRIDGE Remove the print cartridge and make sure the packing material is properly removed Reinstall...

Page 206: ...pecify the correct size setting For Windows users specify the size from Print Properties For Macintosh users specify the size from the Page Setup dialog Dark lines The imaging kit may be defective If...

Page 207: ...size setting For Windows users specify the size from Print Properties For Macintosh users specify the size from the Page Setup dialog Light colored line white line or incorrectly colored line These ar...

Page 208: ...resh package Store paper in its original wrapper until you use it CHECK THE PAPER TYPE SETTING Make sure the paper type setting matches the paper loaded in the tray 1 From the printer control panel ch...

Page 209: ...r specifications Print is too light These are possible solutions Try one or more of the following CALIBRATE THE COLOR The printer automatically calibrates the colors whenever a new imaging kit is dete...

Page 210: ...AY HAVE ABSORBED MOISTURE DUE TO HIGH HUMIDITY Load paper from a fresh package Store paper in its original wrapper until you use it CHECK THE PAPER Avoid textured paper with rough finishes CHECK THE P...

Page 211: ...ns until Color Adjust appears and then press Calibrating appears CHECK THE DARKNESS BRIGHTNESS AND CONTRAST SETTINGS The Toner Darkness setting is too dark the RGB Brightness setting is too dark or th...

Page 212: ...ed For more information contact Customer Support Toner fog or background shading appears on the page These are possible solutions Try one or more of the following THE IMAGING KIT MAY BE WORN OR DEFECT...

Page 213: ...rom the Print dialog CHECK THE PAPER TEXTURE SETTING From the printer control panel Paper menu make sure the Paper Texture setting matches the paper loaded in the tray Toner specks These are possible...

Page 214: ...the Print dialog Uneven print density Replace the black and color imaging kit Solving color quality problems This section helps answer some basic color related questions and describes how some of the...

Page 215: ...ecify document color using RGB or CMYK color combinations Additionally they allow users to modify the color of each object in a document For more information see the software program Help topics How d...

Page 216: ...lor Correction must be set to Manual or no user defined color conversion will be implemented Manual color correction settings are specific to the type of object being printed text graphics or images a...

Page 217: ...ed Auto Off or Manual the type of object being printed text graphics or images and how the color of the object is specified in the software program RGB or CMYK combinations When the printer Color Corr...

Page 218: ...u may need to type https instead of http before the printer IP address to access the Embedded Web Server For more information see your system administrator Contacting Customer Support When you call Cu...

Page 219: ...rrors Changes are periodically made to the information herein these changes will be incorporated in later editions Improvements or changes in the products or the programs described may be made at any...

Page 220: ...computing device use a properly shielded and grounded cable such as Lexmark part number 1021231 for parallel attach or 1021294 for USB attach Use of a substitute cable not properly shielded and groun...

Page 221: ...ety Code 6 obtainable from Health Canada s Web site www hc sc gc ca rpb The term IC before the certification registration number only signifies that the Industry Canada technical specifications were m...

Page 222: ...TERNATIONAL INC 1999 5 English Hereby Lexmark International Inc declares that this type of equipment is in compliance with the essential requirements and other relevant provisions of Directive 1999 5...

Page 223: ...rodukt sp a z kladn po iadavky a v etky pr slu n ustanovenia smernice 1999 5 ES Slovensko Lexmark International Inc izjavlja da je ta izdelek v skladu z bistvenimi zahtevami in ostalimi relevantnimi d...

Page 224: ...hone company may request that you disconnect the equipment until the problem is resolved This equipment contains no user serviceable parts For repair and warranty information contact your point of pur...

Page 225: ...odem est indiqu sur l tiquette produit situ e l arri re de l quipement Les compagnies de t l phone constatent que les surtensions lectriques en particulier celles dues la foudre entra nent d important...

Page 226: ...must be used as metering pulses are present on all analog telephone lines in Switzerland Utilisation de ce produit en Suisse Cet appareil n cessite l utilisation d un filtre de tonalit de facturation...

Page 227: ...ver any human access to laser radiation above a Class I level during normal operation user maintenance or prescribed service condition Laser advisory label A laser notice label may be affixed to this...

Page 228: ...gy usage DEVICE PATENT LICENSE IMPORTANT PLEASE READ BEFORE OPENING Opening this package installing the printing device software or using the products inside confirms your acceptance of the following...

Page 229: ...55 900 999 Service message 159 940 01 158 940 02 158 941 01 158 941 02 158 942 01 158 942 02 159 943 01 158 943 02 159 A Access USB after scan 146 Access USB now 146 Active NIC menu 117 address book e...

Page 230: ...he wall jack 75 connecting to a distinctive ring service 77 connecting to a DSL line 75 connecting to a PBX or ISDN 76 Fax failed 147 fax quality improving 93 Fax Settings menu 126 fax troubleshooting...

Page 231: ...117 Paper Loading 113 Paper Size Type 108 Paper Texture 110 PCL Emul 140 PDF 139 PictBridge 143 PostScript 140 Quality 137 Reports 116 Set Date and Time 144 Settings 121 Setup 135 Supplies 107 USB 119...

Page 232: ...14 moving 184 185 selecting a location 13 shipping 185 printer messages 150 displayed 155 200 Paper jam area name 156 201 yy Paper jam area name 156 202 yy Paper jam area name 156 230 yy Paper jam are...

Page 233: ...ose feeder 201 option not working 200 printer problems solving basic 189 printing directory list 58 font sample list 57 from flash drive 55 from Macintosh computer 51 from Windows 51 installing printe...

Page 234: ...drive 189 incorrect characters print 191 incorrect margins 205 jammed page does not reprint 202 job prints from wrong tray 191 job prints on wrong paper 191 job takes longer than expected 190 jobs do...

Page 235: ...replacing 161 Wireless menu 118 Y Yellow Low 147 Index 233...

Page 236: ......

Page 237: ......

Page 238: ...Printed in USA G510 7212 00...

Reviews: