


19
INSTALLATION
isar -
Installation and Servicing
FLUE OUTLET
2
5
4
4
A
Ecl
6067
1
Gasket
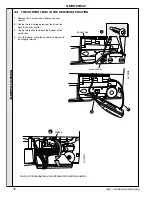
22 MOUNTING THE BOILER
IMPORTANT.
Before mounting the boiler on the wall fit the 'S' trap hose moulding/
nut.
1. Ensure that the plastic plugs are removed from both the CH and
DHW pipes before mounting. N.B. Some spillage of water may
occur from the pipework when mounting the boiler to the frame.
2. Lift the boiler onto the wall mounting frame, locating it over the tabs at
the top of the frame.
3. Lower the boiler into position, engaging it onto the support bracket.
Note.
Ensure the condensate drain pipe is correctly positioned before
continuing.
4. Using the fibre washers supplied in the hardware pack, engage and
then tighten the 4 water unions.
5. Engage and tighten the gas union, ensuring that the rubber seal is in
place. DO NOT overtighten.
6. Connect a pipe to the safety drain outlet using the nut and olive
supplied in the boiler hardware pack.
7. Plug the user control (display unit, pack A) into the control box. Refer
to Frame 65.
8. Screw the user control into position.
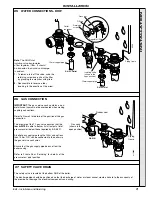
23 CONNECTING THE FLUE TO THE BOILER
Note.
Before fitting the flue turret fill the condensate trap within the boiler by pouring a cupful of water into the flue outlet A.
Take care to ensure that the water is only poured into the flue outlet, and does not spill into the boiler casing.
1. Insert the flue assembly through the prepared hole in
the wall.
2. Locate the flue turret on the top of the boiler,
ensuring that the turret gasket is in place.
Check that the flue seal ‘A’ located
in the top of the flue manifold
is secure and giving an
effective seal.
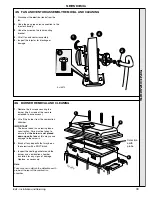
3. Locate the flue into the
turret.
4. Secure the flue turret on
top of the boiler by
inserting the open ends of
the turret clamp under the
2 studs and fixing it in the
middle with the single M5 x
10mm pozi-hex screw
provided.
5. Flues over 1 metre long.
Fix the flue support bracket to
the wall, using the 4 wall plugs
and wood screws.
NB. The space bracket will utilise one
fixing hole only whilst used in conjunction
with the stand-off option.
7
Ecl 2363
Summary of Contents for isar m30100
Page 1: ......


