background image

VDSL2 Gateway Router


55 

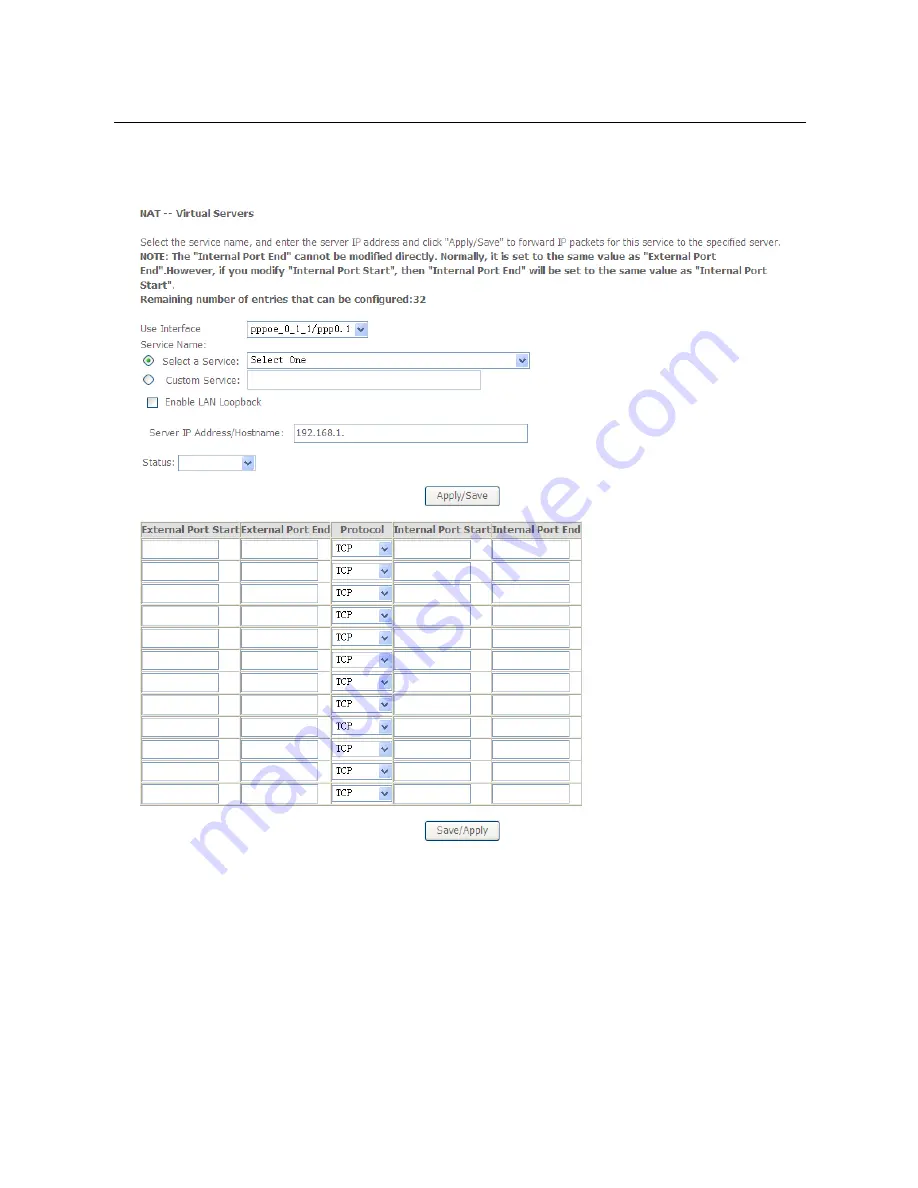
In this page, you are allowed to add or remove a virtual server entry. 

To add a virtual server, do as follows: 

Step 1 

Click the 

Add

 button to display the following page. 


Use interface

: Select an interface that you want to configure. 


Select a Service

: Select a proper service in the drop-down list. 


Custom Server

: Enter a new service name to establish a user service type. 


Server IP Address

: Assign an IP address to virtual server. 


External Port Start

: When selecting a service, the port number will 

automatically be displayed. You can modify it if necessary. 


External Port End

: When selecting a service, the port number will 

automatically be displayed. You can modify it if necessary. 

Summary of Contents for iB-WVG300N

Page 1: ...User Guide VDSL2 Gateway Router Model No iB WVG300N Ver 1 0 0...

Page 2: ...on a circuit different from that to which the receiver is connected Consult the dealer or an experienced radio TV technician for help This device complies with part 15 of the FCC Rules Operation is s...

Page 3: ...CE Mark Warning This is a class B product In a domestic environment this product may cause radio interference in which case the user may be required to take adequate measures...

Page 4: ...NEL 3 4 1 2 REAR PANEL AND SIDE PANEL 3 4 2 HARDWARE INSTALLATION 6 4 2 1 LOCATION FOR WIRELESS OPERATION 6 4 2 2 CONNECTING THE DEVICE 6 CHAPTER 5 CONNECTING THE ROUTER 8 5 1 SYSTEM REQUIREMENTS 8 5...

Page 5: ...CP 18 6 2 NETWORK SETTING 19 6 2 1 WAN INTERFACE 20 6 2 2 WAN SETUP 24 6 2 3 3G WAN SETUP 45 6 2 4 LAN CONFIGURATION 48 6 2 5 NAT 54 6 2 6 SECURITY 58 6 2 7 PARENTAL CONTROL 61 6 2 8 QUALITY OF SERVIC...

Page 6: ...POWER MANAGEMENT 86 6 2 23 MULTICAST 88 6 3 WIRELESS 89 6 3 1 BASIC SETTINGS 89 6 3 2 SECURITY 91 6 3 3 MAC FILTER 99 6 3 4 BRIDGE 100 6 3 5 ADVANCED 101 6 3 6 WIRELESS CLIENTS 104 6 4 DIAGNOSTICS 10...

Page 7: ...VDSL2 Gateway Router iv 6 5 4 TR 69 CLIENT 109 6 5 5 TIME SETTING 110 6 5 6 AUTHENTICATION 112 6 5 7 FIRMWARE UPDATE 114 6 5 8 RESTART 114 CHAPTER 7 Q A 115 CHAPTER 8 CONTACT INFORMATION 115...

Page 8: ...uct packaging VDSL2 Gateway Router 2 x 5dBi Antenna Fixed Power Adapter 2 x RJ11 Patch Cord RJ45 Patch Cord ADSL Splitter Cd Quick Installation Guide Note Make sure that the package contains the above...

Page 9: ...12a 12b 17a VDSL2 Bandplan support Plan 997 Plan 998 MIMO technology 5dBi x 2 Internal Omni directional Antenna provides better throughput stability wireless performance Quad WAN Router VDSL Internet...

Page 10: ...RJ45 WAN port 3G Internet Access 2G 3G Internet with GSM CDMA compatible data card 4 10 100Mbps LAN Port 1 LAN WAN Interchangeable 1 RJ11 WAN Port IPv6 Ready Multi SSID Security Guest SSID Access secu...

Page 11: ...VDSL2 Gateway Router 3 Chapter 4 Hardware Description and Installation 4 1 Hardware Description 4 1 1 Front Panel Figure 1 Front panel 4 1 2 Rear Panel and Side Panel...

Page 12: ...er Power interface for connecting the power adapter On Off Power switch WLAN WLAN switch for enabling or disabling the WLAN function WPS This button is used for enabling WPS PBC mode If WPS is enabled...

Page 13: ...the route mode Blink Internet data is being transmitted Off Ethernet interface is disconnected Red On Authentication has failed LAN 1 2 3 4 Green On The Ethernet interface is connected Blink Data is...

Page 14: ...cess your network from anywhere you want However the numbers of walls ceilings or other objects that the wireless signals must pass through limit signal range Typical ranges vary depending on types of...

Page 15: ...Router 7 Note If you use 3G WAN service connect the 3G USB data card to the USB port of the router The followig figure displays the connection of the DSL router PC and telephones Figure 2 Connecting t...

Page 16: ...Avoid direct irradiation of any strong light such as sunlight Keep at least 2 inches 5 cm of clear space around the Router Operating Temperature 0 40 32 104 Operating Humidity 10 90 RH Non condensing...

Page 17: ...Obtain an IP address automatically 1 Set up the TCP IP Protocol in Obtain an IP address automatically mode on your PC 2 Then the built in DHCP server will assign IP address for the PC Now you can run...

Page 18: ...een your PC and the Router has been established well Figure 5 1 Success result of Ping command If the result displayed is similar to the Figure 5 2 it means the connection between your PC and the Rout...

Page 19: ...he range of 192 168 1 2 192 168 1 254 5 3 Logging In to the VDSL2 Gateway Router To connect to the Router you should set up the LAN Connection TCP IP setting of the PC to Obtain an IP address automati...

Page 20: ...management of the DSL router which allows you to configure and control all of DSL router features and system parameters in a user friendly GUI 6 1 Status Info Choose Status Info and the submenus of St...

Page 21: ...following page appears This page displays the information of the WAN interface such as the connection status and the IP address 6 1 3 Statistics 6 1 4 LAN Choose Status Info Statistics LAN and the fo...

Page 22: ...interface Click Reset Statistics to restore the values to zero and recount them 6 1 6 xTM Choose Status Info Statistics xTM and the following page appears In this page you can view the statistical in...

Page 23: ...VDSL2 Gateway Router 15...

Page 24: ...r Rate Click Reset Statistics to restore the values to zero and recount them xDSL BER Test Click xDSL BER Test to perform a bit error rate BER test on the DSL line The test page is as follows The Test...

Page 25: ...SL2 Gateway Router 17 Note If the BER reaches e 5 you cannot access the Internet 6 1 8 Route Choose Status Info Route and the following page appears In this page you can view the route table informati...

Page 26: ...w the MAC address and IP address information of the device connected to the router 6 1 10 DHCP Choose Status Info DHCP and the following page appears In this page you can view the host name the IP add...

Page 27: ...VDSL2 Gateway Router 19 6 2 Network Setting Choose Network Setting and the submenus of Network Setting are shown as below...

Page 28: ...er 20 6 2 1 WAN Interface 6 2 1 1 ADSL Connection Choose Network Setting WAN Interface ADSL In this page you can add or remove to configure ADSL Interfaces Click Add to add ATM Interface and the follo...

Page 29: ...ints in an ATM network ranging from 32 to 65535 1 to 31 are reserved for known protocols DSL Link Type EoA it is for PPPoE IPoE and Bridge PPPoA or IPoA Encapsulation Mode LLC SNAP BRIDGING or VC MUX...

Page 30: ...ce VDSL and the following page appears In this page you can add or remove to configure VDSL WAN Interfaces Click Add and the following page appears In this page you can select scheduler for queues of...

Page 31: ...he following page appears In this page you can add or remove to configure Broadband WAN Interfaces Click Add and the following page appears In this page you can select a ETH port Click Apply Save to s...

Page 32: ...s PPP over Ethernet PPPoE IP over Ethernet Bridging And the corresponding configurations of PTM WAN service are same as the configurations of ATM WAN service 6 2 2 1 Adding a PPPoE WAN Service This se...

Page 33: ...you can select a ATM Interface for the WAN service After selecting the ATM interface click Next to display the following page Step3 In this page select the WAN service type to be PPP over Ethernet PPP...

Page 34: ...ou need to enter the idle timeout time Within the preset minutes if the modem does not detect the flow of the user continuously the modem automatically stops the PPPoE connection Once it detects the f...

Page 35: ...uter 27 Step5 After setting the parameters click Next to display the following page Step6 In this page select a preferred WAN interface as the system default gateway and then click Next to display the...

Page 36: ...e it displays the information about the PPPoE settngs Click Apply Save to save and apply the settings 6 2 2 2 Adding a MER IPoE WAN service This section describes the steps for adding the MER WAN serv...

Page 37: ...Interface and then click Next to display the following page Step3 In this page select the WAN service type to be IP over Ethernet enter the service description for this service After finishing settin...

Page 38: ...omatically or manually enter the IP address provided by your ISP Click Next and the following page appears Note If selecting Obtain an IP address automatically DHCP will be enabled for PVC in MER mode...

Page 39: ...tion settings for example enabling NAT enabling firewall and enabling IGMP multicast After finishing setting click Next and the following page appears Step6 In this page select a preferred WAN interfa...

Page 40: ...about the IPoE settngs Click Apply Save to save and apply the settings 6 2 2 3 Adding a PPPoA WAN service This section describes the steps for adding the PPPoA WAN service Step1 Choose Network Settin...

Page 41: ...link type to be PPPoA and select the encapsulation mode to be VC MUX according to the uplink equipment After finishing setting click the Apply Save button to apply the setings Step3 Choose WAN Service...

Page 42: ...Router 34 Step4 Select the proper interface for the WAN service and then click Next to display the following page Step5 In this page you may modify the service description Click Next to display the f...

Page 43: ...ou need to enter the idle timeout time Within the preset minutes if the modem does not detect the flow of the user continuously the modem automatically stops the PPPoA connection Once it detects the f...

Page 44: ...it Step6 In this page you can enter the PPP username and PPP password provided by your ISP Select the authentication method according to your requirement After finishing setting click Next to display...

Page 45: ...VDSL2 Gateway Router 37 Step8 In this page you can obtain the DNS server addresses from the selected WAN interface After finishing setting click Next to display the following page...

Page 46: ...Back button if necessary 6 2 2 4 Adding an IPoA WAN service This section describes the steps for adding the IPoA WAN service Step1 Choose Network Setting WAN Interface ATM Interface to dsipaly the DSL...

Page 47: ...o be LLC SNAP ROUTING according to the uplink equipment After finishing setting click the Apply Save button to save the settings Step3 Choose WAN Service and click Add to display the following page St...

Page 48: ...and then click Next to display the following page In this page Network Address Translation NAT allows you to share one Wide Area Network WAN IP address for multiple computers on your Local Area Netwo...

Page 49: ...Router 41 Step7 After finishing setting click Next to display the following page Step8 In this page select a preferred WAN interface as the system default gateway and then click Next to display the f...

Page 50: ...Click Apply Save to save and apply the settings You can modify the settings by clicking the Back button if necessary 6 2 2 5 Adding a Bridge WAN service This section describes the steps for adding th...

Page 51: ...VDSL2 Gateway Router 43 Step2 Select the proper ATM Interface and then click Next to display the following page...

Page 52: ...VDSL2 Gateway Router 44 Step3 In this page you can select the WAN service type and modify the service description for this service After finishing setting click Next to display the following page...

Page 53: ...ge is used to configure 3G connection If you want to access the Internet through 3G connection a 3G network card is required Connect the 3G network card to the USB interface of the Router Information...

Page 54: ...work that is available You may select EVDO WCDMA CDMA2000 TD SCDMA GSM or Auto Dial on demand Within the preset minutes if the modem does not detect the flow of the user continuously the modem automat...

Page 55: ...s priority over the 3G connection When the DSL WAN connection starts to perform dial up the 3G connection will be disconnected If the DSL WAN connection has established you may manually to perform 3G...

Page 56: ...LAN and the following page appears In this page you can configure an IP address for the DSL router enable IGMP snooping enable or disable the DHCP server edit the DHCP option configure the DHCP advan...

Page 57: ...ng all ports in the VLAN With IGMP snooping the router listens to IGMP membership reports queries and leave messages to identify the switch ports that are members of multicast groups Multicast traffic...

Page 58: ...n the LAN Editing the DHCP Option60 Click the Edit DHCP Option60 button in the Local Area Network LAN Setup page to display the DHCP Option60 Setup page In this page you can add edit or delete the DHC...

Page 59: ...he DHCP Static IP Lease List The lease list of static IP address can reserve the static IP addresses for the hosts with the specific MAC addresses When a host whose MAC address is in the lease list of...

Page 60: ...erface In the Local Area Network LAN Setup page you are allowed to set the second IP address and the subnet mask for a LAN interface After enabling Configure the second IP Address and Subnet Mask for...

Page 61: ...tion of dynamic host configuration protocol for IPv6 DHCPv6 originally developed by the KAME project The implementation mainly complies with the following standards RFC3315 RFC3319 RFC3633 RFC3646 RFC...

Page 62: ...evice running MLD Snooping establishes mappings between ports and multicast MAC addresses and forwards IPv6 multicast data based on these mappings After finishing setting click the Save Apply button t...

Page 63: ...igure Select a Service Select a proper service in the drop down list Custom Server Enter a new service name to establish a user service type Server IP Address Assign an IP address to virtual server Ex...

Page 64: ...necessary Step 2 After finishing setting click Save Apply to save and apply the settings 6 2 5 2 Port Triggering Some applications need some ports to be opened in the firewall for the remote access W...

Page 65: ...ort Trigger Protocol Select the application protocol You may select TCP UDP TCP or UDP Open Port Start The start port number that is opened to WAN Open Port End The end port number that is opened to W...

Page 66: ...MZ host After finishing the settings click the Apply Save button to apply the settings If you want to clear the DMZ function of the host please delete the IP address of the host in the field of DMZ Ho...

Page 67: ...ermit or Drop from the drop down list MAC Filtering Setup In some cases you may want to manage Layer2 MAC address to block or permit a computer within the home network When you enable MAC filter rules...

Page 68: ...display the following page Protocol Type Select the proper protocol type Destination MAC Address Enter the destination MAC address Source MAC Address Enter the source MAC address Frame Direction The...

Page 69: ...owing page appears Click the Add button to display the following page This page is used to control the time restriction to a special LAN device that connects to the DSL router In this page se the user...

Page 70: ...de URL list type If you select the Exclude URL list type it means that the URLs in the list are not accessible If you select the select the Include URL list type you are allowed to access the the URLs...

Page 71: ...VDSL2 Gateway Router 63 6 2 8 Quality of Service Enabling QoS Choose Advance Setup Quality of Service and the following page appears Select Enable QoS to enable QoS and configure the default DSCP mark...

Page 72: ...Save to save and apply the settings Note If the Enable Qos checkbox is not selected all QoS will be disabled for all interfaces The default DSCP mark is used to mark all egress packets that do not mat...

Page 73: ...ter 65 In this page you can enable add or remove a QoS rule Note The lower integer value for precedence indicates the higher priority Click the Add button to display the following page Name Enter the...

Page 74: ...oS queue After finishing setting click Apply Save to save and apply the settings QoS Classification Choose Network Setting Quality of Service Qos Classification and the following page appears In this...

Page 75: ...VDSL2 Gateway Router 67 6 2 9 Routing Default Gateway Choose Network Setting Routing Default Gateway and the following page appears...

Page 76: ...list of Selected WAN Interface as the system default gateway After finishing setting click Apply Save to save and apply the settings Static Route Choose Network Setting Routing Static Route and the fo...

Page 77: ...rface for the rule Gateway IP Address The next hop IP address Metric The metric value of routing After finishing setting click Apply Save to save and apply the settings Policy Routing Choose Network S...

Page 78: ...ing click Apply Save to save and apply the settings RIP Choose Network Setting Routing RIP and the following page appears In this page if you want to configure an individual interface select the desir...

Page 79: ...this page you can select a DNS server interface from the available interfaces manually enter the DNS server addresses or obtain the DNS address from a WAN interface After finishing setting click Apply...

Page 80: ...Username Enter the username for accessing the DDNS management interface Password Enter the password for accessing the DDNS management interface After finishing setting click Apply Save to save and app...

Page 81: ...VDSL2 Gateway Router 73 In this page you can set the DSL settings Usually you do not need to modify the factory default settings After finishing setting click Apply Save to save and apply the settings...

Page 82: ...ing click Apply Save to save and apply the settings 6 2 13 DNS Proxy Choose Network Setting DNS Proxy and the following page appears In this page you can enable or disable the DNS proxy function After...

Page 83: ...disable the printer server After finishing setting click Apply Save to save and apply the settings 6 2 15 DLNA Choose Network Setting DLNA and the following page appears In this page select the Enabl...

Page 84: ...n and the following page appears In this page you can enable packet flow accelerator 6 2 17 NAS Storage Device Info Choose Network Setting NAS Storage Device Info and the following page appears This p...

Page 85: ...ging groups Each group will perform as an independent network To support this feature you must create mapping groups with the appropriate LAN and WAN interfaces using the Add button The Remove button...

Page 86: ...Gateway Router 78 In this page please follow the on screen configuration steps to configure the parameters of the interface grouping After finishing setting click Apply Save to save and apply the set...

Page 87: ...tting IP Tunnel IPv6inIPv4 and the following page appears The default value is IPv6 in IPv4 information Click Add and the following page appears In this page you can add a new tunnel 6 2 19 2 IPv4 in...

Page 88: ...age appears In this page you can add a new tunnel of IPv4 in IPv6 6 2 20 IPSec Choose Network Setting IPSec and the following page appears In this page you can add or remove the IPSec tunnel connectio...

Page 89: ...on name tunnel mode and remote IPSec gateway address If you need to configure the advanced settings of this IPSec tunnel connection please click the Show Advanced Settings button to display the other...

Page 90: ...is page please set the following parameters Certificate name Set the certificate name Common Name The common name is the fully qualified domain name or FQDN used for DNS lookups of your server for exa...

Page 91: ...ull name of the state or province Country Region Name This is the two letter ISO abbreviation for your country for example GB for the United Kingdom After finishing setting click the Apply button to a...

Page 92: ...age paste the signed certificate and then click the Apply button A new certificate is created Importing an Existing Local Certificate To import an existing certificate click the Import Certificate but...

Page 93: ...y Router 85 In this page paste the certificate and the private key Finally click the Apply button to import the certificate Trusted CA Choose Network Setting Certificate Trusted CA and the following p...

Page 94: ...his page enter the certificate name and paste the certificate content Finally click the Apply button to import the certificate 6 2 22 Power Management Choose Network Setting Power Management and the f...

Page 95: ...VDSL2 Gateway Router 87 After proper configurations click Apply to take the configurations effect...

Page 96: ...uter 88 6 2 23 Multicast Choose Network Setting Multicast and the following page appears In this page you can configure the multicast parameters After finishing setting click Apply Save to save and ap...

Page 97: ...VDSL2 Gateway Router 89 6 3 Wireless Choose Wireless and the submenus of Wireless are shown as below 6 3 1 Basic Settings Choose Wireless Basic to display the following page...

Page 98: ...proved SSID For the security reason you should change the default SSID to a unique name BSSID Display the MAC address of the wireless interface Country The name of the country with which your gateway...

Page 99: ...settings In this page It includes the wireless SSID and password You can obtain the wireless SSID and password through scanning this figure 6 3 2 Security Choose Wireless Security to display the follo...

Page 100: ...he PIN method you will need a Registrar access point wireless router to initiate the registration between a new device and an active access point wireless router Note The PBC method may also need a Re...

Page 101: ...VDSL2 Gateway Router 93...

Page 102: ...this function you can set the encryption strength current network key and network keys Encryption Strength You can set 64 bit or 128 bit key Current Network Key The current key that you use Network Ke...

Page 103: ...e Open Mode 802 1x Select SSID Select a SSID for configuring the security settings Network Authentication Select the 802 1X in the drop down list RADIUS Server IP Address Enter the IP address of the R...

Page 104: ...cimal digits For the 64 bit key you need to enter 5 ASCII characters or 10 hexadecimal digits WPA Mode Select SSID Select a SSID for configuring the security settings Network Authentication Select the...

Page 105: ...rent key The default key is 87654321 WPA Group Rekey Interval Setting the interval for renewing key WPA WAPI Encryption You may select AES or TKIP AES Select SSID Select a SSID for configuring the sec...

Page 106: ...twork RADIUS Port The port number that the RADIUS server uses The default port number is 1812 You may change it according to the server setting RADIUS Key Set the RADIUS key for accessing the RADIUS s...

Page 107: ...mode Mixed WPA2 WPA PSK The parameters description of Mixed WPA2 WPA PSK mode please refer to the WPA PSK mode 6 3 3 MAC Filter Choose Wireless MAC Filter to display the following page This page is u...

Page 108: ...ress list to access the wireless network of the wireless router Click the Add button to display the following page In this page enter the MAC address of the wireless client and then click the Apply Sa...

Page 109: ...ed features of the wireless LAN interface Usually you do not need to change the settings in this page Band You can select 2 4GHz or 5GHz Channel Fill in the appropriate channel to correspond with your...

Page 110: ...ection The 802 11n standards provide a protection method so 802 11b g and 802 11n devices can co exist in the same network without speaking at the same time Support 802 11n Client Only Only stations t...

Page 111: ...able This is a special accelerating technology for IEEE802 11g The defaule is Disabled Transmit Power Adjust the transmission range here This tool can be helpful for security purposes if you wish to l...

Page 112: ...ostics Click Diagnostics Diagnostics and the following page appears This page is used to test the connection to your local network the connection to your DSL service provider and the connection to you...

Page 113: ...PTM Click Diagnostics Fault Management and the following page appears 6 4 3 Diagnostic Tools Click Diagnostics Tools Ping This page is used to test the connection to your local network the connection...

Page 114: ...ools are shown as below 6 5 1 Maintenance Backup Choose System Tools Maintenance Backup to display the following page In this page click the Backup Settings button to save your router s settings to yo...

Page 115: ...intenance Factory Default to display the following page In this page click the Restore default settings button and then system returns to the default settings 6 5 2 System Log Choose System Tools Syst...

Page 116: ...en selecting Both the events are recorded in the local memory or sent to the specified IP address and UDP port of the remote system log server After finishing setting click the Apply Save button to sa...

Page 117: ...retrieve statistics and status from the SNMP agent in this device In this page you may enable or disable the SNMP agent and set the parameters such as the read community system name and trap manager...

Page 118: ...rovision collection and diagnostics to this device In this page you may configure the parameters such as the ACS URL ACS password and connection request user name After finishing setting click the App...

Page 119: ...ter to synchronize its time with the Internet time servers After enabling Automatically synchronize with Internet time servers the following page appears In this page set the proper time servers and t...

Page 120: ...on Passwords and the following page appears In the page you can modify the username and password of different users After finishing setting click the Apply Save button to save and apply the settings S...

Page 121: ...VDSL2 Gateway Router 113 In this page you can enable or disable the different types of services After finishing setting click the Apply Save button to save and apply the settings...

Page 122: ...Update Software button Note When software update is in progress do not shut down the router After software update completes the router automatically reboots Please make sure that the new software for...

Page 123: ...ntered 5 Q Why I fail to access the web configuration page of the DSL router A Choose Start Run from the desktop and ping 192 168 1 1 IP address of the DSL router If the DSL router is not reachable ch...

Page 124: ...ADSL Standards Annex M Standards IEEE 802 3 IEEE 802 3u IEEE 802 11b IEEE 802 11g IEEE 802 11n Wireless 2 4GHz 802 11b g n 2T2R Interface LAN 4 x 10 100Base TX Auto MDI MDI X RJ45 port WAN 1 x RJ 11...

Page 125: ...Factory default LED Indicators PWR DSL LAN1 4 WLAN WPS Security Power 12V DC 1 5A Physical and Environment Working Temperature 0 40 Working Humidity 10 90 RH non condensing Storage Temperature 40 70 S...

Page 126: ...to change without notice iBall Baton is a registered trademark of Best IT World India Pvt Ltd Other brands and product names are trademarks or registered trademarks of their respective holders No part...

Reviews: