128
8 - A
ਢਢਤਲਲਮਨਤਲ
Adapter Base for Sidewalk Canopy Installation
(optional)
Dismantling guidelines
1-
Make sure all the equipment necessary for a safe dismantlement of the installation is
on hand (slings, chains, crane or rough terrain forklift, etc.).
2-
Follow the dismantling instructions appropriate for the confi guration
leaving the last
two tie levels in place
. For dismantling instructions, refer to the
Motorized Unit
section,
starting on p. 36.
3-
Before lifting and moving the motorized unit, make sure all workers have stepped
down, and that all tools, equipment and loads have been removed from the platform.
4-
Remove all installed bridges.
5-
Using a rough terrain forklift or a crane,
support the motorized unit
. Refer to p. 131
of the
Transport, Storage and Maintenance
section for instructions on the lifting of a
motorized unit. Remove the last two tie levels.
Installation of the adapter base (cont’d)
Installation of the motorized unit on the adapter base
1-
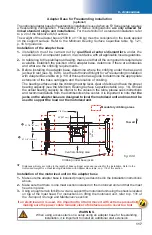
Make sure the adapter base is installed properly, as described in the installation
instructions, starting on p. 126.
2-
Add one full mast section on the motorized unit (to have a total of two full mast sections)
and put the mast head into place.
3-
Raise the motorized unit up by 2' (0,6 m).
4-
Using a rough terrain forklift or a crane, support the motorized unit using the mast head.
For instructions on lifting the motorized unit, refer to p. 131 of the
Transport, Storage
and Maintenance
section.
If an electrical unit is used, it is important to lift and move it with extreme
precaution, making sure the power cable remains clear of obstacles and is never
too taut.
If an electrical unit is used, it is important to lift and move it with extreme
precaution, making sure the power cable remains clear of obstacles and is never
too taut.
5-
Lift and carefully lower the motorized unit on top of the adapter base.
6- Continue to hold the motorized unit
and secure the base of the motorized unit to the
adapter base using plate assemblies supplied with the adapter base. Tighten the bolts to
100 lb-ft (136 N-m) of torque.
7- Still holding the motorized unit
, install
the fi rst tie level on the fi rst full mast section
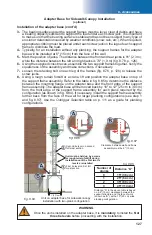
(“1” in fi g. 8.84, p. 127) to secure the mast to the face of the work.
8- Continue to hold the motorized unit
and install the second tie level on the second
full mast section (“2” in fi g. 8.84, p. 127).
9- Once the fi rst two tie levels are installed
, release the unit.
10-
Install
four
additional mast sections and install a
third tie level
at 20' (6 m)
above the
second one
(“3” in fi g. 8.84, p. 127).
11-
Proceed with the installation steps as described in the method of installation appropriate
for the confi guration. For more information about methods of installation, refer to p. 20
of the
Motorized Unit
section.
6- Still holding the motorized unit
, remove the plate assemblies holding the base of the
unit on top of the adapter base.
Make sure the lateral base extensions are in place
.
7-
Carefully lift the motorized unit off the sidewalk canopy frame and lower it the ground.
8-
Release the motorized unit.
9-
Secure the adapter base to the support frame assembly by tightening each girder clamp
assembly (fi g. 8.80, p. 126) to a torque of 108 lb-ft (146 N-m).
10-
Verify the level of the adapter base, if necessary. Adjust the level using the screw jacks
on the support frame assembly or by adding cribbing.


