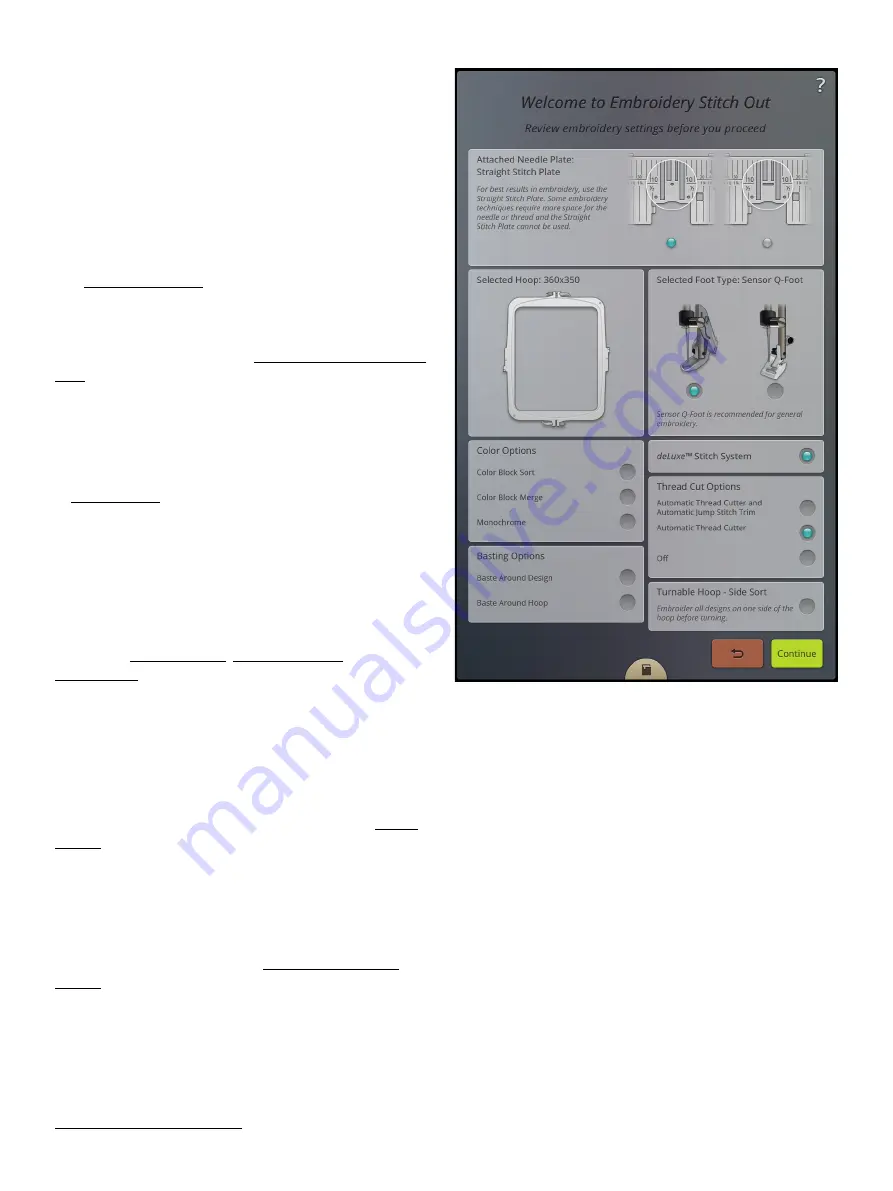
Welcome to Embroidery Stitch Out
Before you enter embroidery stitch out mode, a welcome to
embroidery stitch out window will appear. In this window
you will see an overview of your current embroidery settings.
Review your current embroidery settings to check that
everything is set as you desire.
Touch continue in the lower right corner to proceed to
embroidery stitch out. Touch return to go back to
embroidery edit.
Attached Needle Plate
The Straight Stitch Plate is generally recommended for best
results in embroidery. Your DESIGNER EPIC™ machine
senses which needle plate is attached. If the needle plate
shown is not the one you wish to use, attach your preferred
needle plate. Read about how to change to the Straight Stitch
Plate.
Selected Hoop
The currently selected hoop in embroidery edit is shown in
the window. If you want to change the hoop, touch return to
go back to embroidery edit. There you can change the hoop
in hoop selection. When you attach a hoop, the machine will
sense which hoop that is attached to confirm that the hoop
attached is the selected hoop in embroidery edit.
Color Options
Preset your embroidery with any of the three color options:
color block sort, color block merge or monochrome. You
can also set these options in embroidery stitch out. Read
more about color block sort, color block merge or
monochrome.
Note: You can set both color block sort and color block merge if desired.
Basting Options
Select basting to add a basting stitch that will secure your
fabric to your stabilizer. You can choose either baste around
design or baste around hoop or both. Basting can also be
activated in embroidery stitch out. Read more about basting
options.
Selected Embroidery Foot Type
Select which embroidery foot type you will use for the
embroidery. The Sensor Q-Foot and
deLuxe
™ stitch system
are recommended for best embroidery results. Whichever
foot type you have selected in the temporary embroidery
settings is the foot that will be shown in this window. You
can change the foot type in the window and it will change the
selected embroidery foot type in the temporary embroidery
settings.
deLuxe
™ Stitch System
Depending on which embroidery foot is selected in
temporary embroidery settings the
deLuxe
™ stitch system
135
Summary of Contents for VIKING Designer EPIC
Page 1: ...User s Guide KEEPING THE WORLD SEWING ...
Page 9: ...1 Introduction ...
Page 23: ...2 Preparations ...
Page 47: ...3 Embroidery Preparations ...
Page 52: ......
Page 53: ...4 The Multi Touch Screen ...
Page 60: ......
Page 61: ...5 WiFi mySewnet Services ...
Page 69: ...6 JoyOS advisor ...
Page 84: ......
Page 85: ...7 Sewing ...
Page 105: ...8 Embroidery ...
Page 132: ......
Page 133: ...9 Embroidery Stitch Out ...
Page 152: ......
Page 153: ...10 Program ...
Page 162: ......
Page 163: ...11 Settings ...
Page 173: ...12 File Manager ...
Page 181: ...13 Maintenance ...
Page 191: ...14 IMPORTANT 191 ...
Page 192: ......


