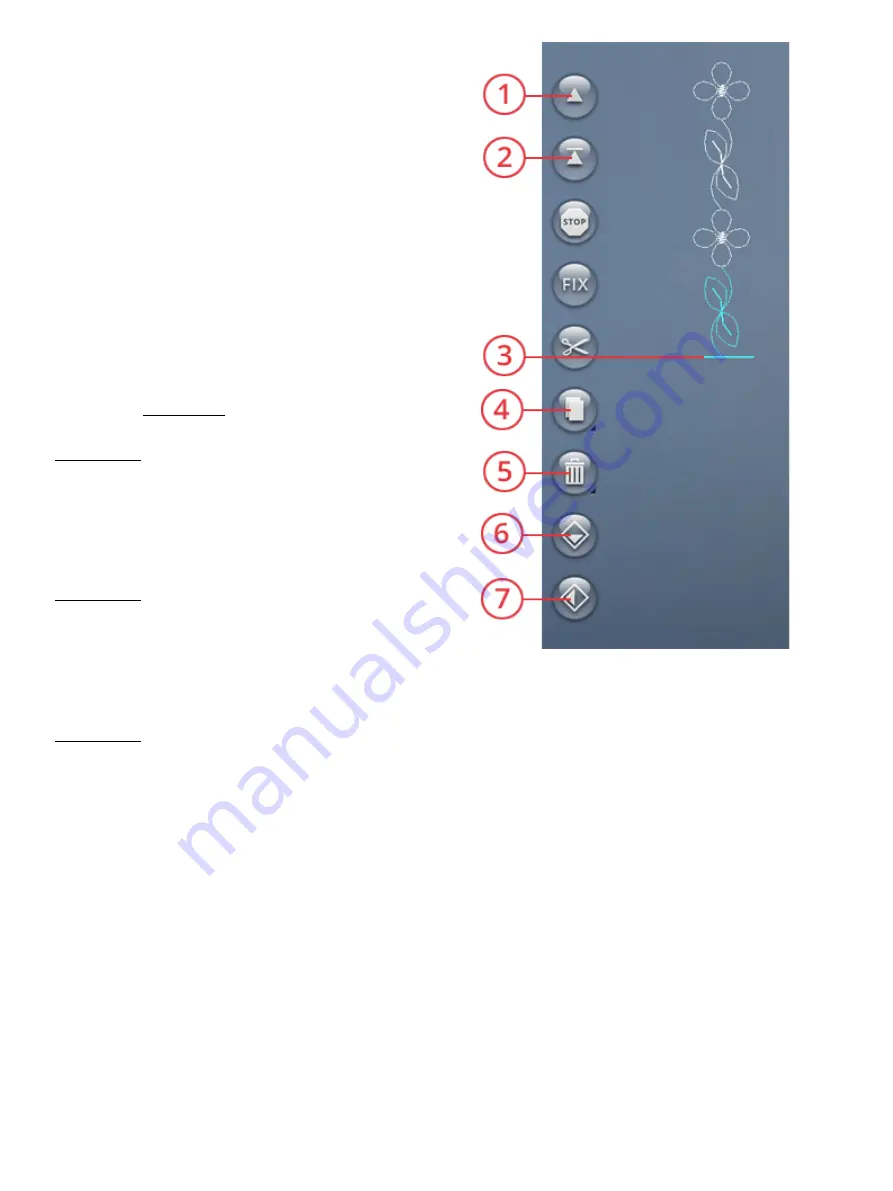
1. Step to previous stitch/go to last
2. Step to next stitch/go to first
3. Cursor
4.
Duplicate
5. Delete
6. Mirror end to end
7. Mirror side to side
Move the cursor to the point where you want to add a stitch
or letter by using the step to previous/step to next stitch
button. If the step to previous arrow has an underline you
will move the cursor to the beginning. If the step to next
arrow has an underline you will move the cursor to the end.
Touch the desired stitch in the stitch menu or in file manager
to add it at the cursor position.
Touch the font menu to open a keyboard and touch a letter
to insert it at the cursor. Change the font style by touching
another font style in the selection area. Close the keyboard at
the top right corner. If you touch the stitch menu or file
manager the keyboard will close automatically. You can open
the keyboard again by touching the keyboard button or
touching the font menu.
Adjust a Stitch or Letter
You can mirror, adjust the length, width and position or
change the density of the selected stitch, in the same way you
can adjust the stitch settings in sewing mode.
Touch & hold over the program on the screen to open the
smart toolbox. The smart toolbox will allow you to duplicate,
delete or mirror the selected stitch or letter in the program.
Delete a Stitch or Letter
If you want to delete a stitch, move the cursor to the stitch or
letter you want to delete (the selected stitch or letter will be
blue) and touch the delete button on the screen or in the
smart toolbox. Touch & hold the delete button to delete the
entire program.
Duplicate a Stitch or Letter
To duplicate a stitch, move the cursor to the stitch or letter
you want to duplicate (the selected stitch or letter will be
blue) and touch the duplicate button on the screen or in the
smart toolbox.
Note: Make your adjustments to the stitch before duplicating and the
duplicated stitch will include the adjustments.
Touch & hold to use the keypad where you can enter the
exact number of copies you want to insert.
Replace a Stitch or Letter
To replace a stitch or letter, simply select it using the scroll
arrows to select the stitch or letter you wish to replace and
touch delete. Insert the new stitch or letter and it will be
placed at the cursor.
157
Summary of Contents for VIKING Designer EPIC
Page 1: ...User s Guide KEEPING THE WORLD SEWING ...
Page 9: ...1 Introduction ...
Page 23: ...2 Preparations ...
Page 47: ...3 Embroidery Preparations ...
Page 52: ......
Page 53: ...4 The Multi Touch Screen ...
Page 60: ......
Page 61: ...5 WiFi mySewnet Services ...
Page 69: ...6 JoyOS advisor ...
Page 84: ......
Page 85: ...7 Sewing ...
Page 105: ...8 Embroidery ...
Page 132: ......
Page 133: ...9 Embroidery Stitch Out ...
Page 152: ......
Page 153: ...10 Program ...
Page 162: ......
Page 163: ...11 Settings ...
Page 173: ...12 File Manager ...
Page 181: ...13 Maintenance ...
Page 191: ...14 IMPORTANT 191 ...
Page 192: ......


