OPERATION
22
Problem
The vanes closed position needs to be adjusted.
Solution
Adjust the Vanes Closed Position
NOTE:
Fine adjustment mode timeout is 60 seconds. If there is no action
within 60 seconds, fine adjustment mode exits.
■
■
Move the shading to the current vanes closed position. See“Basic
Operation” on page 15.
■
■
On the remote, ensure that the ALL button and the group number buttons
are not selected.
■
■
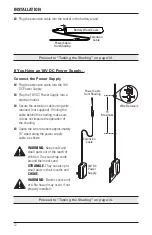
Fine Adjustment Mode — Press and hold the programming button on the
shading.
■
➤
While holding the programming button, press and release the LEFT
ARROW button on the remote.
■
■
Release the programming button. The shading will move to the vanes
closed position, if not already there, and the LED behind the programming
button will turn solid red to indicate the shading is in fine adjustment
mode.
■
■
On the remote, make sure the group number for the shading is selected
and the other group numbers are de-selected.
■
■
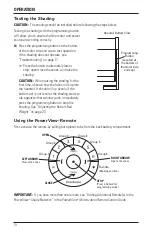
Press
OPEN or
CLOSE on the remote and the shading should move
at a slow speed.
NOTE:
If the shading does not move at a slow speed, repeat the
previous steps.
■
■
When the desired vanes closed position is reached, press the
STOP
button on the remote.
■
■
Press and hold
STOP on the remote until the indicator lights on
the remote blink (approximately 6 seconds). The remote is now in
programming mode. Ensure none of the group buttons are selected on
the remote.
■
➤
While the remote is in programming mode, press and hold the
programming button on the shading.
■
■
Press the LEFT ARROW button on the remote. The shading will move
slightly twice to indicate the new vanes closed position is set. The LED
will flash green and then turn off.
■
■
Exit programming mode on the remote. Press and hold
STOP on the
remote until the indicator lights stop blinking (approximately 6 seconds),
or let the remote time out (approximately 20 seconds).
■
■
Verify the new vanes closed position by moving the vanes.
Summary of Contents for Pirouette PowerView
Page 1: ...Installation Operation Care Pirouette Window Shadings PowerView Motorization...
Page 29: ...Notes...
Page 30: ...Notes...
Page 31: ......

