background image

2

Enter a keyword (such as "food", "scenery", or "flower").

3

Photos related to that keyword will be displayed. Touch a suggested keyword or enter

more keywords to find more results.

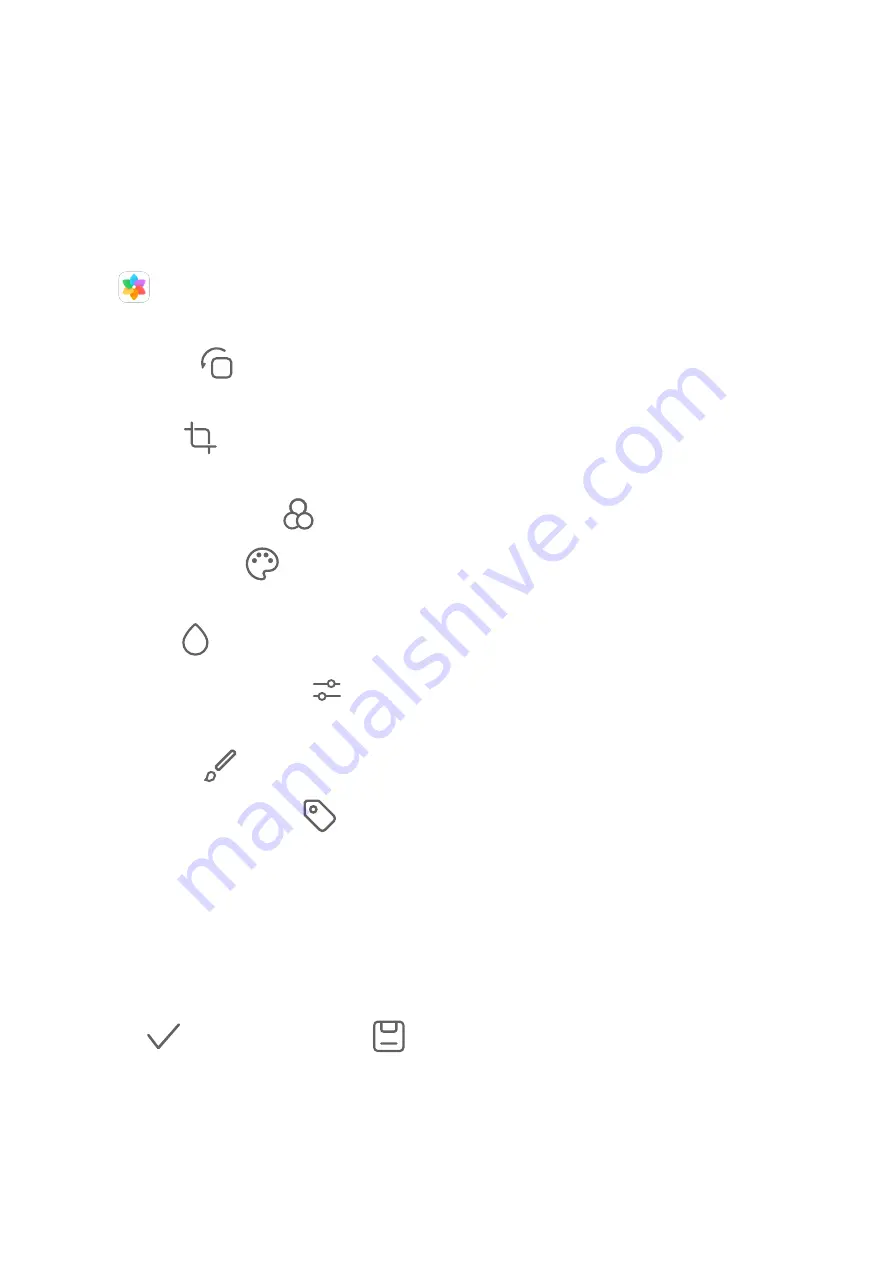
Edit Photos and Videos

Gallery offers a wide range of editing features for photos and videos.

Basic Editing

Open 

Gallery, touch the thumbnail of the photo you want to edit, then touch Edit to

access the editing features.

Rotate: Touch 

 and drag the angle wheel to the desired orientation.

You can also touch Rotate to rotate your photo 90 degrees or Mirror to flip it.

Crop: Touch 

 and drag the grid or its corners to make your selection.

You can also select a fixed ratio and drag the corners of the grid to crop the photo.

Add filter effects: Touch 

 to select a filter.

Color splash: Touch 

 to select the colors you want to highlight. Other parts of the photo

will be black and white.

Blur: Touch 

, select a blur mode, and drag the slider to adjust the blur.

Adjust photo effects: Touch 

 to adjust the brightness, contrast, saturation, and other

qualities of the photo.

Graffiti: Touch 

 to select a brush and color to add graffiti.

Add a text element: Touch 

 to select an element style and font format.

Add Stickers to Photos

1

Touch Edit > Stickers.

2

Select a type of sticker, such as TimeLocationWeather, or Mood.

3

Select a sticker and drag it to change its position. You can also edit the text of some types

of stickers.

4

Touch 

 to save your edits and 

 to save the photo.

Pixelate Photos

1

Touch Edit > Mosaic.

2

Select a mosaic style and size to censor parts of a photo.

3

To remove the mosaic, touch Eraser and wipe it off the photo.

Camera and Gallery

28

Summary of Contents for MediaPad M6

Page 1: ...User Guide MediaPad M6 ...

Page 2: ...Enter Text 9 Split screen Mode Floating Window 9 Charging 10 Smart Features AI Lens 12 HiTouch 12 Easy Projection 12 Huawei Share 14 Camera and Gallery Launch Camera 17 Take Photos 17 Master AI 18 Take Panoramic Photos 19 Light Painting 19 Take HDR Photos 20 Moving Pictures 21 Add Stickers to Photos 21 Documents Mode 22 Pro Mode 22 Record Videos 24 4K HD Videos 24 Time Lapse Photography 25 Filters...

Page 3: ...tly Used App Features 56 Tablet Manager 56 Phone Clone 59 HiSuite 59 Tips 61 Settings Search for Items in Settings 62 Wi Fi 62 Bluetooth 63 Mobile Data 64 More Connections 65 Home Screen Wallpaper 71 Display Brightness 73 Sounds Vibration 76 Notifications 77 Biometrics Password 79 Apps 80 Battery 81 Storage 82 Security 82 Privacy 85 Digital Balance 88 Accessibility Features 89 Users Accounts 90 Sy...

Page 4: ...About Tablet 96 Contents iii ...

Page 5: ...p menus In applicable third party apps swipe inward from the left or right edge near the top of the screen Three Key Navigation Go to Settings System updates System navigation and select Three key navigation Touch Settings to select the navigation key combination you prefer The icons on the navigation bar are as follows Back key to return to the previous screen exit an app or close the onscreen ke...

Page 6: ...en touch Huawei or Other Android 2 Follow the onscreen instructions to download and install Phone Clone on your old device 3 On your old device open Phone Clone and touch This is the old phone Follow the onscreen instructions to connect your old device with your new tablet by scanning a code or connecting manually 4 On your old device select the data you want to clone then touch Transfer to start ...

Page 7: ... Timeout Period Go to Settings Display brightness Sleep and select a screen timeout period Enter the Password to Unlock the Screen Once the screen is turned on swipe from any position on the screen to display the password input panel Then enter your lock screen password Use Face Unlock Lift your tablet and align it with your face Your tablet will unlock once your face is recognized Unlock Your Tab...

Page 8: ...t screen and enable HUAWEI Assistant so your tablet can provide you with smart notifications on this screen Notification and Status Icons Notification and Status Icons Network status icons may vary according to your region or network service provider Supported functions vary according to the device model Some of the following icons may not be applicable to your tablet 5G network connected 4G netwo...

Page 9: ... Do Not Disturb mode enabled Data syncing Data sync failed Performance mode enabled New emails Event reminders Digital balance enabled Shortcut Switches Shortcut Switches Turn on a Shortcut Switch Swipe down from the status bar to open the notification panel then swipe down on it again to show all shortcuts Touch a shortcut switch to enable or disable the corresponding feature Touch and hold a sho...

Page 10: ...Move or Delete a Widget Touch and hold a widget on your home screen until your tablet vibrates then drag it to the desired position or touch Remove Set Your Wallpaper Set Your Wallpaper Use a Preset Wallpaper 1 Go to Settings Home screen wallpaper Wallpaper 2 Touch an image you want to set as the wallpaper 3 Set the following according to your preferences Blur applies a blur effect which can be ad...

Page 11: ...saved to Gallery by default Record the Screen Record your screen activities in sharable videos to compose a tutorial show off your awesome gaming skills and a lot more Use a Key Combination to Start Screen Recording Press and hold the Power and Volume up buttons simultaneously to start screen recording To stop recording press and hold both buttons again Use a Shortcut to Start Screen Recording 1 S...

Page 12: ...ttom of the notification panel to clear all notifications Block Silence or Delay Notifications Swipe left on a notification then touch to block silence or delay notifications from that source Some system notifications can t be blocked cleared or delayed Adjust Sound Settings Adjust Sound Settings Press a Volume Button to Adjust the Volume Press the Volume up or down button to adjust the volume Pre...

Page 13: ...Open an app 2 Enable split screen mode using any of the following methods Swipe up from the middle of the screen with three fingers When using gesture navigation swipe up from the bottom of the screen and hold to enter the Recent tasks screen Then touch When using three key navigation touch and hold the key 3 Open the other app to start multitasking Adjust the Size of the Split screen Panes Drag i...

Page 14: ... limited number of charge cycles When the battery life becomes noticeably shorter go to an authorized Huawei Customer Service Center to replace the battery Do not cover your tablet or charger during charging Your tablet may heat up when you have been using it for an extended period of time especially in high temperatures In this case stop charging disable some features and move your tablet to a co...

Page 15: ...technology that allows a tablet to directly access files on a USB flash drive or digital camera or connect to an external device such as a keyboard or mouse with the help of an OTG cable You can use your tablet to charge other devices using an OTG cable 1 Connect your tablet with the device to be charged using an OTG cable 2 When the Use USB to dialog box is displayed on your tablet touch Reverse ...

Page 16: ... Convenient Shopping When you see an item you wish to buy on your tablet screen touch and hold it with two fingers to search for it online and touch the displayed links to view more details 1 Go to Settings Accessibility features HiTouch then enable HiTouch 2 Touch and hold the item you wish to purchase with two fingers spread slightly apart 3 After the subject is identified links to the item on d...

Page 17: ...le a TV using a wired connection It is recommended that you purchase the accessories recommended or specified by Huawei from authorized sources Projection Using a Type C Cable 1 Prepare a Type C cable Use a Type C to HDMI Type C to DP or Type C to MiniDP cable depending on your external display 2 Connect the Type C end to your tablet and the other end to the external display 3 On the external disp...

Page 18: ...ename or delete files Quick search Search for documents multimedia files and apps using the start menu search box Create app shortcuts From the start menu touch and hold an app and then drag it to the desktop to create a shortcut You can also right click an app icon and select the option to create an app shortcut on the desktop Audio output Touch the audio output icon in the status bar then select...

Page 19: ...ouch Huawei Share then touch the icon of the recipient device to send the file Operations may vary if you are sharing files from apps directly 3 On the recipient device touch Accept to accept the transfer To view the files received go to Files then go to Internal storage Huawei Share on the Categories tab Received pictures or videos can also be found in Gallery Albums Huawei Share Share Files Betw...

Page 20: ...the type of printer ensure the following Wi Fi capable printers The printer must be powered on and connected to the same network as your tablet Wi Fi Direct capable printers The printer must be powered on and have Wi Fi Direct enabled Bluetooth capable printers The printer must be powered on and discoverable 2 On your tablet preview the file to be printed then go to Share Huawei Share 3 Once the p...

Page 21: ... touch and hold the viewfinder and drag the individual ring or frame to the desired location Adjust brightness Touch the viewfinder When the symbol appears next to the focus frame drag it up or down Zoom in or out On the viewfinder pinch or spread two fingers or drag the zoom slider Select a camera mode Swipe left or right across the camera mode options Turn the flash on or off Touch and select Au...

Page 22: ...era timer allows you to set a time delay so you can get into position after you have touched the shutter button 1 Open Camera 2 Go to Timer and select a delay option 3 Return to the viewfinder and touch the shutter button Your tablet will take a photo when the countdown ends Use Voice Commands to Take Photos You can use your voice to take photos without having to touch the shutter button 1 Open Ca...

Page 23: ...g point then touch to start shooting 4 Slowly move the camera in the direction of the arrow displayed on the screen Keep your tablet steady and the arrow on the center line the entire time 5 Touch when you are finished Light Painting Light Painting Light painting helps you capture light trails by allowing the shutter to stay open for a longer time No manual aperture and shutter adjustment is invol...

Page 24: ...oth photographs of waterfalls and rivers 1 Go to Camera More Light painting Silky water 2 This feature works best when taking photos of a stream or waterfall where the water is flowing heavily 3 Touch to start shooting Observe the shot in the viewfinder When the exposure is just right touch to finish shooting Capture the Beauty of the Stars in Star Trails Mode Star trails mode lets you use your ca...

Page 25: ...ving picture will automatically stop after a complete playback You can also touch the screen to stop the playback Share Moving Pictures Go to Gallery Albums Camera touch and hold to select the moving picture you want to share then touch to share it Moving pictures can be shared through Wi Fi Direct Bluetooth Huawei Share and more In order to play the moving picture effect the receiving device must...

Page 26: ...e document you want to shoot in the viewfinder such as a presentation slide on a projector or a street poster Then touch 3 The camera then automatically identifies the text area within the viewfinder and unskews the image Adjust the Text Area If you find the skew correction provided by Documents mode unsatisfactory you can also manually adjust the text area This is only available for photos taken ...

Page 27: ...noise Adjust the shutter speed Touch S and drag the slider When you are shooting static scenes or portraits it is recommended that you lower the shutter speed When you are shooting moving scenes it is recommended that you increase the shutter speed Adjust EV exposure compensation Touch EV and drag the slider Increase the EV value in low light conditions and lower the value in well lit environments...

Page 28: ... Gallery RAW format pictures take up more storage space than standard format pictures Make sure that your tablet has sufficient storage space 3 Touch the shutter button to shoot a photo or video Record Videos Record Videos 1 Open Camera and select Video mode 2 Adjust the following settings Zoom in or out On the viewfinder pinch or spread two fingers or drag the zoom slider Focus Touch where you wa...

Page 29: ...ure the beauty of change blooming flowers drifting clouds and more 1 Go to Camera More then touch Time lapse 2 Place your tablet in position To reduce camera shake use a tripod to steady your tablet 3 Touch to start recording Touch to end the recording The recorded video is automatically saved to Gallery Filters Filters 1 Open Camera and select Photo or Video mode 2 Touch or and select a filter So...

Page 30: ...eted To ensure that the camera runs correctly pre installed camera modes cannot be deleted Adjust Camera Settings Adjust Camera Settings Adjust the Camera Resolution 1 Open Camera and touch to access the Settings screen 2 Touch Resolution and select a resolution This feature is not available in some modes Enable Location Tag Enable Location tag to tag your location in photos and videos Swipe up on...

Page 31: ...amera album Screenshots and screen recordings are saved in the Screenshots album View by Category Gallery intelligently sorts photos into categories allowing you to quickly sift through large albums by category Touch a category album on the Discover tab such as food portrait or scenery to view photos in that album View Details About Photos and Videos 1 Touch a photo or video to view it in Full scr...

Page 32: ...er effects Touch to select a filter Color splash Touch to select the colors you want to highlight Other parts of the photo will be black and white Blur Touch select a blur mode and drag the slider to adjust the blur Adjust photo effects Touch to adjust the brightness contrast saturation and other qualities of the photo Graffiti Touch to select a brush and color to add graffiti Add a text element T...

Page 33: ...will also take up more storage space 3 When you are finished touch to export the video The exported video will be saved alongside the original video in its original album Share Photos and Videos You can share photos and videos from Gallery in multiple ways 1 Open Gallery 2 Use either of the following methods Share a single photo or video Touch the photo or video then touch Share multiple photos or...

Page 34: ...deleted album then go to Delete Recover Deleted Photos and Videos In the Recently deleted album touch and hold to select the items you want to recover then touch to restore them to their original albums If the original album has been deleted a new one will be created Add Photos and Videos to Favorites Open a photo or video then touch The item will appear in both its original album and the My favor...

Page 35: ...atically create People albums of individuals or groups by identifying faces in your photos This will happen when your tablet is charging and the screen is off You can name your People albums and set the relationship of individuals with you Group photo albums require a specific number of photos that contain 2 to 10 faces that have already been named in People albums 1 Go to Gallery Discover and vie...

Page 36: ...l touch the video to select a preset template at the bottom of the screen 2 Touch at the top of the screen to customize the background music filter intro and outro and more Then touch to save the video 3 When you are finished touch to export the video Share Huawei Vlogs 1 Go to Gallery Albums Video Editor where you will find all your exported videos 2 Touch and hold to select the videos you want t...

Page 37: ...eos based on time location and theme information and even generates a short video clip so you can instantly relive the good times To start using Highlights go to Camera and enable Location tag Highlights albums are created automatically when your tablet is charging the screen is turned off and the battery is at least 50 charged This process may take some time Highlights albums will not be created ...

Page 38: ...ghlights tab touch an album 2 You can then Add photos or videos Touch select the items you want to add then touch Remove photos or videos Touch and hold to select photos or videos you want to remove touch then touch Move Rename Highlights Albums 1 On the Highlights tab touch an album 2 Go to Rename and enter a new name Delete Highlights Albums 1 On the Highlights tab touch an album 2 Go to Delete ...

Page 39: ... uninstalled as uninstalling them may cause system errors Manage Background Apps 1 Access the recent tasks screen using either of the following methods depending on the navigation method you are using Gestures Swipe up from the bottom of the screen and hold Three key navigation Touch 2 On the recent tasks screen you can Swipe across to view app previews Touch an app preview to access an app Swipe ...

Page 40: ...ooth Import via Wi Fi Direct or Import from storage then follow the onscreen instructions to import contacts Scan Business Cards to Add Contacts 1 On the Contacts screen go to Scan or go to Business cards Scan 2 Place a business card on a flat surface adjust the camera so that the contents on the business card are clearly displayed in the viewfinder then touch to capture a single or multiple busin...

Page 41: ...reen go to Settings Import Export 2 Touch Export to storage and follow the onscreen instructions to export contacts The exported vcf files are saved in the root directory of your device s internal storage by default You can open Files to view the exported files in the internal storage Delete Contacts Delete contacts using either of the following methods Touch and hold the entry you want to delete ...

Page 42: ...Contact Groups On the Groups screen touch and hold the group to be deleted then touch Delete Create Personal Information You can create a business card containing your personal information to share with others You can also add personal emergency information so you can call for help quickly in an emergency Create a Personal Business Card 1 Open Phone select the Contacts tab at the bottom of the scr...

Page 43: ...ssigned number key Go to Phone Settings Speed dial select a number key then set a contact for this speed dial number Press the Power Button to End a Call During a call press the Power button to end the call Go to Phone Settings and enable Power button ends call Set a Contact Profile Picture for Calls You can set profile pictures for your contacts to be shown on the screen during incoming and outgo...

Page 44: ...isplayed in red in the call log list for you to quickly identify them on the All screen 2 Touch next to a call log to call back or send a message Delete Call Logs Delete call logs using either of the following methods On the Phone screen touch and hold a call log then touch Delete entry On the Phone screen go to Delete entries Select multiple call logs then touch to delete them Set a Ringtone for ...

Page 45: ...eive a call when the screen is unlocked Touch to answer the call Touch to reject the call Touch to reject the call and reply with an SMS message Touch to set a callback reminder Answer a New Incoming Call During a Call 1 When you receive an incoming call when you are already engaged in a previous call touch to answer it 2 Touch or touch a held call in the call list to switch between the two calls ...

Page 46: ...rules Block Incoming Calls from Specific Numbers You can block incoming calls from specific numbers using either of the following methods Go to Phone Blocked Blocklist touch then add the phone numbers you want to block On the Phone screen touch the Contacts tab at the bottom touch the contact you want to block then go to Block contact Set Whether to Receive Notifications for Blocked Calls Go to Ph...

Page 47: ... your local emergency number and touch to call the number Alternatively touch Emergency information and select an emergency contact to call Make Operations During a Call Voice calls are not supported on Wi Fi only tablets During a call an in call menu will be displayed Touch to enable hands free mode Touch to start another call only available once three way calling has been activated This feature ...

Page 48: ...draft message Cancel Sending a Message On the Messaging screen go to Settings Advanced and enable Recall messages Within six seconds after the message is sent you can double touch the message to cancel sending it View and Reply to Messages 1 On the Messaging screen select a contact to view your conversation with them 2 To reply to a message enter your message content in the text box then touch New...

Page 49: ...add the numbers you want to block SMS and MMS messages sent by these numbers will all be blocked Block Messages Containing Specific Keywords 1 Go to Messaging Blocked Keyword blocklist 2 Touch and add the keywords to be filtered All messages containing these keywords will be blocked Set Whether to Receive Notifications for Blocked Messages Go to Messaging Blocked Receive notifications and set whet...

Page 50: ...d you prefer Delete Events You can delete events using the following methods On the Calendar screen then touch the event to be deleted and touch Touch Schedule touch and hold an event select the events you want to delete then touch Set a Calendar Notification Set the calendar notification type according to your requirements You can set status bar notifications banner notifications sound notificati...

Page 51: ...nd your tablet will automatically download holiday information for that country region and display it in the Calendar Clock Alarm You can set alarms to play a sound or vibrate at specific times Set an Alarm 1 Go to Clock Alarm touch and set a time 2 Select a sound for the alarm The sound will play when you select it You can press the Volume buttons to adjust its volume 3 Set the following options ...

Page 52: ...ocal time in different time zones around the world Go to Clock World clock touch and enter the name of a city or select one from the list of cities Notepad Create Notes You can create notes to record your thoughts and inspirations 1 Go to Notepad Notes then touch 2 Enter the title and content of the note 3 Touch to insert a picture into the note as needed Touch and hold the picture then drag it to...

Page 53: ...eft on an item touch then select a tag Touch and hold a note or to do select or drag over the check boxes of the notes or to dos you want to categorize under the same tag then touch to select a tag Share Notepad Items You can share your Notepad items as text files or images On the All notes or All to dos screen touch the item to be shared touch then follow the onscreen instructions to share it Del...

Page 54: ...Touch to skip the muted parts Touch to adjust the playback speed Touch to add a tag Touch a tag to rename it Edit a Recording 1 On the Recorder home screen touch a recording 2 Touch to display the waveform of the recording 3 Drag the start and end bars to adjust the clip length Pinch your fingers on the waveform to zoom in or out to adjust the clip length more precisely 4 Touch and select Keep sel...

Page 55: ...ct Exchange 3 Enter the email address username and password 4 Touch Manual setup On the Account setup screen set parameters such as the email domain name server address port number and security type 5 Touch Next then follow the onscreen instructions to complete the configuration The system will automatically connect to the server and check the server settings Send Emails Select an email account an...

Page 56: ...ou want to set encryption for touch Email encryption then enable Encrypt outgoing emails 4 If the certificate has been installed select Encryption certificate and set Encryption algorithm according to your preferences If no certificate has been installed enable Send encrypted emails without installing certificates Set Automatic Replies for an Exchange Account 1 Go to Email Settings 2 Select the Ex...

Page 57: ...ion screen select an existing group then touch to save the contact in the group Alternatively touch Create group enter the group name then touch Save Once you have created a group you can select the group from the recipient drop down list to send emails to group members Sync Emails After automatic email syncing is enabled the emails on your tablet will be automatically synced with those on the ema...

Page 58: ... Remove account Manage VIP Contacts Important email contacts can be added as VIP contacts Emails from VIP contacts will be automatically stored in the VIP inbox Add a VIP Contact You can add VIP contacts using either of the following methods Go to Email Settings VIP contacts On the VIP list screen go to Add Create or touch Add from contacts then follow the onscreen instructions Open an email touch...

Page 59: ...button Clear the display Touch the Clear C button Flashlight Flashlight You can turn on the flashlight using either of the following methods Swipe down from the status bar to open the notification panel and touch to turn on the flashlight Touch the icon again to turn off the flashlight Swipe up from the bottom of the lock screen to display the shortcut panel and touch to turn on the flashlight Tou...

Page 60: ...certain apps from app icons on the home screen and even add shortcuts for these features to the home screen Quickly Access Frequently Used App Features Touch and hold an app icon until a pop up menu is displayed Then touch a frequently used feature to access it For example touch and hold the icon then touch a shooting mode from the pop up menu to access it If no pop up menu is displayed after you ...

Page 61: ...mission of an App On the Data usage screen touch Network access then change the settings for apps that consume a large amount of data such as video streaming apps so they can only be used when you are connected to a Wi Fi network Enable or Disable Smart Data Saver Enable Smart Data Saver to prevent apps from using mobile data in the background 1 On the Data usage screen touch Smart Data Saver then...

Page 62: ...ck sales fraud and other kinds of spam messages Block Spam Messages Go to Messaging Blocked and set block rules You can also go to Tablet Manager Blocked to set block rules Block Messages from Specific Numbers 1 Go to Messaging Blocked Blocklist 2 Touch and add the numbers you want to block SMS and MMS messages sent by these numbers will all be blocked Block Messages Containing Specific Keywords 1...

Page 63: ...llow the onscreen instructions to connect your old device with your new tablet by scanning a code or connecting manually 4 On your old device select the data you want to clone then touch Transfer to start cloning Phone Clone is only available on tablets running Android 4 4 or later Clone Data from an iPhone or iPad 1 On your new tablet open Phone Clone in the Tools folder by default Alternatively ...

Page 64: ...ackup Restore Data 1 On the home page of HiSuite click Restore 2 Click Backup Files select the items you want to restore to your tablet then click Restore 3 If you have set a password for the backup data on your tablet you will need to enter the password and click OK 4 HiSuite will then restore the items you have selected Keep the USB cable connected throughout the backup process 5 Click Done when...

Page 65: ...o read cards with a short clip or image to quickly get to grips with all the most useful features on your tablet The cards are categorized so you can jump directly to a category you are interested in Recommended features The Recommended section is packed with featured articles and posters arranged by usage scenario to help acquaint you with the more popular features User guides Find detailed instr...

Page 66: ...id security risks and financial losses resulting from the leakage of your personal data 1 Go to Settings Wi Fi and enable Wi Fi 2 Connect to a Wi Fi network on the Wi Fi screen using either of the following methods Select a Wi Fi network to connect to under Available networks A password is required for encrypted networks To manually add a Wi Fi network scroll down to the bottom of the screen touch...

Page 67: ...ice name enter a name then touch OK Pair with a Bluetooth Device 1 Enable Bluetooth on the target device and set it to discoverable For detailed instructions refer to the device s user guide 2 From your tablet access the Bluetooth settings screen and enable Bluetooth to have your tablet automatically search for nearby Bluetooth devices 3 From the list of Available devices select the one you want t...

Page 68: ...twork Mobile data and enable Mobile data To conserve battery power and reduce data usage disable the mobile data service when you don t need it Personal Hotspot Data services are not supported on Wi Fi only tablets Once Personal hotspot has been enabled you can share your mobile data or the Wi Fi network your tablet is currently connected to with other devices Share Your Network Connection via Blu...

Page 69: ... connected to a Wi Fi network Enable or Disable Smart Data Saver Enable Smart Data Saver to prevent apps from using mobile data in the background 1 On the Data usage screen touch Smart Data Saver then enable it The icon will then display in the status bar 2 If you want to allow unrestricted access to data for some apps even when they are running in the background toggle on the switches for these a...

Page 70: ...t use a wireless HDMI adapter to connect your tablet and external display Ensure that the wireless HDMI adapter is connected to a power supply To check whether your external display supports Miracast and how to enable wireless projection on it consult the user guide or customer service of the external display manufacturer 2 Swipe down from the status bar to open the notification panel then touch t...

Page 71: ...uetooth to discover nearby devices and uses Wi Fi Direct to transfer files without using mobile data Enable or Disable Huawei Share You can enable or disable Huawei Share in either of the following ways Swipe down from the status bar to open the notification panel then touch to enable or disable Huawei Share Touch and hold the switch to enter the Huawei Share settings screen Go to Settings More co...

Page 72: ... earlier 6 Open a folder of your tablet such as the Internal storage folder then view edit or copy files from the folder to the computer or copy files from the computer to this folder to store them in your tablet You can also edit the files in this folder on your computer and the changes will be synced to your tablet automatically Similarly if you edit any files on your tablet the changes will be ...

Page 73: ...a Using a USB Cable 1 Use a USB cable to connect your tablet to the computer After the driver program is automatically installed a drive named for your tablet will display on the computer 2 Select an appropriate USB connection mode on your tablet to transfer data Select Transfer photos in the new drive displayed on the computer to view and copy photos from your tablet to the computer You can also ...

Page 74: ...pot then follow the onscreen instructions to complete the settings 3 Go to Settings More connections Printing Default Print Service and enable Default Print Service 4 Select the printer from the search results and follow the onscreen instructions to add the printer Print Files To print files in Gallery and Notepad do the following Print an image Open Gallery Open the image you want to print go to ...

Page 75: ...e server type to L2TP IPSec PSK then enter the server address L2TP key IPsec identifier and IPsec pre shared key 3 If the VPN server does not have a DNS address touch Show advanced options and enter the DNS domain DNS server address and forwarding route 4 Touch Save 5 Touch the VPN you have just set up enter your VPN username and password then touch Connect Home Screen Wallpaper Manage the Home Sc...

Page 76: ...the home screen to access the Home screen editor 2 Touch and hold the screen page you wish to relocate then drag it to the desired position App Drawer You can put your apps in a drawer and display only frequently used apps on your home screen to streamline your home screen Enable App Drawer Go to Settings Home screen wallpaper Home screen style and select Drawer Once enabled you can swipe up on th...

Page 77: ...ess In the section drag the slider to adjust the screen brightness Adjust the Color Mode Go to Settings Display brightness Color Eye Comfort Color mode temperature and select the color mode that you prefer Normal mode will be easier on your eyes and is therefore recommended Normal natural color tones Vivid vivid color tones Adjust the Color Temperature Go to Settings Display brightness Color Eye C...

Page 78: ... to access the Eye Comfort settings screen Go to Settings Display brightness Color Eye Comfort Eye Comfort and enable or disable Enable Once Eye Comfort is enabled will be displayed in the status bar and the screen will take on a yellow tint as a result of emitting less blue light Set a Schedule for Eye Comfort Mode Go to Settings Display brightness Color Eye Comfort Eye Comfort enable Scheduled t...

Page 79: ... enable or disable this feature Automatically Switch Between Portrait and Landscape Orientation Your tablet is able to automatically switch your screen display orientation with the help of the built in Swing Gesture Sensor to detect your face orientation and gravity sensor For example When you need to switch your tablet between portrait and landscape orientation when it is placed on a surface just...

Page 80: ... to Phone Settings Ringtone or Settings Sounds vibration Tablet ringtone 2 Select a system ringtone or touch Music on device to select a local song as the ringtone Set a Ringtone for a Contact 1 Open Phone touch the Contacts tab at the bottom of the screen then select the contact you want to set a ringtone for 2 On the contact details screen touch Ringtone and select a ringtone Set the SMS Notific...

Page 81: ...y Atmos and select an option Dolby Atmos will be enabled when the speaker is enabled on your tablet Notifications App Badges When new notifications arrive for an app a badge will appear on the app icon By default a numbered badge is displayed You can also set a dot as the badge or hide the badge for some or all apps Turn Off App Badges 1 Go to Settings Notifications and touch App icon badges 2 Tur...

Page 82: ...uch the app which you want to disable notifications for then disable Allow notifications Touch Manage all then turn off the switches for multiple apps which you want to disable notifications for Disable App Notifications in Settings 1 Go to Settings Apps Apps and search for the app which you want to disable notifications for 2 Touch the app icon then touch Notifications and disable Allow notificat...

Page 83: ... completed touch OK You can now place your finger on the fingerprint sensor to unlock the screen Rename or Delete a Fingerprint 1 Go to Settings Biometrics password Fingerprint ID and enter your lock screen password 2 In the Fingerprint list section touch an enrolled fingerprint to rename or delete it Identify a Fingerprint Fingerprint identification allows you to match your fingers with the enrol...

Page 84: ... and touch Lock screen password 2 Enter a password containing 6 digits 3 Alternatively touch Change unlock method and select a password type then follow the onscreen instructions to input a new password Change the Lock Screen Password 1 On the Biometrics password screen go to Change lock screen password 2 Enter the original lock screen password 3 Enter a new password or touch Change unlock method ...

Page 85: ...ower Management On the Battery screen you can check the estimated battery time remaining and enable a power saving mode to extend the battery life of your tablet Optimize Tablet Power Settings Go to Settings Battery or Tablet Manager and touch Optimize battery usage Your tablet will automatically analyze the current power consumption issues optimize certain settings and recommend other setting opt...

Page 86: ... feel necessary Cleanup You can use Cleanup in Tablet Manager to scan for redundant or large files such as app residue unwanted installation packages WeChat data and more Once detected you can choose whether or not to delete files as suggested 1 Open Tablet Manager then touch Cleanup 2 When the scan is complete touch Cleanup after each item and delete any files you don t need Clean Up Duplicate Fi...

Page 87: ...d Vault ACCOUNTS to view or delete the stored usernames and passwords Disable Password Vault Password Vault is enabled by default but can be disabled if required Go to Settings Security Password Vault and disable Password Vault App Lock You can lock apps containing private data such as chat and payment apps to prevent unauthorized access Enable App Lock Go to Settings Security App Lock Enable set ...

Page 88: ...ABLE This will cancel all locks and clear all App Lock settings Smart Unlock Smart Unlock enables you to unlock your tablet with a Bluetooth device like a smart band When a compatible Bluetooth device is detected you can unlock your tablet with a simple swipe 1 Go to Settings Biometrics password Smart Unlock 2 Touch Step 1 Set an unlock method and follow the onscreen instructions to set the lock s...

Page 89: ...xample if a map app obtains the Location permission it can provide you with location and navigation services You can disable the permission if you do not need these services 1 Go to Settings Apps Permissions 2 On the Permissions screen enter Location touch the app you want to manage and select an option Manage Permissions to Access Other Private Data You can also manage permissions to access your ...

Page 90: ...ding granting one time or permanent access or denying access to location information during use of the app 1 Go to Settings Privacy Permissions touch Location and check which apps have been granted access to location information 2 Touch the app you want to change settings for and follow the onscreen instructions to grant or deny permissions PrivateSpace Create a PrivateSpace that is completely ind...

Page 91: ...allery Albums SharedVideos to view photos and videos Reset Password for PrivateSpace You can set a security question when creating the password for PrivateSpace which will help you to reset the password if you happen to forget it 1 In PrivateSpace go to Settings Privacy PrivateSpace then touch Password protection 2 Follow the onscreen instructions to complete the verification select and answer the...

Page 92: ...blet Fine tune your tablet usage habits by setting a daily screen time limit individual app time limit and away time 1 Go to Settings Digital balance and touch START 2 Select Me and touch OK 3 Now you can Touch Screen time and set your daily screen time limit for your tablet Touch App limits select an app for which you need to set a usage limit and set a time limit Go to Away time Add and schedule...

Page 93: ...et The Enter Digital balance PIN will be required when extending the screen time limit or making changes to the screen time management settings To disable Digital balance go to its home screen and touch Disable Digital balance Accessibility Features Accessibility Screen reader apps are designed to assist visually impaired users to use a tablet Enable Color Correction to Customize the Screen Color ...

Page 94: ...elay Touch hold delay allows you to adjust the time the screen takes to respond when you touch and hold something On the Accessibility screen touch Touch hold delay then select a delay option according to your preferences Scheduled Power On Off Use the Scheduled power on off feature to power your tablet on and off at set times to save power and prevent interruptions while resting 1 Go to Settings ...

Page 95: ...then follow the onscreen instructions to add an account 2 Touch Switch to switch to the user or guest account Configure the settings for the new account as prompted 3 Install apps as needed Note that if a newer version of an app has been installed by another user the app installation will fail A maximum of three user and one guest accounts can be added Authorize a User or Guest Account to Make Cal...

Page 96: ...ts of the country region you have selected Input Method You can download a third party input method and set it as the default input method 1 Download the input method from an official app market 2 Follow the onscreen instructions to set it as the default input method or go to Settings System updates Language input Default keyboard and select the input method Date and Time Your tablet is able to sy...

Page 97: ...s to download and install Phone Clone on your old device 3 On your old device open Phone Clone and touch This is the old phone Follow the onscreen instructions to connect your old device with your new tablet by scanning a code or connecting manually 4 On your old device select the data you want to clone then follow the onscreen instructions to complete the data cloning Phone Clone is only availabl...

Page 98: ...ur tablet touch Shared folder 2 On your tablet scan for available NAS devices using your Wi Fi network then touch an applicable one to access and add its shared folders 3 Touch BACK UP select the data you want to back up then touch Back up 4 Follow the onscreen instructions to set the password and password hint The data will be encrypted and backed up The password will be required if you want to r...

Page 99: ...l prompt you to download and install the update package Before updating make sure your tablet is running an official system version Otherwise the update may fail and your tablet may experience unknown issues Back up your user data before the update After an update third party apps that aren t compatible with the new system version may become unavailable In some cases it may take some time for a co...

Page 100: ...ies Co Ltd 2019 All rights reserved No part of this manual may be reproduced or transmitted in any form or by any means without prior written consent of Huawei Technologies Co Ltd and its affiliates Huawei The product described in this manual may include copyrighted software of Huawei and possible licensors Customers shall not in any manner reproduce distribute modify decompile disassemble decrypt...

Page 101: ...een layout may vary All statements information and recommendations in this guide do not constitute a warranty of any kind express or implied Please visit http consumer huawei com en support hotline for recent updated hotline and email address in your country or region Model SCM AL09 SCM W09 EMUI 10 0_01 ...

Reviews: