background image

Getting Started  15

1.2  Installing the Battery

1. 

Slide the back cover to release it.

2. 

Insert the battery by aligning the exposed copper part of the battery pack with the protruding copper 

conductor.

3. 

Gently push the battery into place. 

4. 

Replace the back cover.

1.3  Installing a microSD Card

You can install a microSD (Secure Digital) card in your phone to have an alternative storage place for your 

images, video, music, and other phone data.

1. 

Pry open the rubber/fiber cover of the microSD slot on the side of the phone.

2. 

Insert the microSD card into the slot with its gold contacts facing up. 

To remove, press the microSD card to pop it out of the slot.

Note

   A microSD card is not included in the box.

1.4  Turning Your Phone On and Off

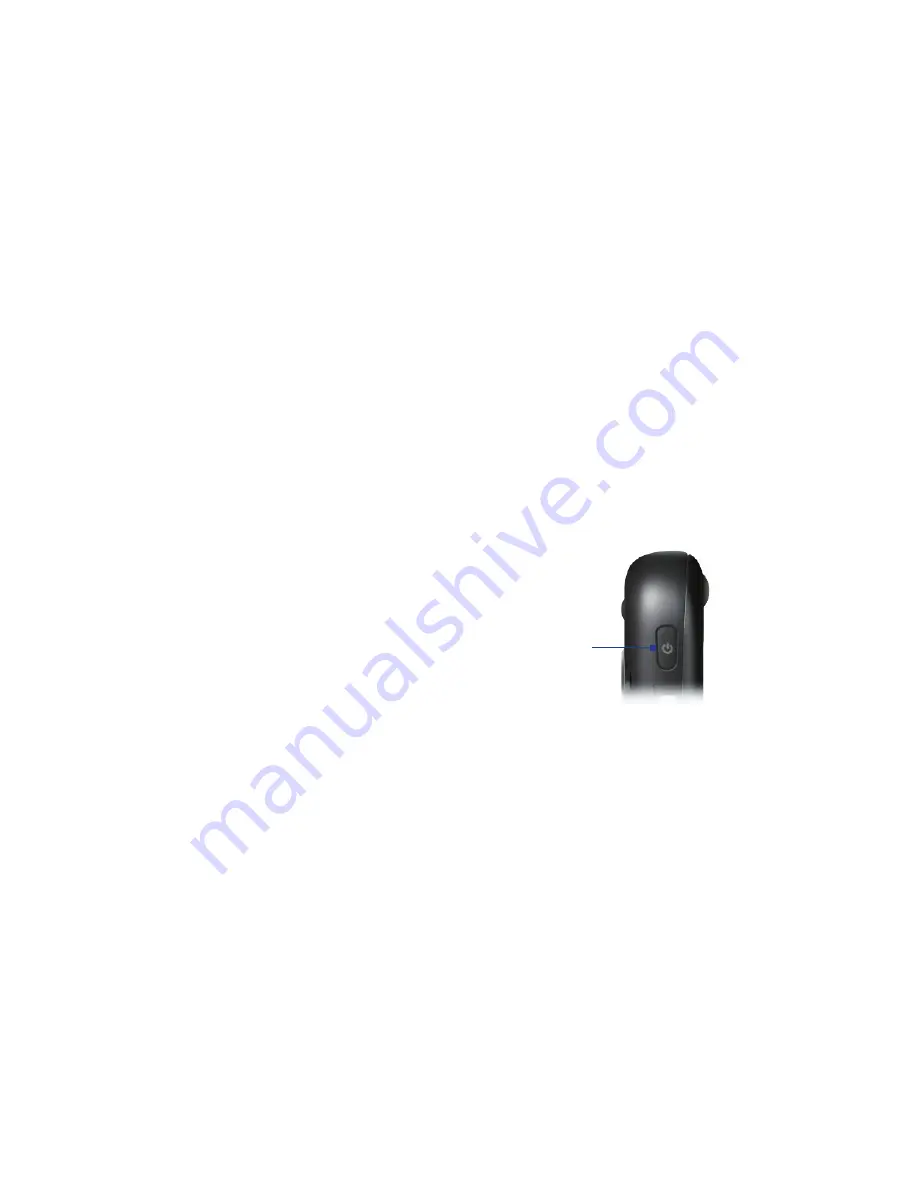
Press and hold the POWER button for about 3 seconds to 

turn the phone on or off.

POWER Button

Summary of Contents for IRIS100

Page 1: ...Smar User Manual ...

Page 2: ... trademarks or registered trademarks of Sun Microsystems Inc in the United States and other countries Copyright 2007 Adobe Systems Incorporated Copyright 2007 Macromedia Netherlands B V Macromedia Flash Macromedia Flash Macromedia Flash Lite and Reader are trademarks and or registered trademarks of Macromedia Netherlands B V or Adobe Systems Incorporated Copyright 2007 JATAAYU SOFTWARE P LTD All R...

Page 3: ...l errors or omissions contained herein nor for incidental or consequential damages resulting from furnishing this material The information is provided as is without warranty of any kind and is subject to change without notice HTC also reserves the right to revise the content of this document at any time without prior notice No part of this document may be reproduced or transmitted in any form or b...

Page 4: ...Use the correct external power source A product should be operated only from the type of power source indicated on the electrical ratings label If you are not sure of the type of power source required consult your authorized service provider or local power company For a product that operates from battery power or other sources refer to the operating instructions that are included with the product ...

Page 5: ...s network using this device s phone function on board an airplane is against the law in most countries If you want to use this device when on board an aircraft remember to turn off your phone by switching to Flight Mode ENVIRONMENT RESTRICTIONS Do not use this product in gas stations fuel depots chemical plants or where blasting operations are in progress or in potentially explosive atmospheres su...

Page 6: ...ant to consult your service provider or call the customer service line to discuss alternatives NONIONIZING RADIATION Your device has an internal antenna This product should be operated in its normal use position to ensure the radiative performance and safety of the interference As with other mobile radio transmitting equipment users are advised that for satisfactory operation of the equipment and ...

Page 7: ...ay form on or within the device To avoid damaging the device allow sufficient time for the moisture to evaporate before using the device NOTE When taking the device from low temperature conditions into a warmer environment or from high temperature conditions into a cooler environment allow the device to acclimate to room temperature before turning on the power Avoid pushing objects into product Ne...

Page 8: ...all 22 2 3 Receiving a Call 24 2 4 In Call Options 24 2 5 Additional Dialing Information 25 Chapter 3 Synchronizing Information with Your Computer 27 3 1 About Synchronization 28 3 2 Using Microsoft Windows Mobile Device Center 28 3 3 Installing and Using Microsoft ActiveSync 29 3 4 Synchronizing with Your Computer 29 3 5 Synchronizing via Infrared 30 3 6 Synchronizing via Bluetooth 30 3 7 Synchro...

Page 9: ...nts 55 7 1 Synchronizing Your Phone with Your Company E mail Server 56 7 2 Working with Company E mails 56 7 3 Managing Meeting Requests 59 7 4 Finding Contacts in the Company Directory 60 7 5 E mail Security 61 Chapter 8 Getting Connected 63 8 1 Comm Manager 64 8 2 Connecting to the Internet 64 8 3 Internet Explorer Mobile 66 8 4 Wi Fi 67 8 5 Wireless Modem 68 8 6 Bluetooth 70 8 7 Windows Live Mo...

Page 10: ...soft Office Word Mobile 90 10 3 Microsoft Office Excel Mobile 91 10 4 Microsoft Office PowerPoint Mobile 94 10 5 Adobe Reader LE 95 10 6 Speed Dial 95 10 7 Voice Speed Dial 96 Appendix 99 A 1 Specifications 100 A 2 Regulatory Notices 101 A 3 Additional Safety Information 106 Index 111 ...

Page 11: ...nd Its Accessories 1 2 Installing the Battery 1 3 Installing a microSD Card 1 4 Turning Your Phone On and Off 1 5 The Home Screen 1 6 Start Menu 1 7 Programs on Your Phone 1 8 Quick List 1 9 Entering Information 1 10 Battery Information 1 11 Status Indicators ...

Page 12: ...12 Getting Started 1 1 Getting to Know Your Phone and Its Accessories 2 3 4 5 6 7 10 12 1 11 13 9 8 15 16 17 18 14 19 27 20 22 29 30 21 28 23 26 24 25 31 32 ...

Page 13: ...space over characters 16 END Press to end a call or press and hold to lock the keyboard 17 Right SOFT KEY Press to perform the command shown in the label above the button 18 Light Sensor Sense dark conditions and activate a backlight under the keyboard automatically glowing in dark 19 POWER Press aprox 3 seconds to turn the phone on and off Press and release the POWER button to display the Quick L...

Page 14: ...sed copper part is properly aligned with the protruding copper conductor of the phone body Right LED Status Flashing blue Bluetooth mode set to On or Visible mode Flashing green Wi Fi connected Accessories The following accessories are provided with the phone 1 2 3 4 5 Accessory Function 1 AC Adapter Recharges the battery 2 USB Sync Cable Connects your device to a PC and synchronizes data 3 Mini U...

Page 15: ...icroSD Secure Digital card in your phone to have an alternative storage place for your images video music and other phone data 1 Pry open the rubber fiber cover of the microSD slot on the side of the phone 2 Insert the microSD card into the slot with its gold contacts facing up To remove press the microSD card to pop it out of the slot Note A microSD card is not included in the box 1 4 Turning Your...

Page 16: ...sages 8 Displays the network signal strength 9 Displays the power status 10 Displays the location settings 11 Displays the available network or connectivity status 12 Displays notifications such as missed calls or new messages 1 6 Start Menu The Start menu is located at the bottom left corner of the Home screen and displays various program icons that are spread across one or more screens To see th...

Page 17: ...es Messaging Send and receive e mails and text messages Messenger Connect to the Windows Live Messenger service MP3 Trimmer Trim an MP3 file to a desired length Pictures Videos Collects organizes and sorts media files PowerPoint Mobile Lets you open view and save PowerPoint files on your phone Settings Personalize your phone to suit the way you use it Speed Dial Create speed dial entries for diali...

Page 18: ...ys the input mode that you are currently using Lowercase text input Uppercase text input caps lock Uppercase text input Numeric or symbol labeled in red input locked Numeric or symbol labeled in red input XT9 text input mode lowercase XT9 text input mode uppercase XT9 text input mode caps lock You can do the following with the QWERTY keyboard To type lowercase letters press the keys using your thu...

Page 19: ...proximations Talk time Up to 3 5 hours Standby time Up to 212 hours Playing WMV Up to 8 hours Playing WMA Up to 12 hours WARNING To reduce risk of fire or burns Do not attempt to open disassemble or service the battery pack Do not crush puncture short external contacts or dispose of in fire or water Do not expose to temperatures above 60 C 140 F Replace only with the battery pack designated for th...

Page 20: ...owing table lists common status indicators with their description Icon Description Icon Description New SMS message Microphone muted New e mail message Bluetooth headset connected Roaming 1xRTT available 1xRTT 1 times Radio Transmission Technology is the third generation data service New Windows Live Messenger message EVDO available EVDO Evolution Data Optimized is a high speed data service for wi...

Page 21: ...Chapter 2 Using Phone Features 2 1 Using the Phone 2 2 Making a Call 2 3 Receiving a Call 2 4 In Call Options 2 5 Additional Dialing Information ...

Page 22: ...e when you receive a call The Vibrate icon appears in the title bar Selecting None in the Ring tone list mutes the phone For more information about sounds see Choose how to be notified about events or actions in Chapter 4 Note To adjust the earpiece volume during a call use the Jog Wheel on the phone s side panel Adjusting the volume at any other time can affect the ring notification and MP3 sound...

Page 23: ...elected contact click Menu Edit Make a call from Call History 1 On the Home screen click Start Call History 2 Select a name or number and press TALK In the Call History screen press ENTER to view details such as the dialed missed or received call call duration date and time Pressing ENTER again dials the associated number To customize calls You can select various options on the Call History screen...

Page 24: ...n speakerphone allows you to talk hands free or lets other people listen to the conversation During a call click Menu Speakerphone On The icon appears at the top of the screen To turn off the Speakerphone during the call click Menu Speakerphone Off Alternatively the speakerphone can be toggled on and off by pressing and holding TALK during the call WARNING To avoid damage to your hearing do not hold ...

Page 25: ... the contact entry that contains the phone number in which you want to insert a pause 3 Click Menu Edit 4 Position the cursor on the phone number where you want to insert a pause 5 Click Menu Insert Pause The letter p will appear in the number to indicate where the pause will occur in the dialing sequence 6 Click Done Insert a longer pause in a dialing sequence Some phone numbers may require a lon...

Page 26: ...26 Using Phone Features ...

Page 27: ... 3 1 About Synchronization 3 2 Using Microsoft Windows Mobile Device Center 3 3 Installing and Using Microsoft ActiveSync 3 4 Synchronizing with Your Computer 3 5 Synchronizing via Infrared 3 6 Synchronizing via Bluetooth 3 7 Synchronizing Music and Video ...

Page 28: ...rtnership see Chapter 8 For information about synchronizing through Bluetooth see Synchronizing via Bluetooth later in this chapter Connect and synchronize using infrared You must first set up your PC to receive infrared beams from your phone before you can synchronize information between them using infrared For information about synchronizing through infrared see Synchronizing via Infrared later i...

Page 29: ... your phone to your PC to synchronize the information between your phone and PC While your phone is connected ActiveSync or Windows Mobile Device Center on your PC synchronizes every time you make a change on either the PC or your phone You can also manually start and stop synchronization any time To manually start and stop synchronization when using ActiveSync 1 After connecting your phone to you...

Page 30: ...o PC then clear the Enable advanced network functionality check box This makes ActiveSync utilize a serial USB connection with your phone 3 5 Synchronizing via Infrared You can connect and synchronize your phone with the PC using infrared To synchronize with a computer via infrared 1 Follow the instructions in ActiveSync Help on the PC for setting up your PC to receive infrared beams 2 Line up the...

Page 31: ...ideo with your phone Other than selecting the media information type in ActiveSync to be synchronized all media synchronization settings must be set in Windows Media Player Before media can be synchronized you must do the following Install Windows Media Player Version 11 on the PC Windows Media Player 11 works only in Windows XP or later versions Connect your phone to the PC with a USB cable If th...

Page 32: ...32 Synchronizing Information with Your Computer ...

Page 33: ...r Phone 4 1 Personalizing your Phone 4 2 Adding and Removing Programs 4 3 Using Task Manager and Managing Memory 4 4 Managing and Backing Up Files 4 5 Protecting your Phone 4 6 Restarting your Phone 4 7 Resetting your Phone ...

Page 34: ...CONTROL to select the portion of the picture you want to use and click Next Note If the picture fits the screen this step is skipped 5 In Adjust the transparency select a higher percentage for a more transparent picture or a lower percentage for a more opaque picture 6 Click Finish Set date time language and other regional options Your phone should already be set up with the regional settings that ...

Page 35: ...dit a profile 1 On the Home screen click Profile Type For example Profile Normal 2 Select the profile to edit 3 Click Menu Edit 4 Do one of the following Modify the settings and click Done To cancel without saving changes click Cancel Tip To revert to the default profile settings click Menu Reset to default To specify the sound for an event 1 On the Home screen click Start Settings Sounds 2 For the d...

Page 36: ...lowing In System font size set the size of the font that is displayed on the screen In Multipress time out set the length of time between keypresses when entering text in Multipress mode In Confirmation time out set the delay before an unconfirmed action times out In In call alert volume set the volume for incoming call or receiving new message alerts while you are in a call 3 Click Done To change...

Page 37: ... Prepend Enable this option to automatically add 1 in front of the number for long distance calls if required Call Options Provide options for setting any key answer to incoming calls notifying when voice privacy is unavailable and setting your phone number voice mail number country code and area code Location Setting Turning Location Setting to On will allow the mobile network to detect your curr...

Page 38: ...installation instructions that come with the program 3 Connect your phone to the PC and then double click the exe file Click Start on the Home screen to find the installed program on your phone To remove a program Programs that are pre installed on the phone cannot be removed 1 On the Home screen click Start Settings Remove Programs 2 Scroll to the program to remove and click Menu Remove 4 3 Using T...

Page 39: ...our phone for files that you want to copy to your PC 4 Select and copy the files Ctrl C and then paste them Ctrl V to the destination folder in the PC Copying a file results in separate versions of a file on your phone and PC Changes made to one file will not affect the other since the files are not synchronized Use File Explorer File Explorer provides many easy to use features for file and folder m...

Page 40: ...ff its functionality This is a helpful feature if for example the phone is turned on and in your pocket and you want to prevent accidental keypresses On the Home screen press and hold Once the keyboard is locked the left soft key label changes to Unlock Tip To quickly lock the keyboard press POWER briefly and select Lock from the Quick List Note You can still receive calls and make emergency calls...

Page 41: ...the phone is restarted while a program is running any unsaved work will be lost To restart the phone 1 Remove the battery 2 Wait 3 seconds then reinsert the battery and turn on your phone 4 7 Resetting your Phone Resetting your phone will remove all the data from its memory and restore the phone back to the factory default settings WARNING As all of your data will be deleted it is recommended that...

Page 42: ...42 Managing your Phone ...

Page 43: ...Chapter 5 Organizing Phone Information 5 1 Contacts 5 2 Calendar 5 3 Tasks 5 4 Voice Notes ...

Page 44: ...enu Edit 3 When finished making changes click Done To call a contact from the contact list 1 On the Home screen click Start Contacts 2 Select the contact to call and press TALK The contact s default phone number is dialed Tip The default phone number is indicated by m h or w corresponding to a contact s name To call a phone number other than the default click the contact scroll to the number you wa...

Page 45: ...er events If you use Outlook on your PC you can synchronize appointments between your phone and PC Create a personal appointment To set Calendar options 1 On the Home screen click Start Calendar 2 Click Menu Tools Options 3 Scroll through the available settings and set your desired default options 4 Click Done To schedule an appointment 1 On the Home screen click Start Calendar 2 Click Menu New Ap...

Page 46: ...l attendees are designated as required For more information see Chapter 7 3 Choose the contact s you want to send the meeting request to and click Select Note To remove an attendee from the list select the attendee and click Menu Remove Attendee 4 On the New screen click Done The meeting request is sent out Note When attendees accept your meeting request the meeting is automatically added to their...

Page 47: ...e recordings Voice notes are included in the All Notes list and are named consecutively Recording1 Recording2 and so on To create a voice note 1 On the Home screen click Start Voice Notes 2 Hold the phone s microphone near your mouth 3 Click Record and say your voice note 4 Click Stop to stop recording a voice note To delete a voice note 1 On the Home screen click Start Voice Notes 2 Select the vo...

Page 48: ...48 Organizing Phone Information ...

Page 49: ...Chapter 6 Exchanging Messages 6 1 Messaging 6 2 Text Messages 6 3 Setting Up E mail Accounts 6 4 E mail Messages ...

Page 50: ...mobile phones To compose and send a text message 1 On the Home screen click Start Messaging 2 Select Text Messages and click Select 3 Click Menu New 4 Enter the mobile phone number of one or more recipients separating them with a semicolon To access phone numbers from Contacts in To press ENTER and select a recipient from the list 5 Enter your message You can enter up to 140 characters in one mess...

Page 51: ...t that you have from an Internet Service Provider ISP Work account that you access using a VPN connection Windows Live Mail Other web based e mail accounts such as Gmail Yahoo Mail etc Set up your phone to synchronize Outlook e mail with the computer If you have installed the synchronization software on your PC and created a partnership with your phone then your phone is ready to send and receive ...

Page 52: ...priority click Menu Message Options If you are working offline e mail messages are moved to the Outbox folder and will be sent the next time you connect To add an attachment to an e mail 1 In the message that you are composing click Menu Insert and click the item you want to attach Picture Voice Note or File 2 Select the file you want to attach or record a voice note View and reply to e mails When ...

Page 53: ...osts based on your rate plan To view and reply to HTML e mails You can receive view and reply to HTML e mails from any type of e mail account The HTML format is retained without layout shifting or resizing Note HTML e mail support in Outlook Mobile is available only if your company is using Microsoft Exchange Server 2007 1 Set the message format to HTML To find out how to set the message format see...

Page 54: ...d format for Outlook e mail 1 Disconnect your phone from the computer 2 Click Start ActiveSync 3 Click Menu Options select E mail then click Settings 4 On the E mail Sync screen set the Download size limit and Message format 5 Close ActiveSync and reconnect your phone to the computer To change the download size and format for POP3 IMAP4 e mail 1 On the POP3 IMAP4 e mail message list click Menu Too...

Page 55: ...pany E mails and Meeting Appointments 7 1 Synchronizing Your Phone with Your Company E mail Server 7 2 Working with Company E mails 7 3 Managing Meeting Requests 7 4 Finding Contacts in the Company Directory 7 5 E mail Security ...

Page 56: ...pen ActiveSync on your phone and click Menu Configure Server to set up an Exchange Server connection When you re prompted to select information types for synchronization clear the Email check box under the Windows PC item first before you can select the Email check box under Exchange Server Tip To change Exchange Server settings open ActiveSync on your phone and click Menu Configure Server Start s...

Page 57: ...ger 2 On the Comm Manager screen click the Microsoft Direct Push button The button will turn to which indicates that you will receive e mails as they arrive When the button is in the state you need to manually retrieve your e mails To enable Direct Push via ActiveSync 1 In ActiveSync on your phone click Menu Schedule 2 Select As items arrive in the Peak times and Off peak times boxes Scheduled sync...

Page 58: ...ools Search Server 3 In the Look for text box enter the search keyword 4 Choose the Date range of messages to search from and where to search in Look in 5 Click Search Flag your messages Flags serve as a reminder to yourself to follow up on important issues or requests that are indicated in the messages Requirement Flags are enabled only if e mails are synchronized with Microsoft Exchange Server 2...

Page 59: ...you can invite attendees to your meeting and check their status to know their availability When you receive a meeting request you can reply by accepting or declining the request The meeting request also clearly indicates whether or not there are conflicting or adjacent meetings Requirement Your company must be using Microsoft Exchange Server 2007 or higher To check the status of invited attendees ...

Page 60: ...n from your organization s Company Directory Requirement Access to the Company Directory is available only if your organization is running Microsoft Exchange Server 2003 SP2 or higher and you have completed your first synchronization with the Exchange Server 1 Synchronize with Exchange Server if you have never done so 2 Do any of the following In Contacts click Menu Company Directory In a new e ma...

Page 61: ...tures for Windows Mobile based phones are available only with Exchange Server 2003 SP2 or a later version that supports S MIME If you are not using one of these products or have not yet synchronized these options are unavailable Note You can encrypt a message with or without a certificate However to read an encrypted message you need a valid certificate to decrypt it To individually sign and encry...

Page 62: ...ncrypt messages to protect your e mails from being viewed except by the intended recipients Select Sign messages so that recipients are certain that e mails are sent by you and have not been altered 5 Click Menu Choose Certificate to select a certificate for signing or encrypting outgoing e mail messages Set permissions on an e mail message Another way of protecting your e mail messages is to send m...

Page 63: ...Chapter 8 Getting Connected 8 1 Comm Manager 8 2 Connecting to the Internet 8 3 Internet Explorer Mobile 8 4 Wi Fi 8 5 Wireless Modem 8 6 Bluetooth 8 7 Windows Live Mobile ...

Page 64: ...profile or customize notification settings 8 Click to open ActiveSync so you can synchronize the phone and computer For more information about the configuration settings for ActiveSync see Chapter 3 8 2 Connecting to the Internet Your phone s powerful networking capabilities allow you to access the Internet or your corporate network at work through wireless and conventional connections Specificall...

Page 65: ...er a name for the connection 4 In Connects to select Work 5 Enter the appropriate information in the remaining fields 6 Click Done Note You can also add and set up the following connections VPN A VPN connection is used to access your corporate network by using an existing Internet connection Proxy A Proxy connection is used to access the Internet using an existing connection to your corporate or WA...

Page 66: ...pen Internet Explorer by pressing from the QWERTY keyboard Browse the Web 1 In Internet Explorer click Menu Address Bar 2 Enter the address and click Go 3 Use the NAVIGATION CONTROL to browse the Web page Press ENTER when a link is highlighted to access it While browsing the Web click Menu to open a list of options that will let you change the view save Favorites and set Internet Explorer Mobile p...

Page 67: ...ected to conserve battery power In Comm Manager click Settings WLAN Settings Wi Fi Menu Wi Fi Settings To create a new Wi Fi connection If the Wi Fi connection you want to connect to is not in the list you can create a new Wi Fi connection 1 On the Home screen click Start Settings Connections WLAN Settings Wi Fi New 2 Enter the Network name and Network type and click Next Note If you want only to ...

Page 68: ...C will automatically detect that your phone has been connected The Found New Hardware dialog box will then appear on your PC 5 In the Found New Hardware dialog box select Install from a list or specific location Advanced and click Next 6 Select Search for the best drivers in these locations 7 Insert the Getting Started Disc into your CD drive Select the Include this location in the search check box...

Page 69: ...an set up a dial up connection on your PC You will then be able to access the Internet on your PC using your phone To dial up and connect to the Internet 1 Open Control Panel on your PC 2 Double click Network Connections 3 Click File New Connection 4 In the New Connection Wizard click Next 5 Click Connect to the Internet then click Next 6 Select Set up my connection manually and then click Next 7 ...

Page 70: ...es but not vice versa 2 Off Bluetooth is turned off In this mode you can neither send nor receive information using Bluetooth You might want to turn off the radio at times to conserve battery power or in situations where radio use is prohibited such as onboard aircraft and in hospitals 3 Visible Bluetooth is turned on and all other Bluetooth enabled devices within range can detect your phone Note Whe...

Page 71: ...ear indicating that your phone has connected with the paired device Click OK 7 The name of the paired device is then displayed You may edit and enter a new name for that device then click Next 8 Select the check boxes of services that you want to use from the paired device and click Done To accept a Bluetooth partnership 1 Ensure that Bluetooth is turned on and in visible mode 2 Click Yes when pro...

Page 72: ...ays them in the list 4 Select the name of the headset and click Next 5 In Passcode enter the alphanumeric passcode for the Bluetooth headset then click Next The passcode is usually 0000 A message will appear saying that your phone has connected to the headset click OK 6 Enter the display name for the headset and click Next 7 Select the check boxes for the Wireless Stereo if available and Hands Fre...

Page 73: ... and it is not automatically added to Outlook click File Import and Export to import it to Microsoft Outlook on your computer To beam information to a Bluetooth enabled device such as another phone create a Bluetooth partnership then do steps 3 to 6 in the above procedure Tip The default folder on your computer where beamed items are stored may be Windows XP C Documents and Settings your_username ...

Page 74: ... Tray 3 In the Bluetooth Devices window click Add 4 The Add Bluetooth Device Wizard opens Select the My device is set up and ready to be found check box then click Next 5 The wizard then detects your phone as a new device and displays its name in the dialog box Select the device name then click Next 6 Select Let me choose my own passkey then enter a passkey between 1 and 16 digits that serves as a...

Page 75: ...nection in this chapter Print files via Bluetooth Connect your phone to a Bluetooth printer to print contact information appointment details messages and other file types Note You can print files in the txt jpg xhtml vcf vcs file formats Before you start printing make sure to turn on the Bluetooth printer and to turn on Bluetooth on your phone To turn on Bluetooth click Start Settings Connections ...

Page 76: ...To set up Windows Live Mobile for the first time 1 Click Start Windows Live 2 Click Sign in to Windows Live 3 On the next screen click the links to read the Windows Live Term of Use and the Microsoft Privacy Statement After reviewing them click Accept 4 Enter your Windows Live Mail or Hotmail address and password then click Next 5 Choose whether or not to show Windows Live s search bar and applica...

Page 77: ...ong Live Mail Messenger and Sync status Click to open activate the selected Windows Live component 3 Click to access Windows Live Messenger settings 4 Click Menu to access and change settings 2 1 3 4 If you chose to display the search bar and Windows Live applications on the Home screen when you were setting up Windows Live you ll see them on the Home screen Search bar and Windows Live application...

Page 78: ...78 Getting Connected ...

Page 79: ...Chapter 9 Experiencing Multimedia 9 1 Camera and Video Recorder 9 2 Pictures Videos 9 3 Windows Media Player Mobile 9 4 MP3 Trimmer ...

Page 80: ...recording video press again to stop recording Capture modes The Camera program lets you capture pictures and video clips using various built in modes The title bar displays the active capture mode for a short duration and then it disappears automatically from the Camera screen to offer you a distraction free view of the image that you intend to capture However pressing the NAVIGATION left right up...

Page 81: ...ase or decrease the zoom level 6 Click to configure general options and settings on the Quick Settings Menu 1 2 3 4 6 5 The Camera Video screen The Camera Picture Theme screen The Recording Status indicator blinks while video recording is in progress Displays the current and total number of photos that can be taken using the selected template Use zooming Before capturing a still image or a video cl...

Page 82: ... Fluorescent to suit the lighting environment You can also choose a special effect such as Grayscale Sepia Cool or Negative to apply to your photos or video clips by clicking Settings Capture Settings tab Effect Only available in Picture Theme mode Allows you to select a template to use for Picture Theme mode While accessing the general options on the Menu to further customize the Camera or Video ...

Page 83: ... file is set to IMAGE or VIDEO followed by a sequential number for example IMAGE_001 jpg You may also choose to prefix filenames using either the current Date or Date Time However if you set the Camera to save captured photos to a storage card the prefix cannot be selected Captured photos will be named using the DCIM Digital Camera Images naming standard Counter Select Reset to reset the naming co...

Page 84: ...le You can choose to send the selected media file via one of your messaging accounts beam it to another device using infrared or Bluetooth play the pictures as a slide show send the picture to your Windows Live MySpace account and more Click Options to customize picture settings and slide show playback preferences Note The available menu options depend on the selected media file When viewing a pic...

Page 85: ... Click Menu to open a list of options that you can do in a particular screen The commands on this menu vary depending upon which screen you are viewing About licenses and protected files Some media files have associated licenses that protect them from being unlawfully distributed or shared If you want to copy a protected file from your PC to your phone use the Windows Media Player on your PC to sy...

Page 86: ...zation between your phone and PC follow steps 1 to 3 in To synchronize content to your phone automatically 2 Click the Sync tab on the Windows Media Player Select a Playlist or a Library on the left panel of the Windows Media Player 3 From the content list drag files you want to sync to your phone to the right panel of the Windows Media Player 4 Click Start Sync to start copying files to your phone ...

Page 87: ...u want to play such as a file or a folder and click Play Troubleshooting For more information see the Troubleshooting Windows Media Player Mobile page at the Microsoft Web site http www microsoft com windows windowsmedia player windowsmobile troubleshooting aspx 9 4 MP3 Trimmer Before setting an MP3 file as a ring tone for your device you can edit the song first to shorten the duration and make th...

Page 88: ...ON CONTROL to select Mark out and then use NAVIGATION left right to set the Mark out point After you set the Mark out point the song will play back starting from 5 seconds before the Mark out point Use NAVIGATION left right to adjust the Mark out point if needed 5 Use the NAVIGATION CONTROL to select Play Press ENTER to play back the trimmed song While playing you can use NAVIGATION left right to ...

Page 89: ...g Other Applications 10 1 Microsoft Office Mobile 10 2 Microsoft Office Word Mobile 10 3 Microsoft Office Excel Mobile 10 4 Microsoft Office PowerPoint Mobile 10 5 Adobe Reader LE 10 6 Speed Dial 10 7 Voice Speed Dial ...

Page 90: ...e features of the PC version of Microsoft Word Some data and formatting may be lost when you save the document on your phone Open and view documents To open a document 1 In Word Mobile click Menu and choose the location where the doc rtf or txt file is saved 2 Locate the file you want to open and click Select Note You can only open one document at a time You must close the opened document first befo...

Page 91: ...nd 2 In the Messaging screen select the e mail account you want to use to send the document and click Select 3 In the e mail the file is automatically appended as an attachment 4 Enter the recipient name and click Send 10 3Microsoft Office Excel Mobile Microsoft Office Excel Mobile gives you editing and viewing capabilities for your Excel worksheets and workbooks To open Excel Mobile Click Start Offi...

Page 92: ...icking View Sheet and then selecting the worksheet you want to view Edit and send worksheets In order to edit Excel worksheets you need to switch to Edit mode To switch to Edit mode click Menu Edit Mode To edit the cell text 1 Select the cell whose text you want to edit and click Menu Edit Cell Text 2 Type in the text and click Done To delete the cell content Select the cell whose content you want...

Page 93: ...can also shift the contents of a row or column To shift select the cell you want to shift and click Menu Insert Shift Right or Shift Down To go to a cell Click Menu Tools Go To and then enter the Cell reference or name Click OK Tip You can also sort and find text in the worksheet by clicking Menu Tools Sort or Find To undo and redo an action Click Menu Undo Action or Redo Action To save the worksh...

Page 94: ... 1 Press the right SOFT KEY to show Menu 2 Click Menu Custom Show and then select the custom show you want to view on the list To zoom in on a slide 1 Press the right SOFT KEY to show Menu 2 Click Menu Zoom In Tip You can also press ENTER to zoom in on a slide and zoom out Note You cannot go the next or previous slide when you zoom in You need to zoom out first to be able to go to the next or prev...

Page 95: ... more 10 6Speed Dial You can create speed dial entries for frequently called numbers or frequently accessed items so you can dial a number or access an item by pressing a single key To create a speed dial entry for a contact 1 On the Home screen click Start Contacts 2 Select a contact 3 Press ENTER to view the contact details 4 Select the desired phone number and click Menu Add to Speed Dial 5 Ent...

Page 96: ... 3 Select the item to which you want to assign a voice tag 4 Click Menu Add Voice Tag 5 After the audio prompt begin recording the voice tag preferably one easy to recognize word 6 When the voice tag is successfully trained the phone will play back the voice tag Click OK 7 Enter appropriate details in Name Value and Keyboard assignment 8 Click Done to save the new voice tag To quit at any time dur...

Page 97: ... tag please try again and speak clearly and reduce the surrounding noise To edit delete and play voice tags 1 On the Home screen click Start Speed Dial 2 Select the desired voice tag from the list 3 Do any of the following To change the voice tag click the voice tag in the list make changes and click Done To delete the voice tag click Menu Delete Voice Tag To play back an existing voice tag at any...

Page 98: ...98 Using Other Applications ...

Page 99: ...Appendix A 1 Specifications A 2 Regulatory Notices A 3 Additional Safety Information ...

Page 100: ...n Landscape CDMA EVDO Dual band module Functionality CDMA2000 Mode Dual band 800 and 1900 MHz Antenna Internal Camera module Type 2 0 Megapixel CMOS with fixed lens Resolution UXGA 1200 x 1600 SXGA 960 x 1280 VGA 480 x 640 QVGA 240 x 320 QQVGA 120 x 160 Connection I O port HTC ExtUSB 11 pin mini USB and audio jack in one ExtUSB is a proprietary connection interface that is trademarked by HTC Bluet...

Page 101: ...with your IRIS100 The Battery Pack has been assigned a model number of IRIS160 This product is intended for use with a certified Class 2 Limited Power Source rated 5 Volts DC maximum 1 Amp power supply unit Federal Communications Commission Notice DECLARATION OF CONFORMITY This wireless device IRIS100 manufactured by High Tech Computer Corp complies with part 15 of the FCC Rules Operation is subje...

Page 102: ...mpatible with hearing aids The intent of the HAC Act is to ensure reasonable access to telecommunications services for persons with hearing disabilities While some wireless phones are used near some hearing devices hearing aids and cochlear implants users may detect a buzzing humming or whining noise Some hearing devices are more immune than others to this interference noise and phones also vary i...

Page 103: ...ional Standards Institute ANSI IEEE C95 1 1992 National Council on Radiation Protection and Measurement NCRP Report 86 1986 International Commission on Non Ionizing Radiation Protection ICNIRP 1996 Ministry of Health Canada Safety Code 6 The standards include a substantial safety margin designed to assure the safety of all persons regardless of age and health The exposure standard for wireless mob...

Page 104: ...C s ALI requirements The network compliance with the above FCC requirements is dependent on a the use of digital technology by the wireless network b GPS satellite signals being able to reach the handset such transmissions do not always work indoors for example and c handset signals reaching wireless base stations atmospheric and environmental conditions may cause variations in handset receiving s...

Page 105: ...ch by and recommendations of Wireless Technology Research Persons with pacemakers Should ALWAYS keep the phone more than six inches from their pacemaker when the phone is turned ON Should not carry the phone in a breast pocket Should use the ear opposite the pacemaker to minimize the potential for interference If you have any reason to suspect that interference is taking place turn the phone OFF i...

Page 106: ...ment RoHS and its amendments A 3 Additional Safety Information This section provides more safety information in addition to the information at the beginning of the user manual When Driving Do Not Use The PC Functions Of Your Smartphone While Driving Or Walking Never use the personal computer functions of your device while driving an automobile or any other moving vehicle Always pull out of traffic a...

Page 107: ...ial interference with the pacemaker These recommendations are consistent with the independent research by and recommendations of Wireless Technology Research Never come closer than six 6 inches to a person with a heart pacemaker implant when using your device Doing so could result in interference with the function of the pacemaker Persons with pacemakers Should ALWAYS keep the phone more than six ...

Page 108: ...ns and instructions POTENTIALLY EXPLOSIVE ATMOSPHERES Turn your device OFF when in any area with a potentially explosive atmosphere and obey all signs and instructions Sparks in such areas could cause an explosion or fire resulting in bodily injury or even death Areas with a potentially explosive atmosphere are often but not always clearly marked They include fueling areas such as gas stations bel...

Page 109: ...mperatures above or below the recommended range give it time to warm up or cool down before using Completely drain the battery before recharging It may take one to four days to completely drain Store the discharged battery in a cool dark and dry place Purchase a new battery when its operating time gradually decreases after fully charging Properly dispose of the battery according to local regulatio...

Page 110: ... Never alter the AC cord or plug on an AC charger If the plug will not fit into the available outlet have a proper outlet installed by a qualified electrician Never allow any liquids or water to spill on an AC charger when it is connected to an AC power source Always use the authorized UT Starcom AC charger to avoid any risk of bodily injury or damage to your cellular phone or battery Never attemp...

Page 111: ...Index ...

Page 112: ... programs 38 Comm Manager 17 64 Company Directory 60 Compose e mail message 52 Confirmation time out 36 Connecting to Wi Fi Network 67 Connect PC to Internet using your device as modem 69 Connect phone to Internet 65 Wi Fi 67 Connect phone to private network 65 Contacts beam contact information 45 call a contact 44 create a new contact 44 find a contact 44 overview 17 use 44 view edit a contact 44 ...

Page 113: ...Microsoft ActiveSync 29 Microsoft Windows Mobile Device Center 28 Modem Bluetooth modem 74 infrared modem 68 MP3 Trimmer 87 Mute call 24 N NAVIGATION CONTROL 13 Number format 34 O Office Mobile 90 Excel Mobile 91 PowerPoint Mobile 94 Word Mobile 90 Operating system version 37 Optimize power performance 19 Out of office 59 Outlook e mail 51 Owner information 36 P Panorama capture mode 80 Parts and ...

Page 114: ...ial 17 23 95 Sports capture mode 80 Start menu 16 Status indicators 20 Stop programs 38 Synchronize ActiveSync 29 change information types 29 music and video 31 schedule synchronization with Exchange Server 56 via Bluetooth 30 via Infrared 30 Windows Media Player 31 System font size 36 T Tasks 17 46 Task Manager 17 38 Text Messages Retry 17 Time setting 34 U Unlock screen clock 35 V Verify digital...

Reviews: