7.
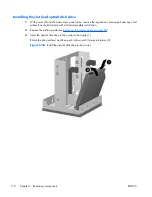
While keeping the hard drive carrier handle in its fully open position, slide the hard drive into the
bay (1) until it comes to a hard stop. When the drive is installed, rotate the handle up until it snaps
into place, fully securing the drive (2).
NOTE:
The hard drive carrier handle is used as a lever to properly seat the connectors and to
securely retain the hard drive. If the handle is closed prematurely, the proper connection is not
made and the hard drive is not retained properly.
Figure 5-44
Installing the drive in the chassis
NOTE:
Ensure that the data cable for the selected bay is connected to the proper data port
connector (see
Hard disk drive cable configuration on page 117
).
8.
Reinstall all removed components and reconnect any cables that have been disconnected.
ENWW
Removing and installing components
121


