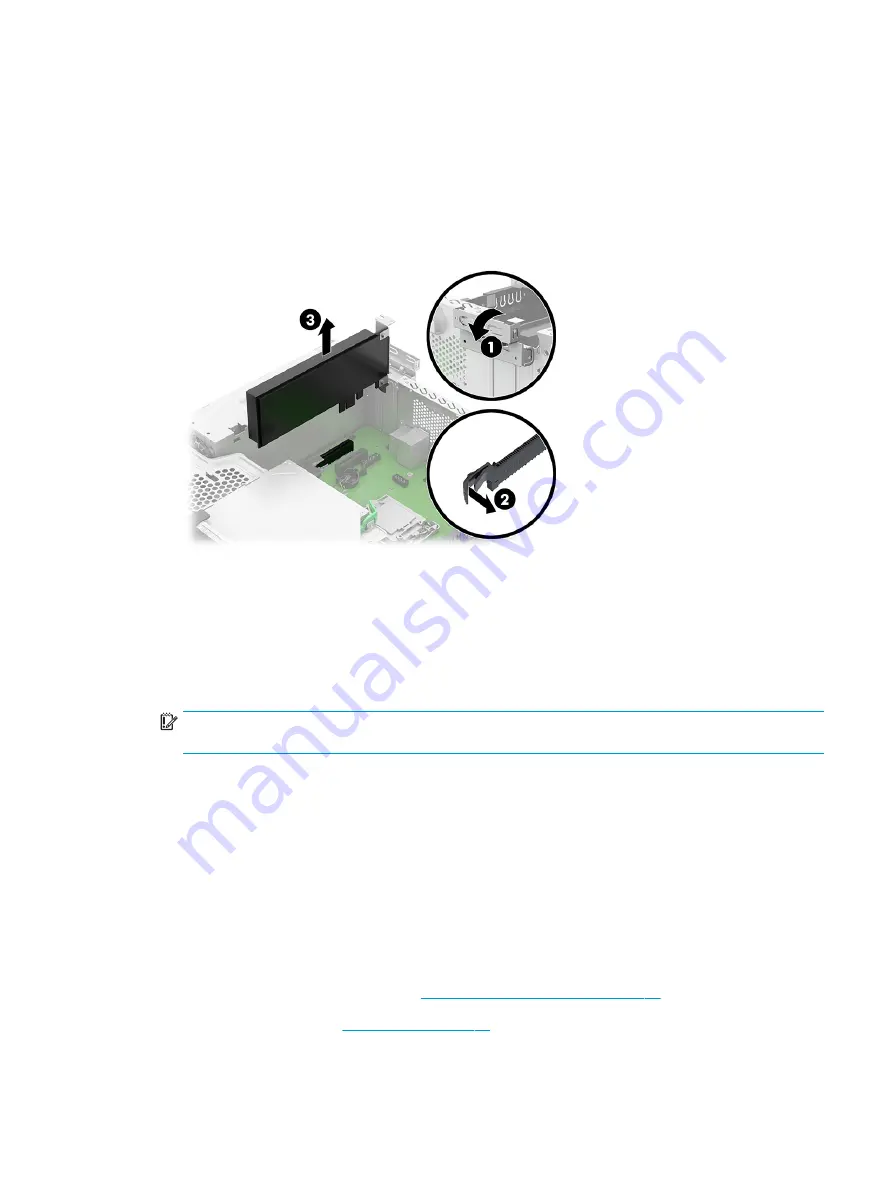
1.
Release the slot cover retention latch (1) that secures the slot covers by lifting the tab on the latch and
rotating the latch to the open position.
2.
If you are removing a PCI Express ×16 card, pull the retention arm on the back of the expansion socket
away from the card (2).
3.
Carefully rock the card back and forth until the connectors pull free from the socket. Lift the card straight
up (3) and then away from the inside of the chassis to remove it. Be sure not to scrape the card against
other components.
4.
Locate the correct vacant expansion socket on the system board and the corresponding expansion slot on
the back of the computer chassis.
5.
Before installing an expansion card, remove the expansion slot cover or the existing expansion card.
6.
Store the removed card in antistatic packaging.
7.
If you are not installing a new expansion card, install an expansion slot cover to close the open slot.
IMPORTANT:
After removing an expansion card, you must replace it with a new card or expansion slot
cover for proper cooling of internal components during operation.
8.
After installing an expansion card, connect external cables to the installed card and internal cables to the
system board, if needed.
9.
Reassemble and reconfigure the computer, if necessary.
Drive cage
To remove the drive cage, use these procedures. The drive cage is located next to the heat sink. The drive cage is
secured with three slotted Torx screws.
Before removing the drive cage, follow these steps:
1.
Prepare the computer for disassembly (
Preparation for disassembly on page 21
2.
Remove the access panel (
Remove the drive cage:
ENWW
Drive cage
29
Summary of Contents for ProDesk 400 G7 SFF
Page 8: ...Index 125 viii ENWW ...
Page 12: ...4 Chapter 1 Product features ENWW ...
Page 56: ...48 Chapter 4 Removal and replacement procedures ENWW ...
Page 82: ...74 Chapter 5 Troubleshooting without diagnostics ENWW ...
Page 106: ...98 Chapter 7 POST error messages ENWW ...
Page 128: ...120 Chapter 11 Statement of memory volatility ENWW ...
Page 132: ...124 Chapter 13 Specifications ENWW ...
Page 136: ...128 Index ENWW ...


