Installation Guide
69-2285EFS—03
18
TrueSTEAM has internal system diagnostics that monitor system operation, maintenance schedules,
and faults. If a system fault is detected, the system will attempt to recover itself up to five times in a
24 hour period. If unable to recover in that time, the red Service light will activate.
If the TrueSTEAM Service light is blinking, a system fault has occurred from which the humidi
-
fier can not recover by itself. The table below shows the possible faults, along with steps to fix
TrueSTEAM.
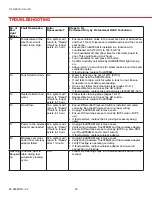
If the red Service light is on, count the number of blinks between pauses. Refer to the table
below for the fault signified by the number of blinks that occur. To clear the fault, press and hold
the GO button for 5 seconds.
Press/hold the GO button to clear the Service Timer light (i.e. the Cleaning Required light).
no. of
red
light
Blinks
fault description
auto-
recoverable?
steps to fix
performed only by professional hVac technician
1
Water/Heater temper-
ature sensor failed.
Yes, TrueSTEAM
will reset if fault
no longer exists in
1 hour.
• Unplug TrueSTEAM and plug back in.
• Press the GO button.
• If fault returns, replace TrueSTEAM.
2
Water sensors failed.
Yes, TrueSTEAM
will reset if fault
no longer exists
in 1 hour. Will
attempt to reset
itself 5 times in 24
hours.
• Unplug TrueSTEAM and remove cover.
•
Disconnect water level sensor wiring, remove screen and
lift snap-hinge clamp.
Remove water sensor assembly.
• Replace water sensor (#50027998-001).
• Reassemble the sensor assembly in the unit, replace snap-
hinge, and reattach and secure cover.
• Plug unit back in and press the GO button.
3
Failure to fill tank
with water.
Yes, system will
return to “Ready”
if fault no longer
exists in 3 hours.
• Ensure inlet water is on.
• Check for leaks around the tank seal and solenoid.
• Turn off water supply and replace in-line water filter.
• Press/hold GO button until the red Service light turns off.
• If tank still fails to fill, press the DRAIN button (if unit fails to
drain, unplug unit and make sure water in tank is cool).
• Follow this guide’s cleaning steps in the Maintenance
section. Ensure you have a firm grip of the tank prior to
releasing the tank, especially if water is present.
• Clear any excess debris from the tank’s bottom orifice to the
solenoid.
• Reassemble tank and plug unit back in. Press the GO button.
• If water still fails to fill into the tank, replace the solenoid
valve (# 50027997-001).
trouBleshootInG
M24901


