3.1
LOWER DOME INSTALLATION, CONTINUED
3.1.3 Rugged
Dome
1. Insert the three posts on the lower dome in the three holes on the housing.
2. Push the lower dome up until it is snug against the housing.
3. Insert the key in the lock on the lower dome.
4. Turn the key clockwise in the lock until the latch is between the brackets in the
housing.
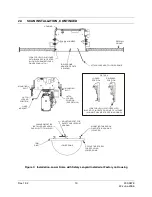
3.1.4 Outdoor Weather Dome
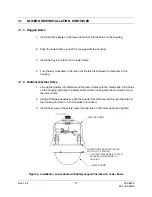
1. Line up the quarter turn fasteners on the lower dome with the metal clips in the holes
on the housing and align the safety cable on the housing with the mounting hole on
the lower dome.
2. Using a Phillips screwdriver, push the quarter turn fasteners up through the holes in
the housing and turn ¼-turn clockwise until locked.
3. Insert the screw on the safety cable into the hole on the lower dome and tighten.
LOWER DOME
1/4-TURN FASTENERS (3 PLACES)
SECURES LOWER DOME TO
HOUSING
LOWER DOME MOUNTING HOLES
WITH CLIPS (3 PLACES)
WEATHER DOME
Figure 6. Installation, Lower Dome with Safety Lanyard Installed on Lower Dome
Rev. 1.02
17
900.0679
22-June-2006
Summary of Contents for HD6 Series
Page 1: ...HD6 Series PTZ Camera in a Dome User Manual 900 0679 June 2006 Rev 1 02 ...
Page 4: ...Rev 1 02 iv 900 0679 22 June 2006 ...
Page 18: ...Rev 1 02 4 900 0679 22 June 2006 Notes ...
Page 32: ...Rev 1 02 18 900 0679 22 June 2006 Notes ...
Page 38: ...Rev 1 02 24 900 0679 22 June 2006 Notes ...
Page 96: ...Rev 1 02 82 900 0679 22 June 2006 Notes ...
Page 122: ...Rev 1 02 108 900 0679 22 June 2006 Notes ...
Page 130: ...Rev 1 02 116 900 0679 22 June 2006 Notes ...
Page 134: ...Rev 1 02 120 900 0679 22 June 2006 Notes ...
Page 143: ...14 9 HD6 SCAN CONTINUED Rev 1 02 129 900 0679 22 June 2006 ...
Page 148: ...Rev 1 02 134 900 0679 22 June 2006 Notes ...
Page 149: ...Rev 1 02 135 900 0679 22 June 2006 Notes ...
Page 150: ...Rev 1 02 136 900 0679 22 June 2006 Notes ...


