3.1
LOWER DOME INSTALLATION, CONTINUED
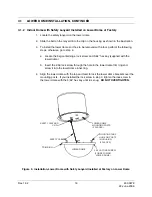
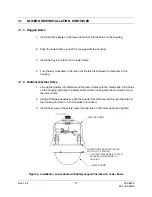
3.1.2 Indoor Dome with Safety Lanyard Installed on Lower Dome at Factory
1. Locate the safety lanyard on the lower dome.
2. Slide the ball on the lanyard into the clip on the housing as shown in the illustration.
3. To install the lower dome so it has to be removed with a tool, perform the following
steps, otherwise, go to step 4.
a. Locate the bag containing a lock screw and 5/64” hex key (supplied with the
lower dome).
b. Insert the 2-56 lock screw through the hole in the lower dome trim ring and
screw it into the lower dome inner ring.
4. Align the lower dome with the top and twist to lock the lower dome brackets over the
mounting posts. If you installed the lock screw in step 3, tighten the lock screw in
the lower dome with the 5/64” hex key until it is snug.
DO NOT OVERTIGHTEN
.
SAFETY LANYARD
CLIP
SAFETY CABLE
TRIM RING
LOWER DOME
LOWER DOME
MOUNTING POSTS
(3 PLACES)
MOUNTING TABS
HOOK ON POSTS
IN HOUSING
(3 PLACES)
2-56 CAPTIVE SCREW
(FOR SECURING
LOWER DOME)
Figure 5. Installation, Lower Dome with Safety Lanyard Installed at Factory on Lower Dome
Rev. 1.02
16
900.0679
22-June-2006
Summary of Contents for HD6 Series
Page 1: ...HD6 Series PTZ Camera in a Dome User Manual 900 0679 June 2006 Rev 1 02 ...
Page 4: ...Rev 1 02 iv 900 0679 22 June 2006 ...
Page 18: ...Rev 1 02 4 900 0679 22 June 2006 Notes ...
Page 32: ...Rev 1 02 18 900 0679 22 June 2006 Notes ...
Page 38: ...Rev 1 02 24 900 0679 22 June 2006 Notes ...
Page 96: ...Rev 1 02 82 900 0679 22 June 2006 Notes ...
Page 122: ...Rev 1 02 108 900 0679 22 June 2006 Notes ...
Page 130: ...Rev 1 02 116 900 0679 22 June 2006 Notes ...
Page 134: ...Rev 1 02 120 900 0679 22 June 2006 Notes ...
Page 143: ...14 9 HD6 SCAN CONTINUED Rev 1 02 129 900 0679 22 June 2006 ...
Page 148: ...Rev 1 02 134 900 0679 22 June 2006 Notes ...
Page 149: ...Rev 1 02 135 900 0679 22 June 2006 Notes ...
Page 150: ...Rev 1 02 136 900 0679 22 June 2006 Notes ...

