


Enhanced Micro TDC 3000 User’s Manual
4-14
9/95
4.3.2
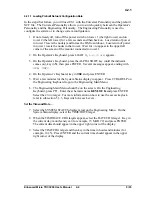
8. If the System has an optional redundant NIM, it is loaded in a similar way except
choose node 04.
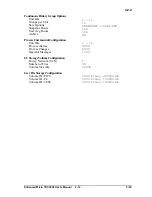
4.3.2.1 NIM Prebuilt Configuration Data
These entities define the primary NIM as node 01 and the redundant NIM as node 02 on
process network 01 (the UCN). $NM01N01 specifies that NIM 1 when operating as the
primary NIM, has responsibility for control, parameter fetching and storing, alarming, and
checkpointing and that data is to be loaded in both the NIM and the APM. A similar entity
is built for the optional, secondary NIM if it is present. This data is in the checkpoint for
the NIM and was loaded when you specified the Default Data Source.
Parameter
Description
Value, Primary NIM
Value, Sec. NIM
(Name)
Entity name
$NM01N01
$NM01N02
NTWKNUM
Network number
01
01
NODENUM
Node number
01
02
NODETYP
UCN Node type
NIM
NIM
NODASSN
Node assignment
ThisNIM
ThisNIM
LOADSCOP
Load scope
NIMandPM
4.4 LOAD THE ADVANCED PROCESS MANAGER
The instructions that follow assume that the NIM was loaded in a preceding section and has
a status of OK. Power must be on at the APM cabinet. If you are not using a standard
APM cabinet as described in Chart 4-1, refer to Task 32 in the System Startup Guide, for
the procedures to build new IDFs and load the APM. If there were minor changes or
additions to the standard dual access APM cabinet, you may wish to reconstitute the
appropriate entities, change them and load them. Refer to the Data Entity Builder Manual,
for the procedures.
4.4.1 Standard Double-Sided Nonredundant APM Cabinet
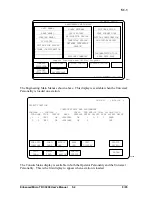
1. If the Engineering Main Menu is on the screen, select the SYSTEM STATUS target on
the Engineering Main Menu. If not, press the SYSTEM STATUS key on the
Operator’s keyboard.
2. On the System Status display, select network 1 (the box with UCN01 in it).
3. Select the NTWK/HWY STATUS target.
4. On the UCN Status display, select the target
03 APM
. The selected target should fill
with color. The status must be
ALIVE
.
5. Select LOAD/SAVE RESTORE. The box should change to white.
6. Select PROGRAM LOAD, then select ENTER.
7. On the Program Source display, select DEFAULT SOURCE, then select EXECUTE.
The Data Source display appears.
8. On the Data Source display, select DEFAULT
SOURCE, then select EXECUTE.
Loading should begin. In a few minutes, The APM status should change to
IDLE
.
Summary of Contents for Enhanced Micro TDC 3000
Page 1: ...L 8 Node Enhanced Micro TDC 3000 User s Manual MT11 520 ...
Page 2: ......
Page 10: ...Enhanced Micro TDC 3000 User s Manual iv 9 95 ...
Page 56: ...Enhanced Micro TDC 3000 User s Manual 3 8 9 95 ...
Page 82: ...Enhanced Micro TDC 3000 User s Manual 4 26 9 95 ...
Page 128: ...Enhanced Micro TDC 3000 User s Manual 5 46 9 95 ...
Page 144: ...Enhanced Micro TDC 3000 User s Manual 6 16 9 95 ...
Page 156: ...Enhanced Micro TDC 3000 User s Manual B 4 9 95 ...
Page 168: ...Enhanced Micro TDC 3000 User s Manual Index 12 7 95 ...
Page 171: ......