


Enhanced Micro TDC 3000 User’s Manual
6-9
9/95
6.3
6.3 CLEANING
The monitor screen, printer, keyboard, and the cartridge drive heads must be periodically
cleaned. For cleaning intervals and instructions, refer to Universal Station Service in the
LCN Service - 1 binder.
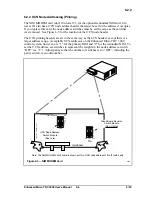
6.3.1 Air Filter Removal and Cleaning
1. Periodically inspect the air filters in each tower for dust buildup—perhaps as frequent
as every month all the way up to an annual basis. Refer to Figure 6-1 for the location
of the filter(s) and Table 6-1 for a recommended inspection timetable.
2. Each filter is located just above the Multinode Module in a tower, and is accessed by
removing the front cover of the tower. Visually inspect the top of the filter for dust
buildup. You can see the top of the filter behind the cartridge drives or hard drive.
3. If the filter must be cleaned or replaced, first shut-down the process, then assure power
is completely removed from the tower by shutting the power switch
OFF
on the front of
the tower, then by disconnecting the line cord to the tower. This is necessary because
some electrical components in the tower may not be controlled by the power switch.
4. Remove the two hex-screws which hold the drive support shelf (for either cartridge
drives or hard III drive) in place over the filter. Carefully lift the drive support shelf up
(not out) with one hand while extracting the filter with the other. Temporarily lay the
drive support shelf back in place while you clean or replace the filter.
5. The filter may be cleaned by hand-washing it in a mild detergent, then rinsing it
thoroughly in clean water. Be sure the filter is thoroughly dry before attempting to
replace it.
6. You may also discard and replace the filter if you wish. Always replace a filter that is
torn or so old that parts of it are flaking off.
7. To replace the filter, lift the drive support shelf with one hand using care not to stretch
or damage the wiring to the back of the drive(s). Slip the replacement filter in place
with the other hand, making sure it lays flat on the Multinode Module.
8. Fasten the drive support shelf in place, using the hex-screws you removed.
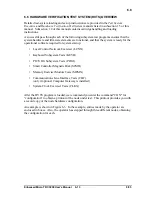
6.4 TROUBLESHOOTING
Before investigating deeply into a problem, make some preliminary checks:
•
Is power applied to both towers and all peripherals? Check power indicators on all
devices in the system. Check switches, fuses, and circuit breakers on all equipment
to insure they are functioning.
Summary of Contents for Enhanced Micro TDC 3000
Page 1: ...L 8 Node Enhanced Micro TDC 3000 User s Manual MT11 520 ...
Page 2: ......
Page 10: ...Enhanced Micro TDC 3000 User s Manual iv 9 95 ...
Page 56: ...Enhanced Micro TDC 3000 User s Manual 3 8 9 95 ...
Page 82: ...Enhanced Micro TDC 3000 User s Manual 4 26 9 95 ...
Page 128: ...Enhanced Micro TDC 3000 User s Manual 5 46 9 95 ...
Page 144: ...Enhanced Micro TDC 3000 User s Manual 6 16 9 95 ...
Page 156: ...Enhanced Micro TDC 3000 User s Manual B 4 9 95 ...
Page 168: ...Enhanced Micro TDC 3000 User s Manual Index 12 7 95 ...
Page 171: ......