background image

6808 Manual  — P/N LS10146-001SK-E:C  09/28/2017

83

Programming Overview

8.2  Mapping Overview

This section of the manual is an overview of mapping. Details about how to select mapping options appear in the appropriate subsections 
in Section 9.

Mapping is an important concept with the control panel. In general terms, mapping is assigning or linking events to outputs that will acti-
vate when events occur. You do this by assigning input points to input zones, output points to output groups and then linking or mapping 
zones and output groups.

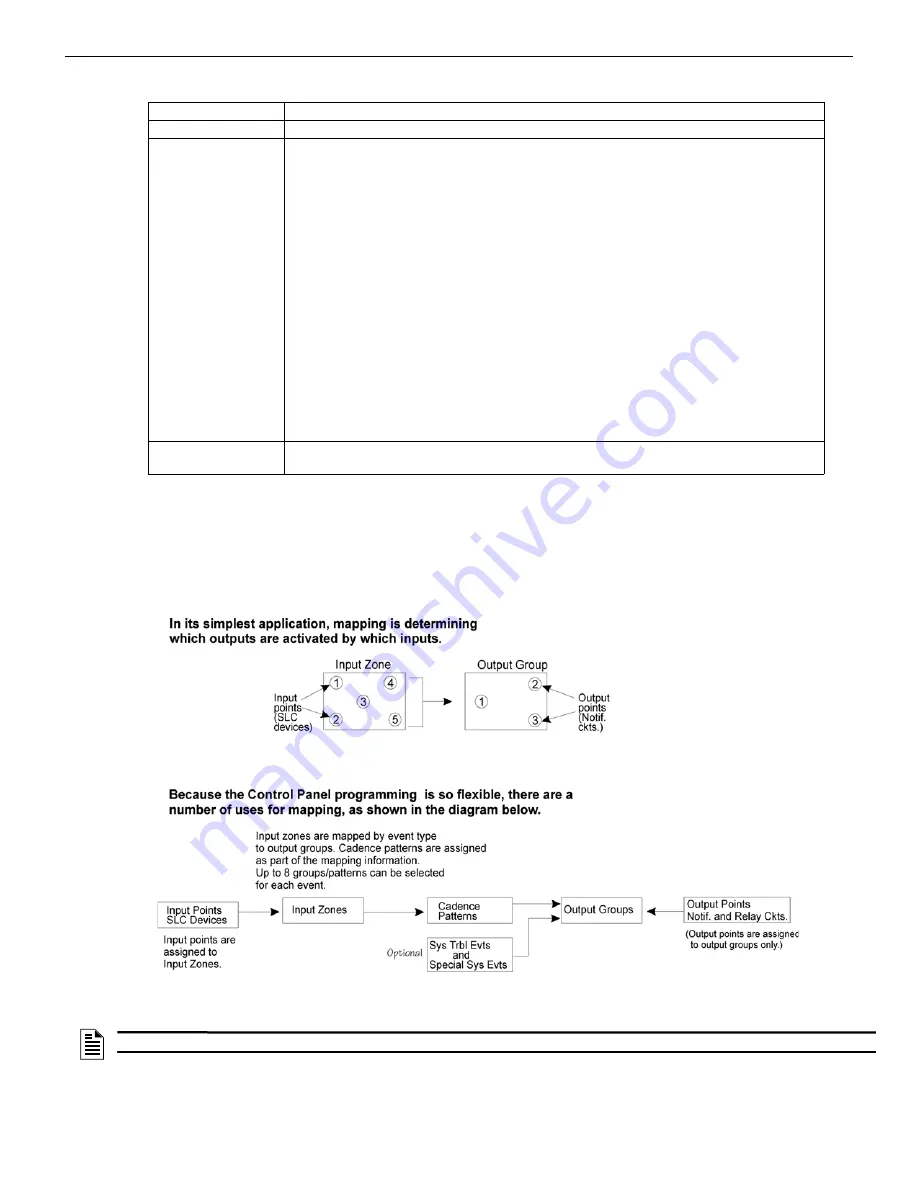
Figure 8.1 is a brief overview of the concept of mapping. The next several pages of the manual show these subjects in detail.

Figure 8.1  Mapping Overview

1 - Review System

Press 1 if you need to review the JumpStart configuration.

2 - Repeat JumpStart 

Press 2 if you need to rerun JumpStart for any reason. 

3 - Accept Config.

1.

If you are ready to make the JumpStart configuration permanent, select 3. 

2.

The system will ask you if the installation contains any Addressable Duct Detectors Used. If 
there are none, select 2 for No and skip to Step 8. If the system contains duct detectors, select 
1 for Yes and continue with Step 3. 

3.

From the list that displays, select the SLC that contains the duct detectors. 

4.

The first photoelectric or ionization detector on the system will display. Select 1 for DUCT and 2 
for NonDUCT. 

5.

Press up arrow to select the next detector. Select 1 for DUCT and 2 for NonDUCT. Continue 
until all duct detectors have been selected. (Note: You can move backwards through the list with 
down arrow).

6.

When you reach the last detector on this device, press left arrow.

7.

The system will ask you if there are any duct detectors used. If there are, select 1 for Yes and 
the message will ask, Have All Addressable Duct Detectors Been Identified? Left arrow for “No”, 
Right arrow for “Yes”. If there are no more duct detectors, continue with Step 8.

8.

The system will restart with the saved JumpStart configuration.

9.

After the system resets, it will use the new JumpStart configuration.

4 - Discard Changes

If you want to discard the changes, and keep the configuration you had before running this JumpStart 
press 4.

NOTE:

 Mapping cannot be programmed through annunciators and can only be programmed through HFSS Honeywell Fire Software Suite.

Summary of Contents for 6808

Page 1: ...6808 Addressable Fire Alarm Control Panel Installation and Operation Manual Document LS10146 001SK E Rev C 10 9 2017 ECN 17 0555 ...

Page 2: ...quate warning of a fire Smoke detectors cannot be expected to provide adequate warning of fires caused by arson children playing with matches especially in bedrooms smoking in bed and violent explosions caused by escaping gas improper storage of flammable materials etc Heat detectors do not sense particles of combustion and alarm only when heat on their sensors increases at a predetermined rate or...

Page 3: ... in an environment with a normal room temperature of 15 27º C 60 80º F Verify that wire sizes are adequate for all initiating and indi cating device loops Most devices cannot tolerate more than a 10 I R drop from the specified device voltage Like all solid state electronic devices this system may operate erratically or can be damaged when subjected to light ning induced transients Although no syst...

Page 4: ...ge number for printed manual Brief description of content you think should be improved or corrected Your suggestion for how to correct improve documentation To order parts contact Silent Knight Sales at 800 328 0103 eVance Honeywell Silent Knight and SWIFT are registered trademarks of Honeywell International Inc Microsoft and Windows are registered trademarks of the Microsoft Corporation Chrome an...

Page 5: ...ications 17 3 6 Board Assembly Diagram 19 3 7 Calculating Current Draw and Standby Battery 19 3 7 1 Current Draw Worksheet Requirements 19 Current Draw Worksheet for SK SLC Devices 20 Current Draw Worksheet for SD SLC Devices 23 3 7 2 Maximum Battery Standby Load 25 Section 4 Control Panel Installation 26 4 1 Mounting the Control Panel Cabinet 26 4 1 1 Preventing Water Damage 26 4 1 2 Removing the...

Page 6: ...ction Using the 5220 Module 51 4 15 3 NFPA 72 Polarity Reversal 52 Using the 5220 Module 52 Using the 7644 L8 Module 53 4 15 4 Using the SD500 ARM Addressable Relay Module 54 4 15 5 Using a MR 201 T Control Relay From Air Products 55 4 15 6 Transmitter Activated by Dry Contacts 57 Section 5 Common Communication Link 58 5 1 Hardware Features 58 5 1 1 Panels 58 5 1 2 Wiring Options to Connect Panels...

Page 7: ...t Points 82 8 1 2 Output Points 82 8 1 3 Running JumpStart 82 8 2 Mapping Overview 83 8 2 1 Input Point Mapping 84 8 2 2 Output Circuit Mapping 85 8 2 3 Event Mapping 85 8 2 4 Mapping LED Points 88 8 3 Programming Using the HFSS Software Suite 88 8 4 Programming Using an Annunciator 88 8 4 1 Entering Exiting the Programming Menu 89 8 4 2 Moving through the Menus 89 8 4 3 Selecting Options and Ente...

Page 8: ...odes 114 10 2 Annunciator Description 114 10 2 1 LCD Displays 114 10 2 2 Banner 115 10 3 Menu System 115 10 3 1 Main Menu Overview 115 10 3 2 Using the Menus 115 10 4 Basic Operation 115 10 4 1 Setting Time and Date 115 10 4 2 Disable Enable a Point 115 Disable Enable NACs by Template 116 Disable Enable NACs by Group 116 Disable Enable Zone Points 116 Disable Enable Point 116 Inhibit Output Group ...

Page 9: ...intenance 141 12 3 Event History 141 12 4 Built in Troubleshooting and Testing Tools 141 12 4 1 SLC Device Locator 141 12 4 2 SLC Multi Locator 141 12 4 3 I O Point Control 142 12 5 Impedances that Cause Earth Ground Faults 142 Section 13 Installation Records 144 13 1 SLC Device Point Record 144 Appendix A Compatible Devices 146 A 1 Notification Appliances 146 A 1 1 Two Wire Detectors 153 A 2 Four...

Page 10: ...s up to 17 of the 6700 6808 6820 and 6820EVS panels to be connected via copper or fiber optic cable so that a designated panel is the communicator for all panels in the link This is not a true peer to peer net work and will not perform like one The default Common communications link setup can contain up to 17 6808 panels connected Common communications link support for up to 17 Sites Each building...

Page 11: ...es SWIFT Wireless SLC Devices See Section Section 7 3 for a list of compatible devices Other Modules 5824 Serial Parallel Printer Interface Module Allows a printer to be attached for the on site event logging Maximum of four 5824s per control panel 5496 Rev F or higher NAC Expander Add 4 Notification Auxiliary power circuits with each 5496 NAC Expander 5496 5895XLs can be used in any combination u...

Page 12: ...odule WSK RELAY Module Wireless relay module B210W 6 wireless base Misc HFSS Honeywell Fire Software Suite For communication and panel programming with a Windows based computer Enables remote viewing of detector status and event history 7860 Telephone Cord RJ31X cord for connecting phone line to the 6808 RBB Remote Battery Box for mounting backup batteries that are too large to fit into the main c...

Page 13: ...6808 Manual P N LS10146 001SK E C 09 28 2017 13 Introduction ...

Page 14: ...service This equipment is not designed for use with party line service Connection to party line service is subject to state tariffs You may contact the state public utility commission public service commission or corporation commission for information Since the 6808 is a commercial fire alarm panel it must be connected upstream of all other equipment utilizing the phone lines If you have questions...

Page 15: ... time so that the 6808 shall automatically initiate and complete a test signal transmission sequence to its associated receiver at least once every 6 hrs 3 The AC Loss Hours option must be set from 1 3 hours 4 If using wired Ethernet or cellular you must program the corresponding account subscriber ID and a test time so that the FACP shall automatically initiate a test signal transmission sequence...

Page 16: ...densing 3 3 Software Downloads In order to supply the latest features and functionality in fire alarm and life safety technology to our customers we make frequent upgrades to the embedded software in our products To ensure that you are installing and programming the latest features we strongly recommend that you download the most current version of software for each product prior to commissioning ...

Page 17: ... Ground N A N A W AC input neutral 120 VAC 60 Hz 3 3 A Terminal Block 6 TROUBLE NC Normally closed relay contact 24 VDC 2 5 A resistive COM Common terminal NO Normally open relay contact RELAY 1 NC Normally closed relay contact 24 VDC 2 5 A resistive COM Common terminal NO Normally open relay contact RELAY 2 NC Normally closed relay contact 24 VDC 2 5 A resistive COM Common terminal NO Normally op...

Page 18: ...ell can also be reduced by running the wire through ferrite shield beads or by wrapping it around a ferrite toroid Figure 3 1 Wire Routing Example Relay Outputs NAC Aux Power Outputs SBUS Devices Phone Lines SLC IN OUT AC Power Input 1 4 spacing must be maintained between each of these circuit types as well as between power limited and non power limited circuits ...

Page 19: ...ddressable devices that will be used in the system and compute the current draw requirements for alarm and standby Record this information in the Current Draw Worksheet on Line A 2 Add up the current draw for all auxiliary devices and record in the table at Line B 3 Add up all notification appliance loads and record in the table at Line C 4 For notification appliance circuits and auxiliary devices...

Page 20: ...0 mA Alarm 250mA 250 mA Addressable SLC Detectors SK PHOTO Standby Alarm 30mA2 mA mA SK PHOTO T mA mA SK HEAT mA mA SK HEAT HT mA mA SK DUCT includes PhotoR 1 SK ACCLIMATE mA mA SK HEAT ROR mA mA SK PHOTO W SLC Standby 200µA mA Alarm 4 5mA mA SK PHOTO R W SLC Standby 200µA mA Alarm 4 5mA mA SK PHOTO T W SLC Standby 200µA mA Alarm 4 5mA mA SK HEAT W SLC Standby 200µA mA Alarm 4 5mA mA SK HEAT ROR W...

Page 21: ...R WH IV Intelligent sounder base Aux Pwr Standby 5mA mA Alarm 35mA mA SLC Standby 3mA mA B200S WH IV Intelligent sounder base Aux Pwr Standby 5mA mA Alarm high vol 35mA mA SLC Standby 3mA mA B200SR LF WH IV Low Frequency sounder base Aux Pwr Standby 1mA mA Alarm 125mA mA B200S LF WH IV Low Frequency sounder base Aux Pwr Standby 55mA mA Alarm high vol 140mA mA SLC Standby 30mA mA B224RB WH IV Relay...

Page 22: ...nt SLC Power 24mA A Total System Current Auxiliary Devices4 Refer to devices manual for current rating IPDACT 2 IP Communicator 1 max Standby 93mA mA Alarm 136mA mA IPDACT 2UD IP Communicator 1 max Standby 98mA mA Alarm 155mA mA CELL MOD CELL CAB SK Standby 55mA mA Alarm 100mA mA Alarm Standby mA mA mA Alarm Standby mA mA mA Alarm Standby mA mA mA Alarm Standby mA mA mA B Auxiliary Devices Current...

Page 23: ... Devices Current per Device Standby Current Alarm Current For each device use this formula This column X This column Current per number of devices Fire Panel Current draw from battery 1 Standby 190 mA 190 mA Alarm 250 mA 250 mA Addressable SLC Devices SD500 AIM Standby Alarm 55 mA1 mA mA SD500 MIM mA mA SD500 ARM mA mA SD500 PS SD505 HEAT mA mA SD505 PHOTO mA mA SD500 ANM Aux Pwr Standby 8 mA mA A...

Page 24: ...FML Fiber Optic Multi Mode 1 Max Standby Alarm 53 mA mA mA SK FSL Fiber Optic Single Mode 1 Max Standby Alarm 79 mA mA mA A Total System Current Auxiliary Devices3 Refer to devices manual for current rating IPDACT 2 IP Communicator Alarm 136 mA mA Standby 93 mA mA IPDACT 2UD IP Communicator Alarm 155 mA mA Standby 98 mA mA CELL MOD CELL CAB SK Standby 55 mA mA Alarm 100 mA mA Alarm Standby mA mA m...

Page 25: ...mA 473 mA 442 mA 18AH 569 mA 506 mA 475 mA 24AH 769 mA 706 mA 675 mA 33AH 1 07A 1 01A 975 mA 35AH 1 14A 1 07A 1 04A 40AH 1 30A 1 24A 1 21A 55AH 1 80A 1 74A 1 71A Table 3 4 Maximum Battery Standby Loads for 24 Hour Standby Rechargeable Battery Size 90 hr Standby 5 min alarm 90 hr Standby 15 min alarm 90 hr Standby 20 min alarm 33 AH N A N A N A 40 AH 347 mA 331 mA 322 mA 55 AH 480 mA 464 mA 456 mA ...

Page 26: ...ch the 6808 to the plywood Also mount any other desired components to the plywood DO NOT flush mount the 6808 cabinet in a wall designated as a fire break Figure 4 1 6808 Cabinet 4 1 1 Preventing Water Damage Water damage to the fire system can be caused by moisture entering the cabinet through the conduits Conduits that are installed to enter the top of the cabinet are most likely to cause water ...

Page 27: ...rge capacity is 7 0 to 35 AH The main control cabinet can house batteries up to 18 AH larger capacity bat teries can be housed in a RBB see Section 4 3 1 for details Use 12V batteries of the same AH rating Determine the correct AH rating as per your current load calculation see Section 3 7 WARNING RISK OF ELECTRICAL SHOCK AND EQUIPMENT DAMAGES Several different sources of power can be connected to...

Page 28: ...erly install the accessory cabinet and backup batteries follow these steps 1 Mount the accessory cabinet See figure Figure 4 4 for the four cabinet mounting holes If mounting onto drywall the accessory cabinet must be mounted onto 3 4 inch plywood This is necessary because the weight of the batteries inside the accessory cabinet could cause the cabinet to pull away from the drywall When mounting o...

Page 29: ... the control panel 5 Insert the RBB cover screws into the cover mounting holes see Figure 4 6 Screw the cover screw of the way into the cover mounting hole 6 Align the cover plate mounting keyhole over the cover mounting screws See Figure 4 7 Figure 4 7 Cover Plate Mounting Keyholes and Cover Mounting Screws Alignment 7 Slide the cover into place and tighten the cover mounting screws Conduit Condu...

Page 30: ...ardless of gauge used The formula used to generate this chart is shown in the note below Wiring Distance calculation example Suppose a system is configured with the following SBUS modules 2 Module 5860 Remote LCD Annunciator 1 5496 NAC Expander 1 5865 LED Fire Annunciator 1 5824 Serial Parallel Printer Interface Module The total worst case current is calculated as follows NOTE Total worst case cur...

Page 31: ...m using 16 Gauge wire 2362 feet maximum using 14 Gauge wire 4 4 2 Wiring Configurations Figure 4 8 illustrates Class B configurations wiring Figure 4 8 SBUS Class B Wiring 5860 Current Draw 2 x 100 amps 200 amps 5496 Current Draw 1 x 010 amps 010 amps 5865 Current Draw 1 x 200 amps 200 amps 5824 Current Draw 1 x 040 amps 040 amps Total Worst Case Current Draw 450 amps NOTE For assistance with SBUS...

Page 32: ... 5 1 3 Connect the 5860 to the panel see Section 4 7 4 Use the DIP switches on the back of the 5860 to assign an ID to the 5860 see Section 4 11 1 5 The new 5860 module must be added to the system through programming JumpStart AutoProgramming will add the module automatically see Section 8 1 You can also add it manually see Section 9 2 2 Select a name if desired 4 5 1 Mounting the 5860 This sectio...

Page 33: ... double gang If an electrical box is used the box must be 1 3 8 back from the face of the wall to accommodate the annunciator Studs used with an electrical box must be two by fours or larger Figure 4 12 Placement of Electrical Box for Flush Mounting Set screw location Loosen set screws to remove bezel when disassembling annunciator Knockout holes Holes for surface mounting Holes for inserting wire...

Page 34: ...the back box and tighten the set screws on the bezel Figure 4 13 Flush Mounting the Back Box Surface Mounting The 5860 can be mounted directly to a surface or can be attached to a single double or four square electrical box The Model 5860TG TR trim ring kit is available for use when surface mounting 1 Drill holes in the surface to match the screw holes on the back box 2 Fit the trim ring over the ...

Page 35: ...el 2 Mount the 6855 in the desired location see Section 4 6 1 3 Connect the 6855 to the panel see Section 4 4 2 4 Use the DIP switches on the back of the 6855 to assign an ID to the 6855 see Section 4 11 1 5 The new 6855 module must be added to the system through programming JumpStart AutoProgramming will add the module automatically see Section 8 1 You can also add it manually see Section 9 2 2 S...

Page 36: ...d prior to the complete installation of the 6855 using any of the mounting holes shown in Figure 4 16 Figure 4 16 Back Box Mounting Holes 2 Remove knockout holes as needed for wires See Figure 4 17 for backbox knockout locations Figure 4 17 Back Box Knockout Locations 3 Wire the Annunciator board to the main control panel See Figure 4 20 Mounting Holes Mounting Holes Wire Knockouts Wire Knockouts ...

Page 37: ... The optional Model RA 100TG TR trim ring kit is available for use when surface mounting 1 Remove the desired knock out See Section 4 5 2 To properly mount the back box insert a single screw into the key shaped mounting hole Do not tighten all the way See Figure 4 19 Place a level on top of the back box with the back box level insert the rest of the mounting screws Figure 4 19 Back Box Surface Mou...

Page 38: ...nvolves the following steps 1 Make sure power is off at the panel 2 Mount the 6860 in the desired location see Section 4 7 1 3 Connect the 6860 to the panel see Section 4 7 2 4 Use the DIP switches on the back of the 6860 to assign an SBUS ID to the 6860 see Section 4 11 1 5 The 6860 module must be added to the system through programming JumpStart AutoProgramming will add the module automatically ...

Page 39: ...s 2 The back box can be mounted prior to the complete installation of the 6860 using any of the mounting holes shown in Figure 4 22 Figure 4 22 Back Box Mounting Holes 2 Remove knockout holes as needed for wires See Figure 4 23 for backbox knockout locations Figure 4 23 Back Box Knockout Locations 3 Wire the annunciator board to the main control panel As described in Section 4 5 2 Mounting Holes M...

Page 40: ... TG red trim ring kit is available for use when surface mounting the 6860 1 Remove the desired knock out See Section 4 5 2 To properly mount the back box insert a single screw into the key shaped mounting hole Do not tighten all the way See Figure 4 25 Place a level on top of the back box with the back box level insert the rest of the mounting screws Figure 4 25 Back Box Surface Mount Holes 3 Run ...

Page 41: ...n in Figure 4 27 Figure 4 27 Model 6860 Connection to the Panel 4 8 5824 Serial Parallel Interface Module Installation The 5824 serial parallel interface module allows you to connect a printer to the panel Printing is available for real time events detector status and event history The 5824 and the printer connected to the 5824 are for ancillary use only The printer must be a UL 864 listed printer...

Page 42: ... A screen similar to the one shown in Figure 4 29 will display Figure 4 29 Selecting Printer and Output Port Options 6 Select options for the printer as needed for your installation Most printers are parallel 7 If you are using a serial printer use the next screen to select serial port options as required for your printer Refer to your printer manual if you need more information 4 9 5880 LED I O M...

Page 43: ...he DIP switch for selecting an SBUS ID number Figure 4 30 5880 Board Layout 4 9 2 5880 Connection to Panel The 5880 connects to the panel via the SBUS Make connections as shown in Figure 4 31 After the 5880 is connected to the panel it must be added to the system This programming step is described in Section 4 11 Figure 4 31 5880 Connection to Main Control Panel Assembly SBUS Connection Dry Contac...

Page 44: ... P1 Pin 12 is a common open collector output for controlling a PZT If used the 5880 PZT will match the PZT pattern of the on board annunciator or remote annunciator Figure 4 32 5880 Board Layout 4 9 4 Dry Contact Wiring The 8 input circuits on the 5880 board are for monitoring switch inputs any type of switch supported by the control panel can be used with the 5880 For example you can use a 5880 t...

Page 45: ...he key switches and the trouble LED follow the behavior of other system annuncia tors and do not require any installation steps The following sub sections describe how to install the 5865 3 and 5865 4 hardware Refer to Section 9 for programming information Figure 4 34 5865 3 and 5865 4 Assembly front view Supervised Power Limited 4 7k EOL NOTE This manual uses 5865 when referring to aspects of the...

Page 46: ...unt the 5865 4 to a standard 4 gang electrical box Mount the 5865 3 to a standard 3 gang electrical box In Figure 4 36 the 5865 4 attached to a 4 gang box is used as an example Figure 4 36 5865 Mounting Example The 5865 ships with a set of zone description labels that can be inserted into the 5865 board assembly These labels can be used in a type writer or can be written on by hand Slide the label...

Page 47: ...ule addresses 4 11 2 SBUS Bandwidth Considerations Each SBUS device generates a certain amount of traffic on the SBUS Generally the amount of traffic generated depends on the type of SBUS device To help you figure out the SBUS bandwidth usage of a given collection of devices a tool is available on the Honeywell Silent Knight website www silentknight com The tool will serve as a guide to help deter...

Page 48: ... 1 Conventional Notification Appliance This sub section of the manual explains how to install conventional notification appliances for Class A and Class B configurations Class B Notification Wiring You must use an appliance from the list of compatible appliances in Appendix A at the back of this manual To install a Class B notification appliance circuit 1 Wire Class B Notification appliances as sh...

Page 49: ...When there are no alarms in the system and the panel has AC power door holder circuits have 24 volt power present at their terminals Any alarm will cause power to disconnect Power will be re applied when the system is reset If AC power is off for more than 15 seconds the auxiliary door holder power will be disconnected to conserve the battery backup When AC power is restored power is immediately r...

Page 50: ... or Relay 2 as needed for your application See Figure 4 42 for the location of the relay terminals 2 Configure the relay through programming see section 9 5 4 15 Remote Station Applications 4 15 1 Keltron Model 3158 Installation The control panel is compatible with Keltron Model 3158 used for direct connection to a Keltron receiver The 3158 reports alarms supervisories and troubles The steps for c...

Page 51: ...s To install the 5220 for city box connection 1 Use one of the knockouts on the right side of the control panel to connect the 5220 using a short piece of conduit must not exceed 20 feet in length 2 Wire the 5220 to the control panel as shown in Figure 4 44 This drawing also shows how to connect the city box coil to terminals 3 and 4 on the 5220 Do not install an EOL resistor in the terminals of t...

Page 52: ...ight side of the control panel cabinet to connect the 5220 using a short piece of conduit must not exceed 20 feet in length 2 Wire the 5220 to the control panel using the four wire pigtail provided as shown in 4 45 This diagram also shows how to connect the 5220 to the remote indicator Do not install an EOL resistor in the terminals of the NAC circuit used for this application 3 Connect earth grou...

Page 53: ... trouble events to be reported to a remote site Alarms will override trouble conditions and it will not be possible to reset the remote indicator until the condition is cleared and the control panel is reset To install the 7644 L8 for polarity reversal 1 Wire the 7644 L8 to the control panel as shown in Figure 4 46 Do not install an EOL resistor on the terminals of the NAC circuit used 2 Program t...

Page 54: ...wired for polarity reversal it reports alarm and trouble events to a remote site Alarms will override trouble conditions and it will not be possible to reset the remote indicator until the condition is cleared and the control panel is reset Relay 2 must be programmed for Alarm default NOTE If you need to transmit supervisories or trouble conditions additional SD500 ARM modules must be added Use re...

Page 55: ... and trouble events to a remote site Alarms will override trouble conditions and it will not be possible to reset the remote indicator until the condition is cleared and the control panel is reset If an alarm condition occurs the alarm relay will close overriding the trouble condition Current 15 mA max Operating Voltage 24 VDC nominal Resistance 4 K EOL To Remote Intended for Connection to a Polar...

Page 56: ...ersal Connection Using the MR 201 T Relay 2 Program the NAC circuit for non silence NAC circuit Intended for Connection to a Polarity Reversal Circuit of A Remote Station Receiving Unit Having Compatible Rating NOTE If you need to transmit supervisories or trouble conditions additional relay modules must be added Use relay 1 to transmit supervisory conditions Use the trouble relay to transmit trou...

Page 57: ...mitter to the 6808 FACP dry contacts The FACP contacts must be supervised by the remote station transmitter module using end of line resistors ELRs with a value determined by the transmit ter manufacturer Power is also provided by the remote station transmitter manufacturer Refer to the remote station transmitter manufac turer s manual for details Figure 4 49 Transmitter Activated by Dry Contact ...

Page 58: ... across the link Up to 17 sites can be activated and programmed for the link 5 1 2 Wiring Options to Connect Panels 1 Fiber Optic Single Mode Use the SK NIC and SK FSL for up to 30dB loss of signal separation SK FSL connects to the link using 9 125 micron single mode fiber 2 Fiber Optic Multi Mode Use the SK NIC and SK FML for up to 8dB loss of signal separation SK FML connects to the link using 6...

Page 59: ...nternal SK NIC Wiring Option 5 3 SK NIC Wiring Options Linking a group of 6808s requires the use of a SK NIC network interface card with each panel The SK NIC connects to other linked units using unshielded twisted pair wiring or fiber optic cable Figure 5 3 SK NIC Network Interface Card ...

Page 60: ...L is a fiber module that allows the single mode fiber to link between nodes Each fiber loop module can Transmit TX and Receive RX fiber optic cable connecting to the SK NIC Up to two fiber loop cards can be added to the SK NIC and both cards may be combined in the same configuration See Figure 5 5 Figure 5 5 SK NIC with Fiber Loop Modules SK NIC KIT Mounting Kit SK NIC can be mounted within the 68...

Page 61: ...t Port 2 of TB2 is done at the next previous SK NIC due to these wiring connections being connected to Port 1 of TB2 at the next previous SK NIC 4 Unused optic ports on fiber loop modules must have their dust caps placed on the port 5 Based on the type of data medium chosen run the twisted pair wiring fiber optic cable to the next SK NIC using a class B or class A wiring method A combination of bo...

Page 62: ... Communication Link Unshielded Twisted Pair Wiring between Multiple Panels Unshielded twisted pair wiring between multiple panels is shown in Figure 5 7 Class A wiring is shown with a dotted line Figure 5 7 Twisted Pair Wiring Configuration Class A Wiring ...

Page 63: ...2017 63 Common Communication Link Fiber Optic Multi Mode Wiring between Multiple Panels Fiber optic cable between multiple panels is shown in Figure 5 8 Class A is shown with a dotted line Figure 5 8 Fiber Optic Wiring Example Class A Wiring ...

Page 64: ...64 6808 Manual P N LS10146 001SK E C 09 28 2017 Common Communication Link Figure 5 9 Fiber Optic Wiring Single Mode Example Class A Wiring ...

Page 65: ...Optic and Twisted Pair Wiring between Multiple Panels A mixture of fiber optic cable and twisted pair wiring between multiple panels is shown in Figure 5 10 Class A cabling is shown with dotted line Figure 5 10 Twisted Pair and Fiber Optic Combination Wiring Example Class A Wiring ...

Page 66: ...anel ID for each panel is set using DIP switch positions 1 through 5 See Figure 5 11 below for possible DIP switch settings Figure 5 11 ID Settings NOTE It is important that much thought is given when choosing the panel IDs for each panel It is difficult to change the IDs once panel programming has begun ...

Page 67: ...6808 Manual P N LS10146 001SK E C 09 28 2017 67 Common Communication Link ...

Page 68: ...agnostics 1 Enter the Installer Code The panel will automatically go to the main menu 2 Select 6 for Network Programming 3 Press 1 to enter the Learn Network menu 4 Press ENTER to add or remove panels connected to the network as member or guest 6 2 2 Edit Network Names The Edit Network menu allows you to edit the panel name and edit the panels site name To Edit Panel Names 1 Enter the Installer Co...

Page 69: ...ty to access programming and other higher level panel functions while other users may only need access to lower level functions such as preforming fire drills or acknowledging trouble conditions Profile 1 is the profile that dictates what functions the Fire Fighter Key has access to Because this is the profile for a key the user name and the access code can not be edited for this profile Profile 2...

Page 70: ...for reporting The communication link capa bility of the linked system allows all panels to use the same communicator providing an economical solution for reducing the number of paths required for reporting purposes A communicator is specified by panel number The communication link will be used to report events according to the communicator report table Communicator Miscellaneous When using the SIA...

Page 71: ...t 4 for Communicator Reporting Table 5 Press to add rows Press ENTER to edit data Figure 6 1 Communicator Reporting 6 3 Sync Network Options If after making changes to network programming the distribution of network options fail the system will report a trouble of network options out of sync Use this menu to redistribute changed options to the rest of the network The user will be required to choos...

Page 72: ... Access Number 123456 See Section 6 2 4 Computer Code 0 Access Codes Select Profile 01 20 Edit Name Profile 1 is the profile that dictates what functions the Firefighter Key has access to Because this is the profile for a keys the user name and the access code can not be edited for this profile Profile 2 is the profile for the installer and is referred to as the Installer Code This profile s user ...

Page 73: ...ad Download F1 Function Key F2 Function Key F3 Function Key F4 Function Key Send Receive Firmware Update Communicator Options Communicator Assignments Select Panel Primary 0 unused See Section 6 2 6 Communicator Miscellaneous SIA Options Enable pi SIA Modifier See Section Communicator Miscellaneous Include Panel ID in SIA Reporting Receiver Configuration Select Panel Select Receiver Receiver Numbe...

Page 74: ... isolator module I56 3445 000 SK MONITOR Monitor module I56 3442 000 SK MINIMON Mini monitor module I56 3444 000 SK MONITOR 2 Dual input monitor module I56 3435 000 SK MON 10 10 input monitor module I56 3443 000 SK RELAY Addressable relay module I56 3438 000 SK RELAYMON 2 Dual relay monitor module I56 3735 000 SK RELAY 6 Six relay control module I56 3439 000 SK ZONE Addressable zone interface modu...

Page 75: ...e SWIFT manual P N LS10036 000SK E for more information 7 5 Wiring Requirements for SLC Devices The following information applies to all SLC devices Refer to the section that describes the type of device you are installing for details Color Guide IV Ivory color BL Black WH White WHITE White Table 7 1 SK SLC Devices NOTE The control panel supports the use of either SD or SK SLC devices You cannot i...

Page 76: ...ENDED Twisted unshielded pair 12 to 18 AWG 3 31mm2 to 0 82 mm2 50 ohms maximum per length of Style 6 7 50 ohms per branch maximum for Style 4 loop 12 500 ft 3 810 m 9 500 ft 2895 6 m 6 000 ft 1 828 8 m 3 700 ft 1 127 76 m 12 AWG 3 31 mm2 14 AWG 2 08 mm2 16 AWG 1 31 mm2 18 AWG 0 82 mm2 Untwisted unshielded wire in conduit or outside of conduit 5 000 ft 1 528 m 3 700 ft 127 76 m 12 to 16 AWG 3 312 m...

Page 77: ...ts for the various wire gauges Figure 7 2 Calculating Wire Run Length for T tap 7 5 2 Wiring SLC in Class A Configuration Figure 7 3 illustrates how to wire the SLC loop for Class A installations Figure 7 3 Class A SLC Configuration NOTE Style 6 does not use short circuit isolator devices NOTE Style 7 requires an isolator module as the first device on the in and the out loop NOTE No t taps allowed...

Page 78: ... module using address 1 0 is an invalid address Example 1 To select device address 35 turn the ONES rotary dial to 5 and the TENS rotary dial to 3 as shown in Figure 7 4 Figure 7 4 SK SLC Device Addressing Using Rotary Dials 7 7 Wiring SK Detectors This section describes how to install SK heat and smoke detectors See Table 7 1 for a list of detectors Refer to the detectors installation instruction...

Page 79: ...ing 2 Enter the Installer code then press ENTER 3 Select 2 for Point Functions 4 Select 3 for Set SLC Dev Addr 5 Select Yes by pressing the up arrow then press ENTER The panel will go into trouble at this point You can use the SILENCE key to stop the PZT The trouble will clear automatically when the panel reinitializes when you finish programming 6 When the wait message clears the following option...

Page 80: ...idge between a group of wireless fire devices and a SLC loop on the 6808 It is powered by the SLC loops or by a regulated external 24 VDC UL listed power supply For details about wireless devices system setup and opera tion see the SWIFT Smart Wireless Integrated Fire Technology Instruction Manual P N LS10036 000SK E NOTE The SK WGI as part of the wireless network has been tested for compliance wi...

Page 81: ...6808 Manual P N LS10146 001SK E C 09 28 2017 81 SK SD and SWIFT Wireless SLC Device Installation ...

Page 82: ...d type Manual Pull The installer will need to manually change the switch type if manual pull is not correct JumpStart Autoprogramming creates one zone Zone 1 and assigns all input points to Zone 1 Zone 1 is mapped to Output Group 1 After JumpStart completes you can re map to configure a multiple zone output group system see Section Zone Accessory Options For a general explanation of mapping see Se...

Page 83: ...re none select 2 for No and skip to Step 8 If the system contains duct detectors select 1 for Yes and continue with Step 3 3 From the list that displays select the SLC that contains the duct detectors 4 The first photoelectric or ionization detector on the system will display Select 1 for DUCT and 2 for NonDUCT 5 Press up arrow to select the next detector Select 1 for DUCT and 2 for NonDUCT Contin...

Page 84: ...Point Mapping Input points are assigned to input zones Any input point can be assigned to any input zone Input points can be assigned to one zone only An input point can be designated as Unused which means it has not been assigned to a zone Figure 8 2 Input Point Assignment Example ...

Page 85: ...anel events and 6 types of Site events that can be mapped see Table 8 1 For each event type you can activate the output groups with specific output patterns Mapping examples are shown in Figure 8 4 Figure 8 5 Figure 8 6 System Zone Panel Site Fire Manual Pull Alarm System Aux 1 Alarm Fire Drill Water Flow Alarm System Aux 2 Alarm General Fire Alarm Detector Alarm heat or smoke detectors General Fi...

Page 86: ... Trouble General Trouble Status Point Active SBUS Class A Trouble Site Silenced SLC Loop Trouble AC Loss Trouble F1 Key Active Battery Trouble F2 Key Active Ground Fault Trouble F3 Key Active Phone Line Trouble F4 Key Active Reporting Account Trouble Printer Trouble Aux Power Trouble System Switch Trouble Output Group Trouble System Zone Panel Site Table 8 1 Event Types ...

Page 87: ...6808 Manual P N LS10146 001SK E C 09 28 2017 87 Programming Overview Figure 8 5 Example of Zone Events Mapped to Output Groups and Patterns ...

Page 88: ...FSS Honeywell Fire Software Suite to program the control panel onsite personnel will need to be onsite during the upload or download process HFSS is a software package that lets you easily program the control panel using a Windows based com puter HFSS is needed for Mapping When using HFSS you can set up the programming options for the panel save the options in a file then download the file to the ...

Page 89: ...epting all changes If you select No any changes you have made since you entered the Program Menu will have no effect 8 4 2 Moving through the Menus Figure 8 7 shows how to move through Program Menu screens using the System Tests screen as an example Figure 8 7 Moving through Program Menu 8 4 3 Selecting Options and Entering Data There are several ways to make programming selections using the contr...

Page 90: ...l IO Section 9 2 2 6860 LCD Annunciator 5860 LCD Annunciator 6855 LCD Annunciator 5895XL Power Supply 5496 NAC Expander 5880 LED IO Module 5865 LED Annun Module SK NIC Network Interface Card Delete Module Select Module Section 9 2 3 View Module List Select Module Section 9 2 4 Zone Edit Zone Select Zone Edit Zone Name Section Edit Zone Name Zone Properties Verification Type 1 Count Section Edit Zo...

Page 91: ...ion 9 4 3 Point SK SD Devices on Internal SLC Enter Pt Select Module2 UNUSED Section 9 5 SWITCH 1 2 3 4 MANUAL PULL WATERFLO W LATCH NON LATCH FIRE SUPERVSY LATCH NON LATCH FIRE DRILL SILENCE RESET P A S ACK ZONE AUX1 LATCH NON LATCH ZONE AUX2 LATCH NON LATCH SYSTEM AUX1 LATCH NON LATCH SYSTEM AUX2 LATCH NON LATCH DETECTOR FIRE TAMPER LATCH NON LATCH MANUAL RELEASE SWITCH 1 2 3 4 INTERLOCK STATUS ...

Page 92: ... PHOTO No Accessory SDR BAS RLY BAS I SdrBa Intelligent Sounder Base ION No Accessory SDR BAS RLY BAS I SdrBa HEAT1 2 3 No Accessory SDR BAS RLY BAS I SdrBa PHOTO DUCT 1 2 3 No Accessory DCT RLY 2 WIRE SMOKE 1 3 ACCLIMATE1 2 No Accessory SDR BAS RLY BAS I SdrBa DETECTOR1 2 3 HEAT HT1 2 No Accessory SDR base RLY base I SdrBa PHOT HEAT1 2 No Accessory SDR BAS RLY BAS I SdrBa BEAM1 2 SUP DET1 2 3 Sam...

Page 93: ... SDR BAS RLY BAS I SdrBA Intelligent Sounder Base CO SUPR FIRE SUPR No Accessory SDR BAS RLY BAS I SdrBA Intelligent Sounder Base W Detector1 2 4 Photo Photo Heat Heat W SUP DET1 2 4 Same as W Detector Internal Power and External Power UNUSED Section 9 5 2 B NOTIF NOTIF OUTPUT Select Group Supervised Yes or No Edit Name CONTROL CIRCUIT A NOTIF NOTIF OUTPUT Select Group Super vised Yes or No Edit N...

Page 94: ...UX2 SYSTEM AUX1 SYSTEM AUX2 Section 9 5 2 WATERFLO W FIRE SUPER VISORY FIRE TAMPER FIRE DRILL SILENCE RESET P A S ACK ZONE AUX 1 ZONE AUX2 SYSTEM AUX1 SYSTEM AUX2 MANUAL RELEASE INTER LOCK STATUS POINT A SWITCH Same as B SWITCH B DETECT 2 WIRE SMOKE Zone Edit Name 4 WIRE SMOKE CO 4 WIRE DET A DETECT 2 WIRE SMOKE 4 WIRE SMOKE CO 4 WIRE DET 5880 5865 Enter Point UNUSED Section 9 5 3 NOTIF NOTIF OUTP...

Page 95: ...SE Rotary Pulse Format U 60 40 U E 66 34 Dial Tone Disabled Y or N N Monitor Line Y or N N Answering Machine Bypass Y or N N Phone Line Unused Y or N N Edit Ethernet IP Address Section Edit Ethernet Subn Mask SubNet Default Gateway DHCP Enable AlarmNet Timers Ethernet Supervise 75 sec 90 Sec 3 min 5 min 1 hr 24 hrs 30 days None 5 Minutes Section AlarmNet Timers Cellular Supervise 24Hrs 30 days non...

Page 96: ... 50 Hz 60Hz Section Change AC Line Frequency 60 Hz Internal Clock Display Format AM PM AM PM Section Clock Format AM PM or Military MIL Auto resound 4 hours 24 hours Section Auto Resound 4 or 24 hours 24 hours Miscellaneous Options SYNC Strobes when Silenced Y N Section Synchronize Strobes Active During Silence N Auto Display Events Y N Section Auto Display Oldest Event N Daylight Saving Options A...

Page 97: ...6808 Manual P N LS10146 001SK E C 09 28 2017 97 Programming Overview ...

Page 98: ...the up or down arrow to select each character for the modules name or press the right arrow to bypass name edit Press the right arrow to move to the next character CAUTION Before any customized programming is done JumpStart should be run first After Jump start is run thoroughly test the system The reason the system should be tested after JumpStart is because JumpStart automatically programs the sy...

Page 99: ...am Menu or the new module will not be added 9 2 3 Deleting a Module If you ever need to delete a module follow these steps You must be in the Main Menu to perform this task If necessary enter the Installer Code 1 Enter the installer code 2 Press 7 for Program Menu 3 Press 1 to enter module menu 4 Press 3 to delete a module 5 From the next screen select a module to delete 6 A warning screen will di...

Page 100: ...ciator display indicates that a prealarm has occurred If the zone has been mapped to an output group for the prealarm event the output group will activate The prealarm will not be reported to the central station Alarm Verification Alarm verification is an optional false alarm prevention feature that verifies an alarm condition by resetting the smoke detector If the alarm condition still exists by ...

Page 101: ...iew the points in a zone follow these steps 1 Enter the installer code 2 Select 7 for Program Menu 3 Press 2 to enter zone menu 4 Press 2 to view zone points 5 Enter the number of the zone you wish to view then press ENTER Figure 9 3 View Zone Points Screen 9 4 Group An output group is made up of output points that have been programmed to respond in the same way Output groups simplify program ming...

Page 102: ... for more information Figure 9 4 Group Properties Programming Options 9 4 2 View Group Points 1 Enter the installer code The panel will automatically go to the main menu 2 Select 7 for Panel Programming 3 Press 3 to enter group menu 4 Press 2 to view group points 5 Enter the group number then press ENTER 9 4 3 Edit OPG Template 1 Enter the installer code The panel will automatically go to the main...

Page 103: ... Select S for sensor or M for module SK Only 6 Enter the number of the point you wish to edit then press ENTER 7 Select the type of device by pressing the up or down arrow key Refer to Table 9 3 under the column heading Type Selection for a list of choices Type Selection Function Latching Option Comments UNUSED SD DETECTOR PHOTO ION HEAT PHOTO DUCT SD SUP DET PHOTO Latching Non Latching ION HEAT P...

Page 104: ...n the switch is activated a fire drill begins when the switch is de activated a fire drill ends SILENCE System level switch provides an alternate way to silence the system same effect as pressing the Silence key RESET System level switch provides an alternate way to reset the system same effect as pressing the Reset key PAS_ACK Positive acknowledge switch This switch must be used in zones programm...

Page 105: ...plications where the devices require constant power AUX RESET Use for auxiliary power resettable applications See Section 4 13 2 for a description of how this option operates AUX DOOR Use for auxiliary power door holder applications For example if you were using an auxiliary power supply for door holders you would use this option See Section Door Holder Power for a description of how this option o...

Page 106: ... aux2 WATERFLOW SUPERVSY TAMPER FIRE DRILL SILENCE RESET PAS_ACK ZN_AUX1 ZN_AUX2 SYS_AUX1 SYS_AUX2 MAN REL ILOCK Select Type STATUS POINT Non latching Used to activate an ancillary Output Group that does not active alarm sound PZT display status or report events Reset has no affect on this point A SWITCH Same as B SWITCH B DETECT 2 WIRE SMOKE Used for Class B 2 wire detectors 4 WIRE SMOKE Used for...

Page 107: ...ons Auto Test Time To access the Auto Test Time screen 1 Enter the installer code The panel will automatically go to the main menu 2 Select 7 for Panel Programming 3 Select 5 for System Options 4 From the next menu select 1 for Communication Options 5 Select 1 for Auto Test Time 6 Enter the hour you desire the control panel to send an automatic test report or press the up or down arrow key then pr...

Page 108: ...or TT PL 9 Press the up or down arrow key to select the dial option then press ENTER Dial Format 10 Press the up or down arrow key to select the pulse ratio for rotary dialing option then press ENTER Options are Dial Tone Detection Disabled 11 Select Y do disable or N don t disable by pressing the up or down arrow key then press ENTER Monitor Line Enable the line monitor for each phone line that w...

Page 109: ...actory programmed as No 14 Select Y or N by pressing the up or down arrow key then press ENTER Edit Ethernet 1 Enter the installer code The panel will automatically go to the main menu 2 Select 7 for Panel Programming 3 Select 5 for System Options 4 From the next menu select 1 for Communication Options 5 Select 3 for Edit Ethernet Figure 9 7 Edit Ethernet Message AlarmNet Timers 1 Enter the instal...

Page 110: ...ing water flow delay follow these steps 1 Enter the installer code 2 Select 7 for Program Menu 3 Select 5 for System Options 4 Press 4 for Time Options A screen similar to the one shown in Figure 9 9 will display Figure 9 9 Water Flow Delay Programming Screen 5 Enter the number of seconds 0 to 90 to delay an a water flow switch alarm then press ENTER Alarm Verify You can set the alarm verification...

Page 111: ...ng silence display status at idle auto display event report by zone or point Plexiglas door and single key ack To edit Miscellaneous Options 1 Enter the installer code 2 Select 7 for Program Menu 3 Select 5 for System Options 4 Select 5 for Misc Options Synchronize Strobes Active During Silence When SYNC Strbs w Sil is Selected as Y Yes then strobes will continue to flash when the system is silenc...

Page 112: ...ENTER two times to make your selection and exit 9 6 5 Edit Banner The banner is the message that displays on the panel LCD when the system is normal that is when no alarms or troubles exist and no one is currently using system menus You can create a customized message which can be up to 40 characters two lines of 20 characters each If you do not create a customized message the system will use the ...

Page 113: ...installer code 2 Select 7 for Program Menu 3 Select 6 for JumpStart 4 Press ENTER to accept the warning screen 5 Follow the remaining on screen instructions 6 Press ENTER to confirm See Section 8 1 3 9 8 Restore Defaults This option allows you to restore the panel back to factory defaults All programming will be lost 1 Enter the installer code The panel will automatically go to the main menu 2 Sel...

Page 114: ...f prompted 10 1 Default User and Installer Codes Installer Code factory programmed as 123456 Multi site Installer Code factory programmed as 654321 10 2 Annunciator Description Figure 10 1 shows the annunciator that is part of the control panel board assembly Figure 10 1 Control Panel Annunciator for 6808 10 2 1 LCD Displays The control panel LCD displays system messages annunciates alarms supervi...

Page 115: ...ds on the screen Use right arrow to move through the fields Use the up or down arrow key to select options in the fields 3 When the date and time are correct press ENTER 10 4 2 Disable Enable a Point 1 Select 2 for Point Functions 2 Select 1 for Disable Enable Point Main Menu Options Description 1 System Tests Access to Fire Drill Indicator Test Walk Tests Communicator Test Clear History Buffer Ma...

Page 116: ...occur In networked setups each panel stores up to 1000 of its own events When using HFSS Honeywell Fire Software Suite all 1000 events from every panel in the network will be uploaded On multi site displays pressing ENTER or right arrow brings you directly into View Event History and allows you to view the Event History from every panel in each of the sites that the multi site display is assigned ...

Page 117: ...7 Conduct a Communicator Test 1 From the Main Menu press 1 for System Tests 2 Select 5 for Communicator Test The screen will display Manual Communicator Test started When the test is completed you will be returned to the Test Menu 3 The Manual communicator test will be communicated out both Phone Lines and Ethernet Cellular paths if they are all programmed Each manual communicator test will altern...

Page 118: ...tector follow the steps below Section 8 provides instructions for printing the status of all detec tors in the system 1 From the Main Menu press 2 for Point Functions 2 Press 2 for Point Status 3 Select the module where the point you want to check is located 4 Enter the number of the point you want to check and press ENTER 5 A screen similar to those shown in Figure 10 3 will display Figure 10 3 C...

Page 119: ...nu for Ethernet Information AlarmNet Info 1 Press 6 from the System Information menu for AlarmNet Info 2 Cell Strength 0 to 100 3 Status Registered Not Registered AlarmNet Temporary PIN Press 7 from the System Information menu for AlarmNet Temporary PIN This is used in case the FACP is replaced on the CCP 10 5 Operation Mode Behavior The control panel can be in one or more of seven conditions at a...

Page 120: ...tivate the Main Menu Alarm A smoke detector goes into alarm or a pull station is activated CO detector goes into alarm If more than 3 categories are active at a single time this screen will display The communicator seizes control of the phone line and calls the central station The on board annunciator sounds a loud steady beep any notification devices attached to the system will also sound GENERAL...

Page 121: ...the annunciator Once the supervisory condition has been corrected the system will restore itself automatically Trouble A system trouble condition occurs A trouble condition with a CO detector The communicator seizes control of the phone line and calls the central station The on board annunciator sounds a loud pulsing beep in the sequence one second on nine seconds off SYSTEM TROUBLE LED flashes Th...

Page 122: ...o types of releasing Double Interlock Zone and Single Interlock Zone The Double Interlock Zone opera tion requires an interlock switch input in the system and the Single Interlock Zone does not An interlock switch is typically a dry con tact pressure switch Prealarm A single detector trips in a 2 Count zone 2 Count means two detectors must trip before an alarm is reported Touchpad PZT beeps The LC...

Page 123: ...esired NOTE The installer must define which input points will be used for detectors manual release switches or interlock pressure switches NOTE For manual release operation Installer must use an FM approved UL listed releasing manual station Manufacturer Part Number Rated Voltage DC Rated Current Milliamp Asco T8210A107 24 VDC 700 8210G207 24 VDC 442 HV2740607 24 VDC 375 HV2838521 24 VDC 375 HV274...

Page 124: ...vation If two or more addressable detectors or a manual release switch activate the Alarm and the Release outputs will activate and the Pre Alarm output will deactivate Also refer to Table 10 3 Important Detectors must be installed at 0 7 times the linear spacing as described in NFPA 72 Chapter 2 Important Only addressable detectors can be used No conventional detectors can be used Each Single Int...

Page 125: ...al release switch or 2 activated addressable detectors When these conditions are met the Release and General Alarm outputs will activate and the Alert outputs will deactivate Reduce detector spacing to 0 7 times the linear spacing in accordance with NFPA 72 NOTE Refer to Table 10 2 for approved releasing solenoids and ratings Important Only addressable detectors can be used No conventional detecto...

Page 126: ...ammed into the macro Do this by going to any annunciator within the site and entering Main Menu Point Functions and use Disable Enable Point or use I O Point Control to disable output groups or individual points or activate individual points 4 Once you are finished with disabling or activating points output groups enter the F Key Recording Menu again and select the End F KEY Recording option 5 The...

Page 127: ... that the map doesn t exist This can be setup to allow for testing purposes where notification of an entire building is not desired during the test This option is programmable for each output group map through HFSS Honeywell Fire Software Suite When an F Key is active and a map in the system is set to be disable by Map Inhibit the system will show a trouble event indicating it as such ...

Page 128: ...ower low trouble AT 0 ATNN000000 1 301 00 000 AC power low trouble restore AR 0 ARNN000000 3 301 00 000 Auto dialer test communications trouble line 1 YC 1 YCNN000001 1 350 Receiver 001 Auto dialer test communications trouble line 1 restore YK 1 YKNN000001 3 350 Receiver 001 Auto dialer test communications trouble line 2 YC 2 YCNN000002 1 350 Receiver 002 Auto dialer test communications trouble li...

Page 129: ...p Phone line 1 trouble detected LT 1 LTNN000001 1 351 00 000 Phone line 1 trouble restore LR 1 LRNN000001 3 351 00 000 Phone line 2 trouble detected LT 2 LTNN000002 1 352 00 000 Phone line 2 trouble restore LR 2 LRNN000002 3 352 00 000 Printer is off line trouble VZ Exp ID VZNNXX0000 1 336 Exp ID 000 Printer is off line trouble restore VY Exp ID VYNNXX0000 3 336 Exp ID 000 Printer is out of paper ...

Page 130: ...R 3 354 00 Receiver User access code changed JV 0 JVNN000000 1 602 00 000 User initiated manual dialer test RX 0 RXNN000000 1 601 00 000 Walk test begin TS 0 TSNN000000 1 607 00 000 Walk test end TE 0 TENN000000 3 607 00 000 Zone Events Zone events are reported only when Report by Zone is selected Auxiliary power trouble FT 0000 FTNN000000 1 320 00 000 Auxiliary power trouble restore FJ 0000 FJNN0...

Page 131: ...NN001GGG 3 320 00 Group Positive Alarm Sequence acknowl edge switch trouble FT Zone FTNN000ZZZ 1 373 00 Zone Positive Alarm Sequence acknowl edge switch trouble restore FJ Zone FJNN000ZZZ 3 373 00 Zone SLC LED Module trouble ET 0000 ETNN000000 1 333 00 000 SLC LED Module trouble restore ER 0000 ERNN000000 3 333 00 000 Status Point Types Trouble UT 0 UTNN000000 1 379 00 000 Status Point Types Troub...

Page 132: ...one 1000 UHNN001ZZZ 3 140 01 Zone Zone based AUX1 switch trouble UT Zone 1000 UTNN001ZZZ 1 373 01 Zone Zone based AUX1 switch trouble re store UJ Zone 1000 UJNN001ZZZ 3 373 01 Zone Zone based AUX2 switch alarm UA Zone 2000 UANN002ZZZ 1 140 02 Zone Zone based AUX2 switch alarm re store UH Zone 2000 UHNN002ZZZ 3 140 02 Zone Zone based AUX2 switch trouble UT Zone 2000 UTNN002ZZZ 1 373 02 Zone Zone ba...

Page 133: ...ID GR Point GRNNXXPPPP 3 200 Exp ID Point ECS Alarm Point Alarm pi Exp ID QA EPPP E Emergen cy PPP Point QANNXXEPPP 1 220 Emer gency Exp ID Point ECS Alarm Point Alarm Restore pi Exp ID QH EPPP E Emergen cy PPP Point QHNNXXEPPP 3 220 Emer gency Exp ID Point ECS Alarm Point Trouble pi Exp ID QT Point QTNNXXPPPP 1 242 Exp ID Point ECS Alarm Point Trouble Restore pi Exp ID QJ Point QJNNXXPPPP 3 242 E...

Page 134: ...PPPP 3 373 Exp ID Point LOC Mic Activated ECS Alarm pi Exp ID QA 0 QANNXX0000 1 220 Exp ID 000 LOC Mic Activated ECS Alarm Re store pi Exp ID QH 0 QHNNXX0000 3 220 Exp ID 000 LOC ECS Alarm pi Exp ID QA Emergen cy QANNXXE000 1 220 Emer gency Exp ID 000 LOC ECS Alarm Restore pi Exp ID QH Emergen cy QHNNXXE000 3 220 Emer gency Exp ID 000 Manual pull switch alarm pi Exp ID FA Point FANNXXPPPP 1 115 Ex...

Page 135: ...Exp ID FB Point FBNNXXPPPP 1 571 Exp ID Point Supervisory Tamper point enabled pi Exp ID FU Point FUNNXXPPPP 3 571 Exp ID Point Supervisory Tamper point trouble pi Exp ID FT Point FTNNXXPPPP 1 373 Exp ID Point Supervisory Tamper point trouble restore pi Exp ID FJ Point FJNNXXPPPP 3 373 Exp ID Point System based AUX1 switch alarm pi Exp ID UA Point UANNXXPPPP 1 140 Exp ID Point System based AUX1 sw...

Page 136: ...Aux Status 1 Switch is Trouble pi Exp ID UT Point UTNNXXPPPP 1 379 Exp ID Point Voice Aux Status 1 Switch is Trouble Restored pi Exp ID UJ Point UJNNXXPPPP 3 379 Exp ID Point Voice Aux Status 1 Switch is Disabled pi Exp ID UB Point UBNXXPPPP 1 580 Exp ID Point Voice Aux Status 1 Switch is Enabled pi Exp ID UU Point UUNXXPPPP 3 580 Exp ID Point Voice Aux Status 2 Switch is Trouble pi Exp ID UT Poin...

Page 137: ...t UTNNXXPPPP 1 373 Exp ID Point Zone based AUX1 switch trouble re store pi Exp ID UJ Point UJNNXXPPPP 3 373 Exp ID Point Zone based AUX2 switch alarm pi Exp ID UA Point UANNXXPPPP 1 140 Exp ID Point Zone based AUX2 switch alarm re store pi Exp ID UH Point UHNNXXPPPP 3 140 Exp ID Point Zone based AUX2 switch disabled pi Exp ID UB Point UBNNXXPPPP 1 571 Exp ID Point Zone based AUX2 switch enabled pi...

Page 138: ...nts can be sent within a single event block Events are separated by a character 5 Event parameter can be a Zone Point or Circuit Number 6 pi modifier event is not used 7 Panel can be set to report by either Point or Zone Fire Alarm Point Point n a 01 n a 123 EE ZZ EE ZZZ pi01 FA123 Fire Alarm Point Point n a 33 n a 203 EE ZZ EE ZZZ pi11 FA203 Expander Trouble n a n a 11 n a n a EE ZZ ET11 Auto Tes...

Page 139: ...ZZZZ RP32000000 Battery Trouble Panel 32 n a 32 98 n a n a EE PP MM ZZZZ YT32980000 Battery Trouble Expander 18 n a 32 18 n a n a EE PP MM ZZZZ YT32180000 SLC Loop Shorted n a 01 44 n a n a EE PP MM ZZZZ ET01440000 Program Begin n a 32 n a n a n a EE PP MM ZZZZ LB32000000 Program Begin n a 22 n a n a n a EE PP MM ZZZZ LB22000000 AC Power Loss Panel 22 n a 22 98 n a n a EE PP MM ZZZZ AT22980000 MM ...

Page 140: ...owing procedure 1 Disconnect both wires from the terminal block at the panel SLC devices can remain connected 2 Measure the impedance from positive to negative and from negative to positive Both measurements should be greater than 500 K ohms If the installation uses T taps test each T tap individually 3 Temporarily connect the positive wire to the negative wire of the SLC loop at the point farthes...

Page 141: ... that the test is complete 12 3 Event History The event history can be useful for tracking or recalling a trouble condition To view event history 1 Press 3 to select Event History 2 Press the up or down arrow key to view events in the history buffer 12 4 Built in Troubleshooting and Testing Tools The fire control panel has several built in testing and troubleshooting tools that can be utilized to ...

Page 142: ...oggle any output on or off and trip any input device This can be useful to test a point s output mapping Follow these steps to control a I O point 1 Select 2 Point Functions from the Main Menu 2 Select 6 I O Point Control 3 Select the Module the point is on 4 Enter the point number or press the up or down arrow to select the point you wish to test then press ENTER 5 Press ENTER to generate an alar...

Page 143: ...6808 Manual P N LS10146 001SK E C 09 28 2017 143 Testing and Troubleshooting ...

Page 144: ...rd 42 On board 13 On board 43 On board 14 On board 44 On board 15 On board 45 On board 16 On board 46 On board 17 On board 47 On board 18 On board 48 On board 19 On board 49 On board 20 On board 50 On board 21 On board 51 On board 22 On board 52 On board 23 On board 53 On board 24 On board 54 On board 25 On board 55 On board 26 On board 56 On board 27 On board 57 On board 28 On board 58 On board 2...

Page 145: ... 116 On board 83 On board 117 On board 84 On board 118 On board 85 On board 119 On board 86 On board 120 On board 87 On board 121 On board 88 On board 122 On board 89 On board 123 On board 90 On board 124 On board 91 On board 125 On board 92 On board 126 On board 93 On board 127 On board 94 Module Addr Zone Group Description Module Addr Zone Group Description Table 13 1 Installation Record ...

Page 146: ... this feature This control is UL listed for panel wide Synchronization Manufacturer Model Audio Visual Type AMSECO SH24W 153075 x x Horn Strobe SAD24 153075 x Strobe SAD24 75110 x Strobe SL24W 75110 x Strobe SL24C 3075110 x Strobe SLB24 75 x Strobe RSD24 153075 x Strobe RSD24 75110 x Strobe SH24W 75110 x x Horn Strobe SH24W 3075110 x x Horn Strobe SHB24 75 x x Horn Strobe SCM24W 153075 x Chimes St...

Page 147: ...Strobe P2430W FC x x Horn Strobe P2430K FC x x Horn Strobe P2475 FC x x Horn Strobe P2475W FC x x Horn Strobe P2475K FC x x Horn Strobe P24110 FC x x Horn Strobe P24110W FC x x Horn Strobe P24110K FC x x Horn Strobe S2430W FC x Strobe S2430K FC x Strobe S2475 FC x Strobe S2475W FC x Strobe S2475K FC x Strobe S24110 FC x Strobe S24110W FC x Strobe S24110K FC x Strobe Federal Signal 450 x Horn VALS ...

Page 148: ...trobe Ceiling Mount GCCR24 x Multi Candella Horn Strobe Ceiling Mount GCS24 x Multi Candella Strobe Ceiling Mount GCSR24 x Multi Candella Strobe Ceiling Mount GECR 24 x x Multi Candella Horn Strobe GES24 15 x Strobe GES24 30 x Strobe GES24 60 x Strobe GES24 75 x Strobe GES24 110 x Strobe GES24 15 75 x Strobe GES24 177 x Strobe GES3 24 x Multi Candella Strobe GESR 24 x Multi Candella Strobe GEH 24 ...

Page 149: ...robe P2RH x x 2 Wire Horn Strobe High Candela P2RH P x x 2 Wire Horn Strobe High Candela PC2RH x x 2 Wire Horn Strobe High Candela PC2RH P x x 2 Wire Horn Strobe High Candela P2W x x 2 Wire Horn Strobe P2W P x x 2 Wire Horn Strobe PC2W x x 2 Wire Horn Strobe PC2W P x x 2 Wire Horn Strobe P2WH x x 2 Wire Horn Strobe High Candela P2WH P x x 2 Wire Horn Strobe High Candela PC2WH x x 2 Wire Horn Strob...

Page 150: ...trobe 4W Red Ceil 4X4 PC4WL x x Horn Strobe 4W WHT Ceil 4X4 SR x Strobe SR P x Strobe SCR x Strobe SCR P x Strobe SRH x Strobe High Candela SRH P x Strobe High Candela SCRH x Strobe High Candela SCRH P x Strobe High Candela SW x Strobe SW P x Strobe SCW x Strobe SCW P x Strobe SWH x Strobe High Candela SWH P x Strobe High Candela SCWH x Strobe High Candela SCWH P x Strobe High Candela SRK x Strobe...

Page 151: ...x Horn Weatherproof AMT 241575W x x Multi Tone Horn Strobe AMT 24MCW x Mutli Tone Horn Strobe AMT 241575W NYC x x Multi Tone Horn Strobe AMT 12 24 x Multi tone Horn AMT 12 24 NYC x Multi tone Horn AS 121575W x Horn Strobe NH 12 24 x x Horn AS 241575W x x Horn Strobe AS 24MCC x x Horn Strobe AS 24MCCH x x Horn Strobe AS 24MCW x x Horn Strobe AS 24MCWH x x Horn Strobe ASWP 2475W x x Horn Strobe Weat...

Page 152: ... x Multitone Horn Strobe MTWPG 2475W x x Multitone Horn Strobe MTWPR 2475W x x Multitone Horn Strobe MTWPA 24MCCH x x Multitone Horn Strobe ZNH x Horn NS 121575W x x Horn Strobe NS 241575W x x Horn Strobe NS 24MCW x x Horn Strobe NS 24MCC x x Horn Strobe NS 24MCCH x x Horn Strobe ZNS MCW x x Horn Strobe ZNS MCWH x x Horn Strobe ZNS 24MCC x x Horn Strobe ZNS 24MCCH x x Horn Strobe RSS 121575W x Str...

Page 153: ...RSSWP 24MCWH x Strobe Weatherproof ZRS MCWH x Strobe ZRS 24MCC x Strobe ZRS 24MCCH x Strobe MB G6 24 x Motor Bell MB G10 24 x Motor Bell MB G6 12 x Motor Bell MB G10 12 x Motor Bell MIZ 24 R x Mini Horn MT 12 24 R x x Multitone Horn MT4 12 2z x x Multitone Horn ZRS MCW x Strobe MTWPR 24MCCH x x Multitone Horn Strobe NH 12 24R x Horn HSR x Horn Strobe HSW x Horn Strobe STR x Strobe STW x Strobe HNR...

Page 154: ...00 226 55000 227 55000 227 55000 325 55000 325 55000 326 55000 326 55000 327 55000 327 55000 328 55000 328 Hochiki SLR 24 HD 3 HSC 220R HB 72 NS6 220 OR NS4 220 HB 3 15 loop SLR 24H SLR 24V SLR 835 HD 3 14 loop SLR 835H HD 5 System Sensor 1400 A N A 16 loop 1451 B401B A N A 16 loop 2100 A N A 20 loop 2100T A N A 20 loop 2151 B401 A N A 16 loop 2151T B401 A N A 16 loop 2400 A N A 16 loop 2400TH A N...

Page 155: ...sor 2112 24 D Photoelectric 0 05 50 System Sensor 2112 24R Photoelectric 0 50 60 70 System Sensor 2112 24TR Photoelectric 0 50 60 70 System Sensor 2112 24T D Photoelectric w 135 Thermal 0 05 50 System Sensor 2112 24TSRB Photoelectric w 135 Thermal Supervisory Relay 15 45 System Sensor 2312 24TB Photoelectric 0 12 50 System Sensor 2412 12 volt Photoelectric 0 12 77 System Sensor 2412AT 12 volt Phot...

Page 156: ...nt mA Table 3 Compatible Four Wire Smoke Detectors Manufacturer Model Type Current mA Edwards DH150A Floor Mount 96 Edwards DH154A Flush Mount 96 Edwards DH158A Surface Mount 96 Rixon Firemark FM 980 Floor Mount single 68 Rixon Firemark FM 996 Surface Wiring 68 Rixon Firemark FM 998 Concealed Wiring 68 Table 4 Compatible Door Holders Manufacturer Model Current mA Air Products Controls LTD MR 101 C...

Page 157: ...s ALERT White SPSW CLR ALERT Wall High Fidelity Speaker Strobe Clear Lens ALERT White SPSW P Wall High Fidelity Speaker Strobe Plain Red SPSWH Wall High Fidelity Speaker Strobe High Candela White SPSWH P Wall High Fidelity Speaker Strobe High Candela Plain Red SPRL Wall High Fidelity Speaker Red SPWL Wall High Fidelity Speaker White SPCRL Ceiling High Fidelity Speaker Red SPCWL Ceiling High Fideli...

Page 158: ...ter to accept B 8 Example Name Edit 1 Press the up or down arrow to select upper case letters mode Press 2 until F appears 2 Press the up or down arrow to change mode to lower case letters Press 3 until i appears 3 Press 6 until r appears 4 Press 2 until e appears 5 Press 0 to space then continue to next word using the same process 6 Press ENTER to accept Figure B 1 Edit Name Example Lower Case Le...

Page 159: ...6808 P N LS10146 001SK E C 09 28 2017 159 ...

Page 160: ...numbers are populated based on panel number and audited to allow only the 4 appropriate receivers See Section 6 Panel Available receiver numbers 1 1 2 3 4 2 5 6 7 8 3 9 10 11 12 4 13 14 15 16 5 17 18 19 20 6 21 22 23 24 7 25 26 27 28 8 29 30 31 32 9 33 34 35 36 10 37 38 39 40 11 41 42 43 44 12 45 46 47 48 13 49 50 51 52 14 53 54 55 56 15 57 58 59 60 16 61 62 63 64 17 65 66 67 68 ...

Page 161: ...6808 P N LS10146 001SK E C 09 28 2017 161 ...

Page 162: ...162 6808 P N LS10146 001SK E C 09 28 2017 Appendix D Cadence Patterns The cadence patterns shown in below are available for use with the control panel ...

Page 163: ...6808 P N LS10146 001SK E C 09 28 2017 163 ...

Page 164: ...assword Securely configure networks and firewalls Assess security risks Develop a Disaster and Recovery Plan Develop a Backup and Recovery Strategy Install configure and keep anti virus software updated on all computers which access the panel Keep operating system updated on all computers which access the panel Deliver all required system information upon delivery to the system owner Train end use...

Page 165: ...6820 6820EVS Manual P N LS10144 001SK E C 09 28 2017 165 ...

Page 166: ... case of defect secure a Return Material Authorization form from our Return Authorization Department This writing constitutes the only warranty made by Honeywell International Inc with respect to its products Honeywell International Inc does not represent that its products will prevent any loss by fire or otherwise or that its products will in all cases provide the protection for which they are in...

Page 167: ...Menu 2 Press 2 for Point Status 3 From the list that displays select the SLC module where the point you want to view is located 4 The fourth line of the display shows the sensitivity status NORMAL means the detector is in compliance with NFPA 72 CAL MAINT means the detector is in compliance with NFPA 72 but maintenance should be performed soon CAL TRBLE means the detector is not in compliance with...

Page 168: ...Cut Along the Dotted Line ...

Page 169: ......

Page 170: ...Honeywell Silent Knight 12 Clintonville Road Northford CT 06472 1610 203 484 7161 www silentknight com LS10146 001SK E Rev C 10 17 May 29 2018 Honeywell ...

Reviews: