1.2 Installation conditions
NOTICE
•
As the heat is radiated from the top side of the unit, do not stack any other item on the top of the unit. For
example, do not piggyback multiple units on each other, and do not place display devices on top of the unit.
•
Install the unit in places where environmental conditions of the product are met, and in a way that heat will not
accumulate around the unit.
1.2.1 Installation spacing
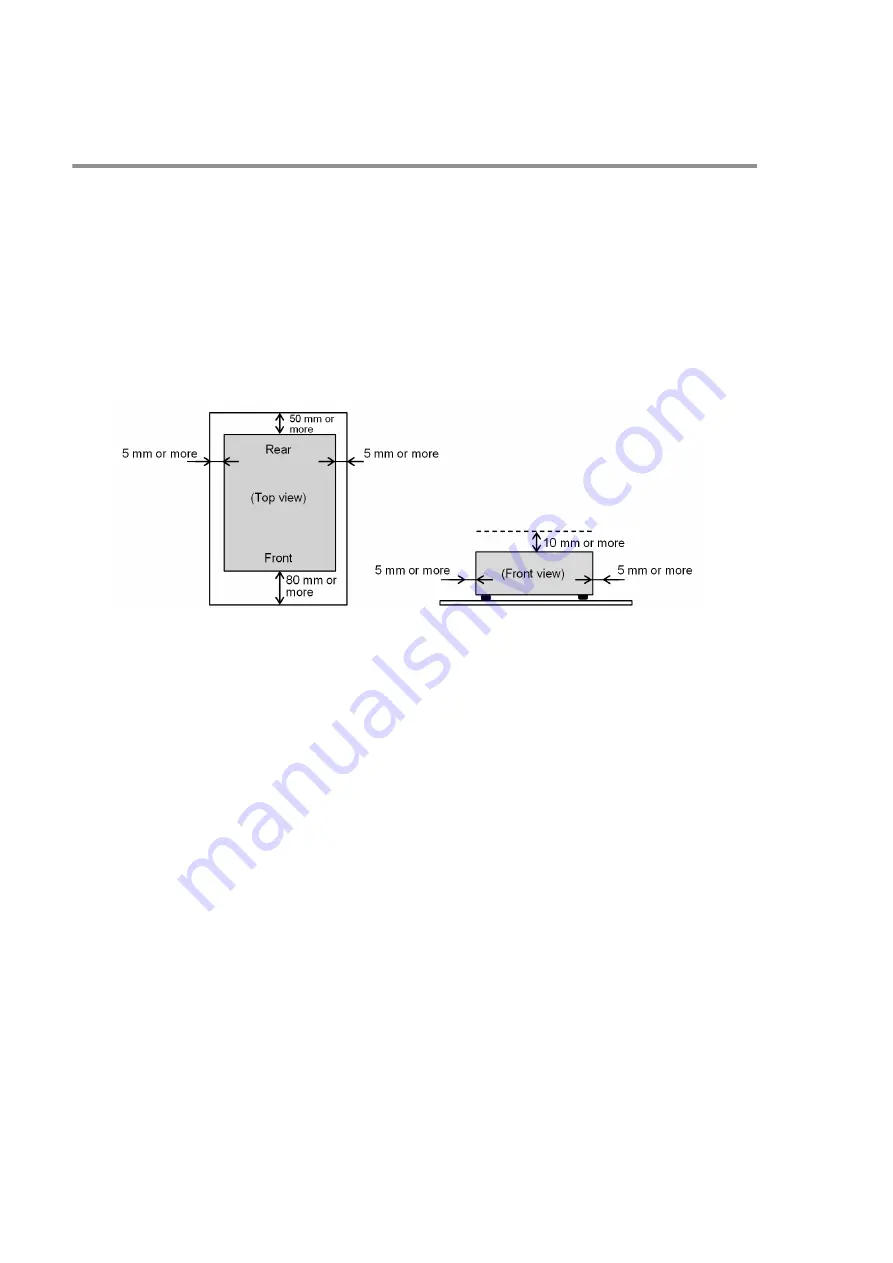
Secure spacing of at least 80 mm at the front of the unit, at least 50 mm at the rear, and at least 10 mm at the top.
Figure 1‒1: Installation and operation space
Multiple devices can be installed adjacent to each other, thereby sharing the side spacings, provided that you allow for
sufficient spacing at the top, ensure that all other installation conditions and precautions are satisfied, and allocate
sufficient operation space.
1.2.2 Installation position
You can install this unit on a desktop, in a 19-inch rack, or on the wall. The following describes the various installation
positions.
(1) Desktop installation
Horizontally install the unit on a desktop. Do not install it on a floor.
(2) 19-rack installation
Install the unit in a rack by using the mounting brackets attached to the unit. For details about how to attachmounting
brackets to the unit, see 1.2.3 Attaching the mounting brackets.
(3) Wall installation
You can install the unit in the following position on a suitably sturdy wall by using mounting brackets. For details
about how to attach the mounting brackets to the unit, see 1.2.3 Attaching the mounting brackets.
1. Installing the CE50-10
4
Summary of Contents for CE50-10
Page 1: ...Hitachi Industrial Edge Computer CE50 10 Instruction Manual CC 65 0171 ...
Page 10: ......
Page 23: ...Figure 1 6 Attaching mounting brackets 4 1 Installing the CE50 10 7 ...
Page 26: ......
Page 38: ......
Page 42: ...4 2 5 Connection diagram Figure 4 2 Connection diagram 4 External Contact Functions 26 ...
Page 44: ......
Page 87: ... sudo etc init d netfilter persistent save 5 Configuring Software Environment 71 ...
Page 117: ...version information 13 Log out from the unit exit 5 Configuring Software Environment 101 ...
Page 148: ......
Page 149: ...7 Maintaining the CE50 10 This chapter describes maintenance of the CE50 10 133 ...
Page 157: ...8 Troubleshooting This chapter describes troubleshooting of the CE50 10 141 ...
Page 162: ...8 1 14 Cannot turn off the power to the unit Please contact us 8 Troubleshooting 146 ...


