3-18
4. Selecting the Zoom
Chapter 3
Mak
in
g
C
o
pies
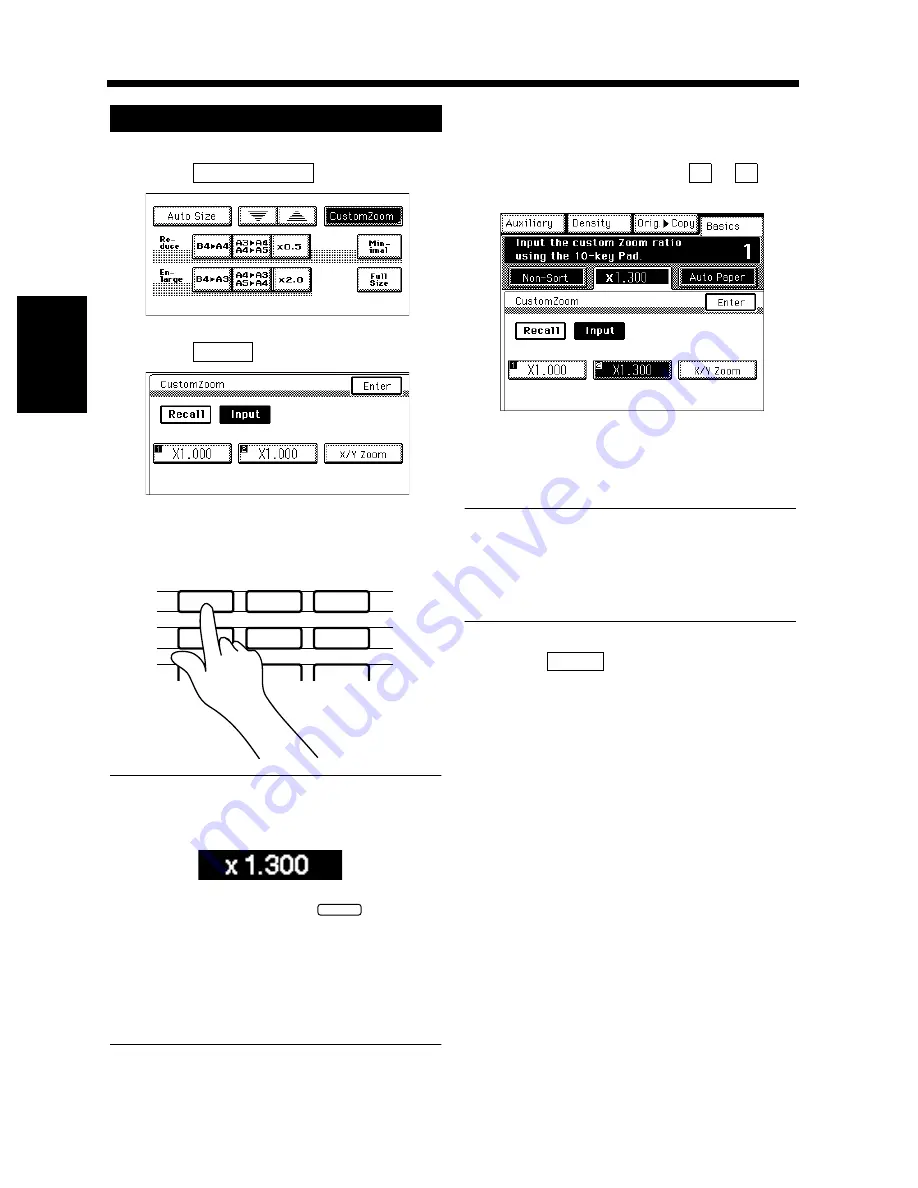
<Same ratio for X and Y>
Touch
.
Touch
.
Enter the desired zoom ratio from the 10-Key
Pad.
Useful Tips
Example:
×
1.300
Press 1, 3, 0, and 0, in that order.
• To correct a ratio, press the
key and
then enter the correct one again.
• The zoom ratio can be set within the range
×
0.250 to
×
4.000 when placing the original
face down on the Original Glass. When using
the Document Handler, the ratio can be set
within
×
0.250 to
×
2.000.
Touch memory location key
or
in
which to store the set zoom ratio.
* When the key is touched, the ratio is shown
on the key, indicating that it has been stored
in memory.
NOTES
• When a new ratio is stored, the old one is
erased.
• The ratios may also be stored in memory by
using the Utility Mode.
☞
p. 4-6
Touch
.
Storing a Ratio in Memory
1
Custom Zoom
1155O257DA
2
Input
1155O264CB
3
1
2
3
4
5
6
7
8
9
0
C
1139O4870A
1149O160BA
C
4
1
2
1155O265CB
5
Enter
Summary of Contents for DDC 52N
Page 4: ......
Page 15: ...1 1 Chapter 1 Safety Notes Chapter 1 Safety Notes ...
Page 19: ...2 1 Chapter 2 Getting to Know Your Copier Chapter 2 Getting to Know Your Copier ...
Page 39: ...3 1 Chapter 3 Making Copies Chapter 3 Making Copies ...
Page 132: ...3 94 11 Typical Function Combinations Chapter 3 Making Copies ...
Page 133: ...4 1 Chapter 4 Using the Utility Mode Chapter 4 Using the Utility Mode ...
Page 163: ...5 1 Chapter 5 When a Message Appears Chapter 5 When a Message Appears ...
Page 191: ...6 1 Chapter 6 Troubleshooting Chapter 6 Troubleshooting ...
Page 195: ...7 1 Chapter 7 Miscellaneous Chapter 7 Miscellaneous ...
Page 205: ...7 11 4 Description of Paper Size and Zoom Ratio Table Chapter 7 Miscellaneous ...
Page 208: ...Index 3 Index Index Index ...
Page 209: ......


