EN – Translation of the original user manual - 2.1 | 2019
74
Emergency opening:
If the loop is opened by the fire emergency and provided that permission for
opening in emergency situations has been set, the gate will open at low speed.
This opening movement can be interrupted by the stop key or the safety facilities;
however after the interruption action has ended the gate will continue to open.
The gate then stops in its open position and no longer responds to any
commands. If the loop to the fire emergency is closed again, the motor drive will
perform a reset and the gate is closed again when the next command is given.
Emergency closing:
If the loop is opened by the fire emergency and emergency closing has been set,
the gate will close at low speed. This closing movement can be interrupted by the
stop key or the safety facilities; however after the interruption action has ended
the gate will continue to close. The gate then stops in CLOSED position and no
longer responds to any commands. If the loop to the fire emergency room is
closed again, the motor drive will perform a reset and the gate is opened again
when the next command is given.
7.10
Setting the traffic light
A simple traffic light circuit can be created using make-and-break relays Rel4 or
Rel5. The red and green lights are connected to one of the two operating contacts
of the make-and-break relay. Always pay attention to the maximum load capacity
of the relay. Lights can also be connected to the backplane; see appendix B and C.
The traffic light switches to "GREEN" when the gate has reached its OPEN position,
the motor has been switched off and the flashing light is not active. The traffic
light switches to "RED" when the flashing light is activated (e.g. warning for
automatic closing), the motor is switched on, or the gate is not in OPEN position.
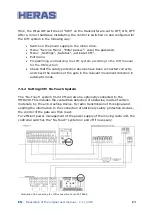
The function can be set on one of the output relays Rel4 or Rel5 as follows.
•
Switch off the power supply to the motor drive.
•
Connect the power supply for the traffic lights to the make-and-break
contact of Rel4.
•
Connect the red/green traffic lights to the other two contacts of the
make-and-break relay Rel4.
•
Switch on the power supply of the motor drive.
•
Menu: "Service Menu", "Enter passw.": enter the password.
•
Menu: „Settings“, „In/Outputs“, „OUT Rel5“: set to „20“.
•
Exit the menu.
Summary of Contents for HGD230
Page 2: ...EN Translation of the original user manual 2 1 2019 2...
Page 112: ...EN Translation of the original user manual 2 1 2019 112 Appendix A Declarations Dop DoC...
Page 113: ...EN Translation of the original user manual 2 1 2019 113...
Page 114: ...EN Translation of the original user manual 2 1 2019 114...
Page 116: ...EN Translation of the original user manual 2 1 2019 116...
Page 117: ...EN Translation of the original user manual 2 1 2019 117...
Page 118: ...EN Translation of the original user manual 2 1 2019 118...
Page 119: ...EN Translation of the original user manual 2 1 2019 119...
Page 120: ...EN Translation of the original user manual 2 1 2019 120...
Page 121: ...EN Translation of the original user manual 2 1 2019 121...
Page 122: ...EN Translation of the original user manual 2 1 2019 122...
Page 123: ...EN Translation of the original user manual 2 1 2019 123...
Page 124: ...EN Translation of the original user manual 2 1 2019 124...
Page 125: ...EN Translation of the original user manual 2 1 2019 125...
Page 126: ...EN Translation of the original user manual 2 1 2019 126...
Page 127: ...EN Translation of the original user manual 2 1 2019 127...
Page 128: ...EN Translation of the original user manual 2 1 2019 128...
Page 129: ...EN Translation of the original user manual 2 1 2019 129 Appendix C ELECTRIC DIAGRAM IGD230...
Page 130: ...EN Translation of the original user manual 2 1 2019 130...
Page 131: ...EN Translation of the original user manual 2 1 2019 131...
Page 132: ...EN Translation of the original user manual 2 1 2019 132...
Page 133: ...EN Translation of the original user manual 2 1 2019 133...
Page 134: ...EN Translation of the original user manual 2 1 2019 134...
Page 135: ...EN Translation of the original user manual 2 1 2019 135...
Page 136: ...EN Translation of the original user manual 2 1 2019 136...
Page 137: ...EN Translation of the original user manual 2 1 2019 137...
Page 138: ...EN Translation of the original user manual 2 1 2019 138...
Page 139: ...EN Translation of the original user manual 2 1 2019 139...
Page 140: ...EN Translation of the original user manual 2 1 2019 140...
Page 141: ...EN Translation of the original user manual 2 1 2019 141...
Page 142: ...EN Translation of the original user manual 2 1 2019 142...
Page 143: ...EN Translation of the original user manual 2 1 2019 143...
Page 144: ...EN Translation of the original user manual 2 1 2019 144...
Page 145: ...EN Translation of the original user manual 2 1 2019 145...
Page 146: ...Local supplier stamp...


